Overview
The Users tab is your central hub for managing everyone involved in your RFP project. From here, you can add internal stakeholders as Project Users, invite external participants as Vendor Users, organise users into departments, and control permissions across the project.
To access the Users tab, open your project and click Users in the left-hand navigation menu. The tab is divided into three main areas:
|
Area |
What you'll find there |
|
Project Users |
Internal stakeholders from your organisation — people who evaluate, score, and contribute to the RFP |
|
Vendor Users |
External contacts from vendor organisations who log in to respond to requirements on behalf of their company |
|
Permissions |
Granular access controls for all users — toggle what each person can see and do in the project |
1. User Types
Olive has two distinct types of users. Understanding the difference upfront will help you manage access and permissions more effectively.
|
User type |
Who they are / What they do |
|
Project Users |
Internal stakeholders — members of your organisation who participate in the evaluation process. They rate, rank, and contribute to requirements. Assigned a role of Stakeholder or Admin. |
|
Vendor Users |
External participants from vendor organisations. Each is linked to a specific vendor and accesses the project to respond to requirements on that vendor's behalf. Access is controlled by the Permissions tab, not a role. |
1.1 Project Users
Project Users are internal stakeholders — members of your organisation who participate in the evaluation process. They can rate, rank, and contribute to requirements within the project.
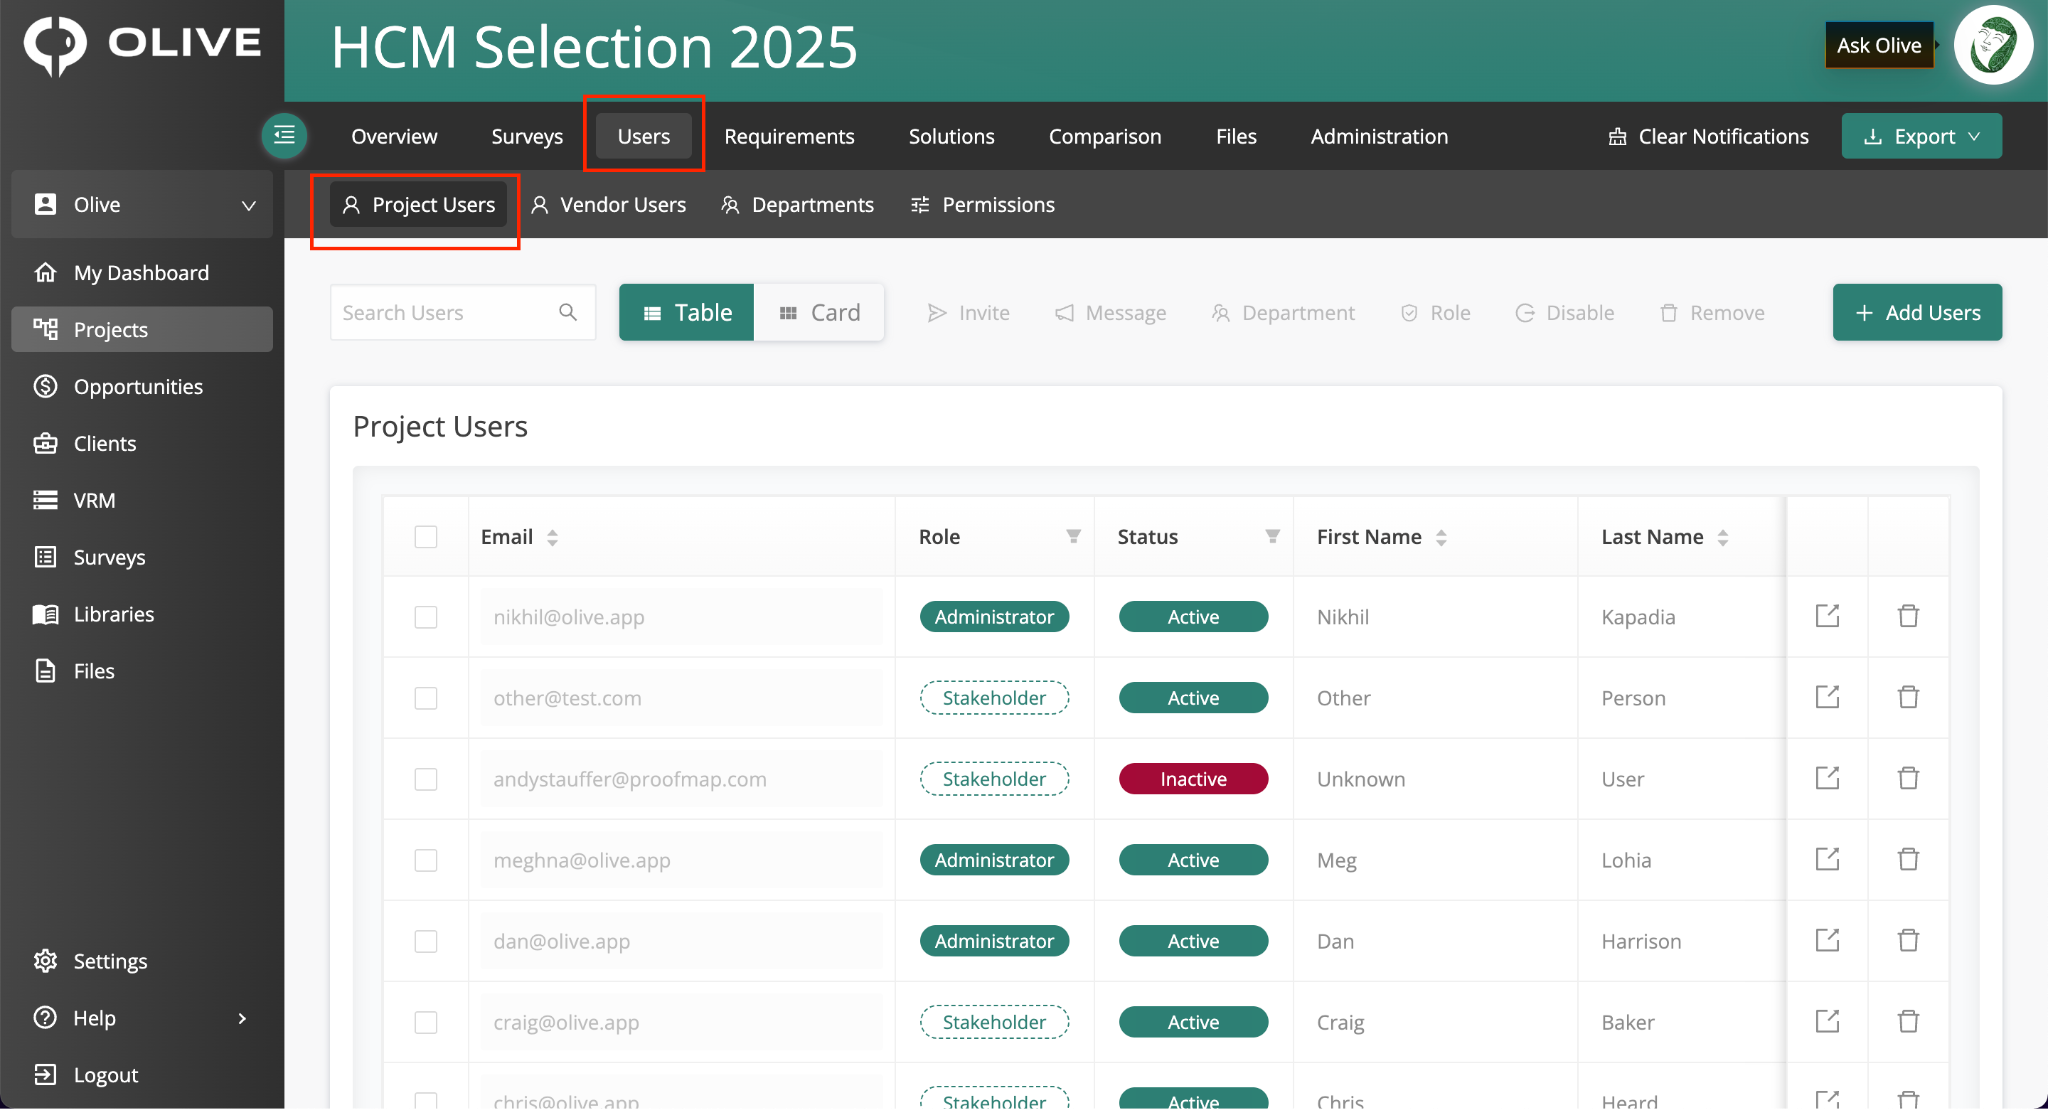
The Project Users view, showing the user list within the Users tab
1.2 Vendor Users
Vendor Users are external participants from vendor organisations. Each Vendor User is associated with a specific vendor and accesses the project to respond to requirements on that vendor's behalf.
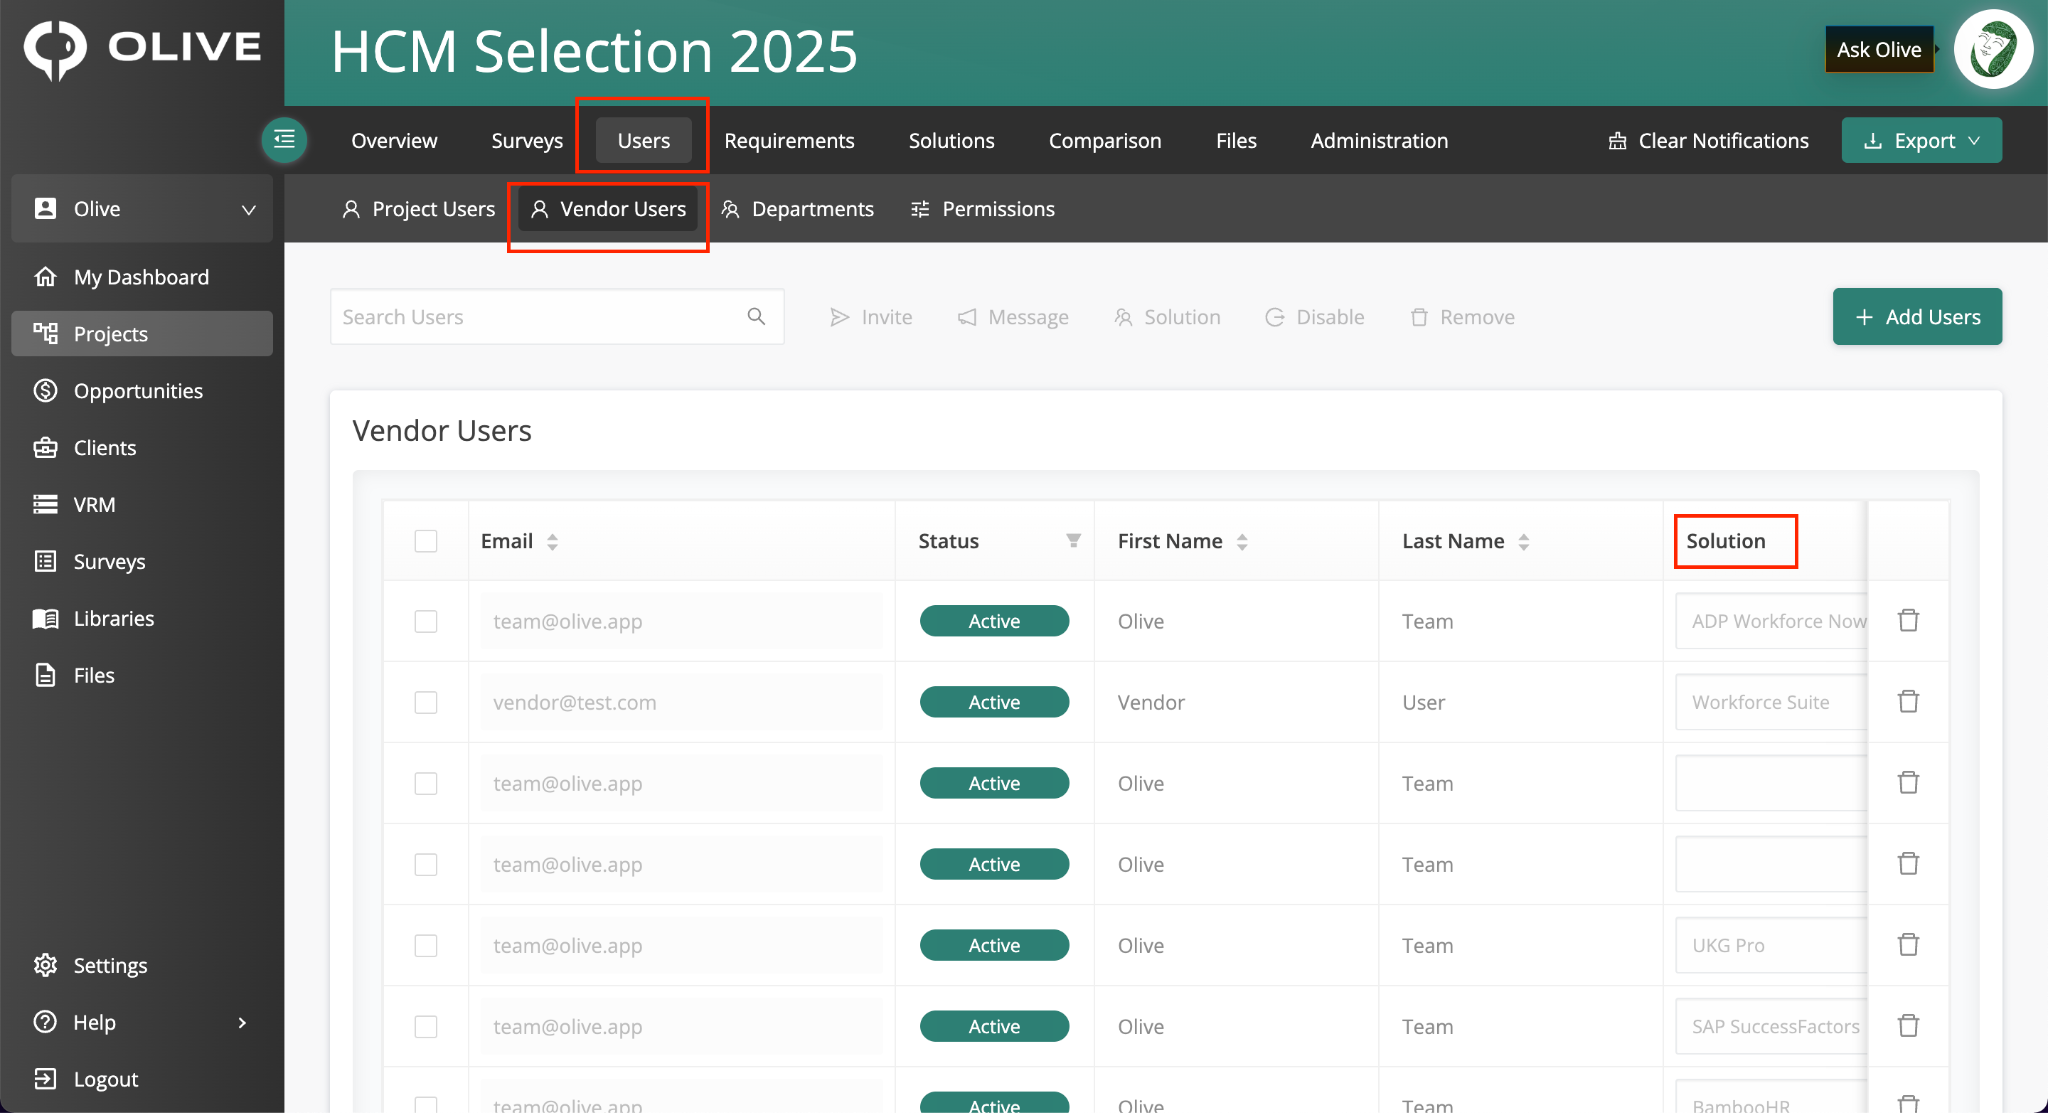
The Vendor Users view, showing external users linked to specific vendors
|
📌 Note: Vendor Users do not have Admin or Stakeholder roles. Their access is determined by the vendor they are assigned to and the permissions set in the Permissions tab. They cannot see your project workspace, other vendors' responses, or your team's scoring and discussions. |
2. Project Users
Click on the Users tab in your project, then select Project Users to manage your internal team. From here you can add new users, assign roles, and send invitations.
2.1 Creating Project Users
To add a new Project User to your project:
- Navigate to your project and click the Users tab
- Select Project Users from the sub-navigation
- Click 'Add Users'
- Enter the user's name in the search field, then click 'Add'
Once added, the user is placed into a staging area. They will not receive an invitation until you choose to send one — this allows you to add multiple users before triggering any emails.
2.2 Roles
Every Project User must be assigned a role that controls what they can do in the project. Use the table below to decide which role to assign:
|
Role |
What they can do |
|
Stakeholder |
Add requirements, rank and weight requirements, score vendor responses. Cannot edit or delete existing project content. |
|
Admin |
Full access — edit and delete any project content, manage users and vendors, organise the overall project structure. |
|
📌 Note: Stakeholders cannot edit or delete existing project content. Use this role to protect project integrity while still allowing contribution. |
|
💡 Tip: Limit the number of users with the Admin role to avoid unintended changes to your project structure. Most participants only need the Stakeholder role. |
2.3 Invite Options
When adding Project Users, you control when invitation emails are sent. Choose the option that best fits your workflow:
|
Option |
When to use it |
|
Invite Later |
Adds the user to the staging area without sending an email. Status shows as Inactive until you send the invite. Best when adding multiple users in one session before notifying anyone. |
|
Invite Now |
Skips staging entirely — the invitation modal opens immediately and the invite is sent as soon as you confirm. Best for adding one user who needs access straight away. |
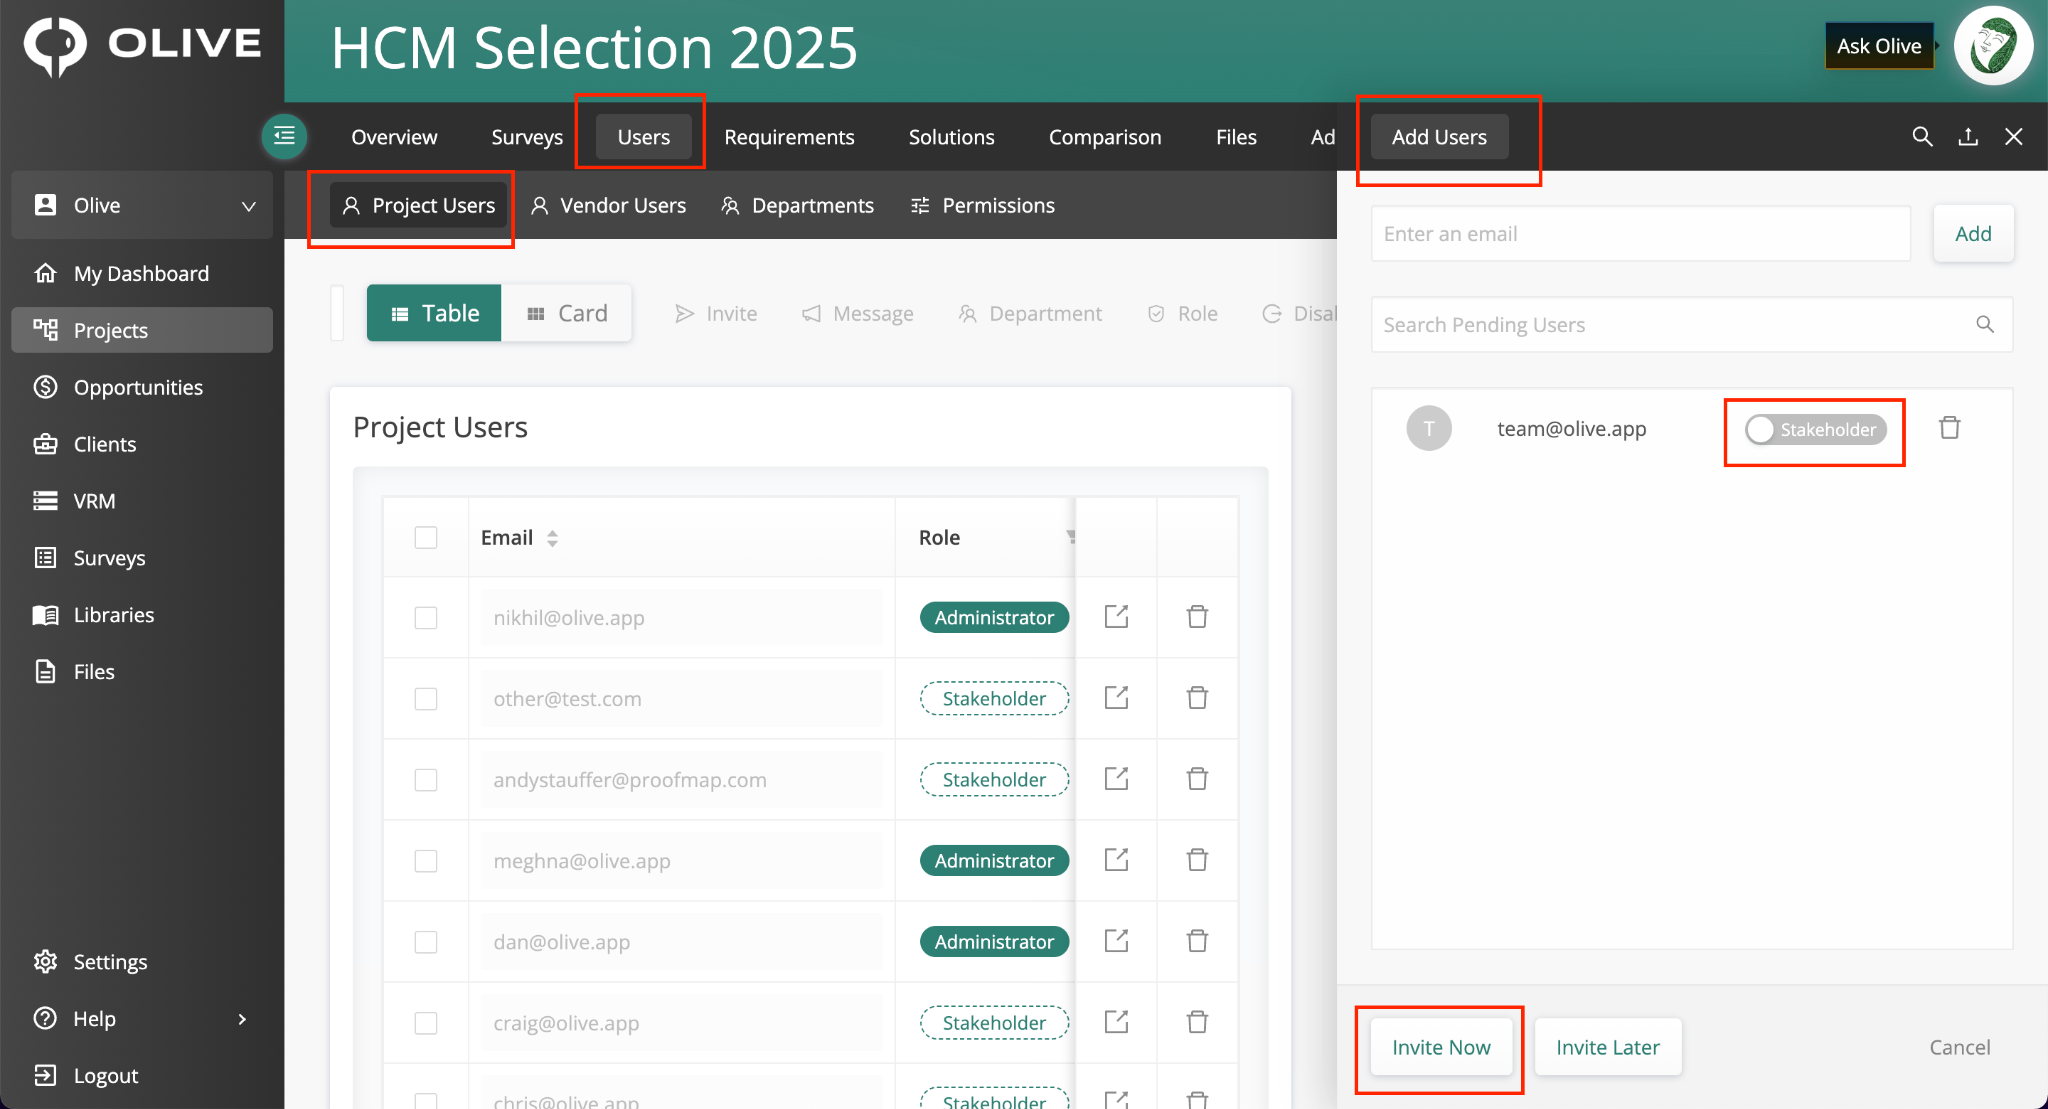
The invitation options modal, showing Invite Now and Invite Later for Project Users
Sending Batch Invitations (Invite Later)
When you're ready to send invitations to users added with Invite Later:
- Multi-select users from the staging area by ticking their checkboxes
- Click 'Invite'
- The email invitation modal opens — send the default Olive invitation or customise the message before sending
|
💡 Tip: Use Invite Later when you want to add multiple users in one session and send all invitations at once. This avoids multiple separate emails and gives you a chance to review before anyone is notified. |
3. Departments
Departments are visible and editable in Table View. To access them, go to the Users tab, open Project Users, and switch to Table View.
3.1 Managing Departments
Organise your Project Users into departments to make it easier to filter and manage them throughout the project. Common examples include Marketing, IT, and Finance.
- Switch to Table View using the view toggle
- Use the department dropdown next to each user to assign them to an existing department — or type a new name to create one
- For bulk assignments, select multiple users and use the apply actions menu
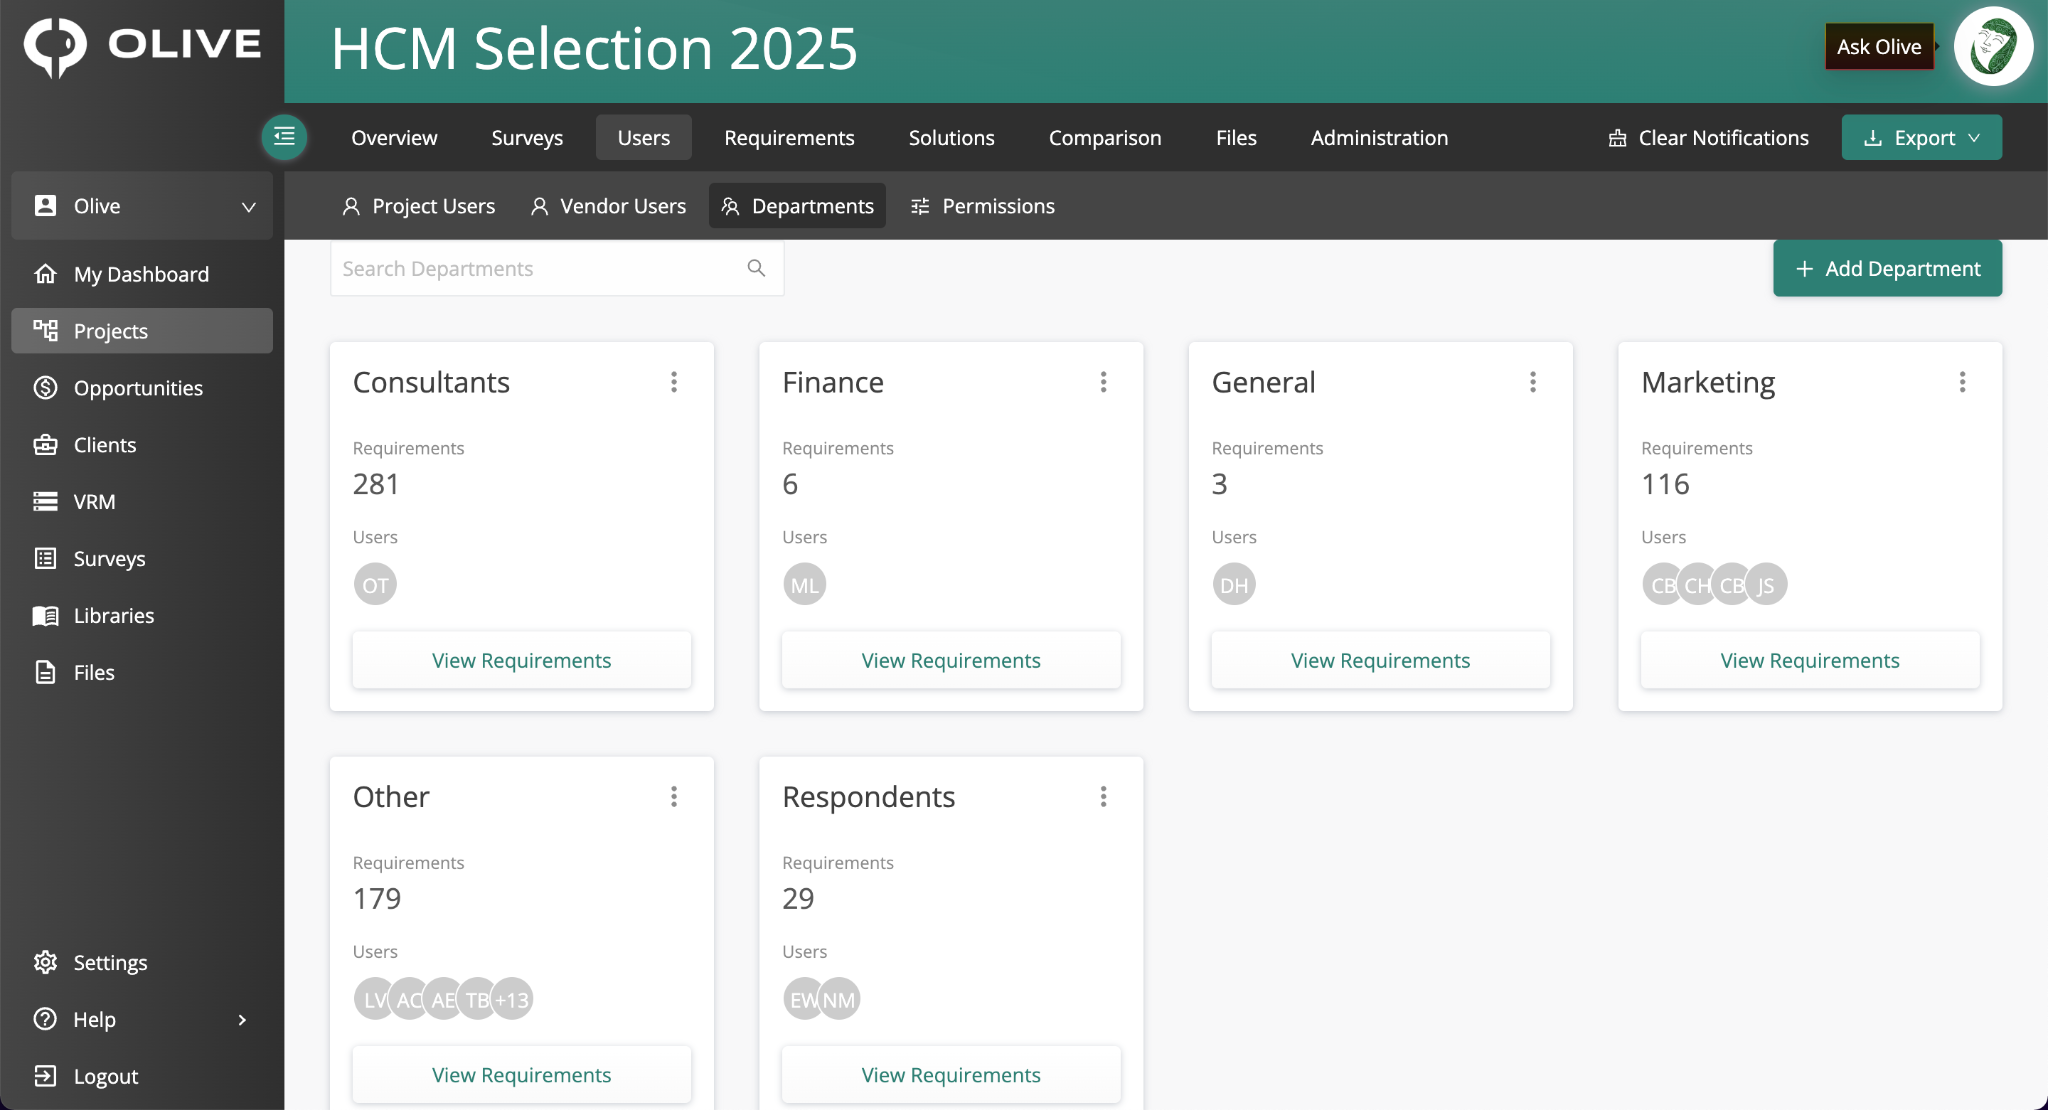
Table View showing department assignments for Project Users
|
💡 Tip: Setting up departments early in your project makes it easier to filter responses and view scoring breakdowns by team later on. |
4. User Views
The Users tab gives you two ways to display your Project Users. Toggle between them using the view buttons at the top right of the Project Users panel.
|
View |
Best for |
|
Card View |
A clean grid layout — easy to scan at a glance. Best for quickly reviewing who is in the project. |
|
Table View |
Denser, more functional layout. Supports bulk actions, and lets you update roles and departments directly without opening a separate modal. |
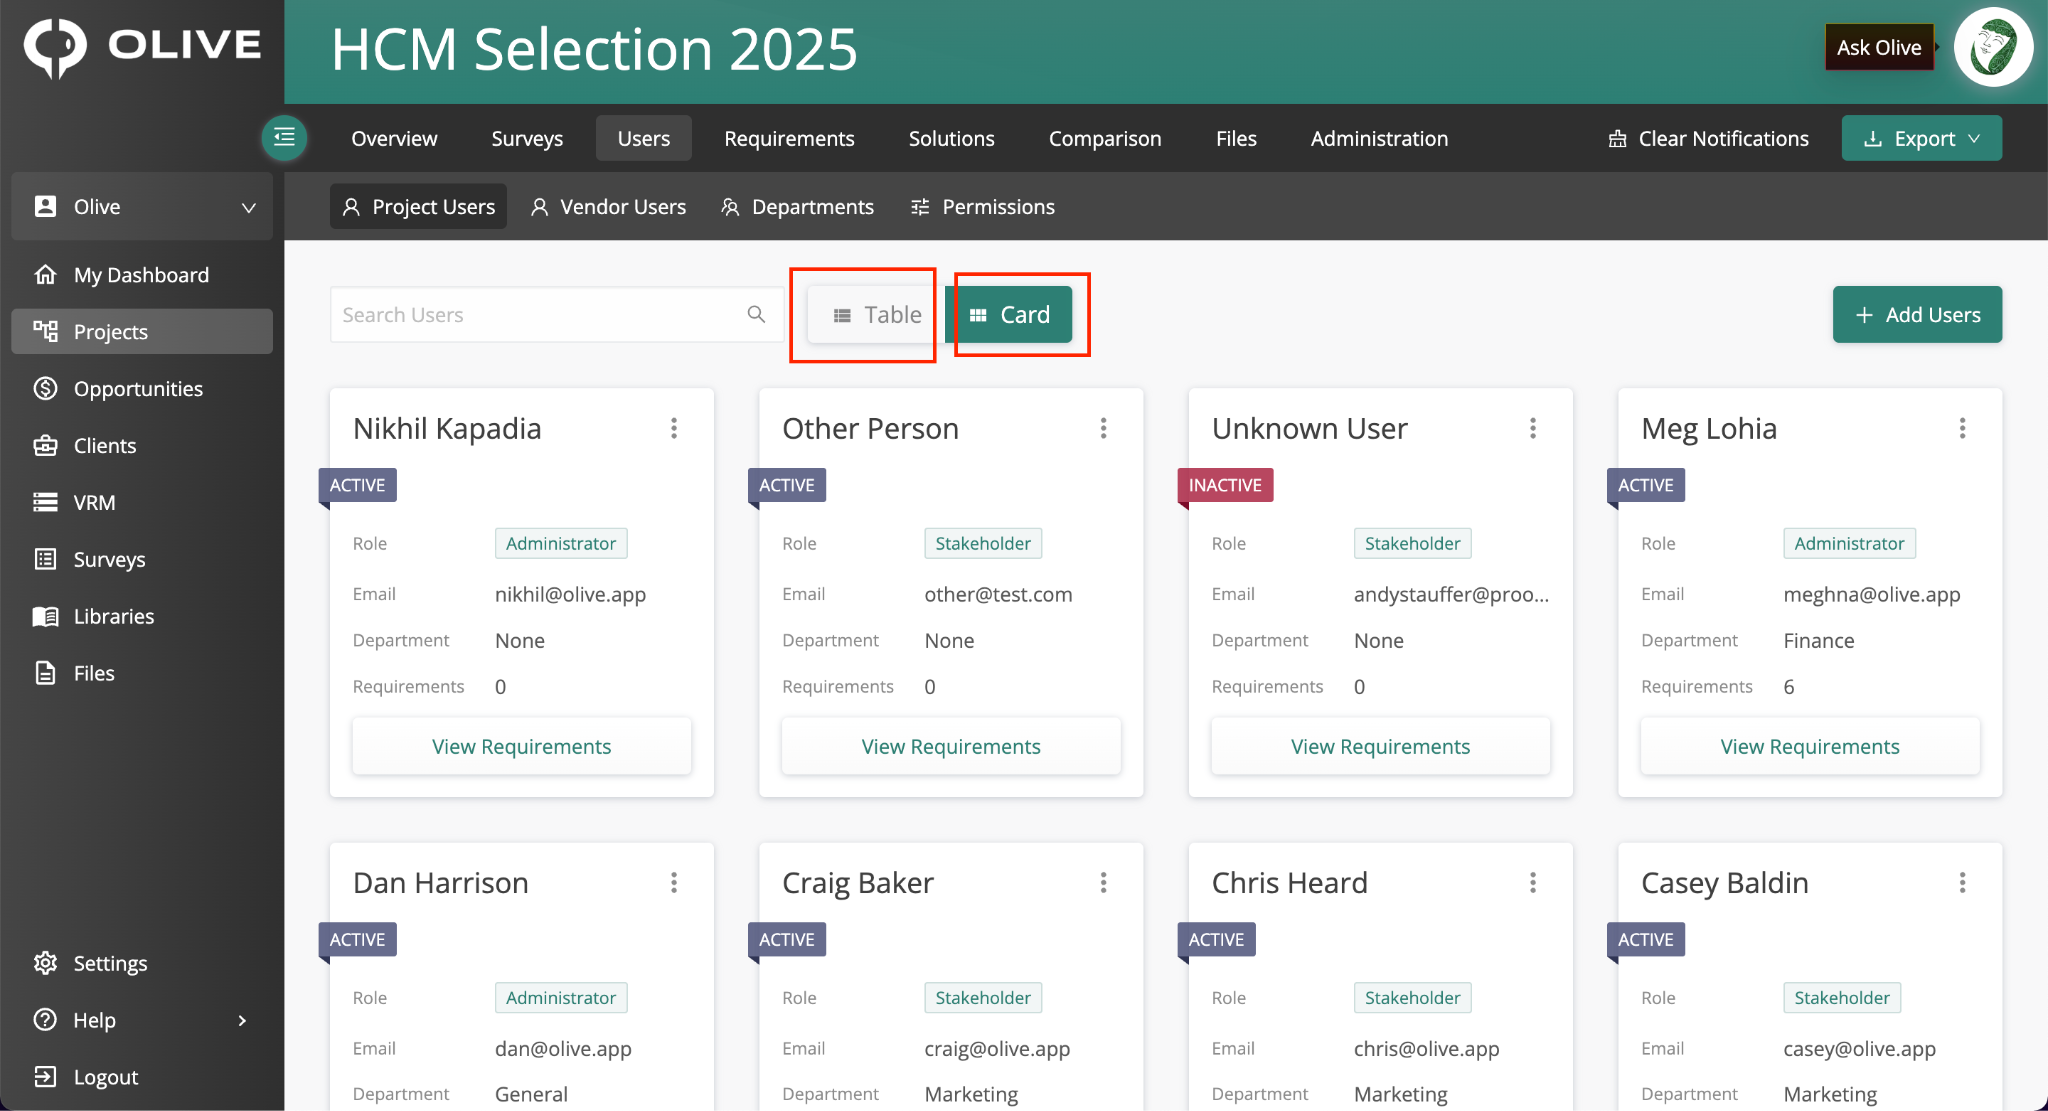
Table View and Card View toggle options in the Users tab
5. Vendor Users
To manage Vendor Users, go to the Users tab and click Vendor Users in the sub-navigation. The process for adding Vendor Users closely mirrors the Project Users flow.
5.1 Creating Vendor Users
To add a new Vendor User:
- Navigate to Vendor Users in the Users tab
- Click 'Add Users'
- Enter the user's name and select the vendor they represent from the dropdown
- Choose 'Invite Now' or 'Invite Later'
Instead of assigning a role (as you do with Project Users), you select which vendor the user belongs to. The staging environment, bulk invite, and email customisation options work identically to the Project Users flow.
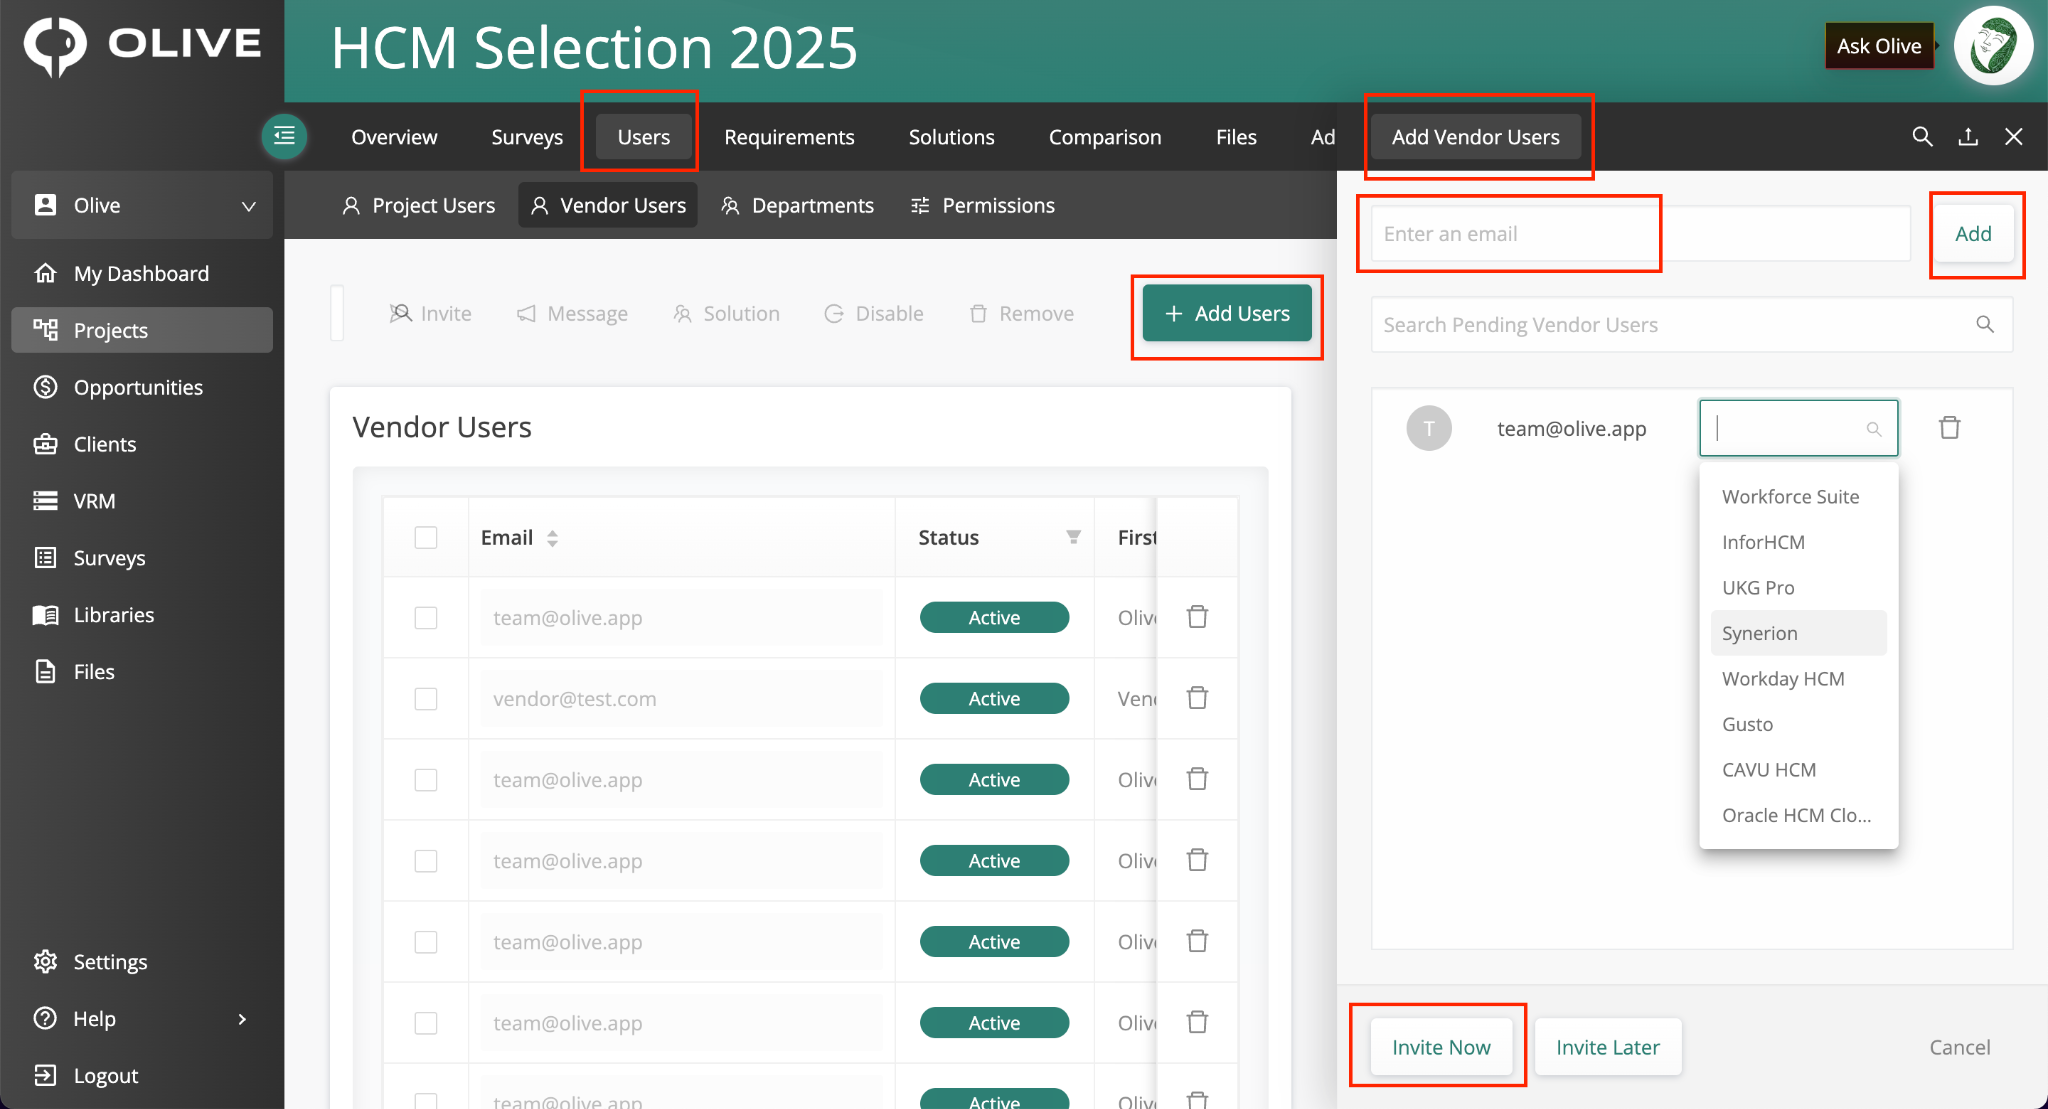
The Add Vendor User flow, showing vendor selection and invitation options
|
📌 Note: Vendor Users do not have Admin or Stakeholder roles. Their access is determined by the vendor they are assigned to and the permissions set in the Permissions tab. |
6. Permissions
Once users are added to your project, navigate to the Users tab and click Permissions in the sub-navigation to control what each user can see and do.
6.1 Permissions Tab
The Permissions tab gives you granular control over user access across the project. From this tab you can:
- View all users in the project in one place
- Control which pages and tabs each user can access
- Define what actions users can take on requirements
The four permission levels available are:
|
Permission level |
What it allows |
|
View |
The user can see the content but cannot make any changes |
|
Add |
The user can add new content but not edit or delete existing items |
|
Edit |
The user can modify existing content |
|
Delete |
The user can permanently remove content |
Apply or remove these at the page level to match each user's responsibilities.
6.2 Default Permissions
By default, all users have access to all areas of the project. Adjust permissions at any time — either globally for all users, or individually for a specific user.
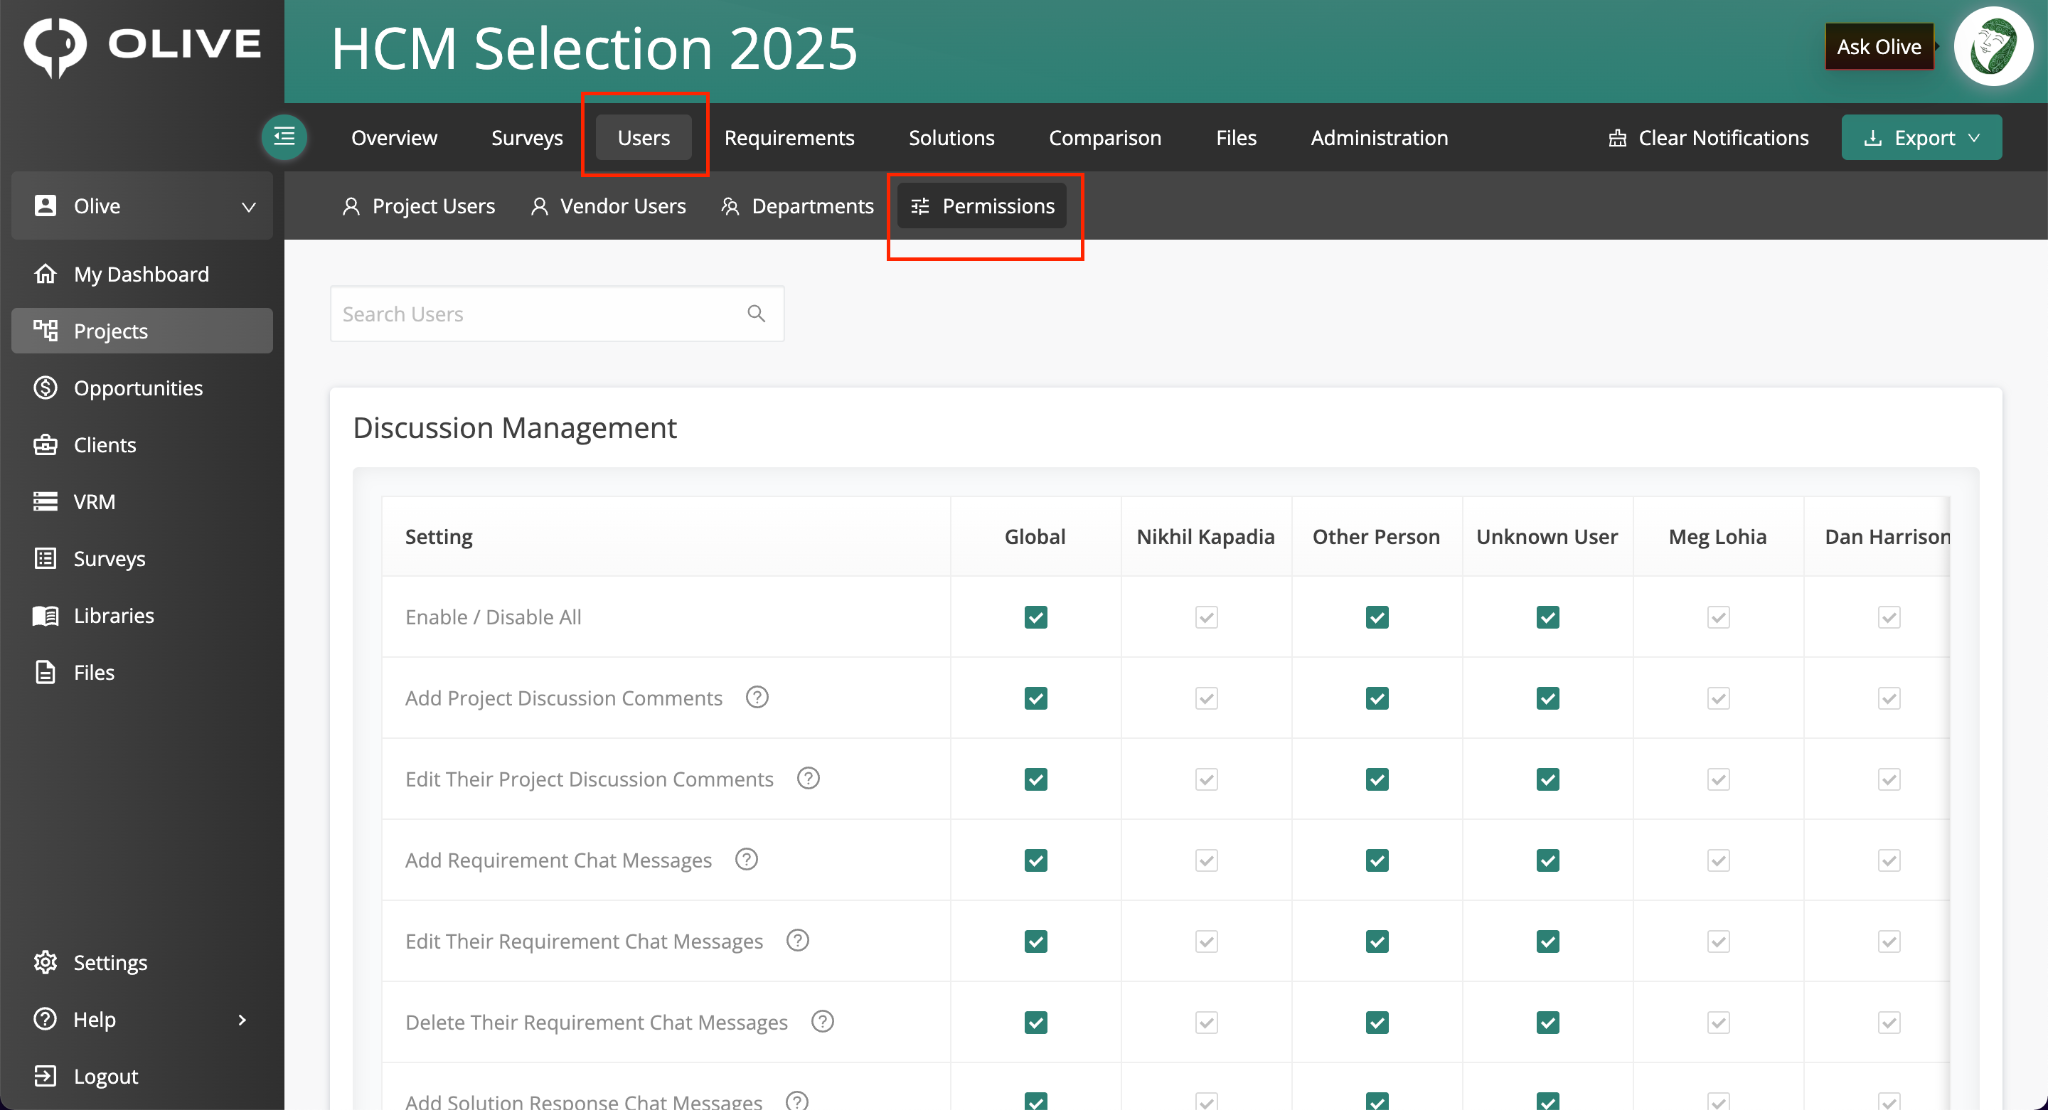
The Permissions tab, showing user access controls and permission levels
|
📌 Note: Restricting permissions is particularly important for larger projects or where certain sections are confidential. Review permissions before sending invitations to avoid users seeing content they shouldn't. |
|
💡 Tip: Tighten permissions on sensitive sections such as pricing or evaluation scoring to ensure only the right stakeholders have access. |
What's Next?
Once your users are set up, here's the recommended order to complete your project setup:
- Review and configure permissions before sending any invitations — users will immediately see whatever access they've been granted once they log in
- Create departments to organise evaluators — this enables filtering in scoring and analysis views later
- Send invitations in a coordinated batch so all team members receive access at the same time
- Monitor user status — check back to confirm who has accepted their invitation and logged in
- Add and invite vendor users once your requirements are ready to send to vendors
Need help? Contact your Olive project administrator or reach out to Olive support.