Overview
The Quick Start method is the fastest way to create a fully-built RFP project in Olive. Rather than building your project manually, Olive's AI guides you through five steps — collecting your project details, identifying topics of interest, generating requirements, recommending vendors, and assembling everything into a ready-to-use project.
This method is ideal when you want to get a project up and running quickly, using AI to generate a strong starting point that you can then refine.
At a Glance: The Five-Step Wizard
Here's what happens at each stage of the wizard. Each step is covered in detail below.
|
Step |
What you do |
What Olive AI does |
|
1 |
Describe your project |
Uses your description to tailor all AI suggestions throughout the wizard |
|
2 |
Select topics of interest |
Suggests relevant focus areas; refines based on your Thumbs Up feedback |
|
3 |
Review and curate requirements |
Generates requirements per topic; lets you toggle Must-Have vs Standard |
|
4 |
Select vendors |
Recommends vendors matched to your topics and requirements |
|
5 |
Review and generate |
Assembles your full project — overview, requirements, and vendors |
|
💡 Tip: Step 1 is the most important — the more detail you provide in your project description, the better Olive's AI suggestions will be throughout the entire wizard. |
Getting Started: My Dashboard
To start a new project using the Quick Start method, begin from My Dashboard:
- Click 'My Dashboard' in the left sidebar
- Click the 'Start A New Project' card on the dashboard
- Select 'Quick Start' from the options that appear
The Guided Project Creation wizard opens. The five steps are listed in the left sidebar — you'll work through them in sequence. Each step is marked complete (✓) once you move forward.
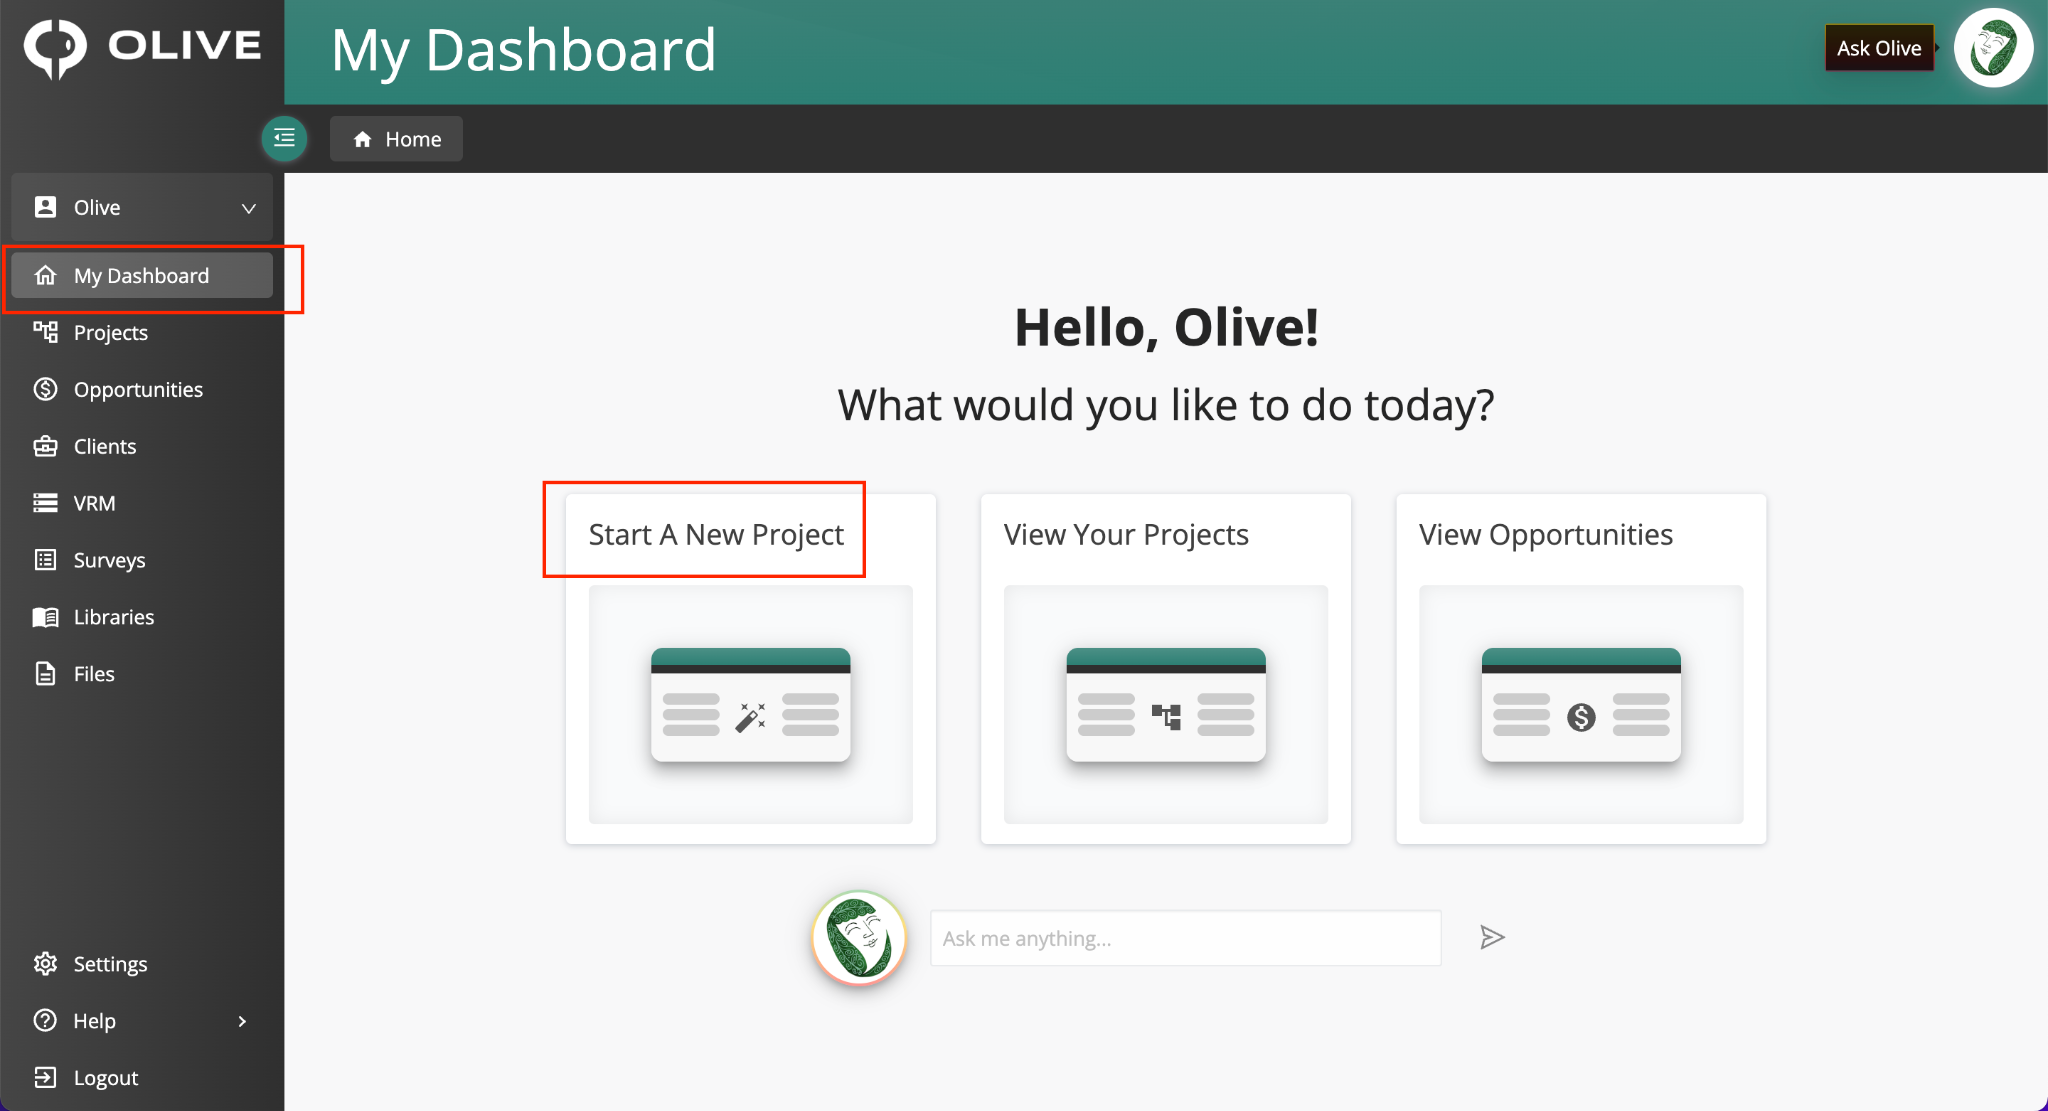
My Dashboard — click 'Start A New Project' to begin
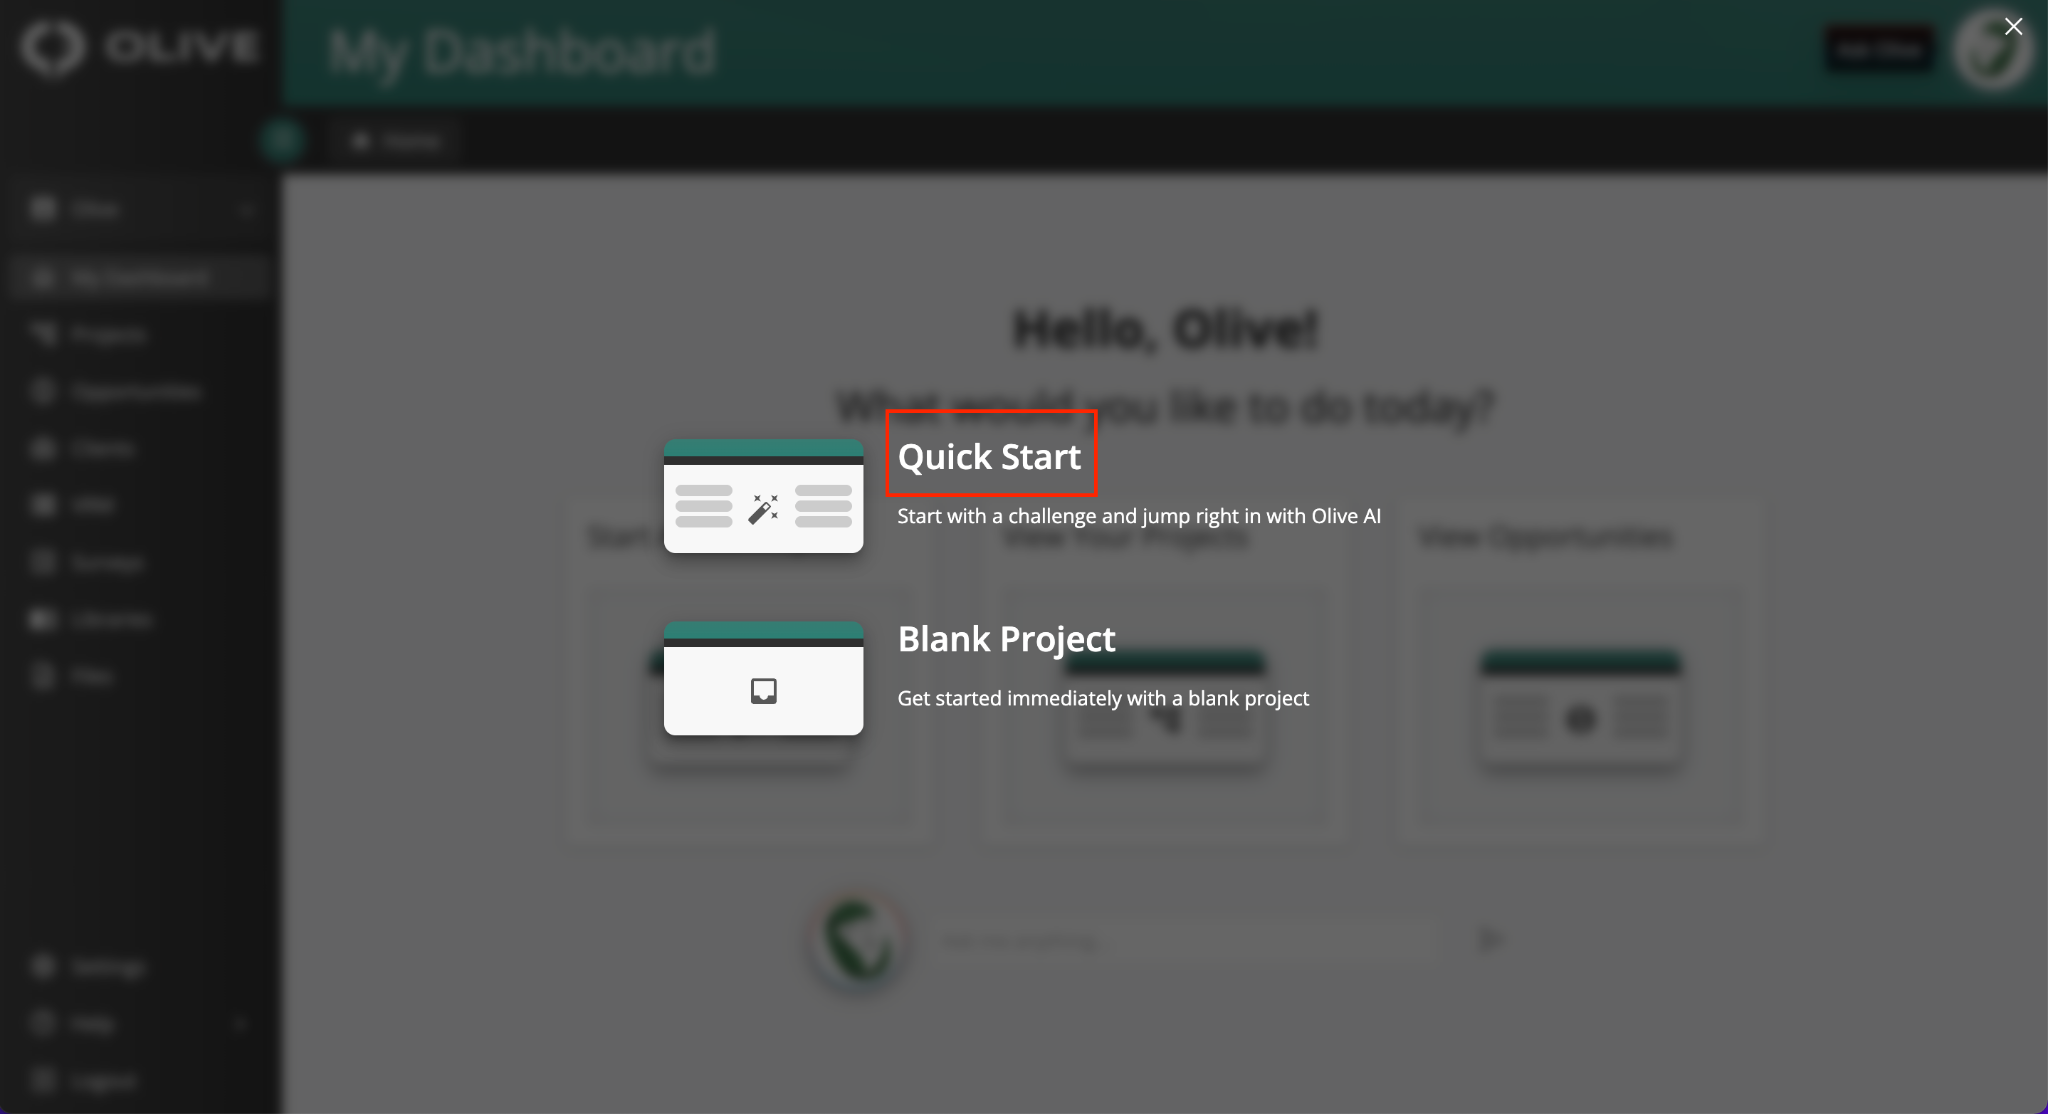
Select 'Quick Start' to launch the guided project creation wizard
|
💡 Tip: You can click 'Clear & Restart' in the left sidebar at any time to reset the wizard and start over. Use 'Exit Wizard' to close without saving. |
Step 1: Project Overview
Step 1 collects the key information Olive needs to tailor its AI recommendations throughout the remaining steps. Fill in all four fields before continuing.
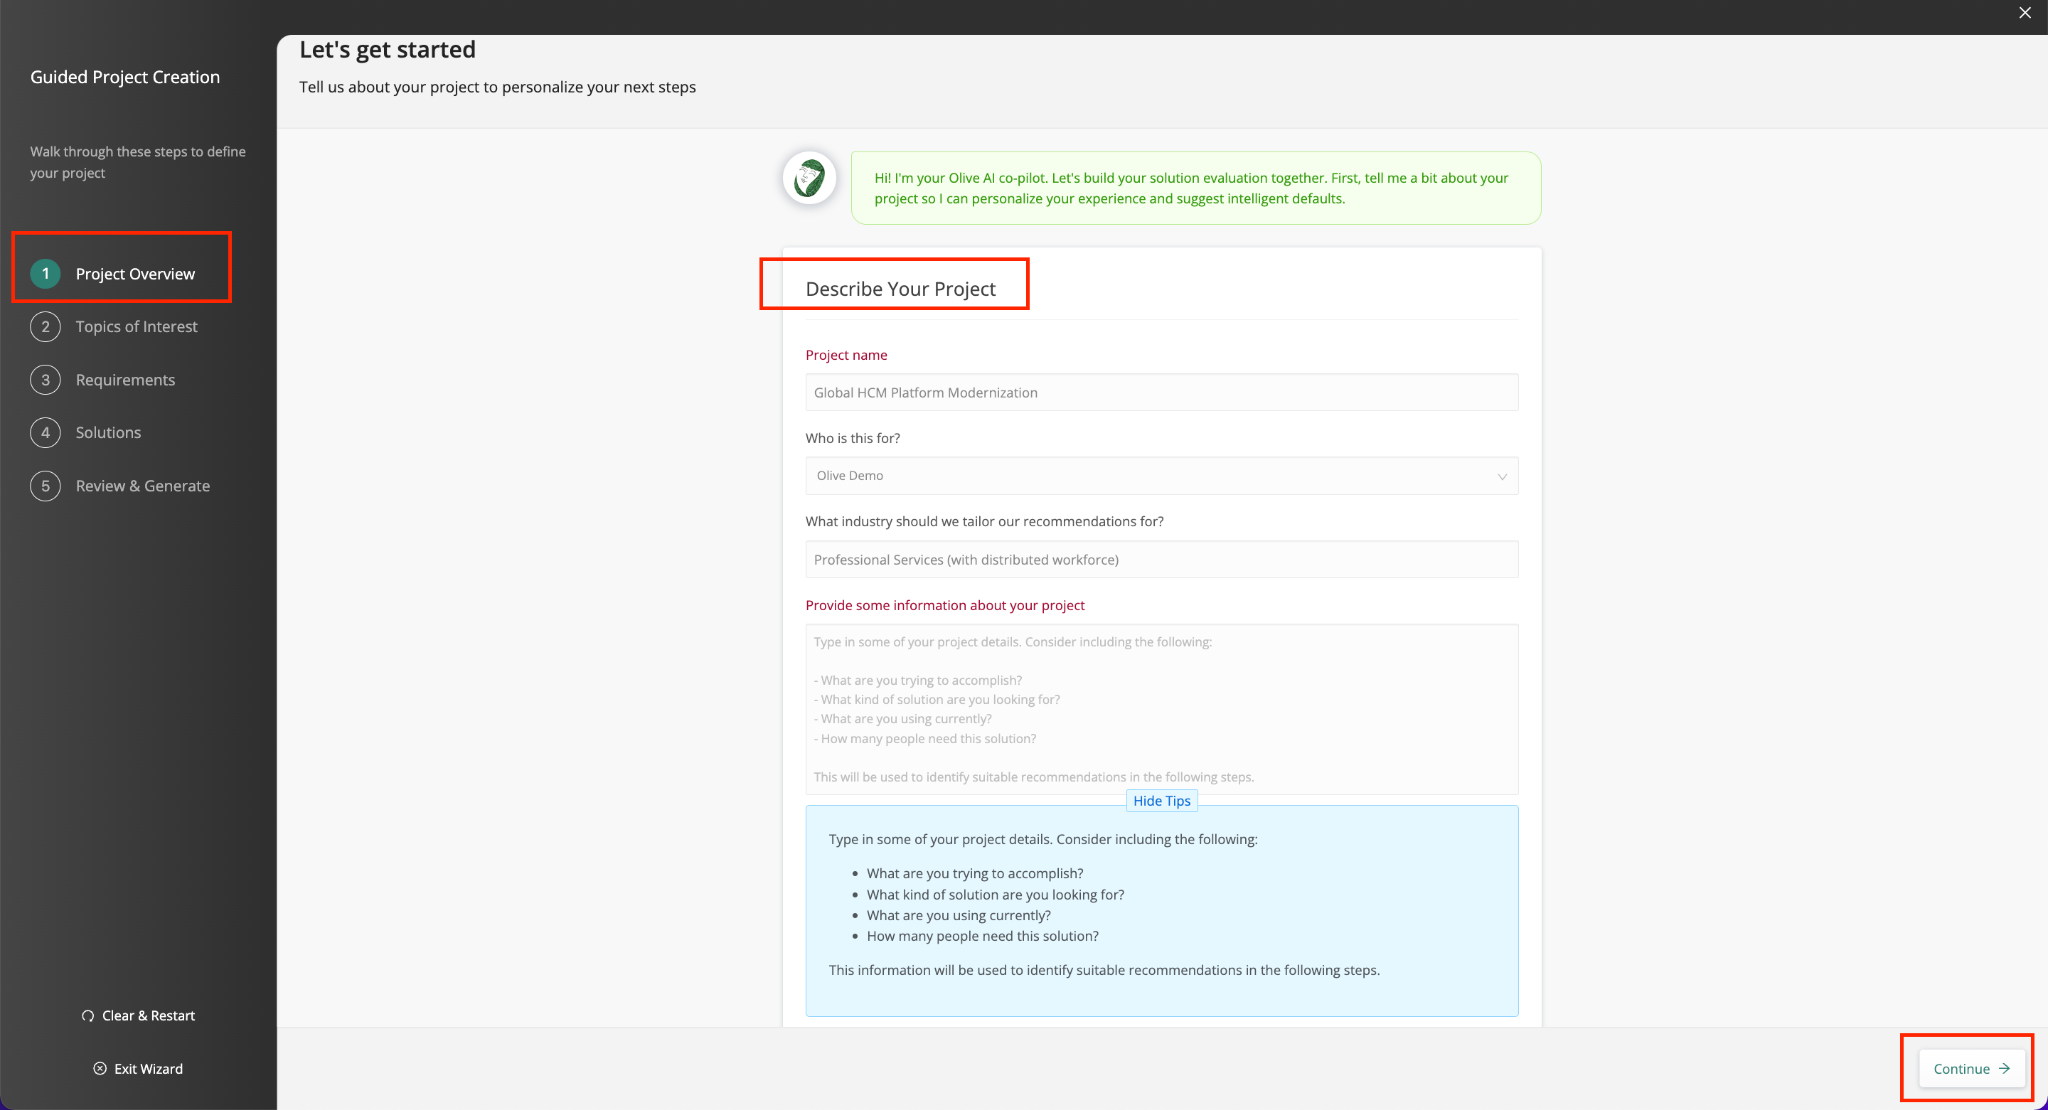
Step 1 — Describe Your Project form with project name, account, industry, and project description fields
Project Name
Enter a clear, descriptive name for your project — for example, 'CRM Platform Selection 2025'. This will be the project's name throughout Olive and will be visible to any vendors you invite.
Who Is This For?
Select the relevant account from the dropdown. This determines which sub-account the project belongs to.
What Industry Should We Tailor Our Recommendations For?
Type or select the industry most relevant to your evaluation. Olive uses this to tailor its topic and vendor recommendations to your specific context.
Provide Some Information About Your Project
Write a description of your project in the text area. This is the most important field in Step 1 — the more detail you provide, the better Olive's AI can tailor recommendations throughout the wizard. Include:
- What you are trying to accomplish
- What kind of solution you are looking for
- What systems you are currently using
- How many people will use the new solution
- Any key requirements or constraints
Click 'Show Tips' below the description field to reveal a guided prompt if you need help getting started. Once all fields are complete, click 'Continue' to proceed to Step 2.
|
💡 Tip: Be as detailed as possible in your project description. A rich description leads to more relevant topic suggestions, better-matched requirements, and more accurate vendor recommendations in the steps that follow. |
Step 2: Topics of Interest
Step 2 asks you to select the focus areas — called Topics of Interest — that will shape your project's requirements. Olive uses these topics to generate targeted requirements in Step 3.
AI Generated Tab
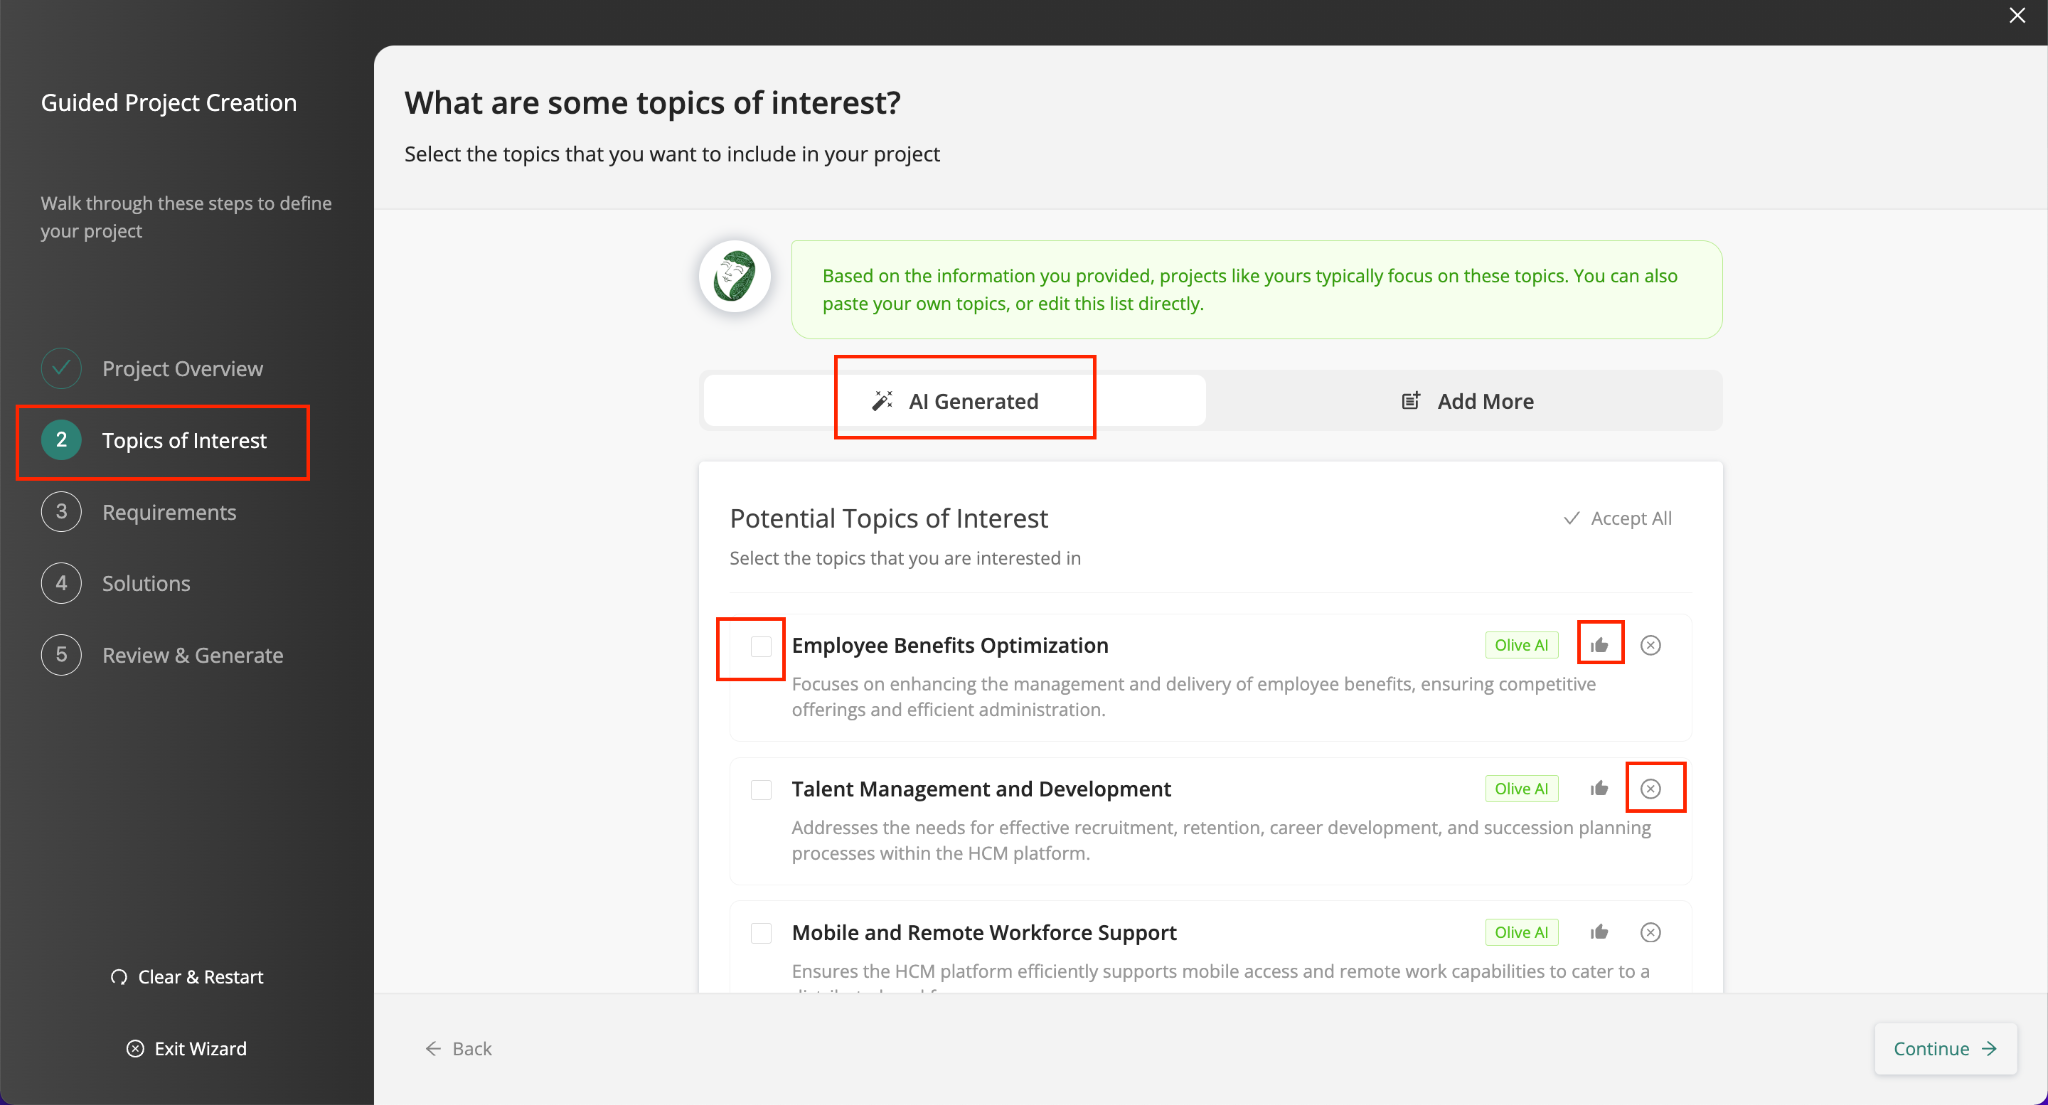
Step 2 — AI Generated tab showing Potential Topics of Interest with checkboxes, Thumbs Up, and X buttons
Olive AI analyses your project description and suggests a list of relevant Potential Topics of Interest. For each topic you can:
- Tick the checkbox to select it for your project
- Click 'Accept All' to select every suggested topic at once
- Click the Thumbs Up (👍) icon on a topic you particularly like — Olive will suggest more topics in a similar direction
- Click the X icon to remove a topic you don't want
Add More Tab
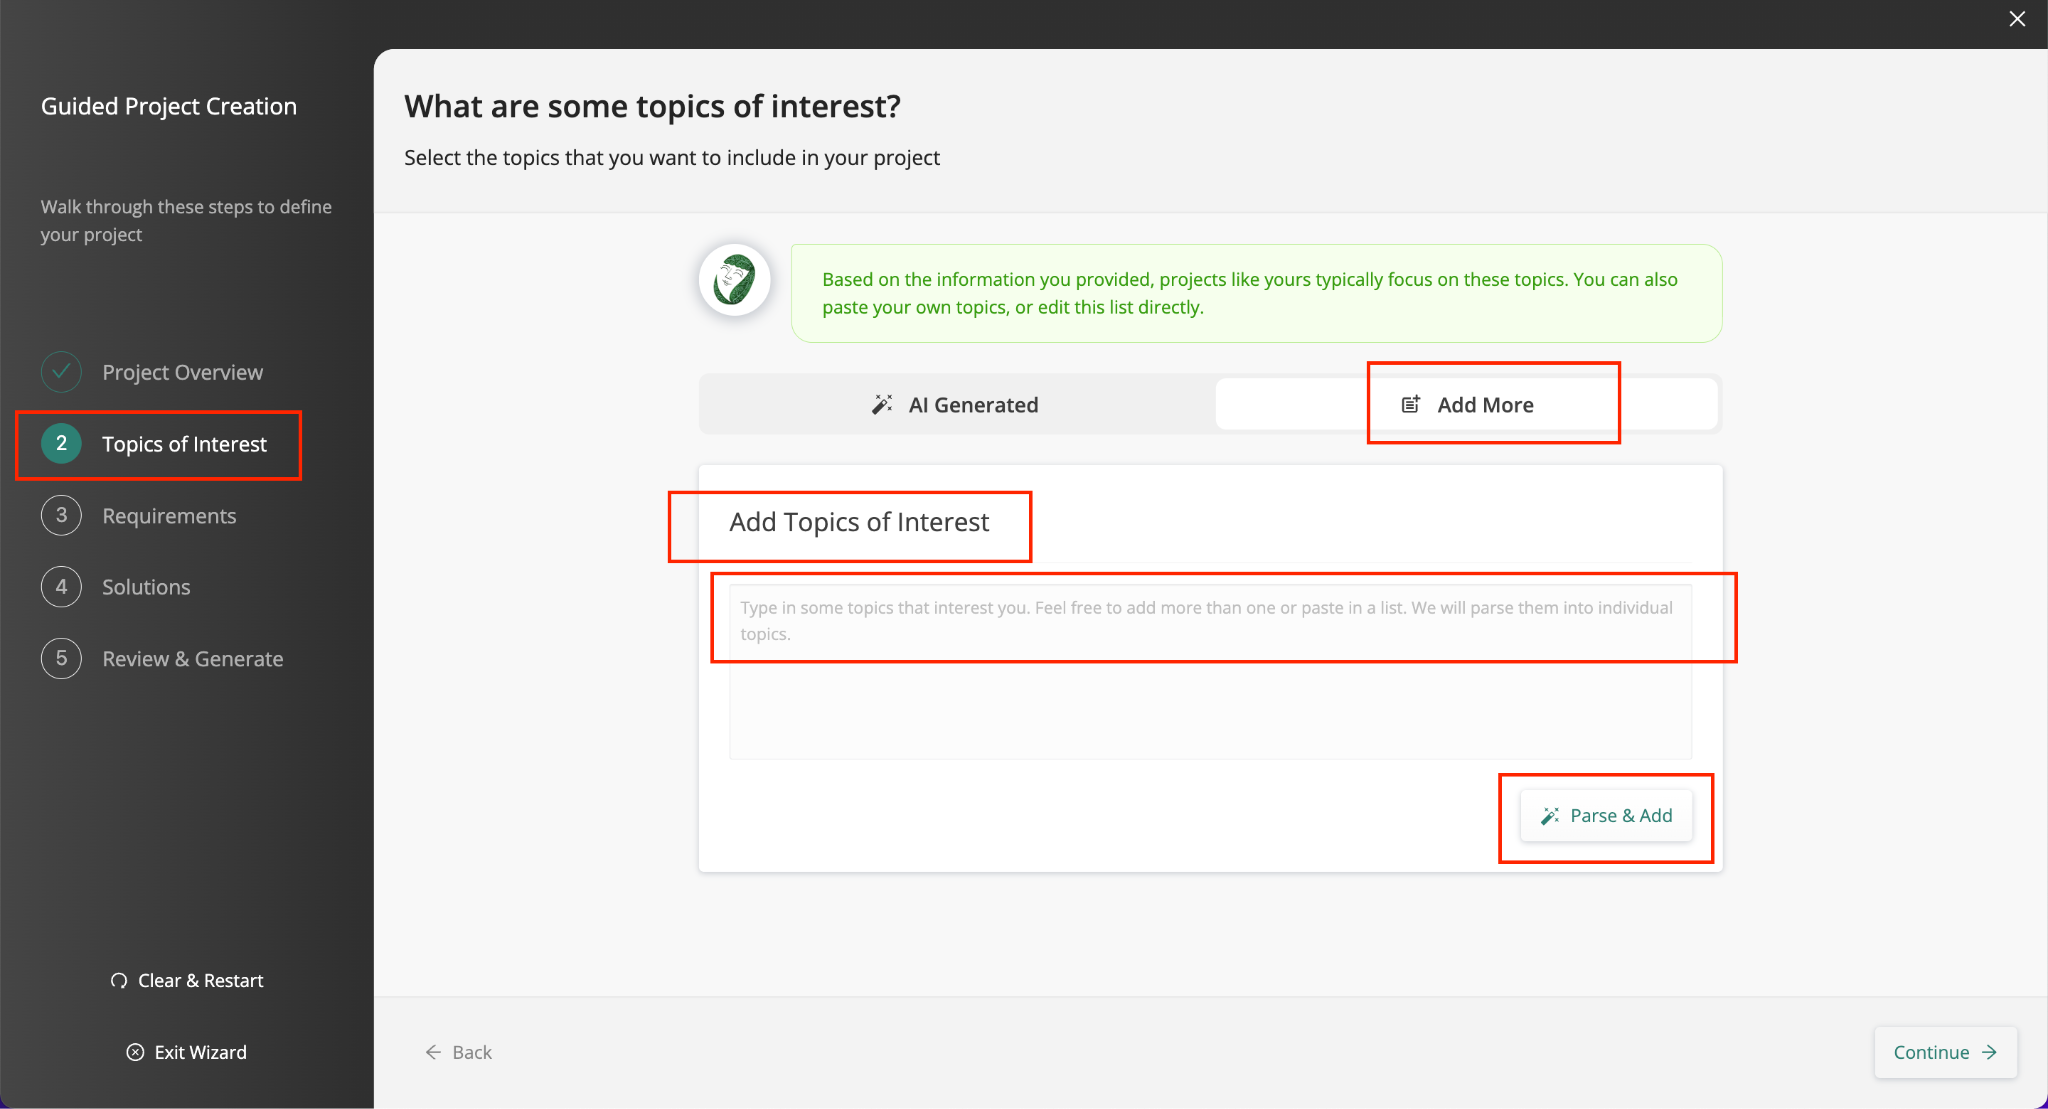
Step 2 — Add More tab for typing in your own topics of interest
Click the 'Add More' tab to add your own topics that aren't in the AI-generated list:
- Type one or more topics — or paste in a list
- Click 'Parse & Add' — Olive will separate them into individual topics automatically
Once you're happy with your topics, click 'Continue' to proceed to Step 3.
|
💡 Tip: Select topics that reflect the real focus areas of your evaluation. The more accurately these reflect your priorities, the more relevant the requirements generated in Step 3 will be. |
Step 3: Requirements
Step 3 is where Olive generates a starter list of requirements for your project, organised by the topics you selected in Step 2. Each requirement is automatically categorised as Must-Have or Standard.
AI Generated Tab
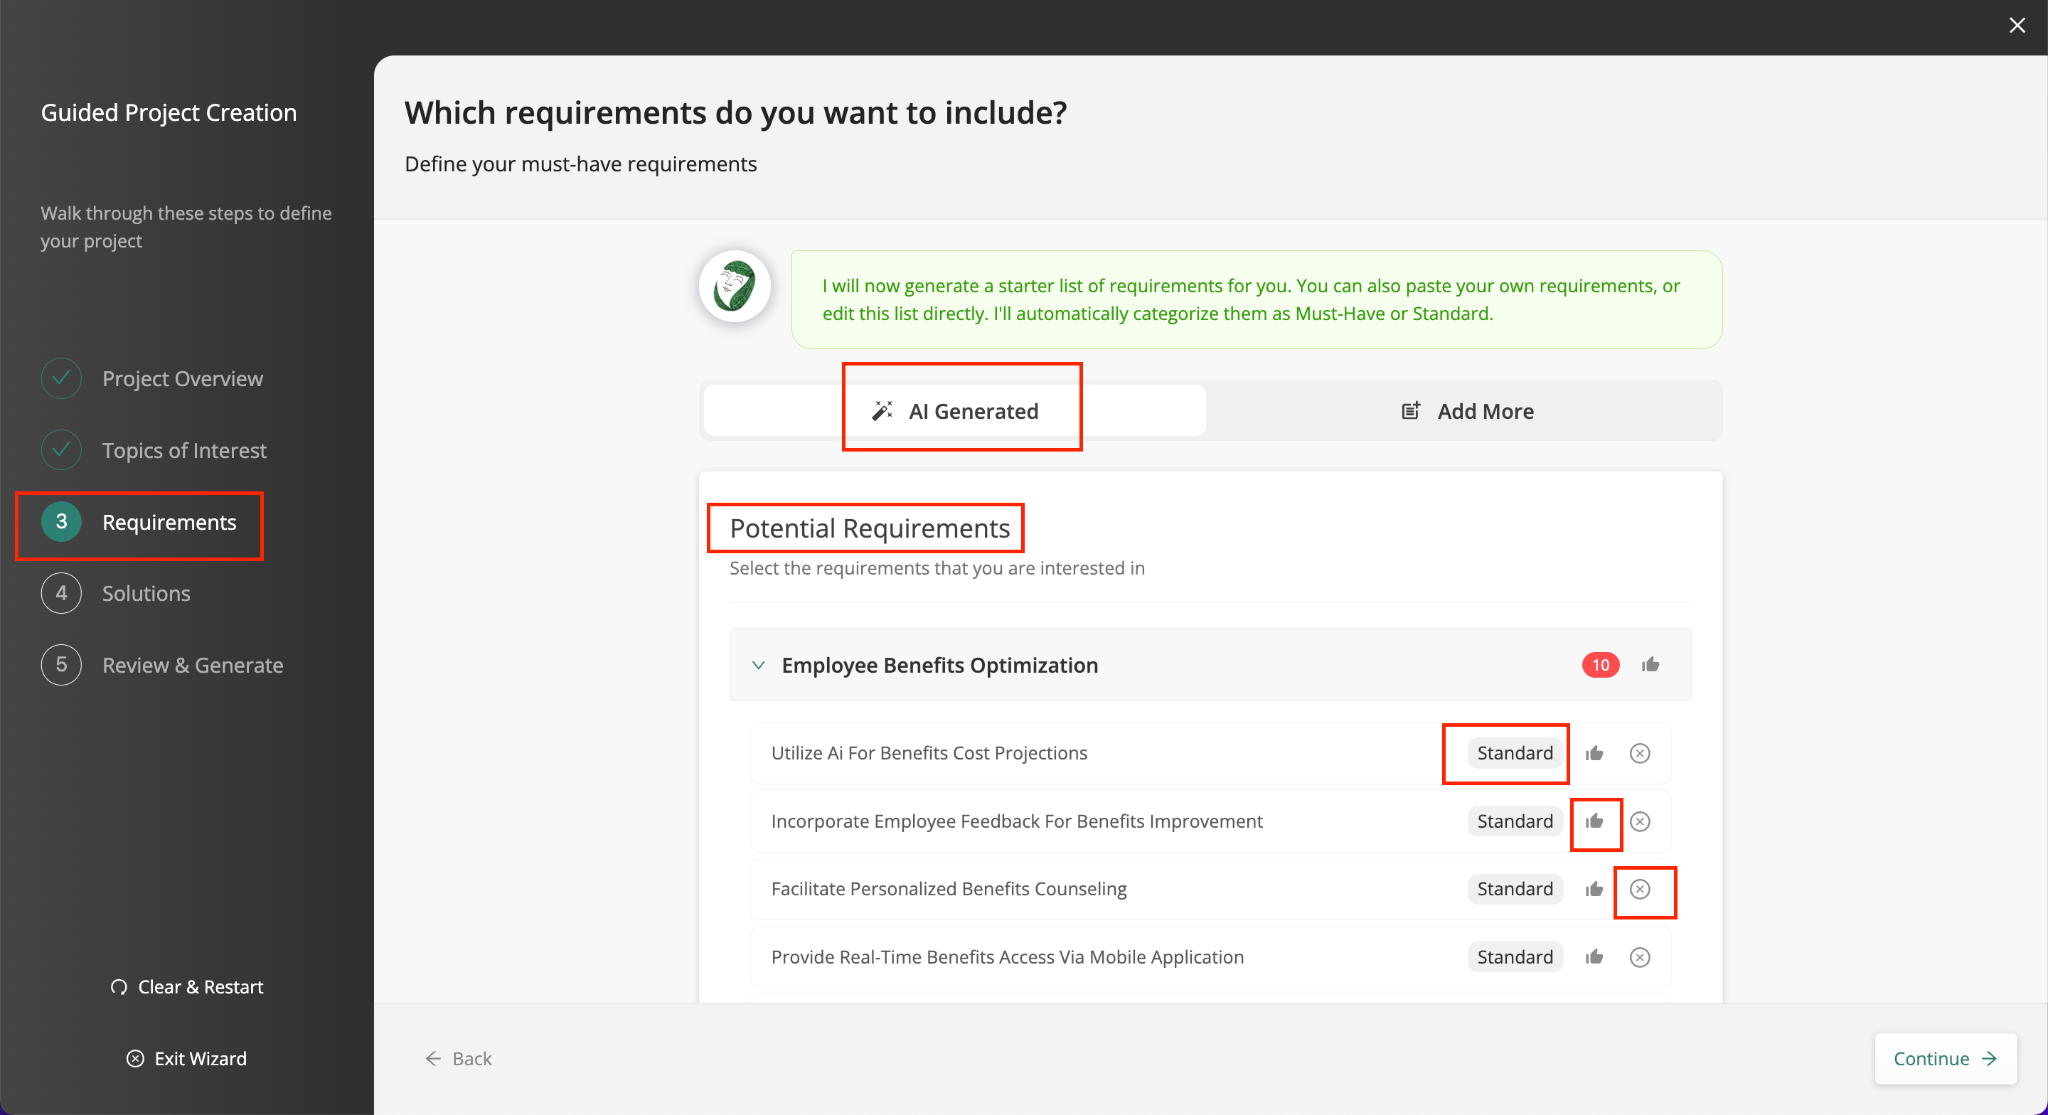
Step 3 — AI Generated tab showing Potential Requirements by topic, with Must/Standard labels, Thumbs Up, and X buttons
Olive AI generates requirements for each Topic of Interest you selected. Requirements are grouped by topic and labelled as either 'Standard' or 'Must'. For each requirement you can:
- Click 'Standard' or 'Must' to toggle between the two categories
- Click the Thumbs Up (👍) icon on a requirement you want more of — Olive will suggest similar additional requirements for that topic
- Click the X icon to remove a requirement you don't want
|
📌 Note: Requirements marked 'Must' become must-have requirements in your project and affect how vendors are ranked in the Comparison tab. Be deliberate about which requirements you mark as Must — reserve this for genuine deal-breakers, not just nice-to-haves. |
Add More Tab
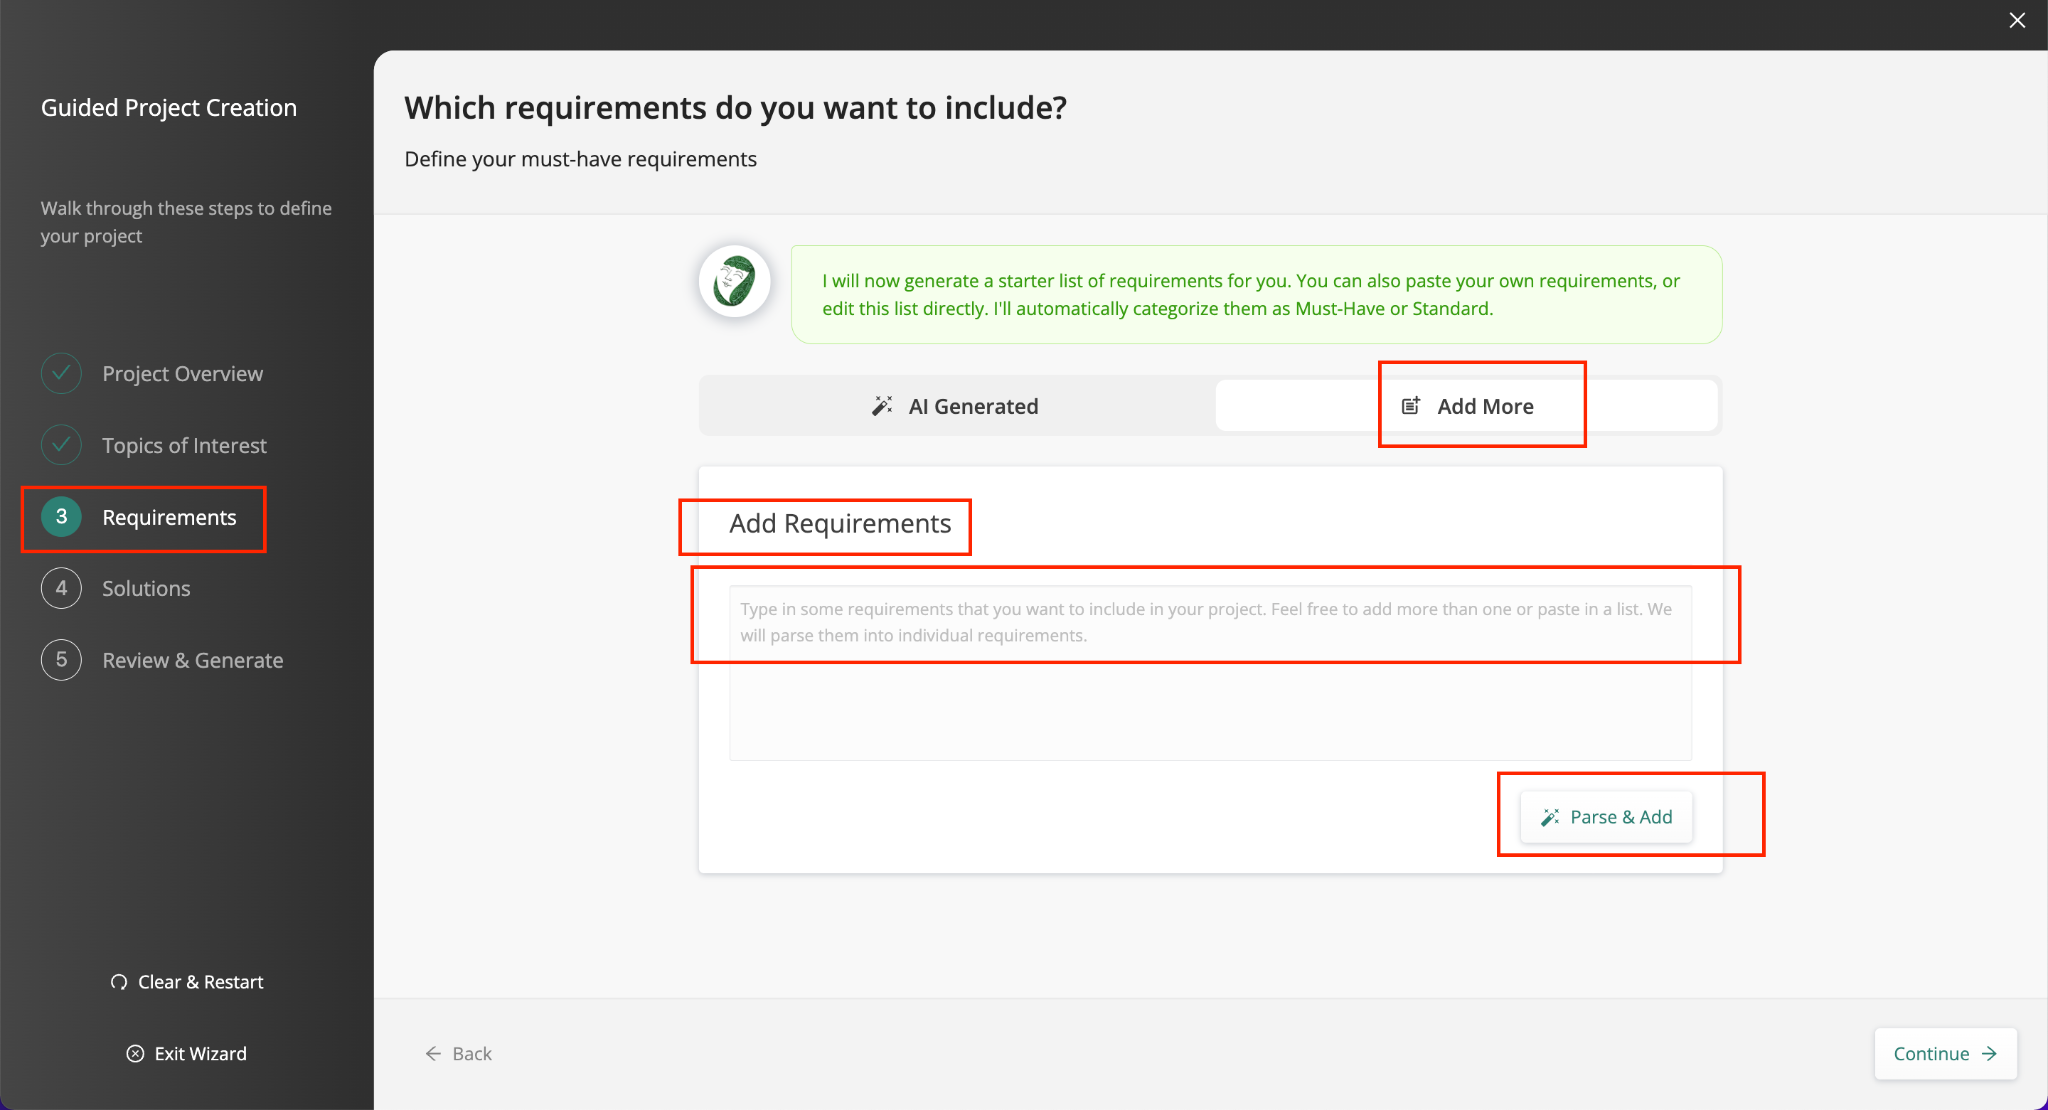
Step 3 — Add More tab for typing in your own requirements
Click the 'Add More' tab to add requirements not covered by the AI suggestions:
- Type one or more requirements — or paste in a list
- Click 'Parse & Add' — Olive will separate them into individual requirements automatically
Click 'Continue' once you're satisfied with your requirements list.
|
💡 Tip: Review all AI-generated requirements carefully. Remove any that aren't relevant and make sure the must-have labels accurately reflect your organisation's priorities — they will influence how vendors are ranked in the Comparison tab. |
Step 4: Solutions
Step 4 is where you select the vendors you want to include in your evaluation. Olive suggests vendors based on your topics and requirements.
AI Generated Tab
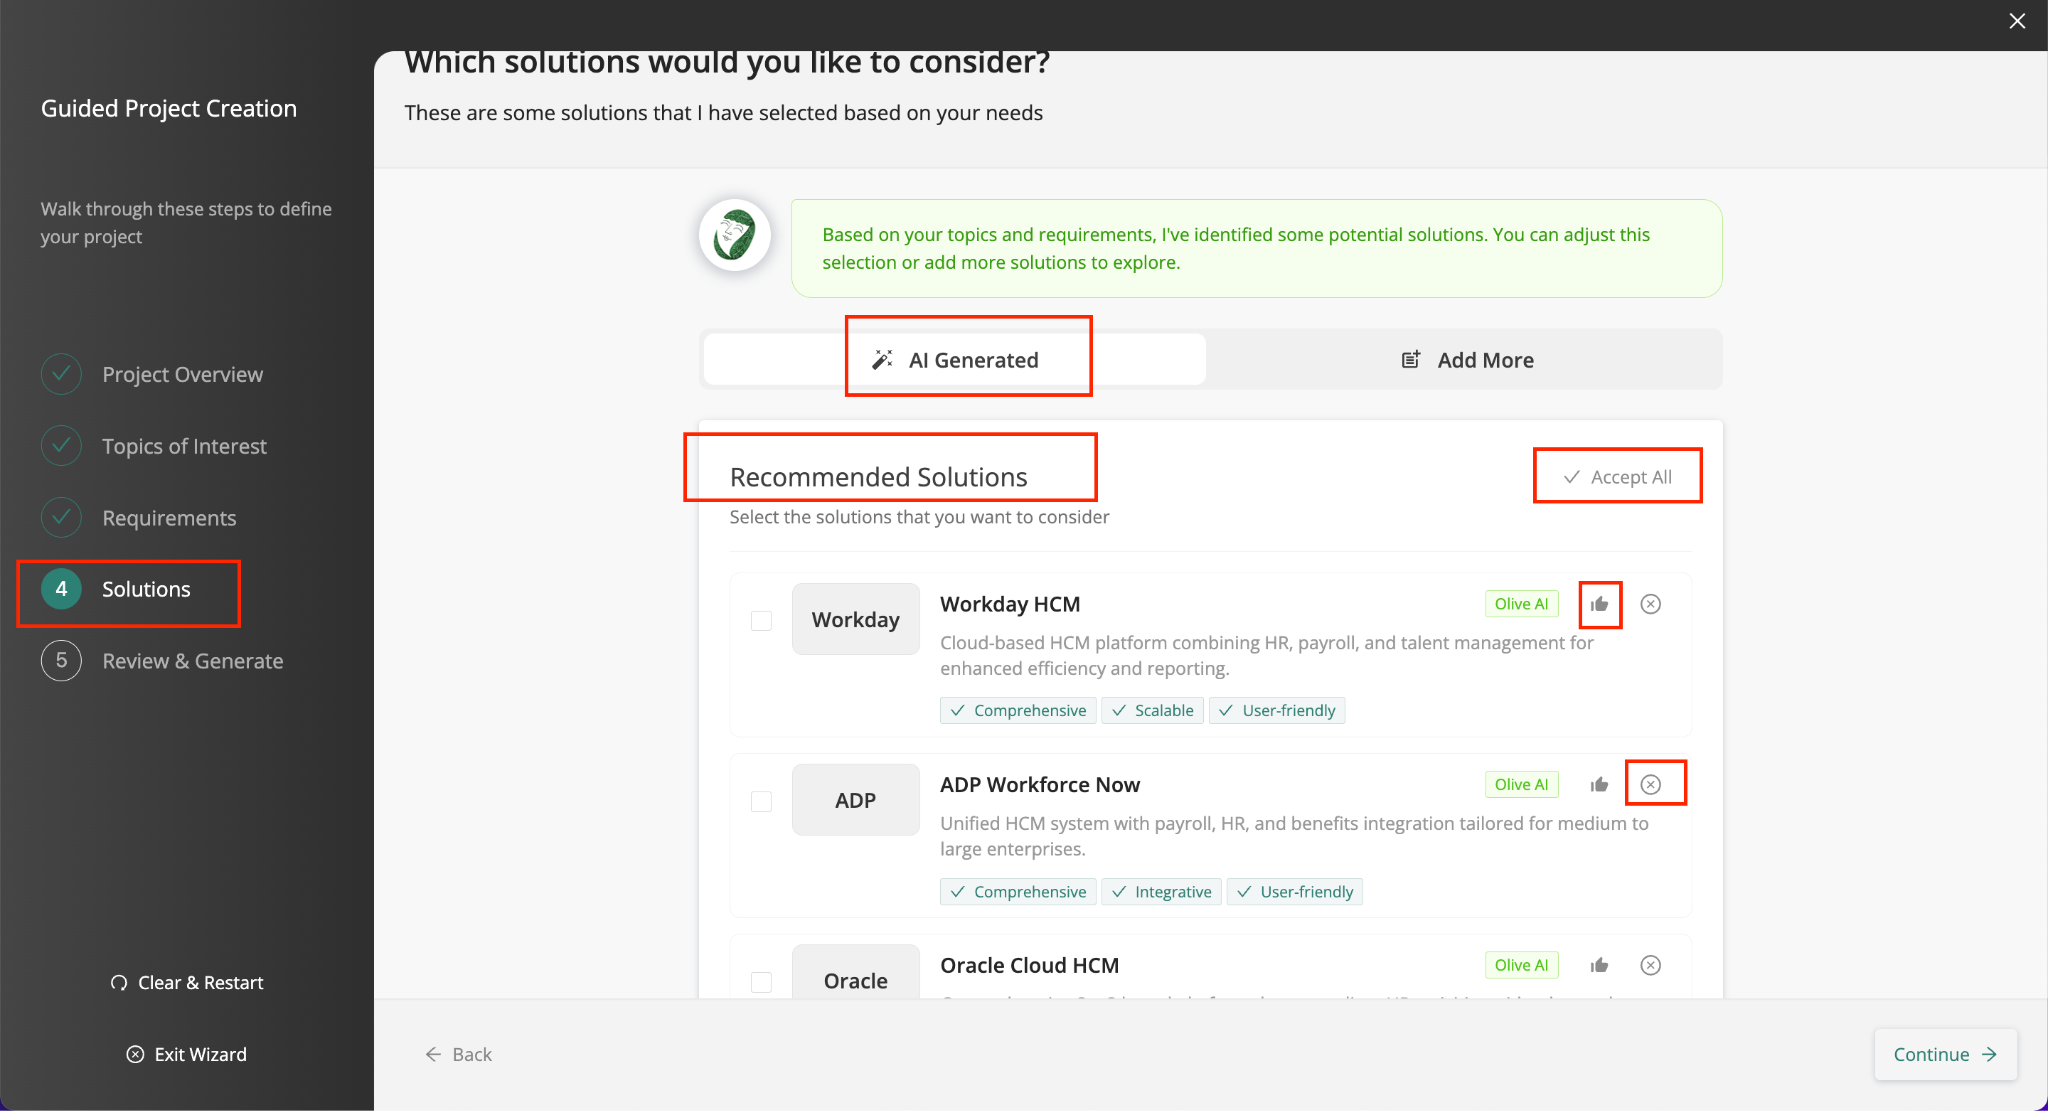
Step 4 — AI Generated tab showing Recommended Solutions with checkboxes, Accept All, Thumbs Up, and X buttons
Olive AI identifies relevant vendors based on your topics and requirements. For each solution you can:
- Tick the checkbox to include it in your evaluation
- Click 'Accept All' to select all suggested solutions at once
- Click the Thumbs Up (👍) icon on a solution you like — Olive will suggest similar solutions
- Click the X icon to remove a solution you don't want to evaluate
Add More Tab
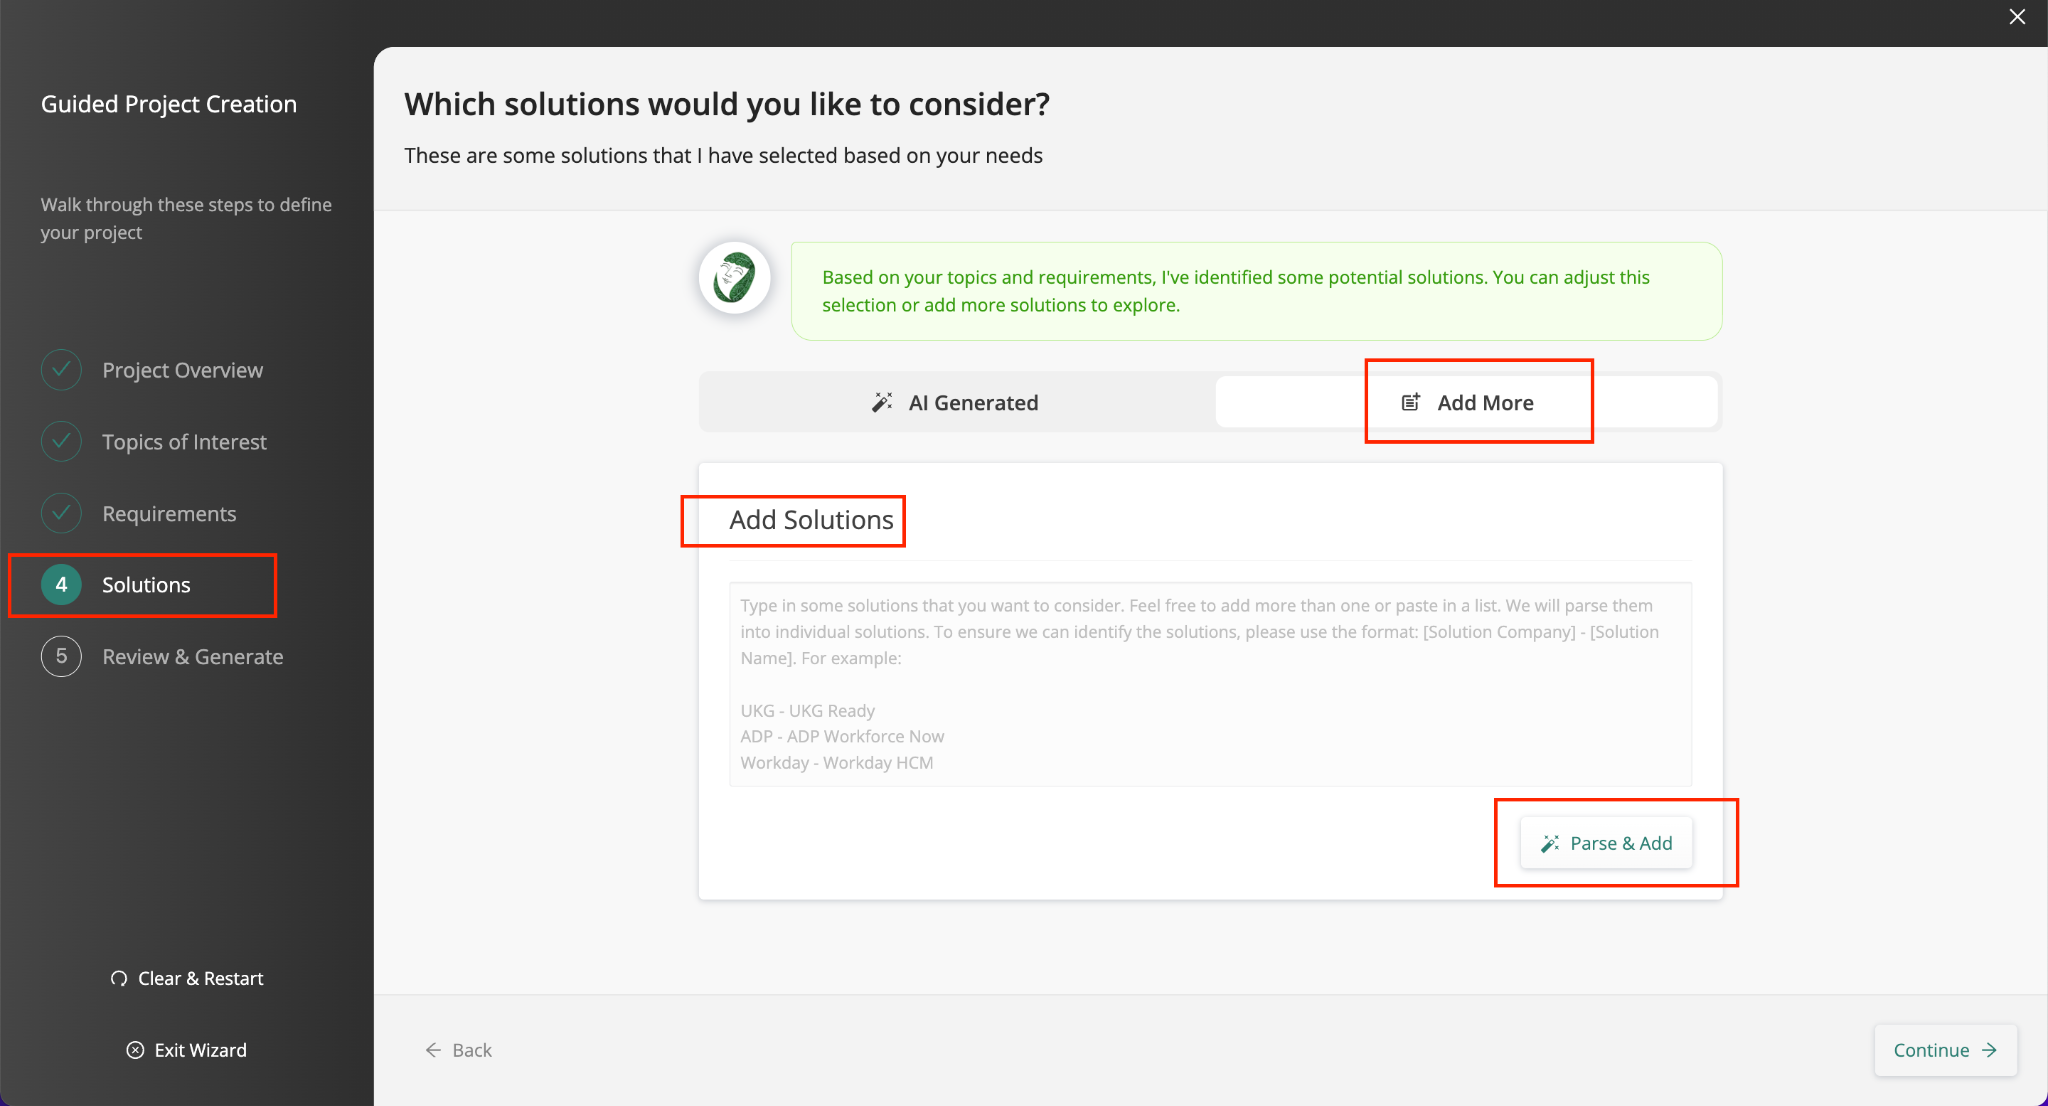
Step 4 — Add More tab for entering your own vendor solutions using the [Company] - [Solution Name] format
Click 'Add More' to add vendors not shown in the AI list. Use the format [Solution Company] - [Solution Name] to ensure Olive can identify them correctly. For example:
- UKG - UKG Ready
- ADP - ADP Workforce Now
- Workday - Workday HCM
- Type one or more solutions — or paste in a list
- Click 'Parse & Add' to add them
- Click 'Continue' when ready
|
💡 Tip: Include a mix of established vendors and any solutions your organisation has been specifically considering. You can always add or remove vendors from the Solutions tab after the project is created. |
Step 5: Review & Generate
Step 5 gives you a final opportunity to review everything before Olive generates your project. The wizard displays a summary of your Project Overview, Requirements, and Solutions To Evaluate.
Reviewing Your Project Summary
Review each area of the summary carefully — this is your last chance to make changes before the project is built:
- Project Overview — click 'Modify' to edit the project name, description, or industry
- Requirements — click 'Modify' to go back and adjust requirements or must-have labels
- Solutions To Evaluate — click 'Modify' to go back and change your vendor selection
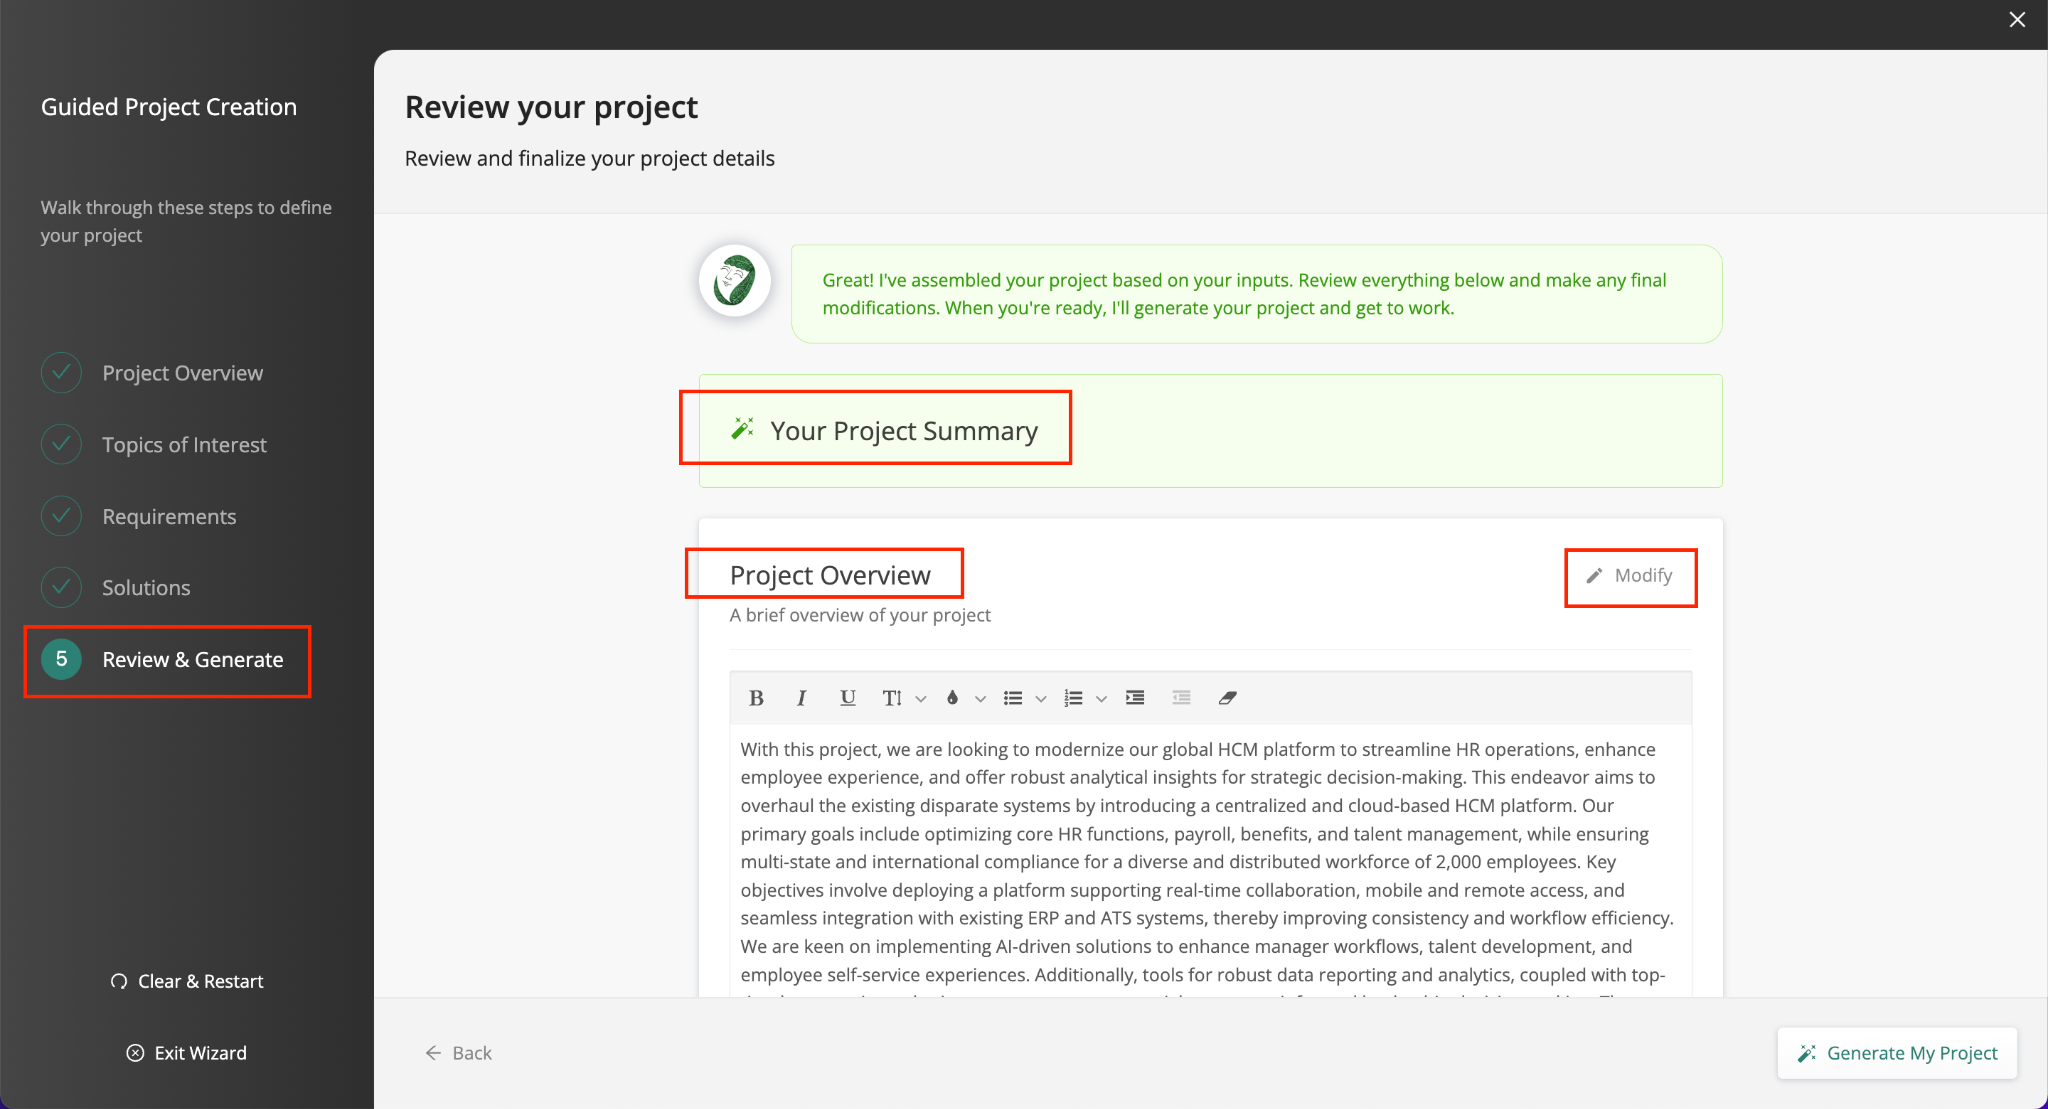
Step 5 — Review & Generate showing the Project Overview section with the Modify button
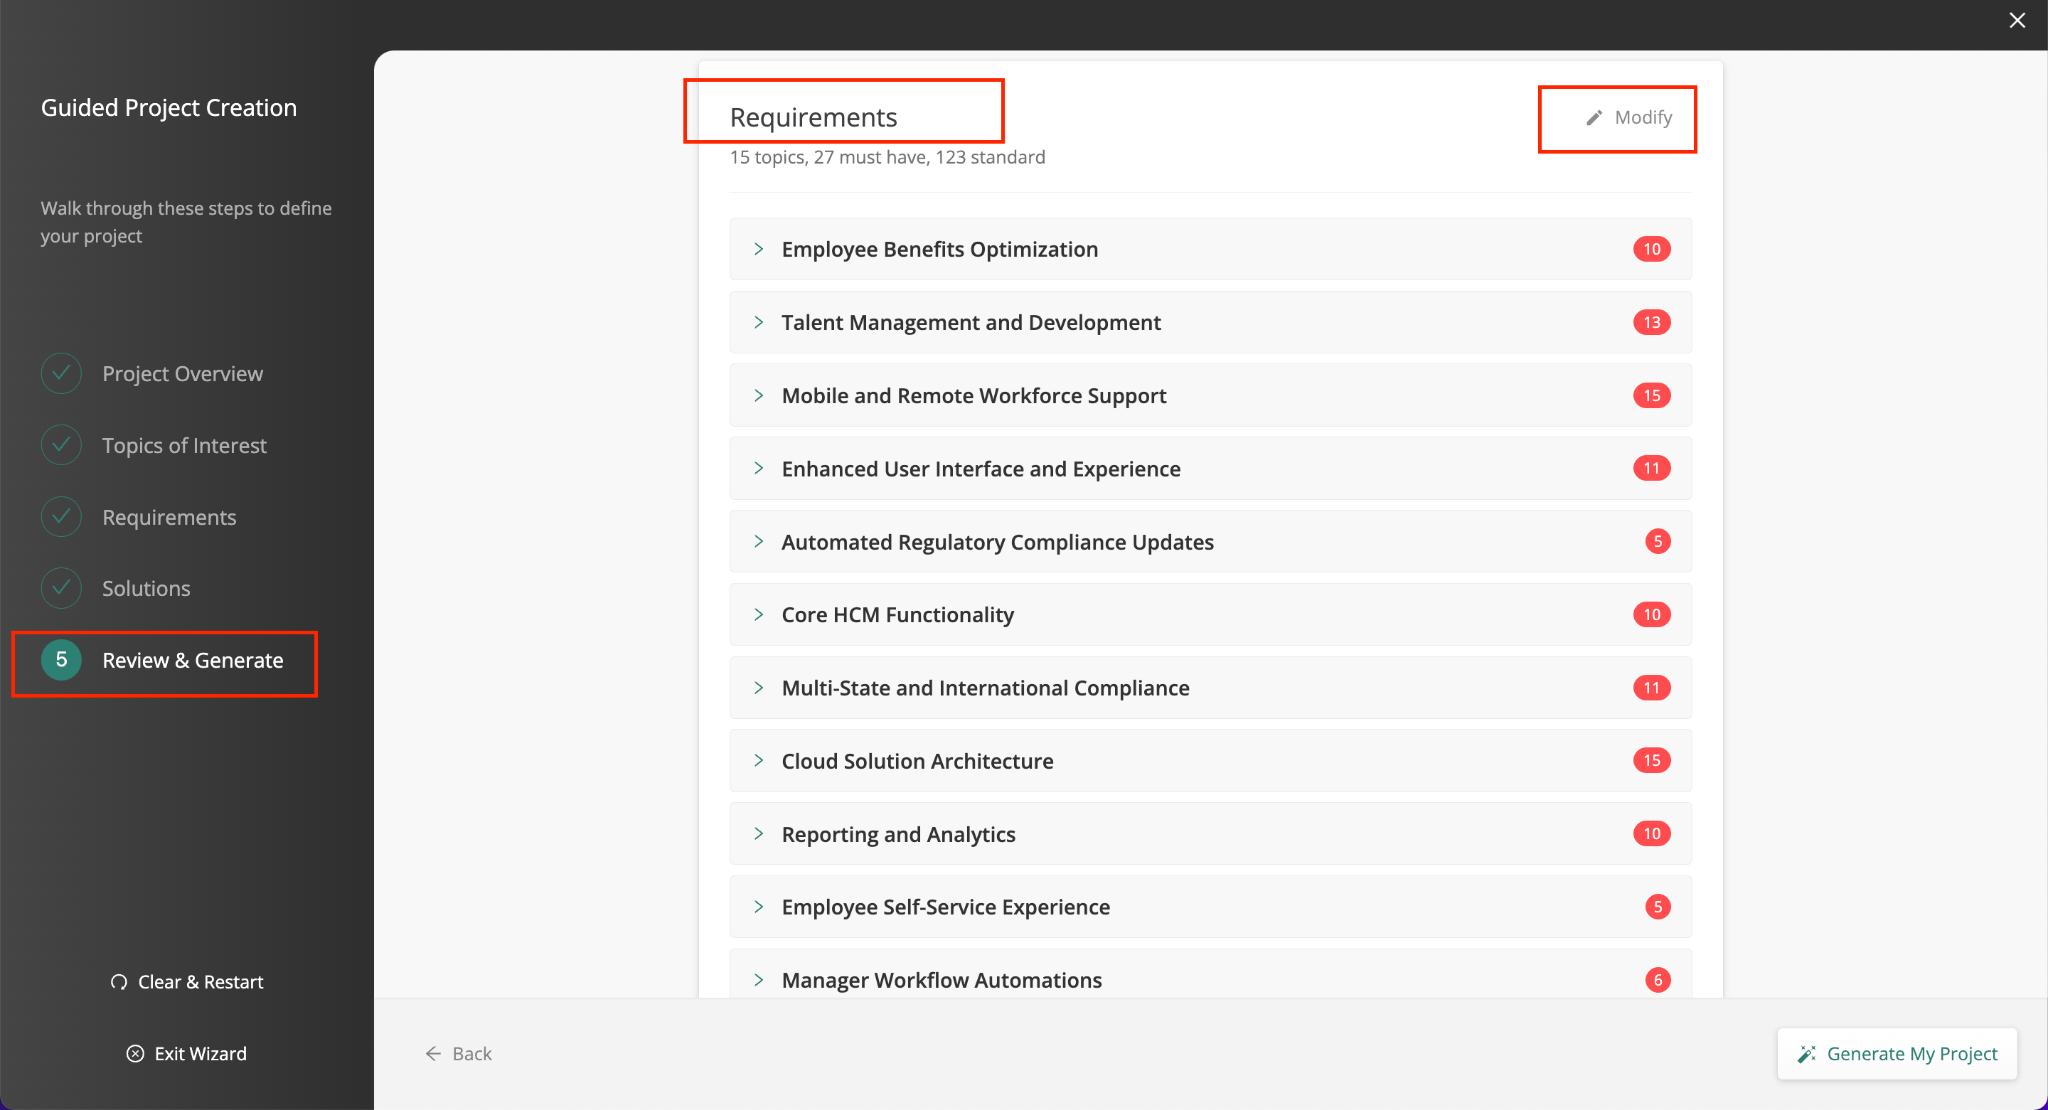
Step 5 — Requirements summary showing all topics and requirement counts per section
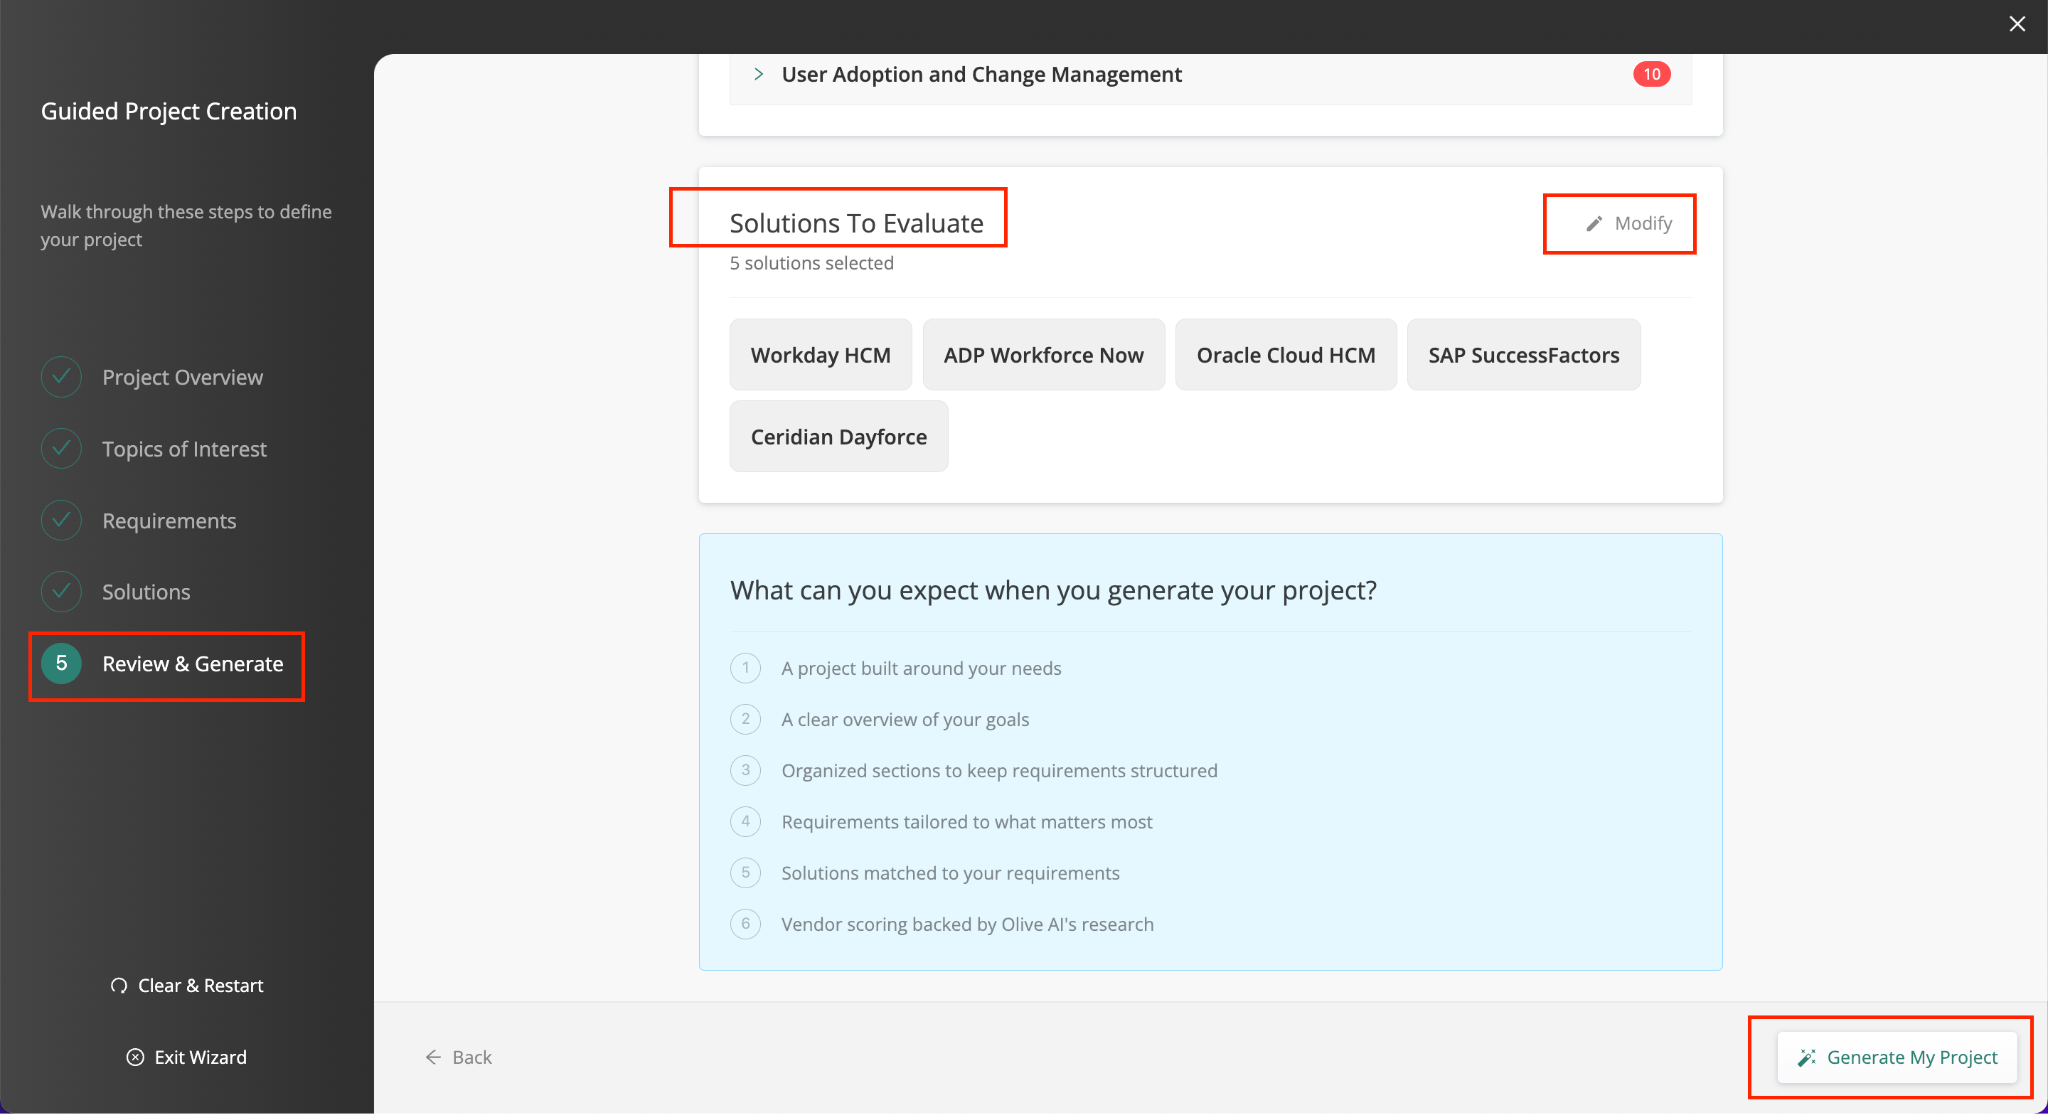
Step 5 — Solutions To Evaluate summary and the 'Generate My Project' button
Generating Your Project
Once you're satisfied with the summary, click 'Generate My Project' at the bottom right. Olive AI will assemble your project based on all your inputs. When complete, you'll be taken directly into your new project.
Your generated project will include:
- A project overview built from your description and goals
- Organised requirement sections structured by topic
- Requirements tailored to your priorities with Must-Have labels applied
- Vendors matched to your requirements with AI-researched scoring as a starting point
|
💡 Tip: Take your time reviewing Step 5 — it's the last chance to make changes before the project is built. Once generated, you can still edit everything, but starting with a clean setup saves time. |
The Generated Project
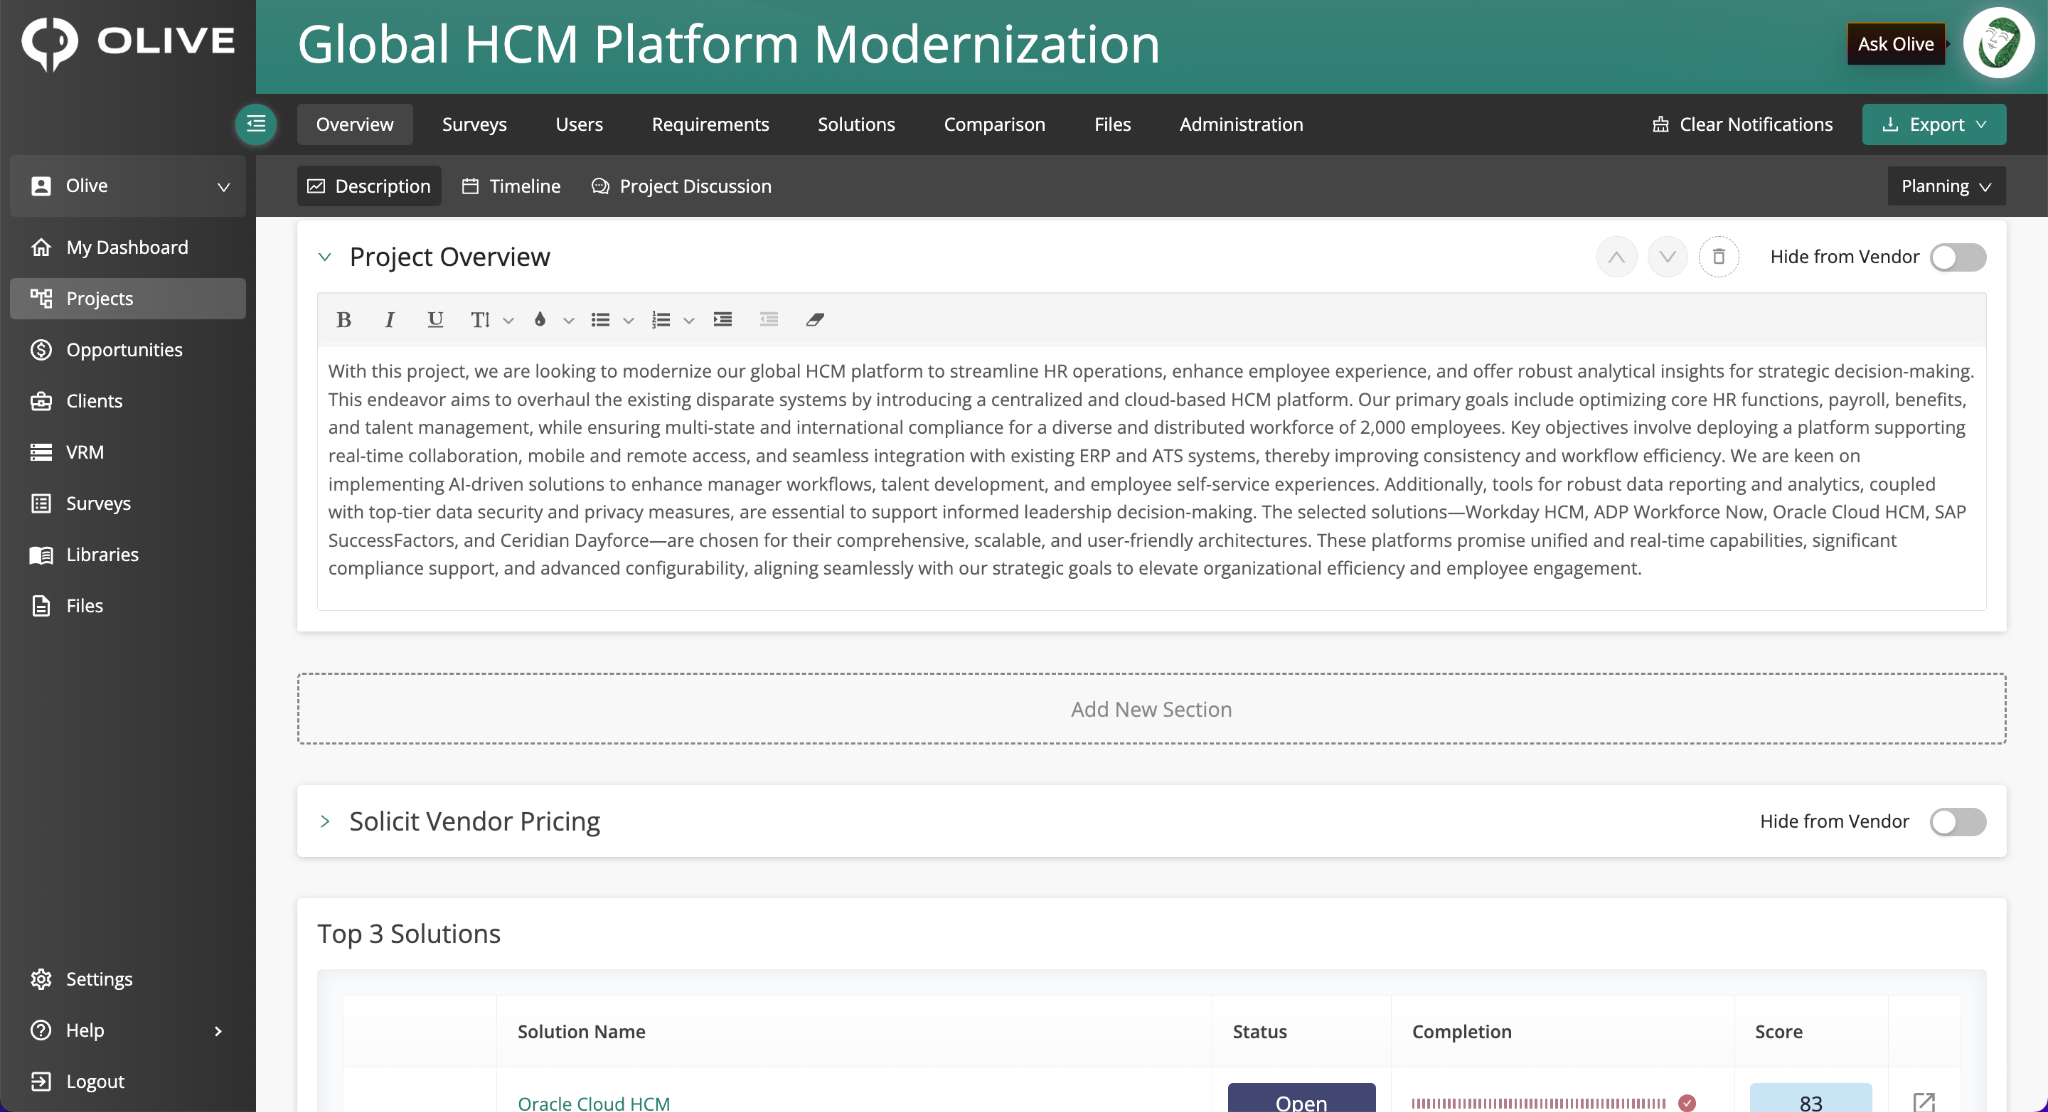
An example generated project — the Overview tab showing the AI-built Project Overview section
Once your project is generated, you'll land on the Overview tab. Your project will already contain a structured project overview, organised requirement sections, and vendor cards for the solutions you selected. Use the table below to navigate the project:
|
Tab |
What you can do there |
|
Overview |
Edit the project overview and description; view live dashboards |
|
Requirements |
Review, edit, add, or remove AI-generated requirements |
|
Solutions |
Manage vendors and invite them to submit responses |
|
Comparison |
Evaluate and score vendor responses side by side |
|
Administration |
Configure scoring scale, star ratings, and weighting settings |
|
⚠️ Important: The generated project is a strong starting point — but it is AI-generated from public information. Review all requirements, adjust Must-Have labels, and customise the project overview before inviting vendors to respond, to ensure your evaluation accurately reflects your organisation's real needs. |
What's Next?
Once your project is generated and reviewed, here's the recommended order for next steps:
- Review and refine your requirements in the Requirements tab — edit, remove, or add anything that doesn't accurately reflect your needs
- Adjust Must-Have labels so they only apply to genuine deal-breakers
- Customise the project overview in the Overview tab before vendors see it
- Configure Administration settings — set your Scoring Scale, Star ratings, and Section and Department Weighting before your team starts scoring
- Invite vendors to submit their responses through the platform
- Use the Comparison tab to evaluate vendor responses and pricing side by side once submissions are in
Need help? Contact your Olive project administrator or reach out to Olive support.