This guide answers common questions about the Surveys tab in Olive — from creating and building surveys, to inviting respondents, collecting requirement ratings and vendor scores, and reviewing results.
Getting Started with Surveys
Q1: How do I find the Surveys tab in my project?
A:
Open your project and click Surveys in the top navigation bar. This opens your project-level surveys — the ones connected to your project's requirements, vendors, and stakeholders.
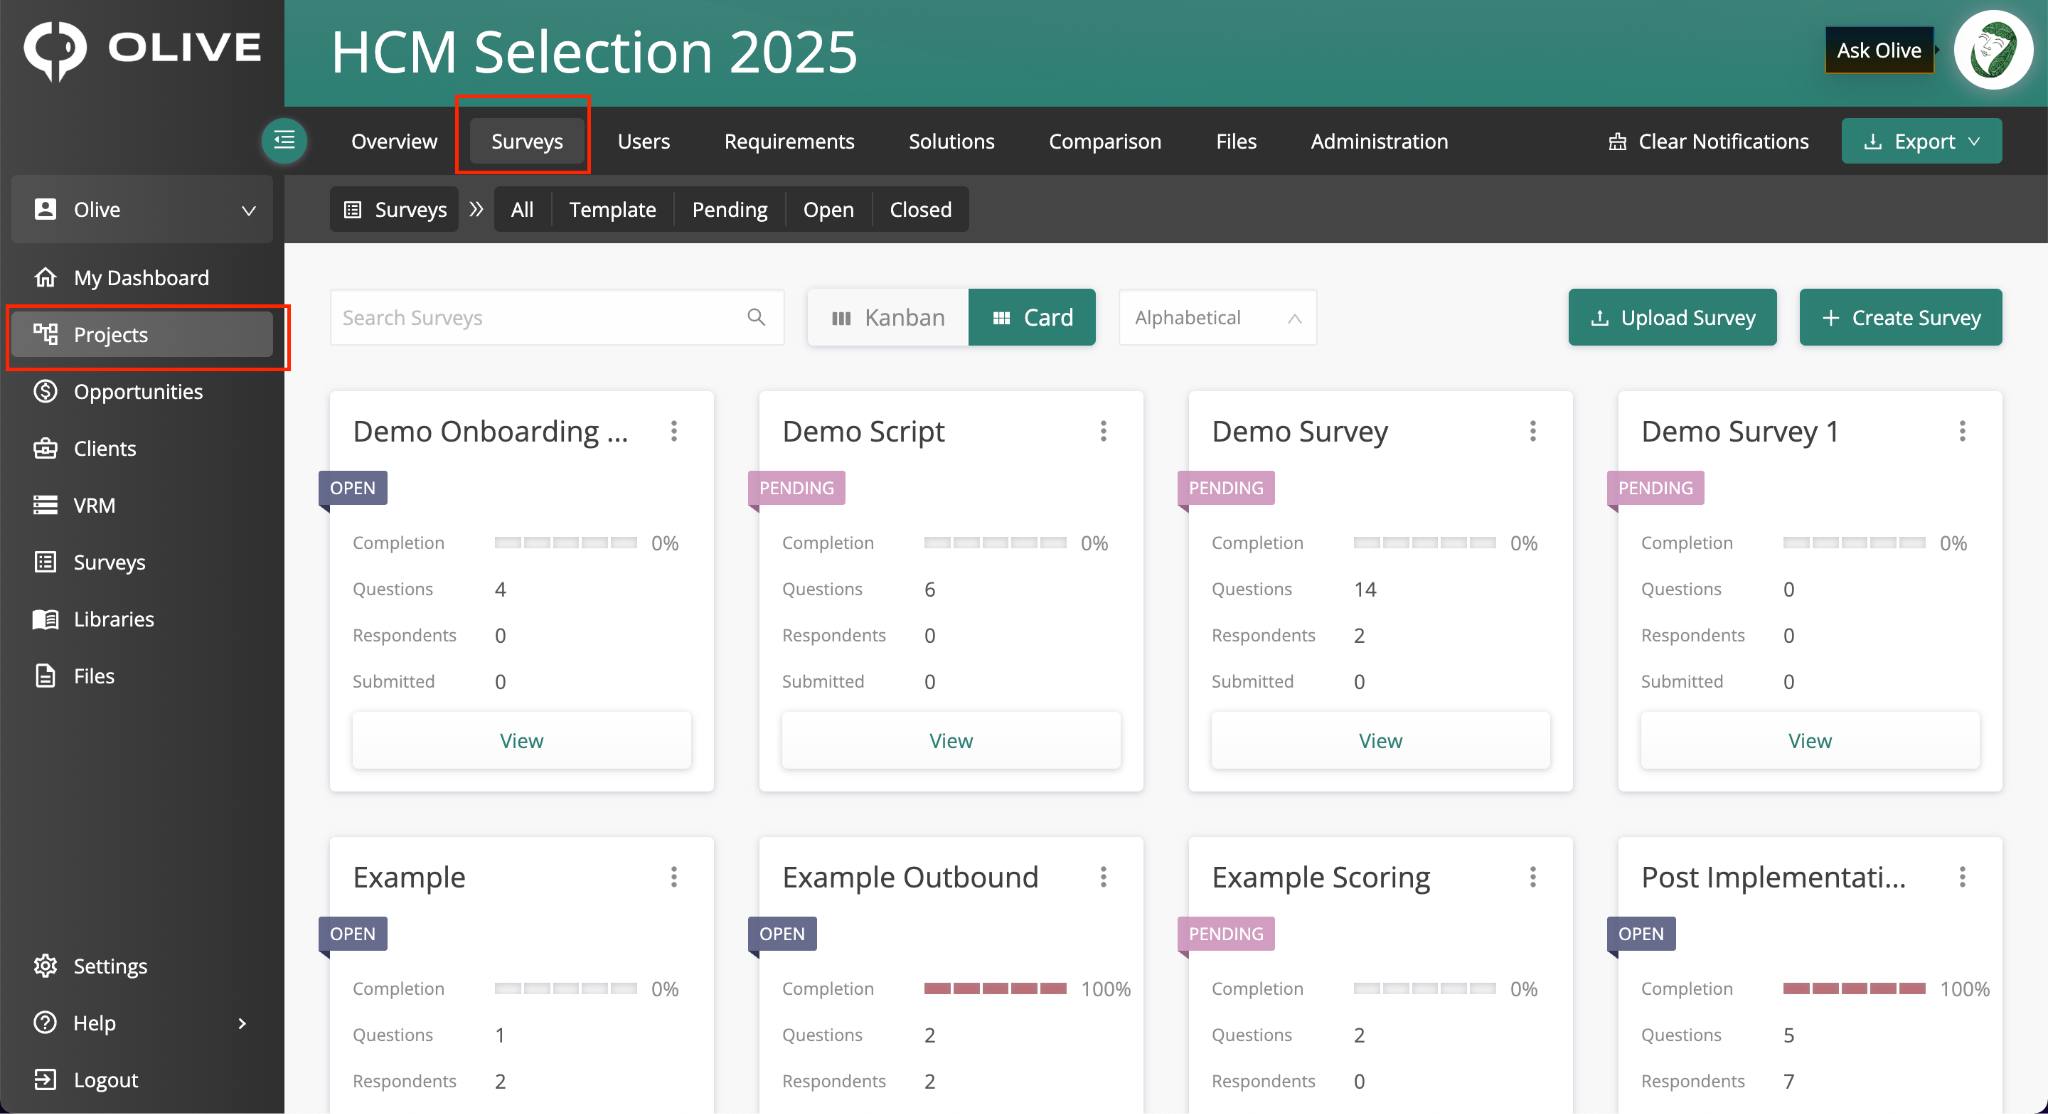
The Surveys tab within a project, showing project-level surveys
Q2: How is a project survey different from an account-level survey?
A:
|
Type |
Where to find it / What it's for |
|
Project survey |
Lives inside a specific project. Linked to that project's requirements, vendors, and stakeholders. Accessed via the Surveys tab in the top navigation. |
|
Account-level survey |
Found in the left-hand navigation. Used for organisation-wide feedback, repeatable templates, or external insight gathering not tied to a single project. |
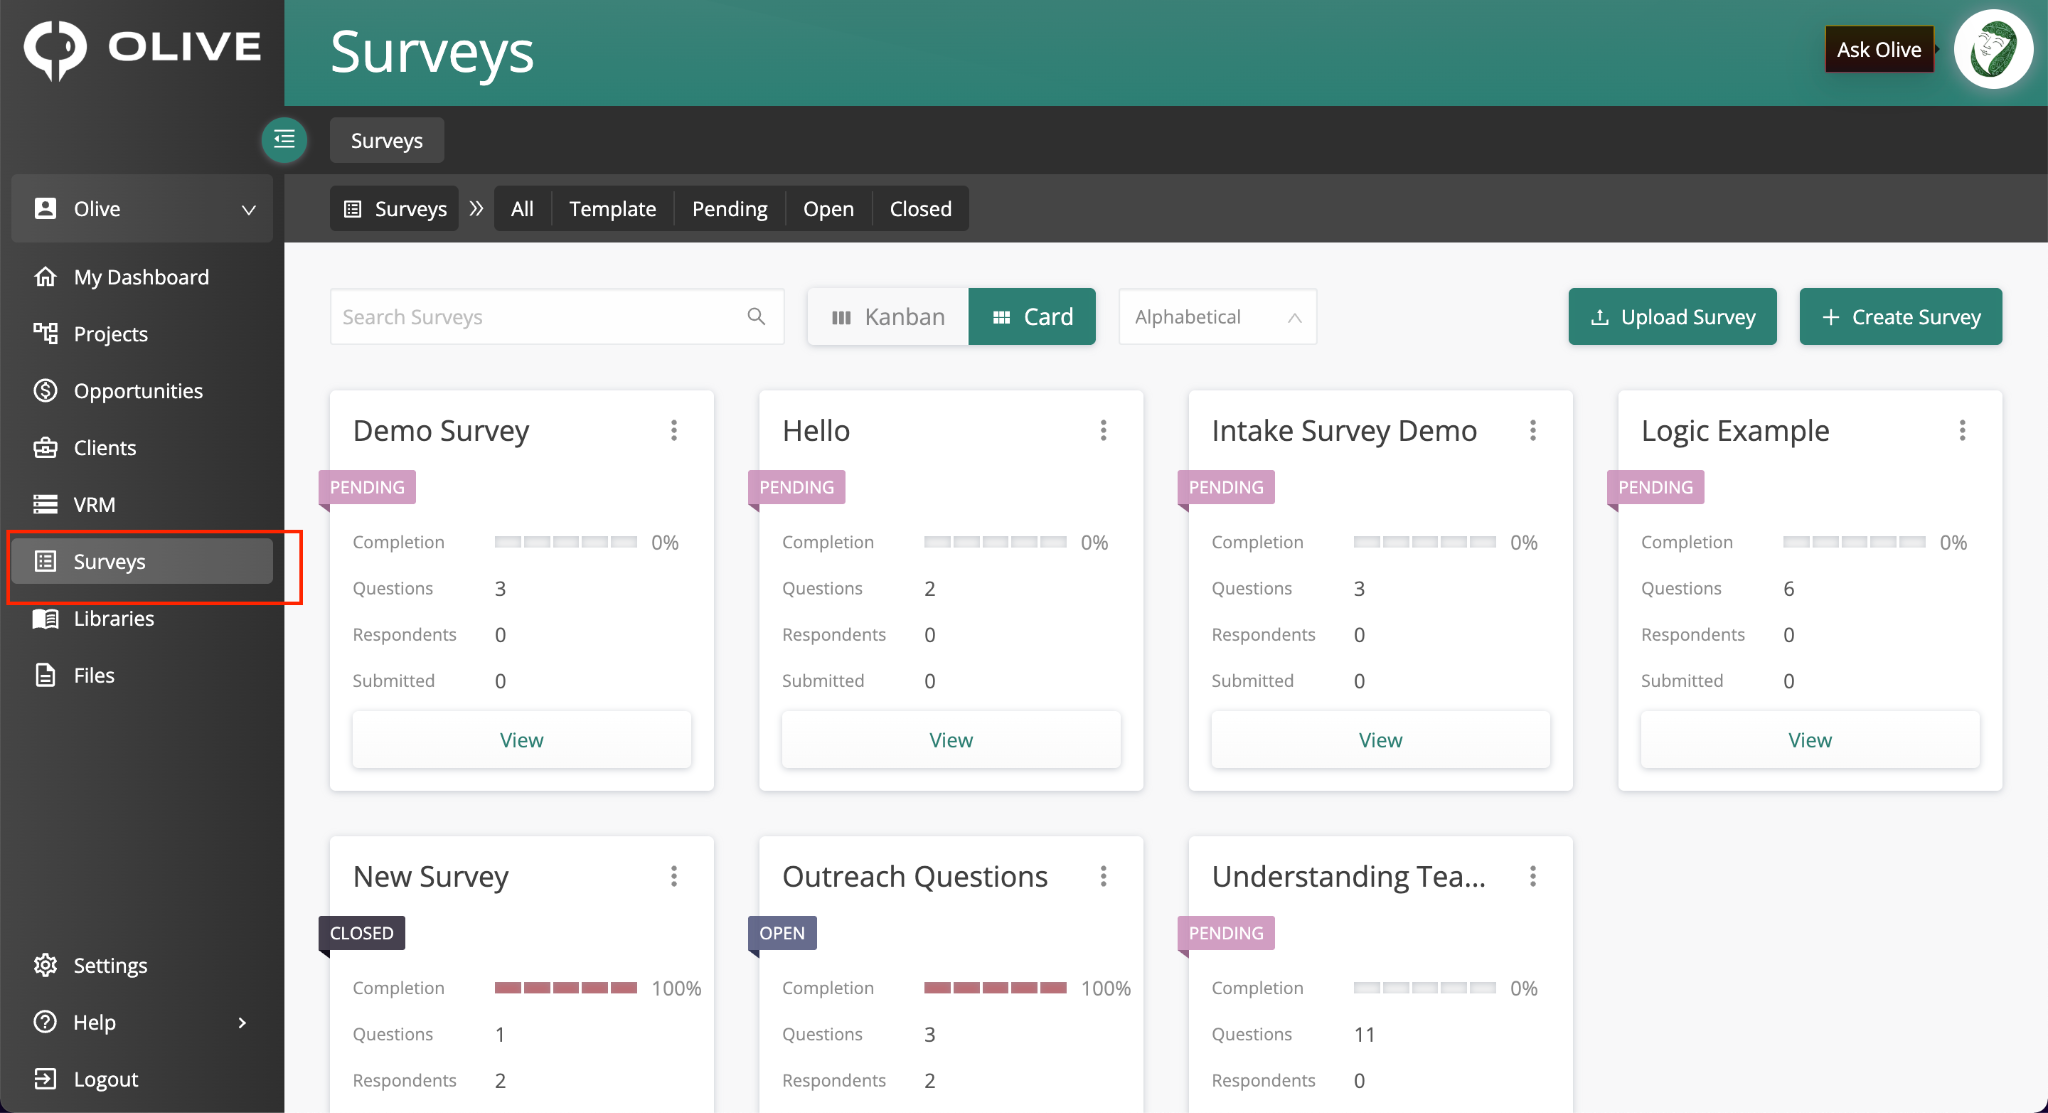
The Account-Level Surveys view in the left-hand navigation
Q3: How do I navigate between my existing surveys?
A:
When you open the Surveys tab, you'll see all existing surveys in the list. Use the view toggle to switch between:
- Kanban View — surveys arranged by stage in column swimlanes
- Card View — surveys displayed in a tile grid layout
You can also sort surveys alphabetically or use the search bar to find a specific one.
Creating Surveys
Q4: How do I create a new survey from scratch?
A:
- Click 'Create Survey'
- Enter a label for your survey
- Click 'Build' to open the survey designer
Your new survey starts blank — use the question sidebar on the left to start adding content.
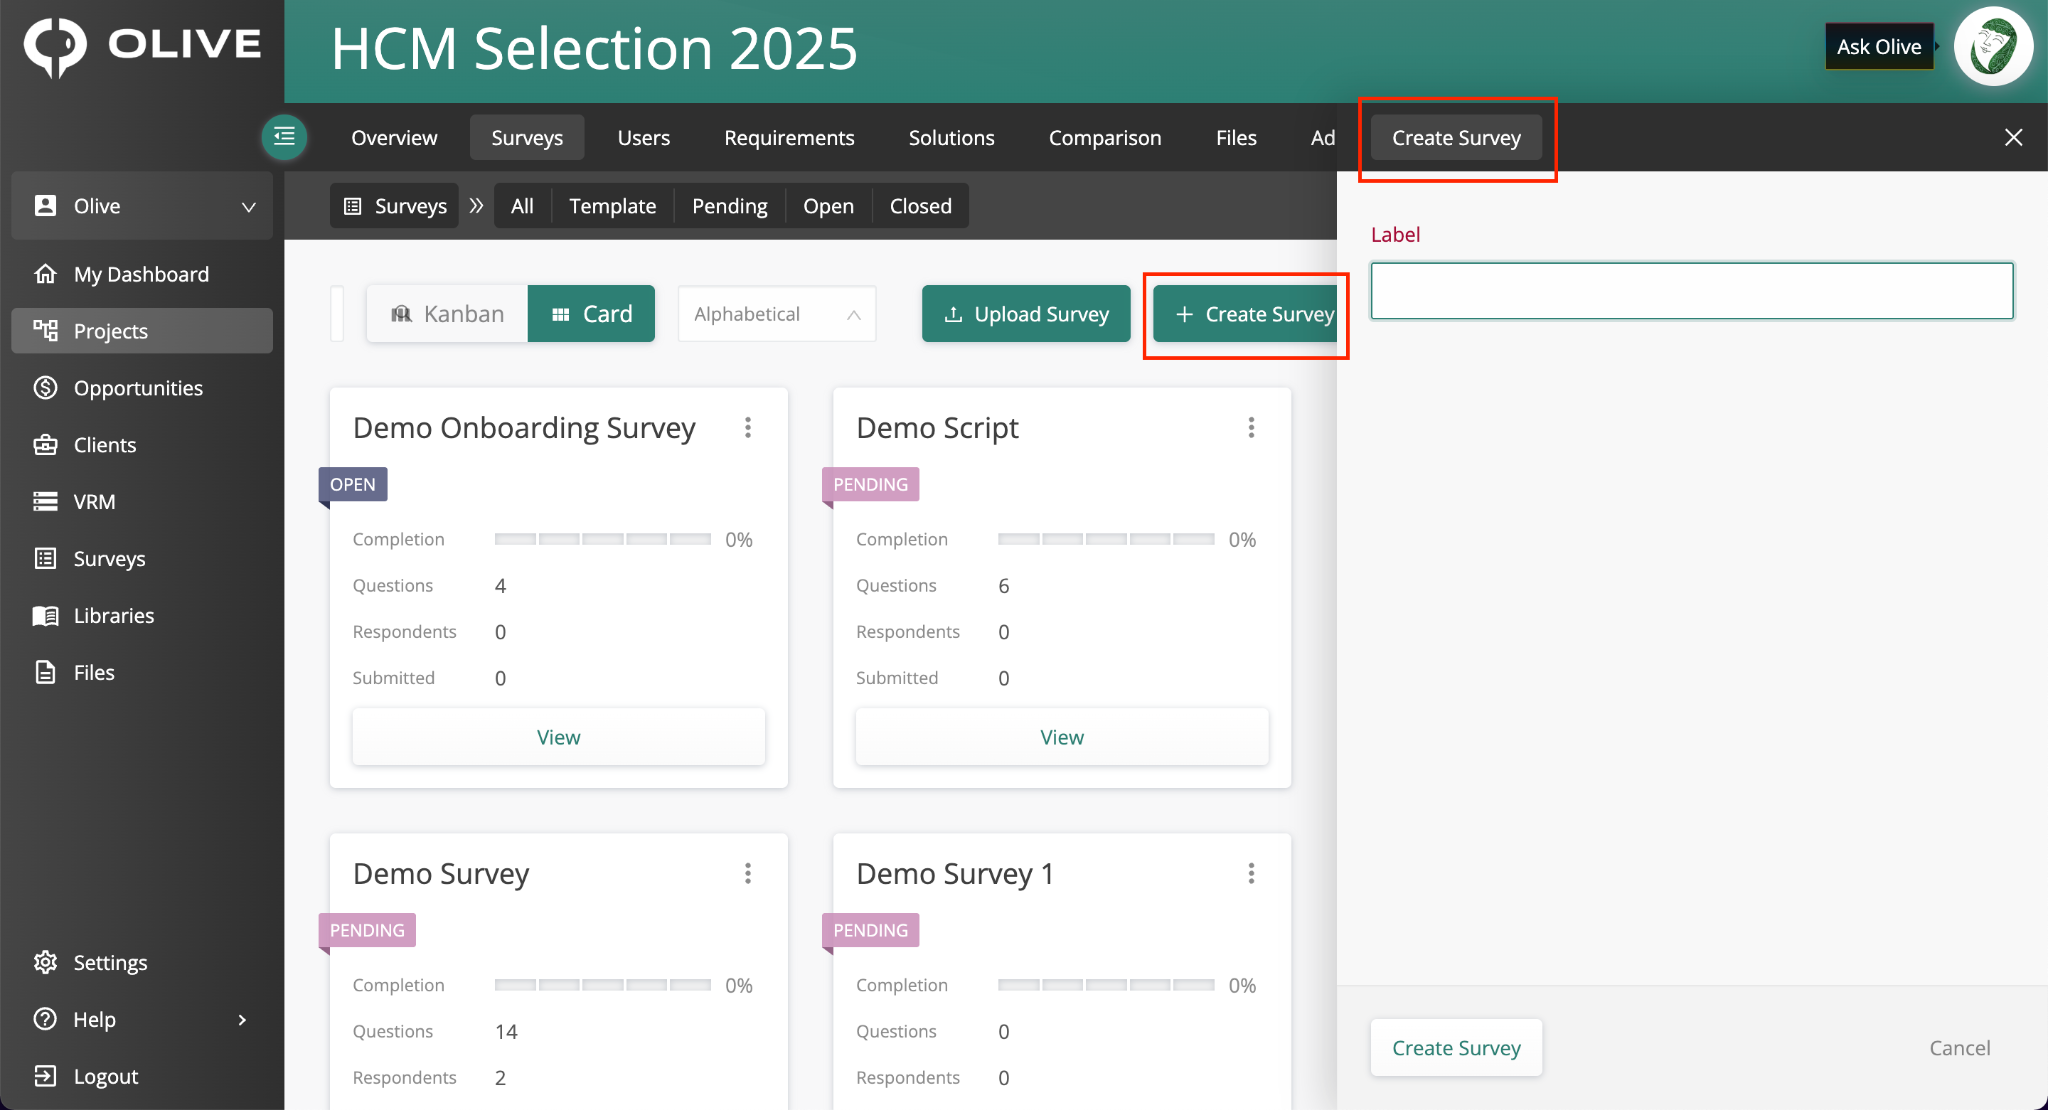
A newly created blank survey, ready to be built in the designer
Q5: How do I create a survey from a spreadsheet I already have?
A:
- Click 'Upload' in the Surveys tab
- Download the CSV or Excel template provided
- Populate the template with your survey questions
- Upload the completed file — Olive will parse the spreadsheet and create the survey automatically
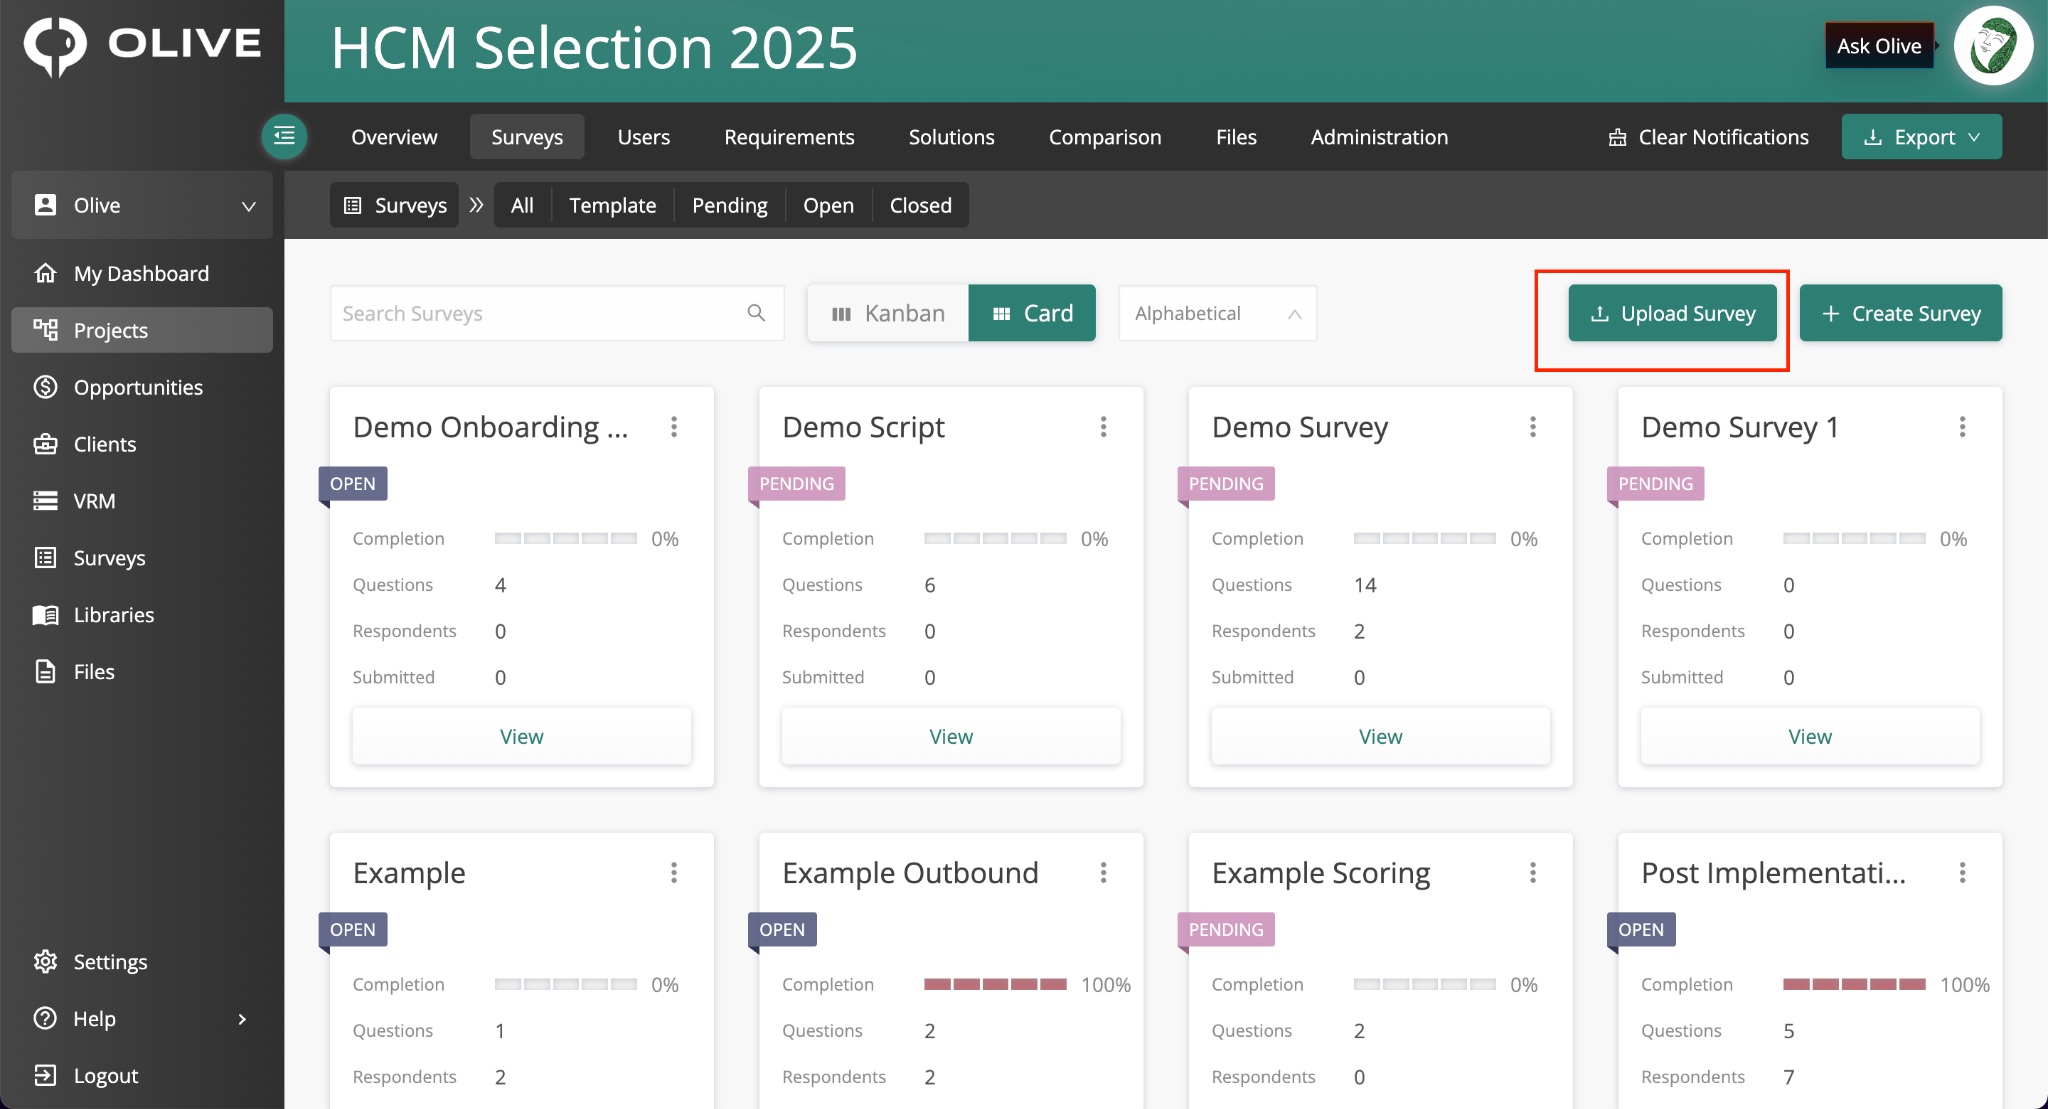
The survey upload flow, showing template download and file upload
|
💡 Tip: Download the Olive template before filling in your spreadsheet — the column structure must match the importer format exactly. |
Q6: How do I use Olive AI to generate a survey for me?
A:
- Click the AI face icon in the top-right corner of the survey view to open the AI chat window
- Type a prompt describing the survey you need — for example, who you're surveying and what topic or context you want covered
- The AI will draft questions — ask for edits, additions, or removals as needed
- Tell the AI to add the survey to your project — it will create the survey and open it in Preview Mode immediately
|
💡 Tip: Reference your project requirements in the AI prompt for best results — the AI can tailor questions directly to your requirement list. |
Building Your Survey
Q7: How do I start building the questions in my survey?
A:
Open the survey and click Build to open the survey designer. Click on the Designer tab if it isn't already active. The left sidebar shows all available question types — click or drag them onto the canvas to add them to your survey.
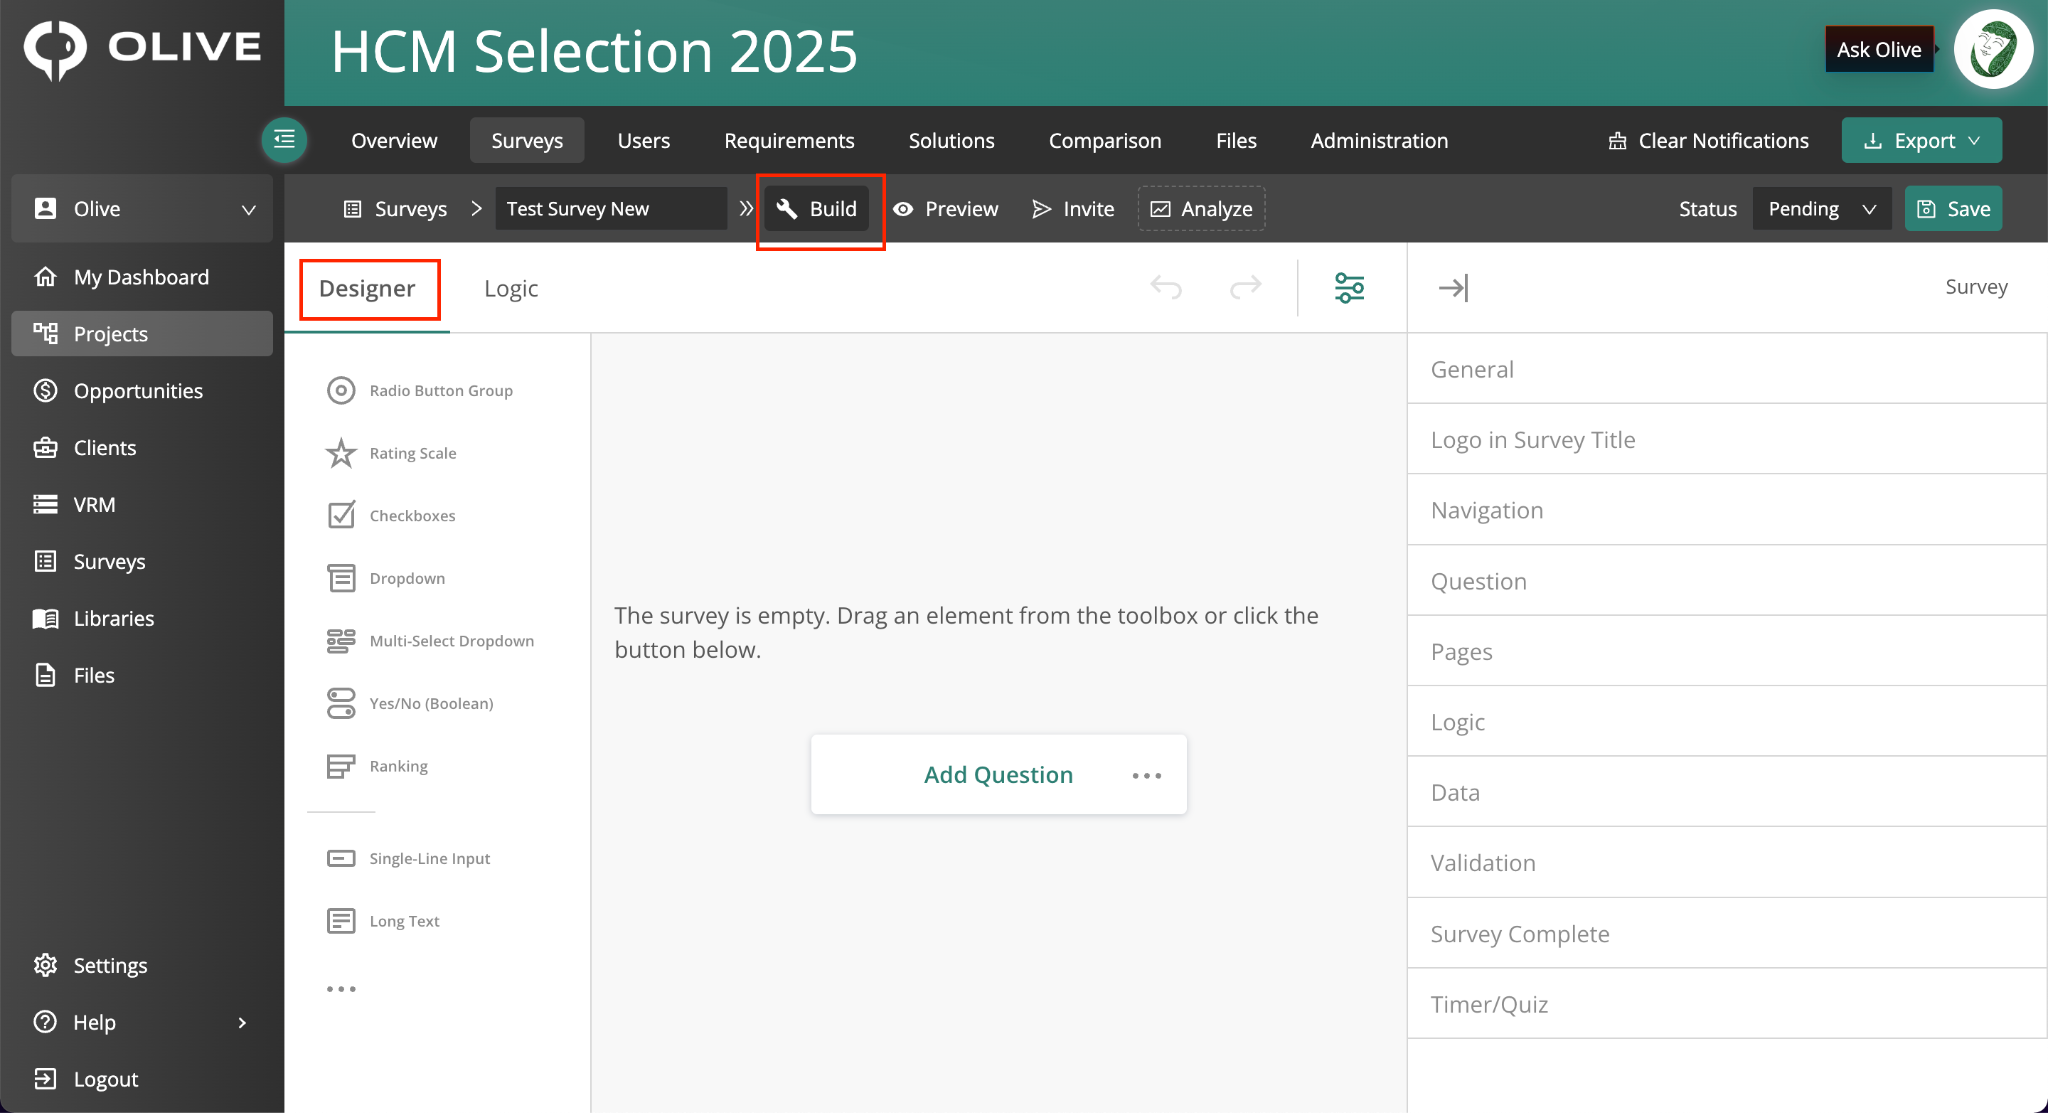
The Designer tab, showing the question type sidebar and survey canvas
Q8: How do I show or hide questions based on what a respondent answers?
A:
Click the Logic tab at the top of the survey designer. From here you can create conditional rules — for example, showing a follow-up question only if the respondent selected a specific answer earlier. You can apply logic to individual questions or to entire question groups (Panels).
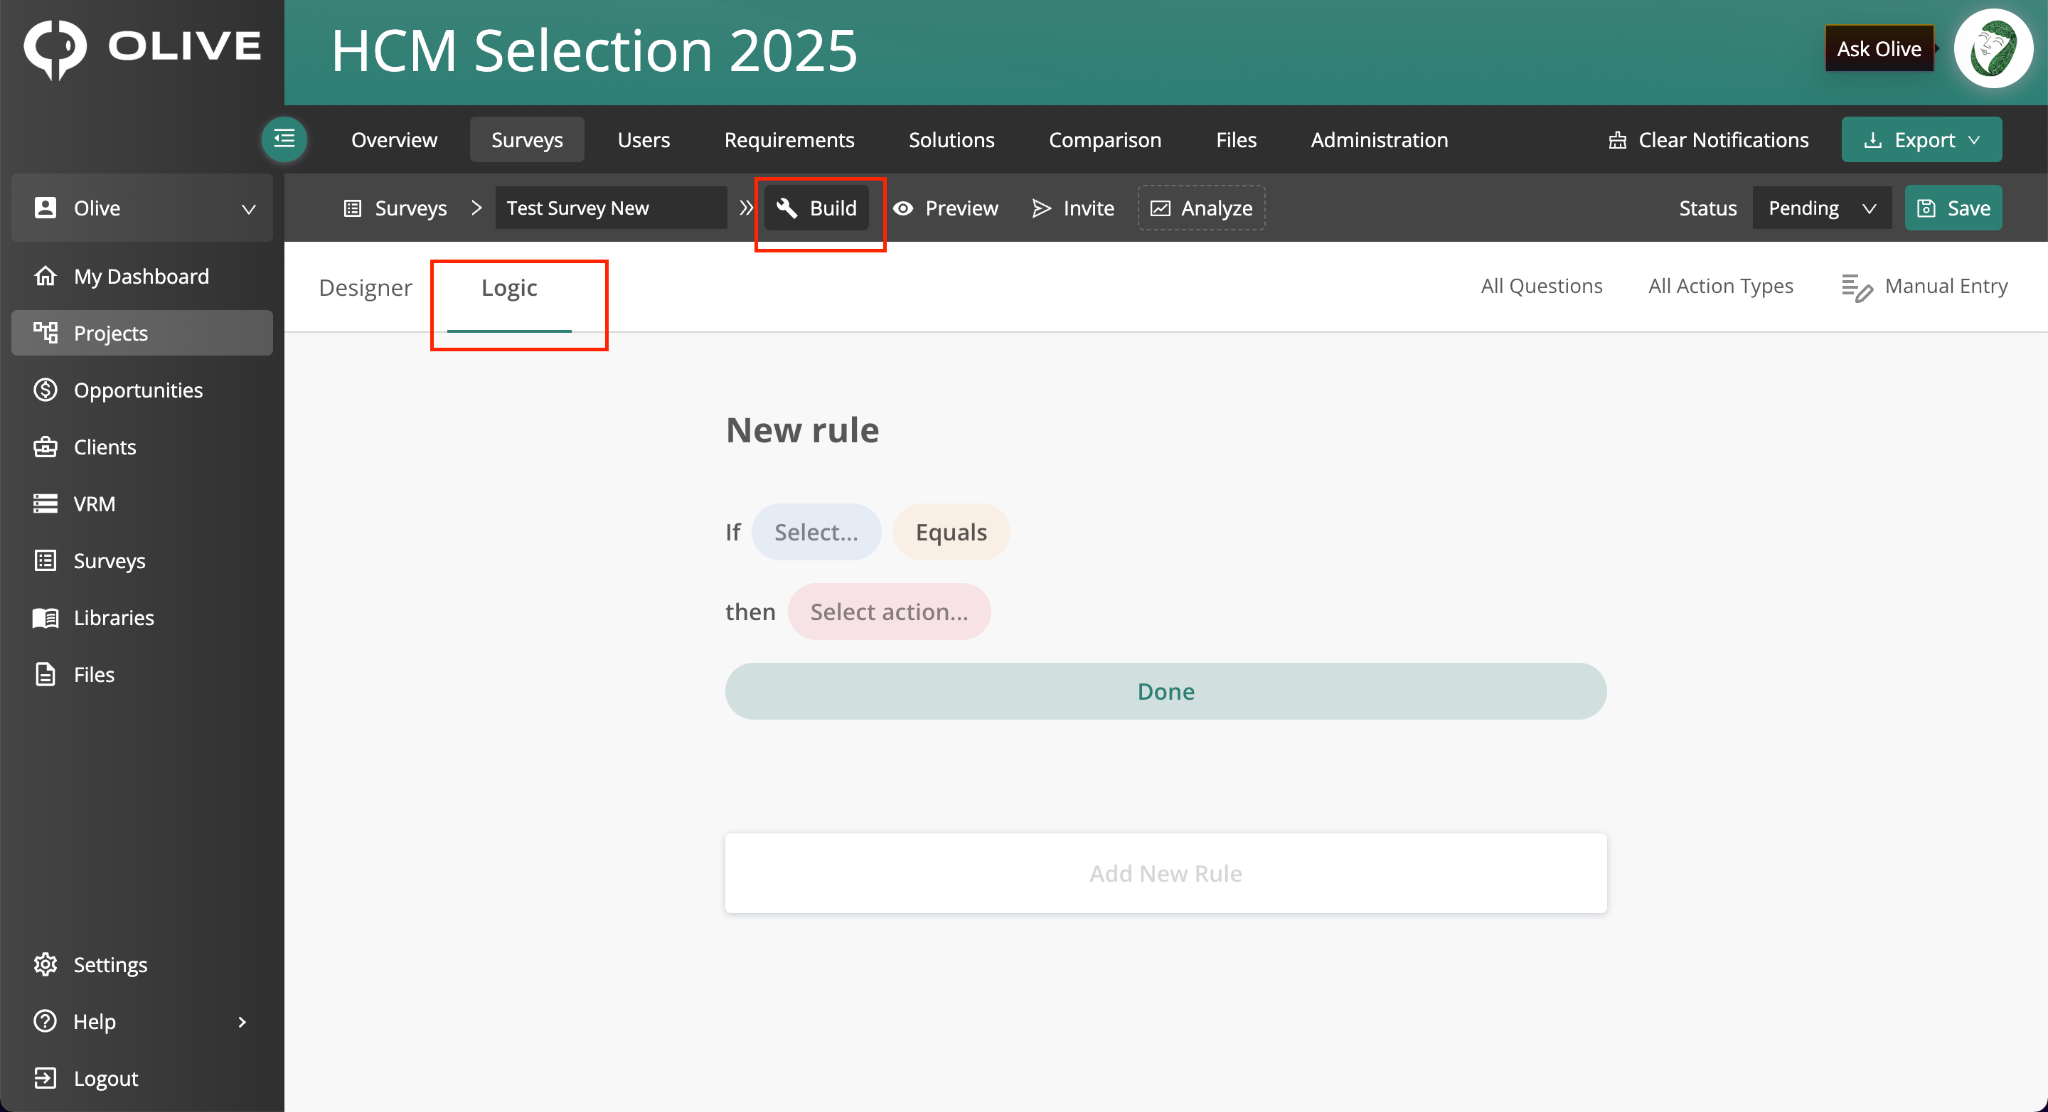
The Logic tab, showing conditional display rules applied to survey questions
|
💡 Tip: Use Panels to group related questions, then apply one logic rule to the Panel to show or hide the whole group at once — far more efficient than setting logic on each question individually. |
Q9: How do I group related questions together visually?
A:
Add a Panel from the question sidebar. Panels act as containers — you place questions inside them to keep related content grouped. Panels can also have their own logic rules, which apply to every question inside them at once.
Q10: How do I add informational text or instructions between questions?
A:
Add a Text Box from the question sidebar. Text Boxes are display-only elements — they are not questions. Use them to add section introductions, instructions, disclaimers, or any contextual information for respondents. They support bold, italic, and bullet formatting.
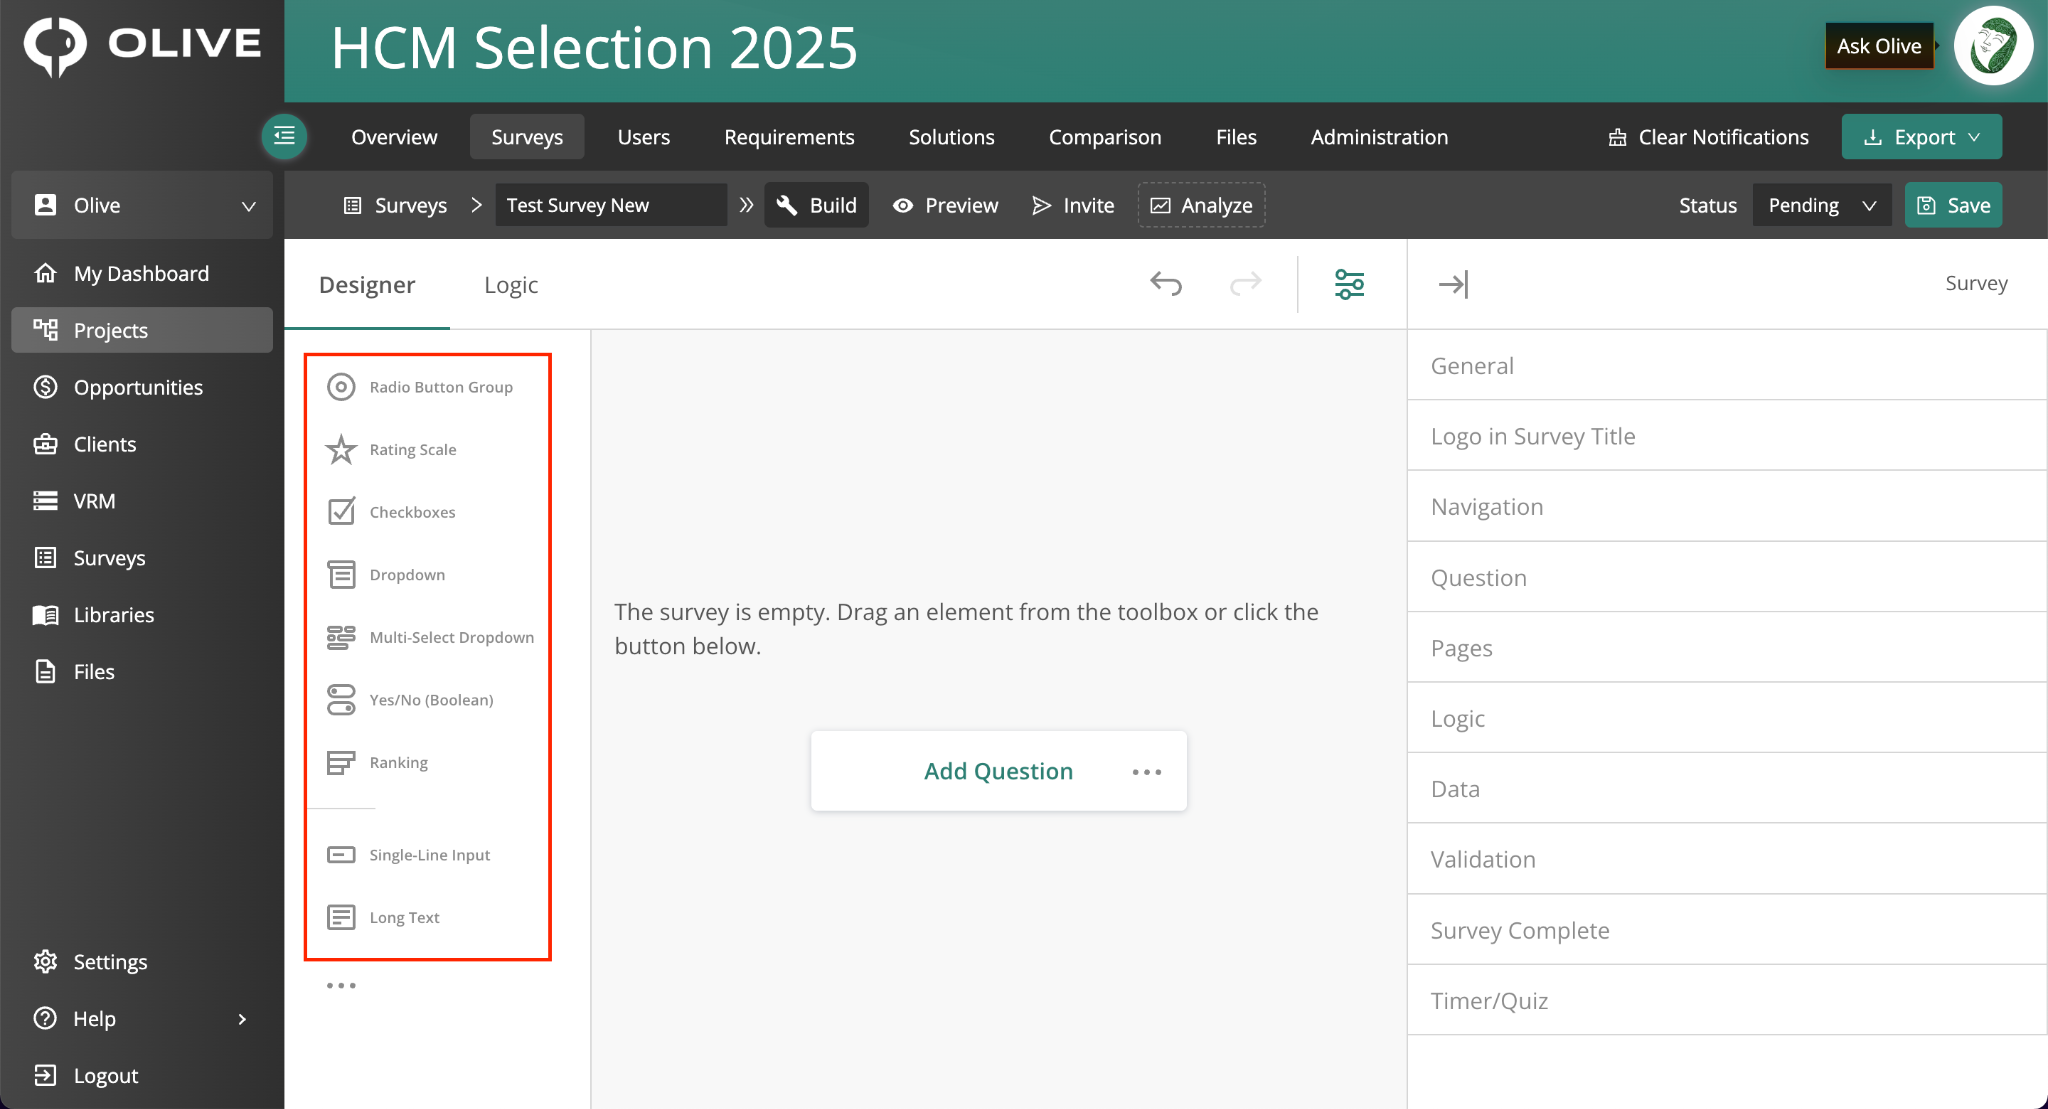
The question types panel in the designer, showing available question options
Q11: How do I make a question required?
A:
Click on the question to select it. In the right-side properties panel, toggle on the Required option. Respondents will not be able to advance without answering that question.
Q12: How do I control the overall layout and appearance of my survey?
A:
Click anywhere outside a question in the designer to open the Survey-Level settings panel on the right. From here you can configure:
- Page structure — single page or multi-page
- Progress bar — show or hide
- Question numbering — display format
- Survey logo — add your brand logo
- Navigation button placement — position of Back/Next buttons
- Completion message — what respondents see after submitting
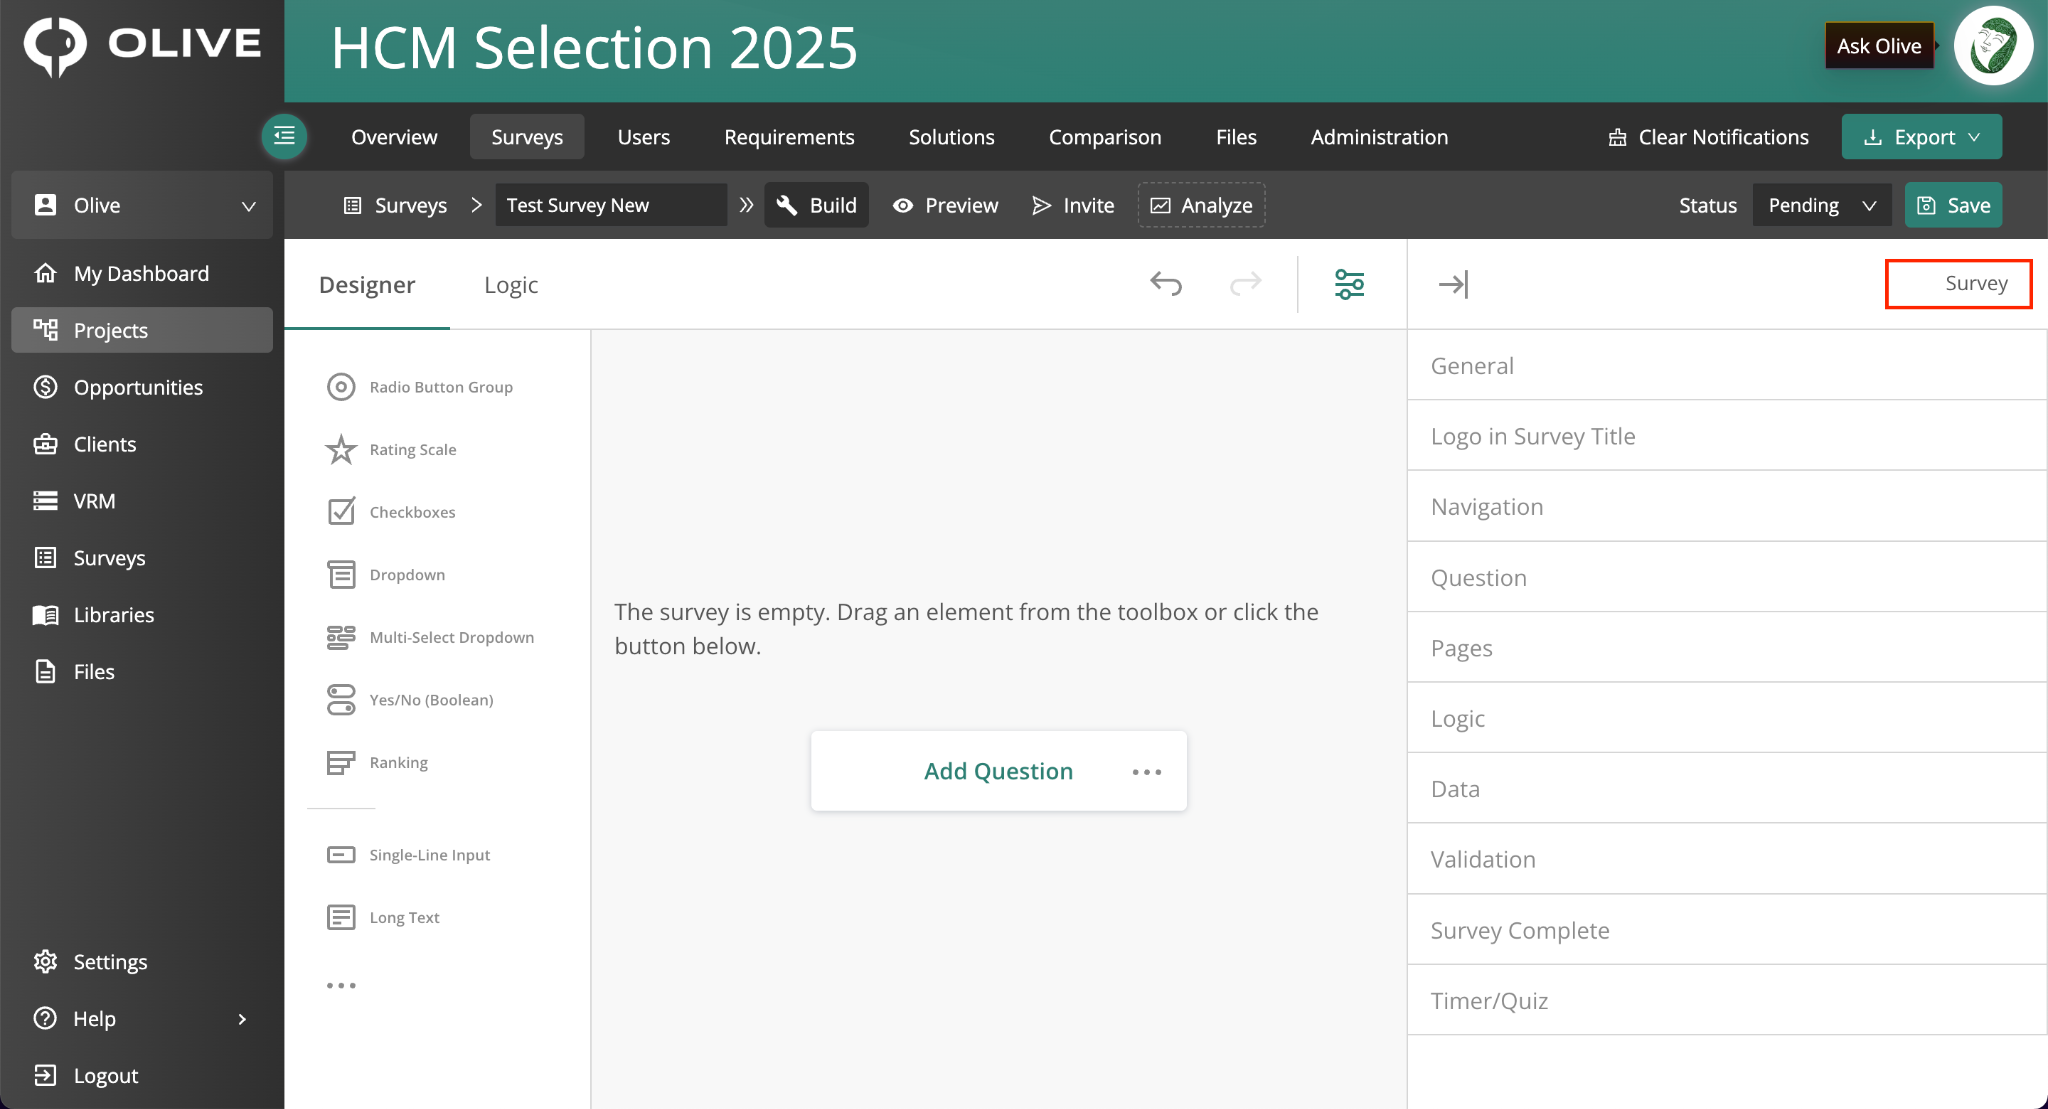
The Survey-Level Configuration panel, showing global settings
Choosing the Right Question Type
Use the table below to quickly find the right question type for your needs:
|
Question type |
Best for |
|
Radio Button (Single Select) |
One answer from a visible list |
|
Dropdown (Single Select) |
One answer from a compact dropdown |
|
Checkboxes (Multi-Select) |
Multiple answers from a visible list of tick boxes |
|
Multi-Select Dropdown |
Multiple answers from a compact dropdown |
|
Rating Scale |
Rating on a scale of numbers, stars, or smiley faces |
|
Ranking |
Respondents drag items into order of priority |
|
Single-Line Input |
Brief text answers — names, phone numbers, short responses |
|
Long Text |
Open-ended responses requiring more detail |
|
Text Box |
Informational text or instructions (not a question) |
|
Panel |
Container to group related questions and apply shared logic |
|
Requirements Rating |
Stakeholders rate project requirements without needing an Olive login |
|
Vendor Scoring |
Stakeholders score vendors against requirements, tags, or sections |
|
Respondent Details |
Collects name and email so responses are attributed, not anonymous |
Q13: How do I let respondents choose only one answer from a list?
A:
Use a Radio Button (Single Select) question for a visible list, or a Dropdown (Single Select) for a compact dropdown version. Both allow only one selection.
Q14: How do I let respondents select multiple answers?
A:
Use a Checkboxes (Multi-Select) question for a visible list of tick boxes, or a Multi-Select Dropdown if you prefer a compact dropdown that allows multiple selections.
Q15: How do I ask respondents to rate something on a scale?
A:
Use a Rating Scale question. You can customise whether the scale displays as numbers, stars, or smiley faces depending on the tone of your survey.
Q16: How do I ask respondents to rank items in order of priority?
A:
Use a Ranking question. Respondents drag items into their preferred order of importance.
Q17: How do I collect a short written response?
A:
Use a Single-Line Input for brief answers (such as a name or phone number), or a Long Text question for open-ended responses where you want more detail.
Collecting Requirement Ratings
Q18: How do I let stakeholders rate our project requirements without giving them an Olive login?
A:
Add a Requirements Rating question to your survey from the question sidebar. Once you send a survey invitation, respondents receive a unique link they can open without an Olive account. Their ratings automatically feed back into your project requirements and stakeholder comparison views.
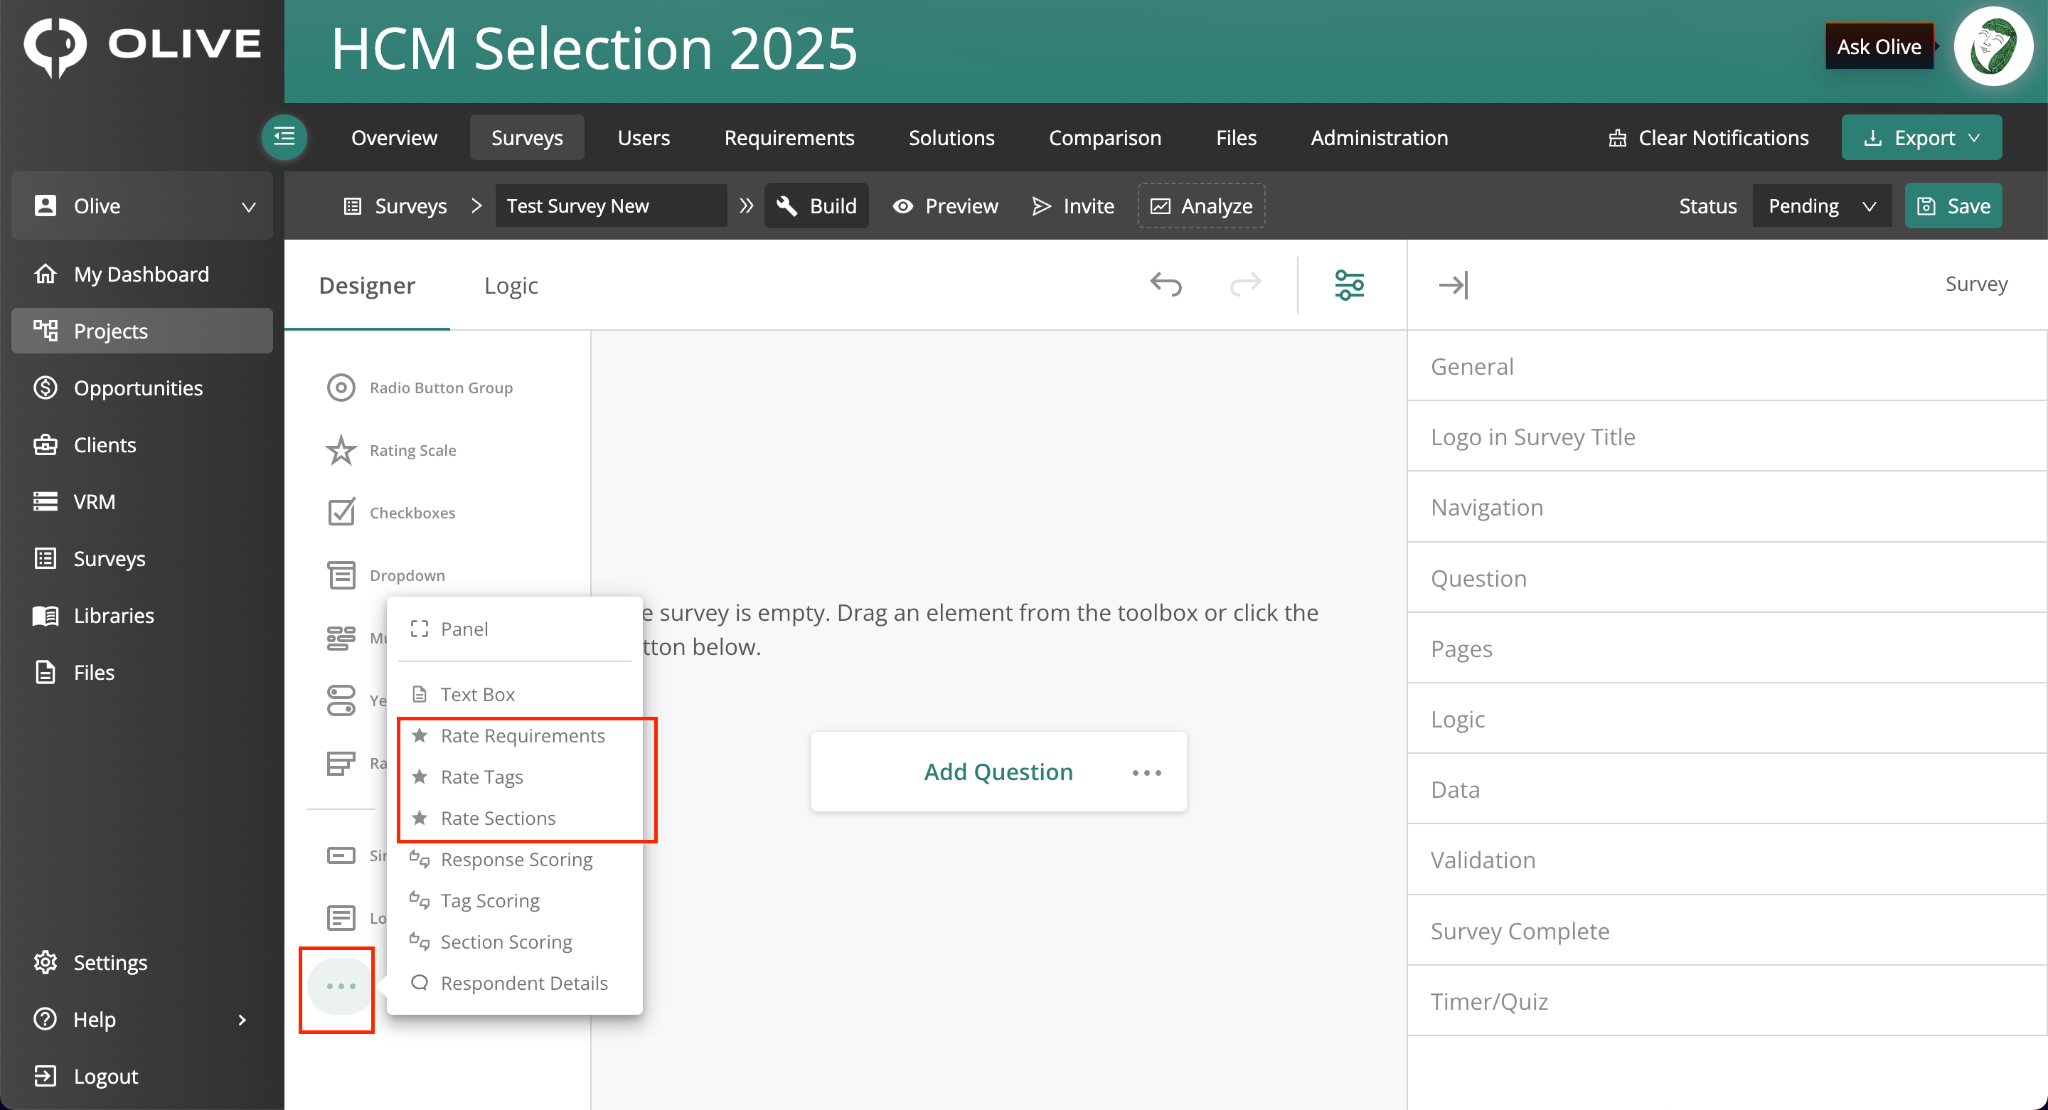
The Requirements Rating question, showing requirement selection for the survey
Q19: How do I choose between having respondents rate individual requirements vs. rating by category?
A:
There are three options depending on how detailed you want the feedback to be:
|
Rating method |
How it works / When to use it |
|
Rate Requirements |
Respondents rate each individual requirement. Most granular — best when you need precise data on specific requirements. |
|
Rate Tags |
Respondents rate a tag (e.g. Security, Marketing) and all requirements under that tag inherit the same score. Good for high-level feedback. |
|
Rate Sections |
Respondents rate an entire requirement section and all items in it get the same score. Fastest completion, least granular. |
|
💡 Tip: For large requirement sets, Rate Tags or Rate Sections significantly reduce survey length and improve completion rates. |
Scoring Vendors Through Surveys
Q20: How do I collect vendor scores from stakeholders through a survey?
A:
Add a Vendor Scoring question to your survey from the question sidebar. Select the vendor you want to score and choose whether you want respondents to rate that vendor against individual requirements, by tag, or by section. Scores submitted through the survey automatically populate into your vendor comparison views in the project.
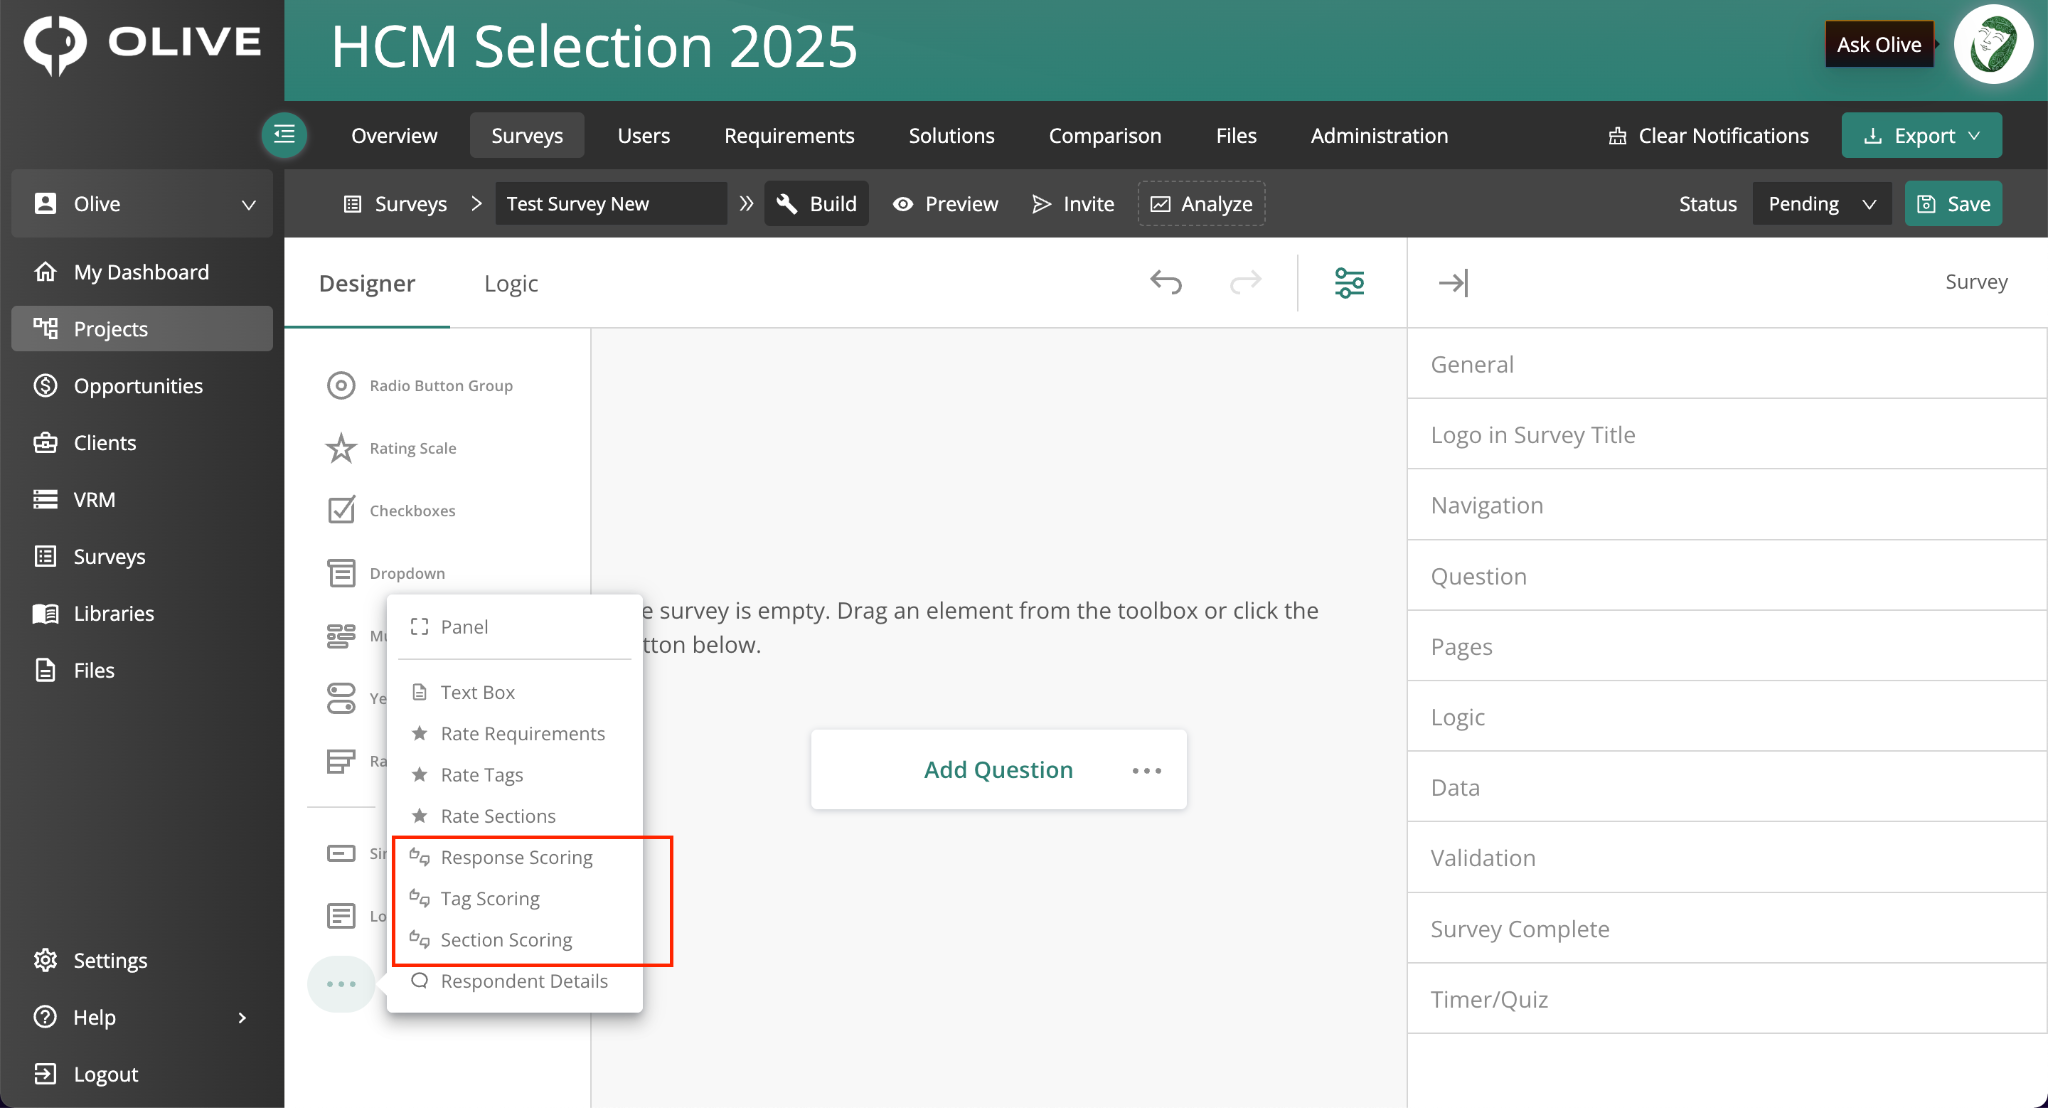
The Vendor Scoring question configuration, showing vendor and section selection
Q21: How do I keep a vendor scoring survey manageable during a product demo?
A:
Use Section-Based Vendor Scoring instead of requirement-by-requirement scoring. This asks respondents to rate the vendor at the section level (e.g., Payroll, Benefits, Onboarding), which is much faster to complete during a live demo while still giving you structured, comparable data.
|
💡 Tip: Set up your demo survey in advance and preview it before the call to confirm the logic and flow work correctly. A smooth demo survey leaves a better impression and gets higher completion rates. |
Tracking Who Responded
Q22: How do I make sure I know who submitted each survey response?
A:
Add a Respondent Details question to your survey from the question sidebar. This adds fields for first name, last name, and email. Responses will then be attributed to the named respondent in the Analyze tab rather than appearing as Anonymous Respondent.
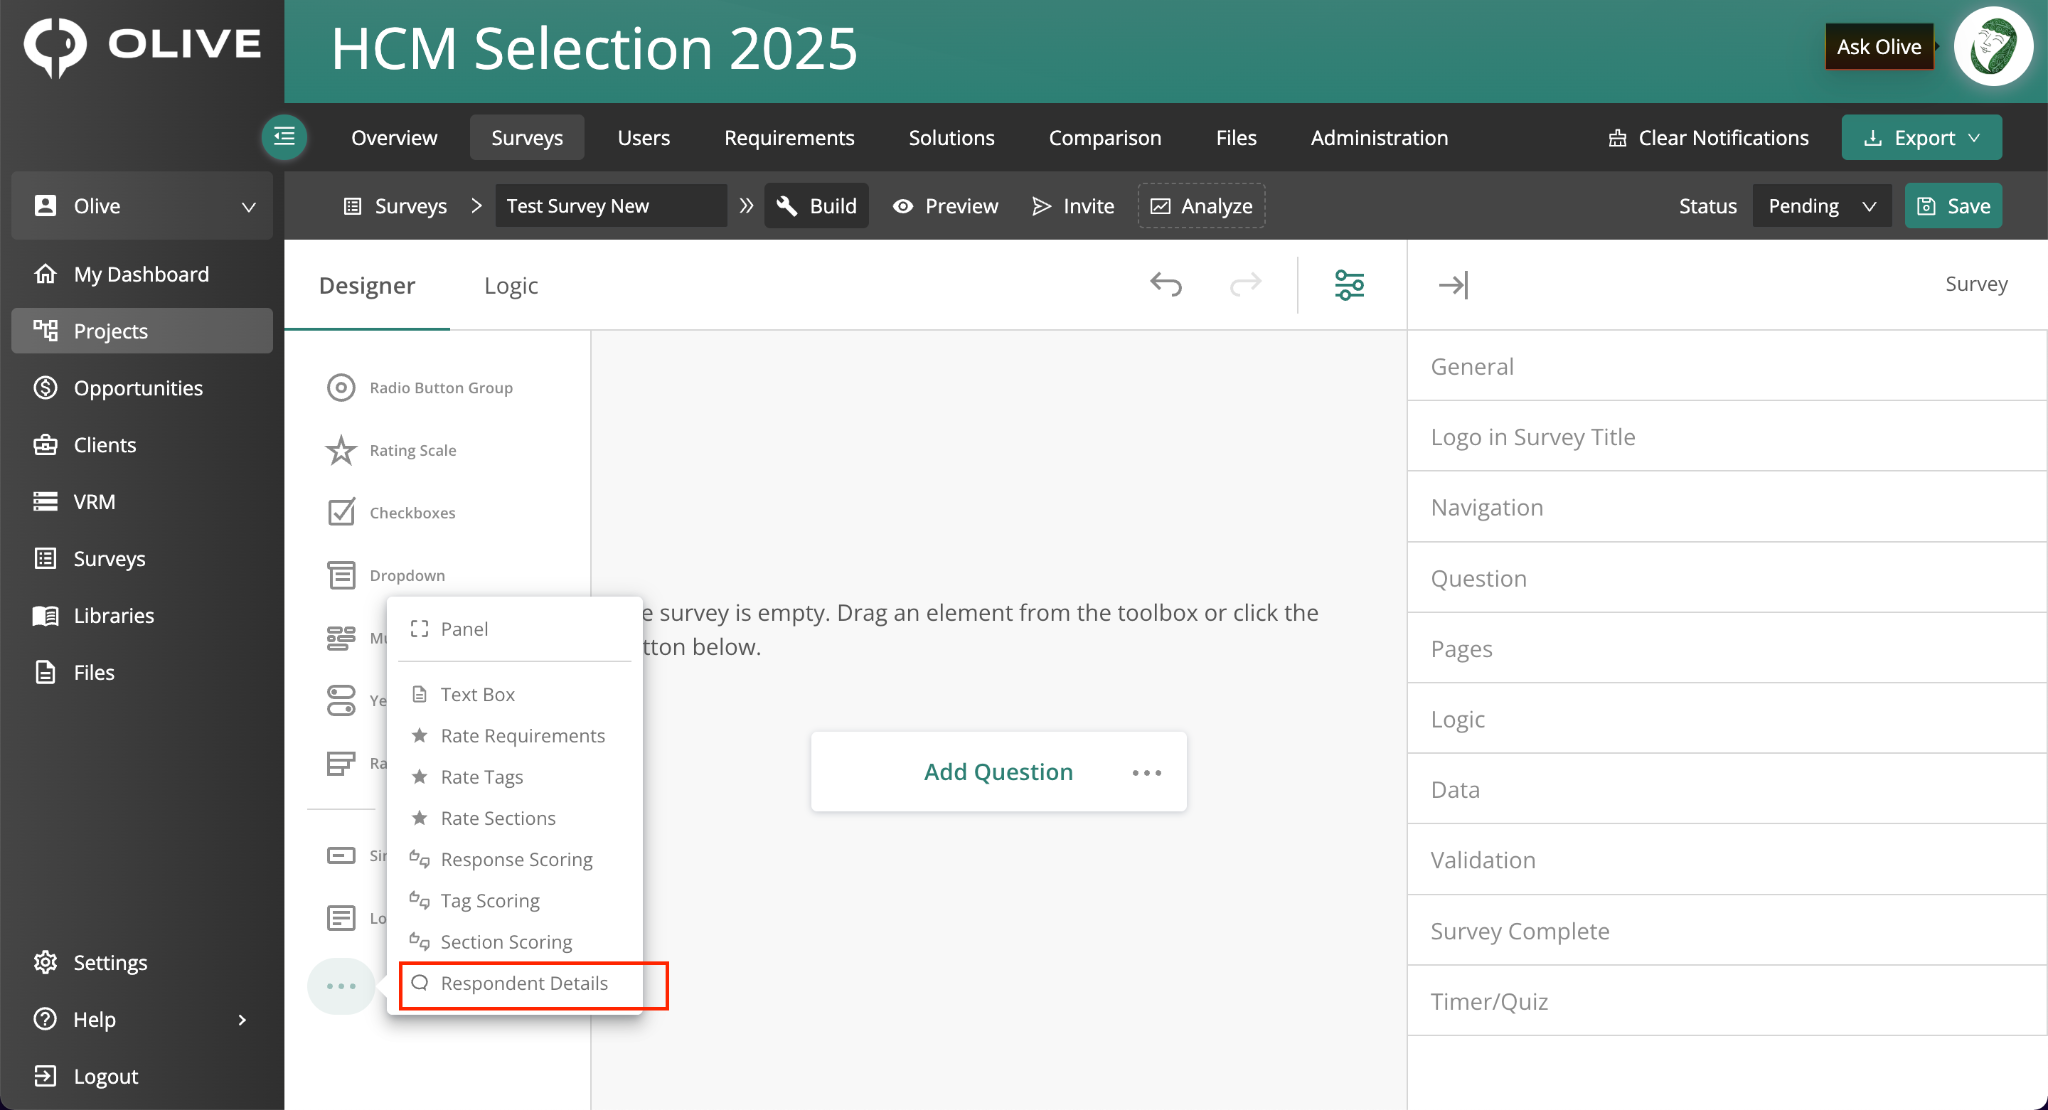
The Respondent Details question, showing name and email fields
|
💡 Tip: Place the Respondent Details question at the start of the survey rather than the end — respondents who drop off mid-survey will still have their identity captured for partial responses. |
Previewing and Testing Your Survey
Q23: How do I see what my survey looks like before sending it to respondents?
A:
Click Preview at the top of the survey designer. This opens the full respondent-facing experience, including all logic and navigation behaviour — exactly as respondents will see it.
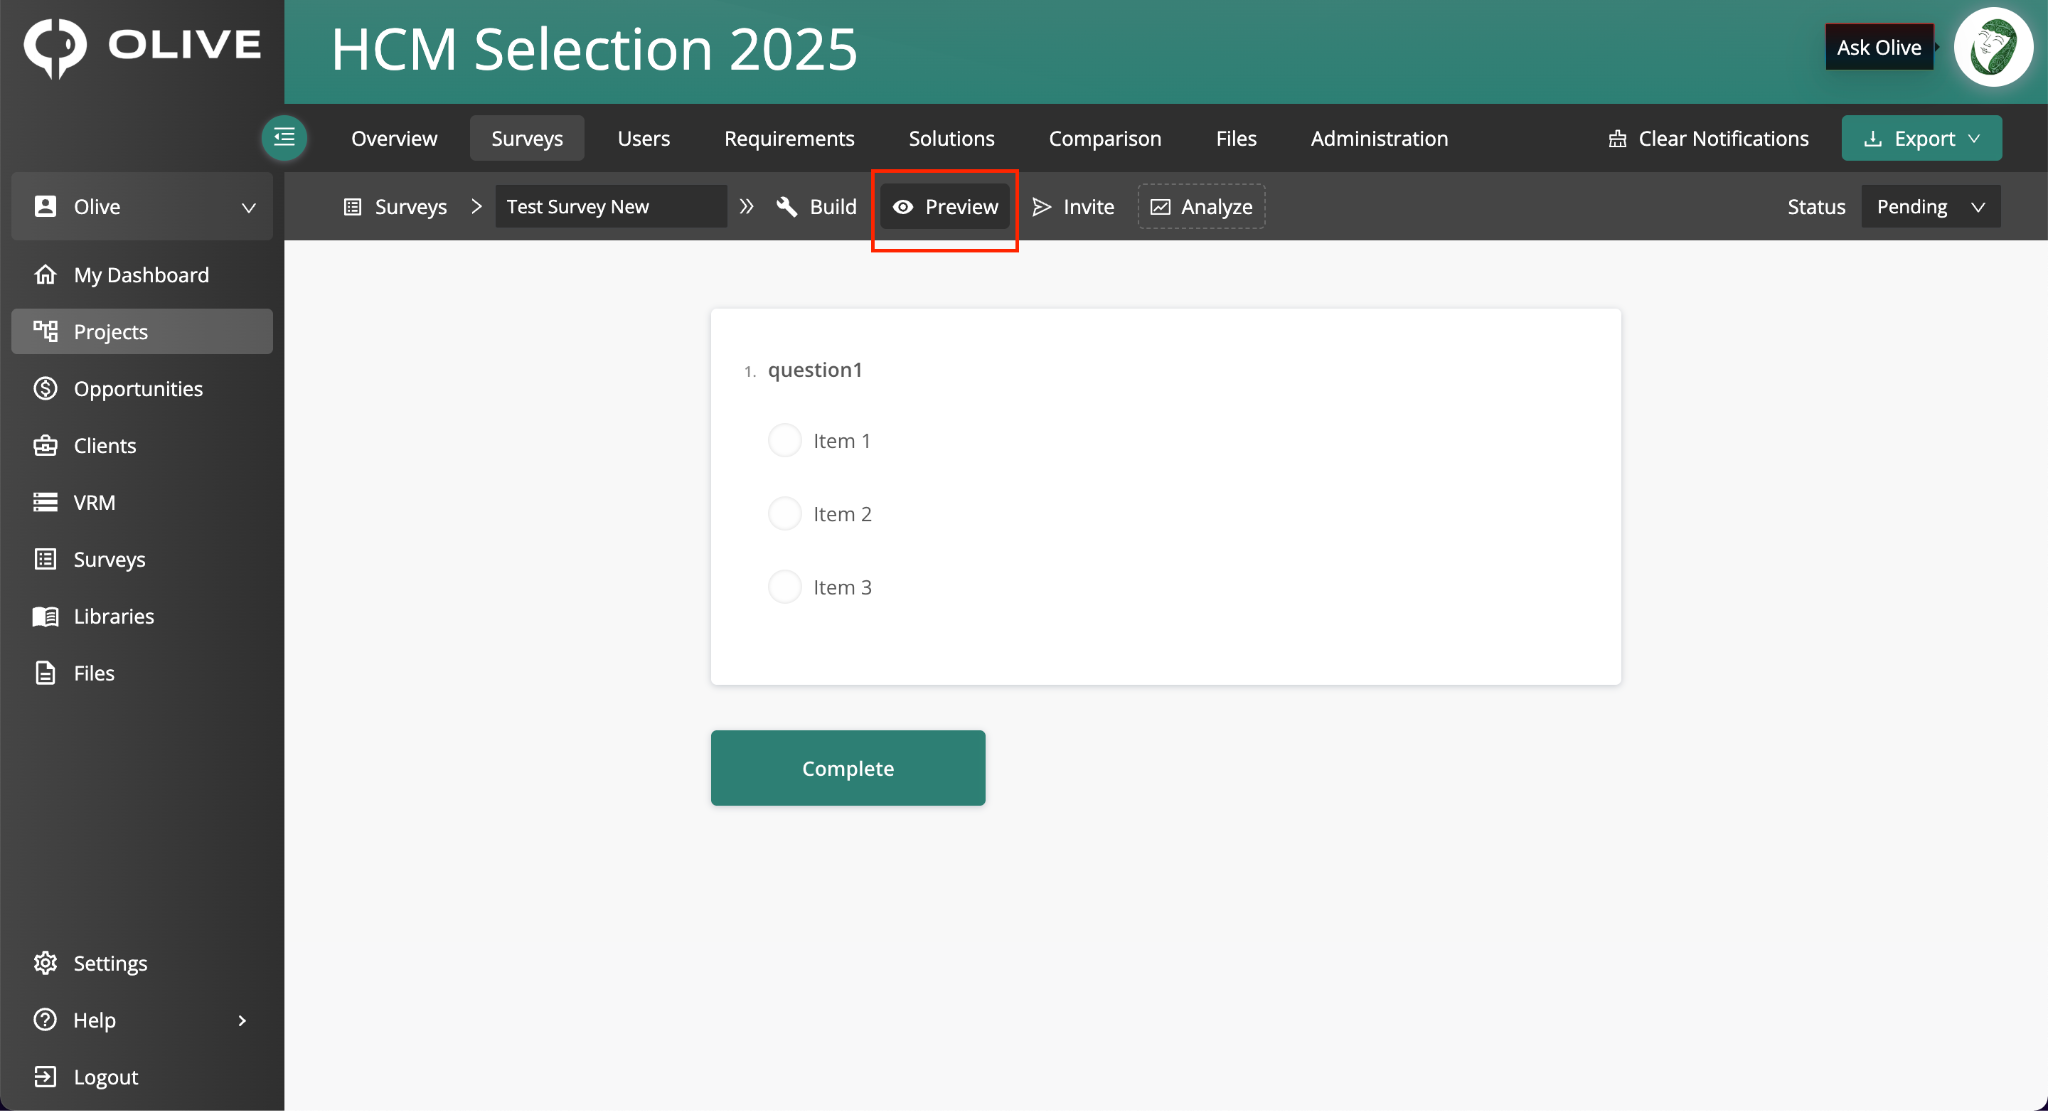
The survey in Preview Mode, showing the respondent-facing experience
|
💡 Tip: Always preview your survey before sending invitations, especially if you have logic rules set up. Preview Mode is the easiest way to catch any misconfigured conditions. |
Inviting Respondents
Q24: How do I invite someone to complete my survey?
A:
- Click 'Invite' at the top of the survey
- Search for existing contacts or enter email addresses manually
- Added respondents appear in the staging area — select them
- Click 'Invite' to send each person a unique link
Respondents do not need an Olive account to complete the survey.
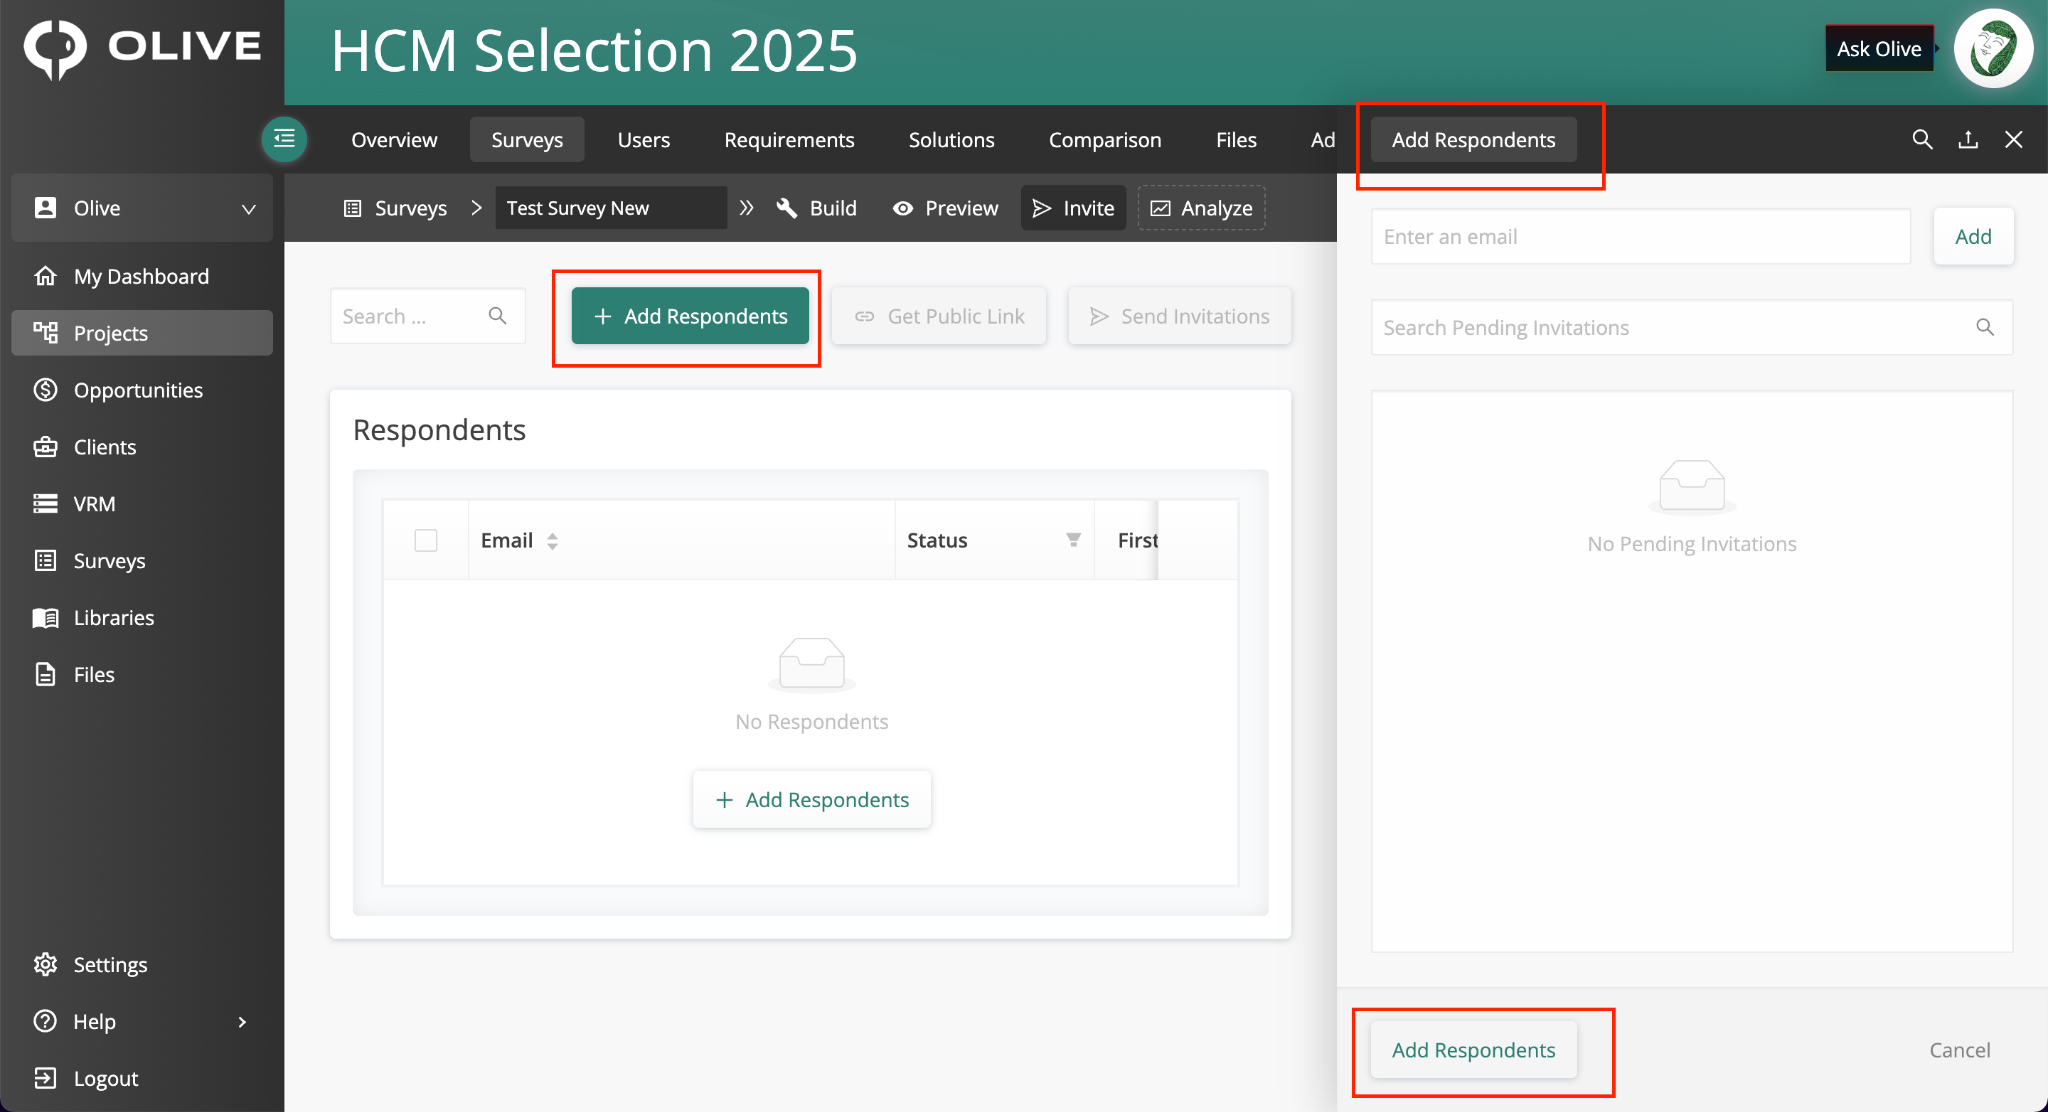
The Add Respondents panel, showing contact search and manual email entry
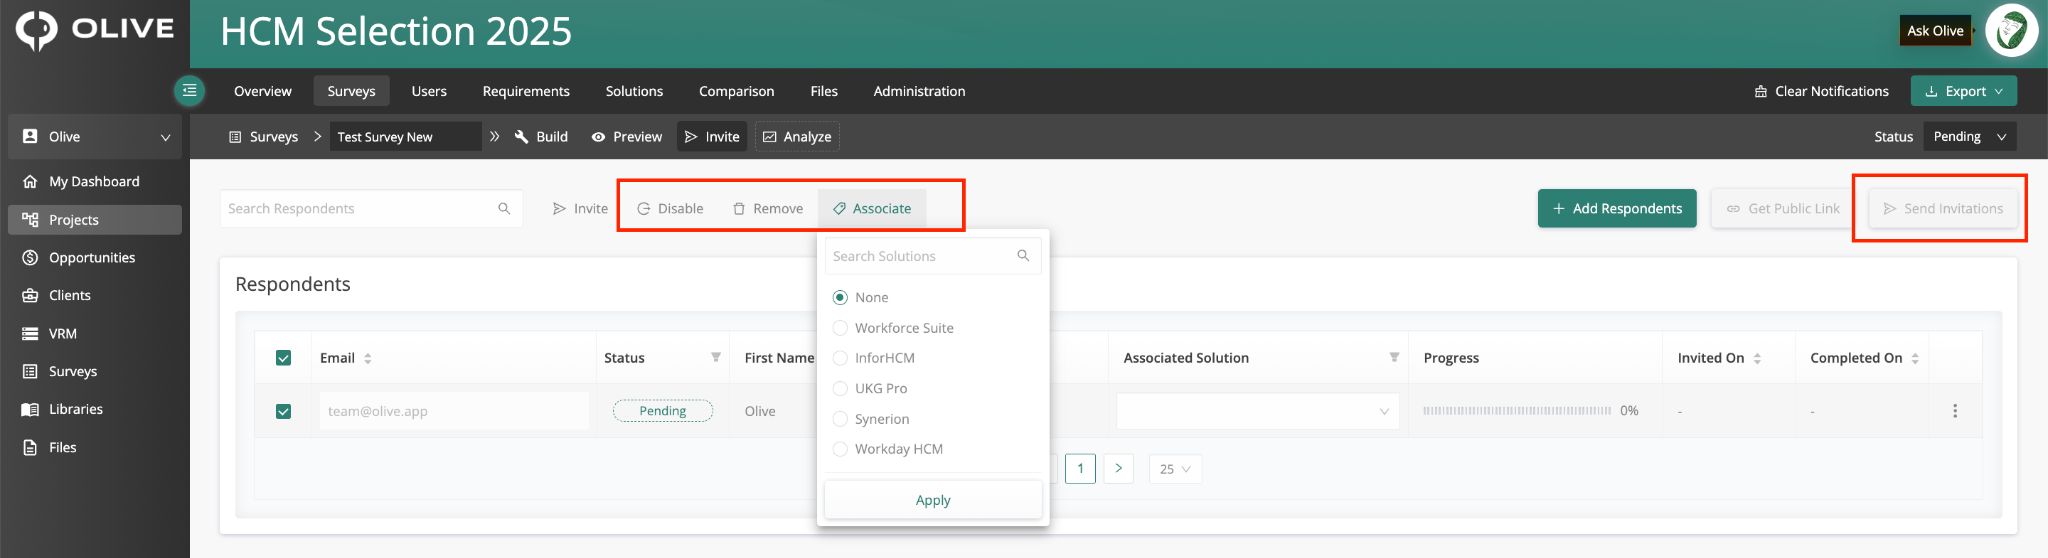
The Invite panel, showing respondent selection and the Invite button
Q25: How do I track whether respondents have completed the survey?
A:
View the Respondent Staging Area after clicking Invite. Each respondent shows a status that updates automatically:
|
Status |
What it means |
|
Pending |
Added but not yet invited |
|
Invited |
Invitation sent — waiting for them to open the survey |
|
Responding |
Has opened the survey and started answering |
|
Completed |
Has submitted all answers |
You can also see each respondent's progress percentage and completion date.
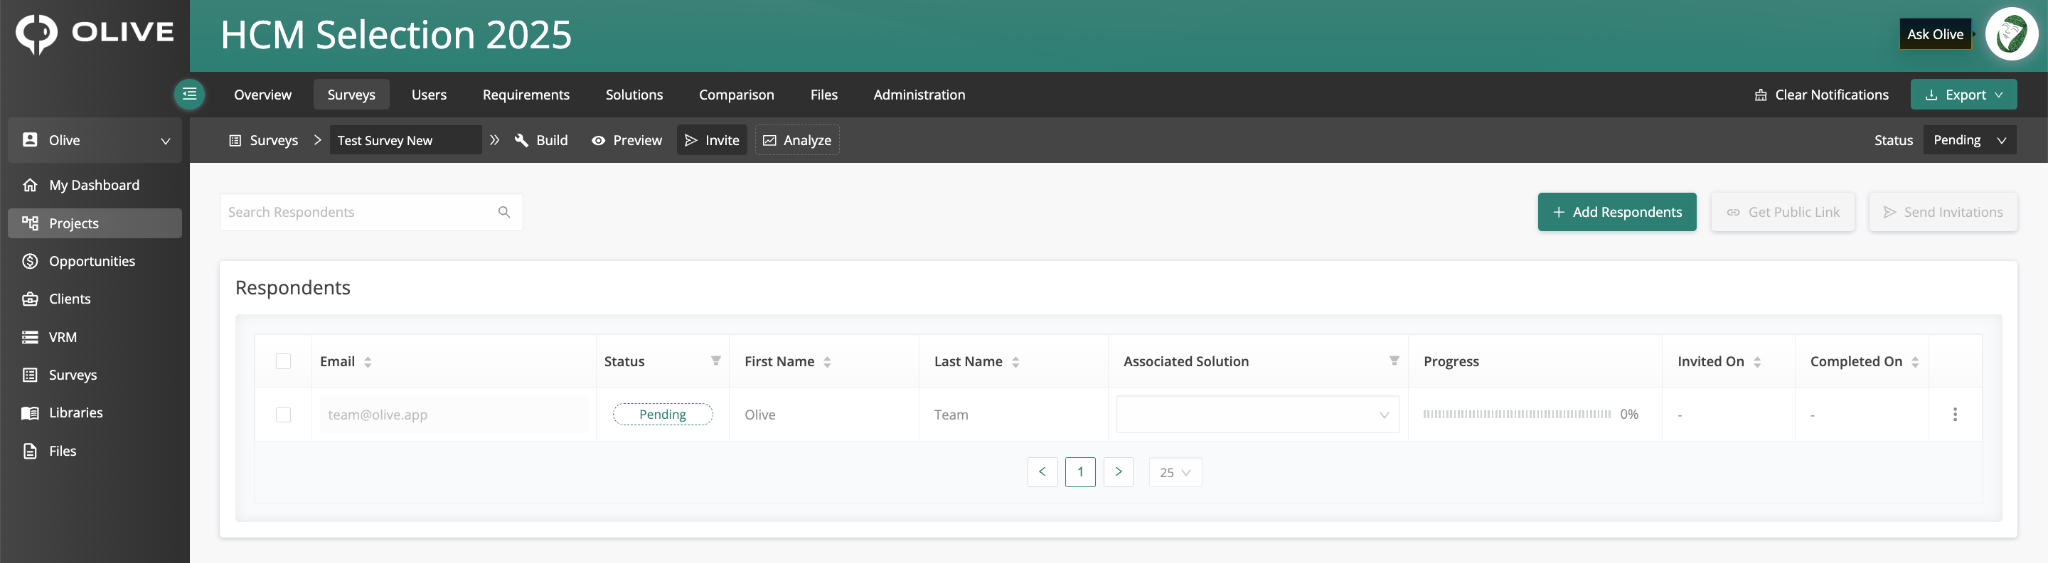
The Respondent Staging Area showing status and progress for each respondent
Q26: How do I share a survey with a large group without sending individual invitations?
A:
- Change the survey status from Pending to Open
- Click 'Get Public Link' and generate the URL
- Share the link anywhere — by email, on a website, or in a messaging tool
Anyone can respond using the link without needing an Olive account.
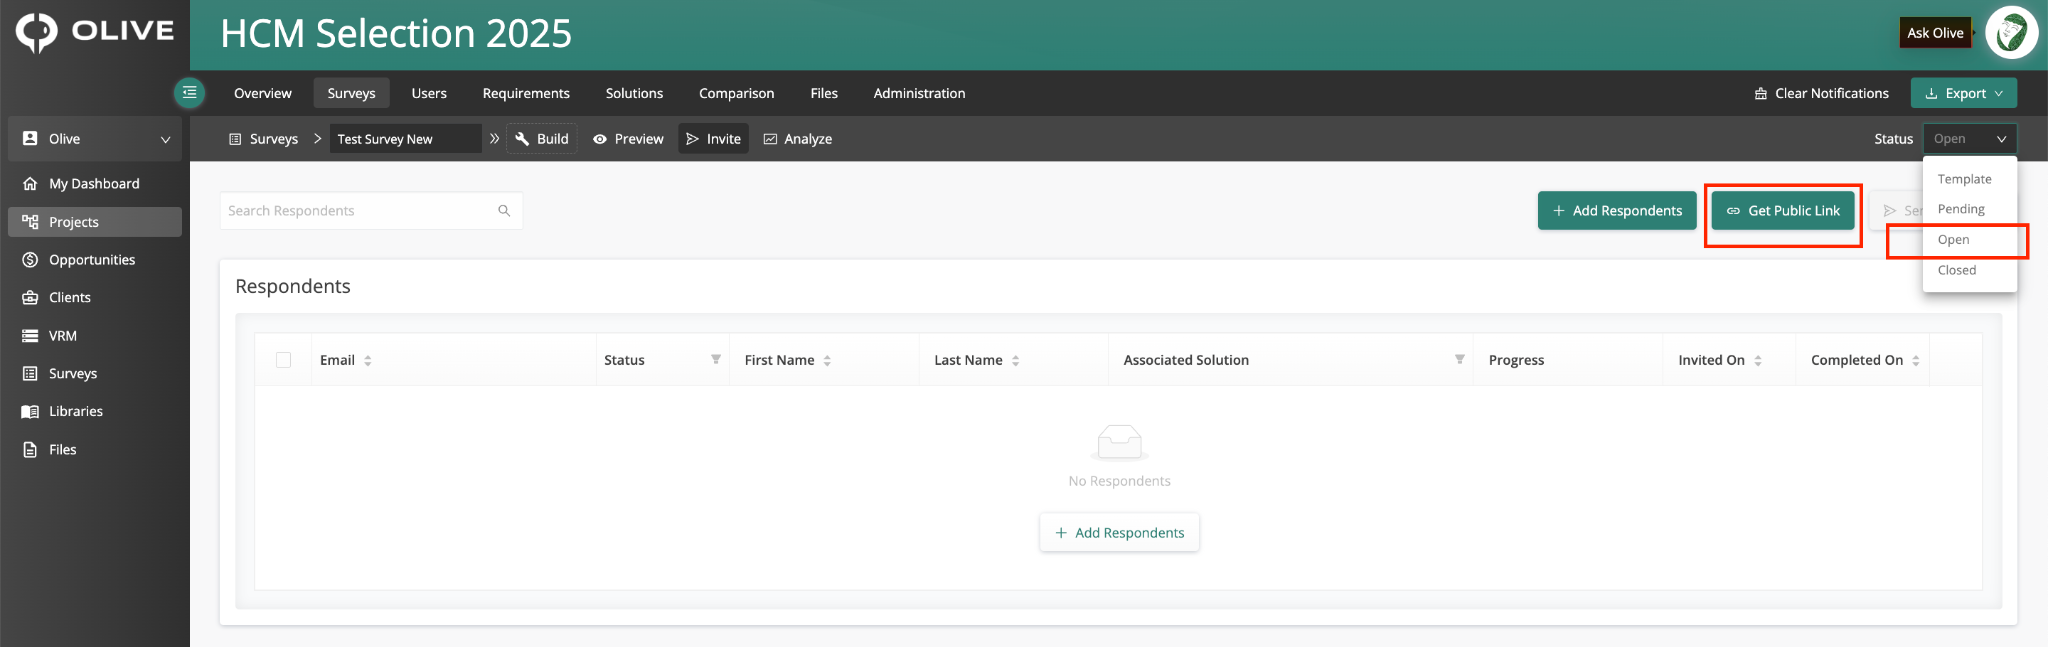
The Public Link panel, showing the Get Public Link option
|
📌 Note: Anonymous responses from public links do not feed back into project requirement ratings or vendor scores. Use named invitations if you need responses attributed to specific stakeholders or to populate your project data. |
Reviewing and Exporting Responses
Q27: How do I see the results after respondents have submitted?
A:
Click the Analyze tab within your survey. You can view results in two ways:
- By respondent — see all answers from one person
- By question — see all responses to a specific question across all respondents
You can also filter by respondent and view requirement ratings or vendor scores.
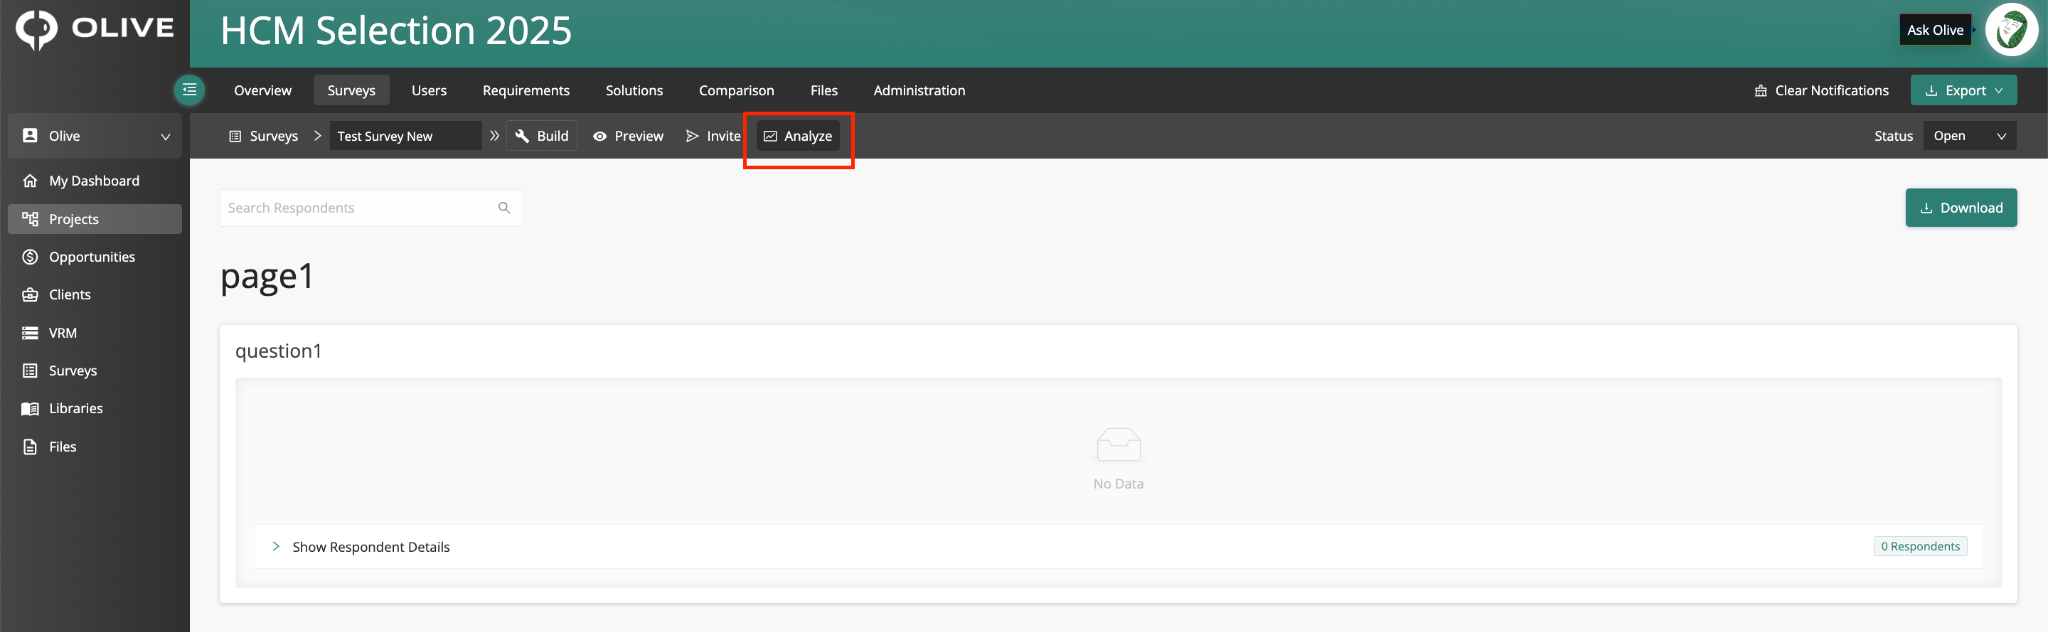
The Analyze tab, showing responses by respondent and by question
Q28: How do I export survey data to use in a spreadsheet or reporting tool?
A:
Click Download within the survey. You can export:
- Raw response data
- Requirement ratings
- Vendor scoring data
The exported files are compatible with Excel, BI tools, and external reporting dashboards.
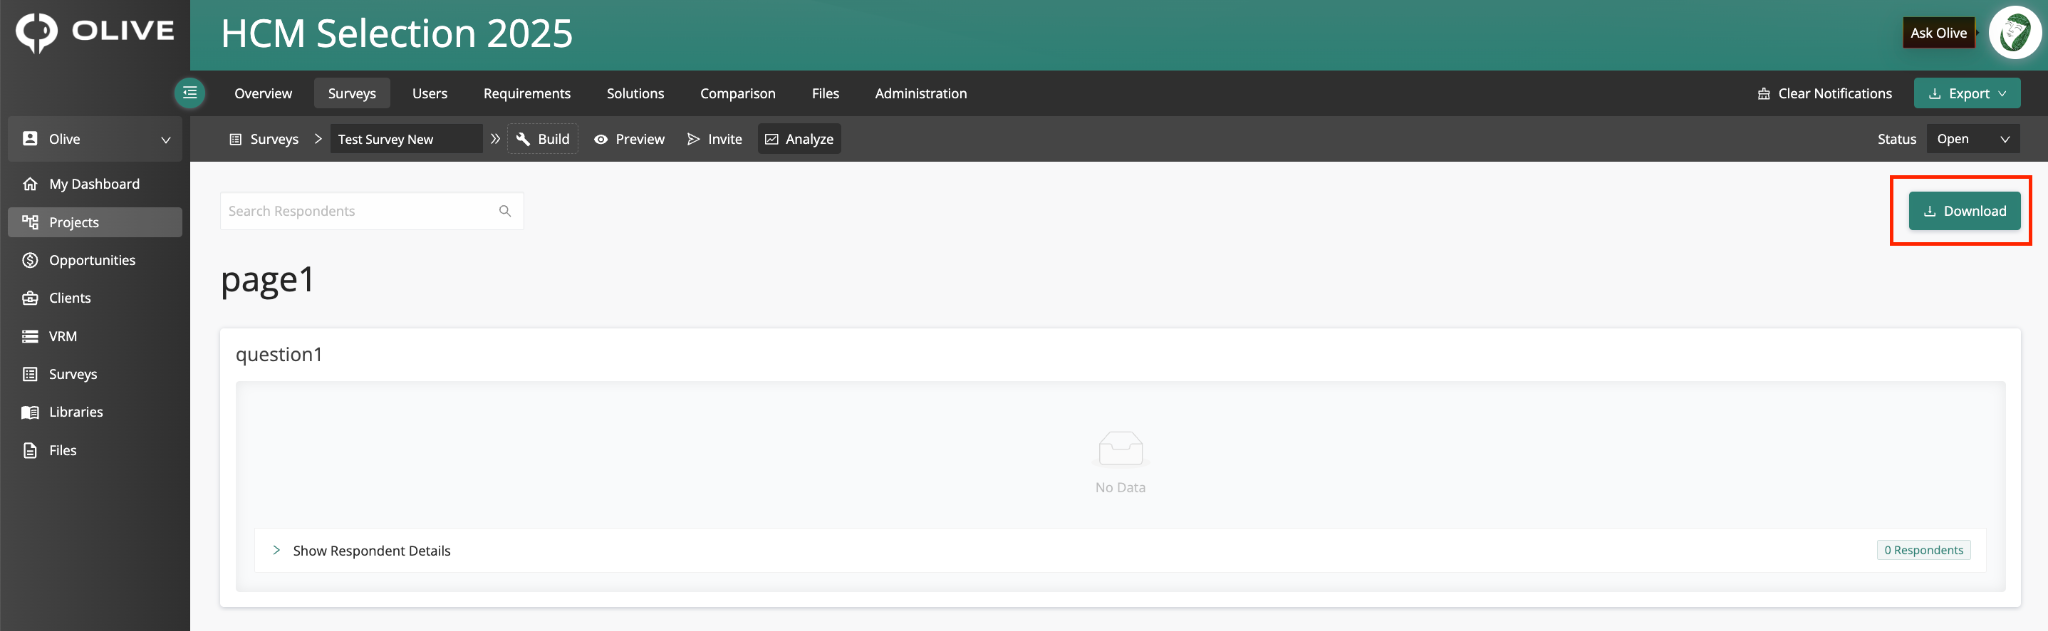
The Download option, showing available export types
What's Next?
Once your survey is set up and responses are coming in, here's the recommended order for next steps:
- Preview the survey before sending any invitations — especially if you've added logic rules
- Add Respondent Details if you want named attribution rather than anonymous responses
- Send invitations or publish a public link depending on your audience
- Monitor completion in the Respondent Staging Area and follow up with non-responders
- Review results in the Analyze tab and export data as needed
- Check your project requirements — stakeholder ratings from Requirements Rating questions will have automatically updated
Still have questions? Contact your Olive project administrator or reach out to Olive support for assistance.