This guide answers common questions about the Solutions tab in Olive — from adding vendors and reviewing their responses, to managing users, permissions, and custom properties.
General
Q1: How do I get an overview of all vendors in my project?
A:
Click the Solutions tab from the top navigation bar, then click the Solutions sub-tab. You'll see all vendors displayed as cards. Each card shows the vendor's name, logo, company, how much of the RFP they've completed, and how well their responses match your requirements based on your scores.
The Solutions tab has six sub-tabs:
|
Sub-tab |
What you'll find there |
|
Solutions |
All vendor cards — your main workspace for managing vendors |
|
Users |
Add and manage vendor contacts, send invitations and messages |
|
Permissions |
Control what each vendor can see and do in their RFP view |
|
Properties |
Create custom data fields to track information about each vendor |
|
Property Groups |
Organise custom properties into logical groups |
|
Data Sources |
Pull in vendor responses from other Olive projects |
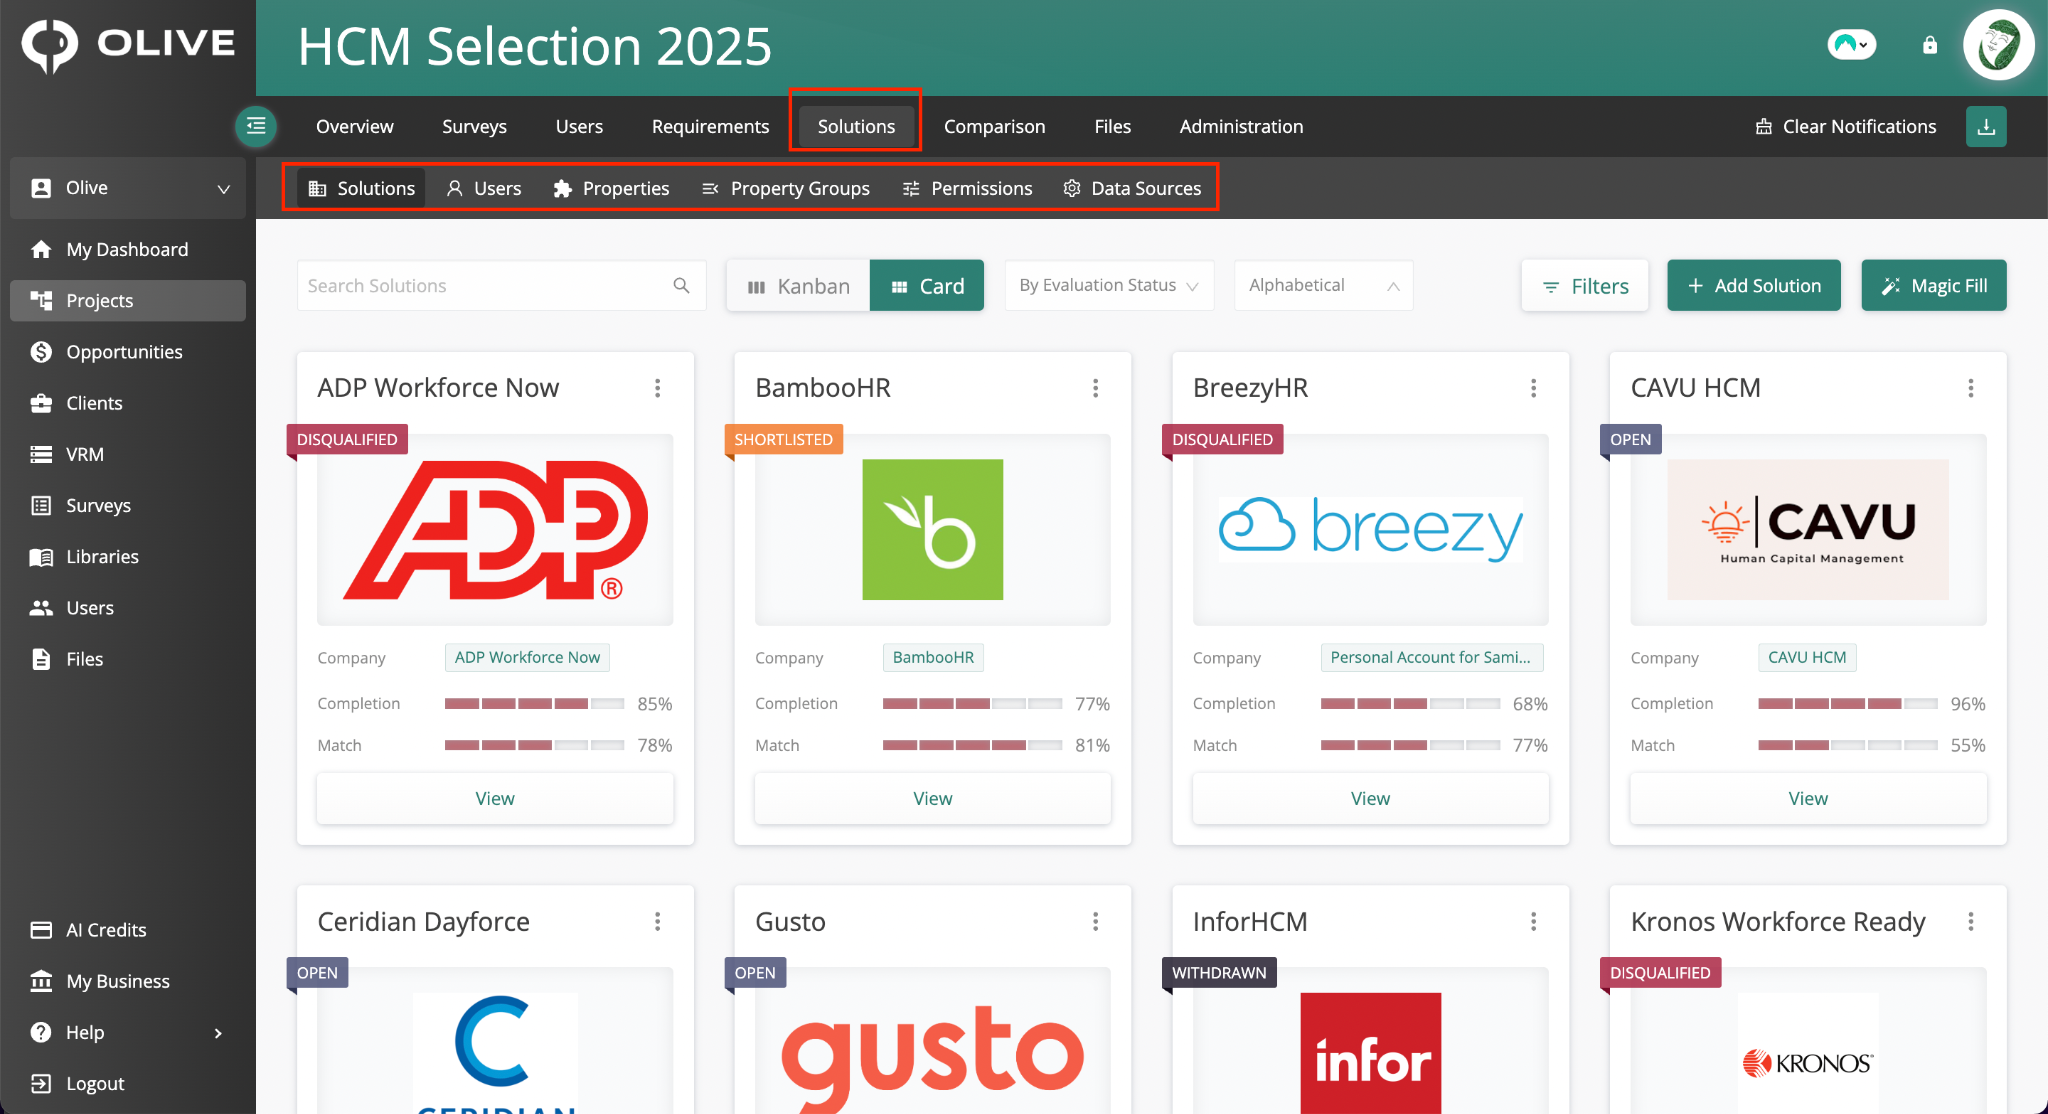
The Solutions tab — showing all solution cards and the six sub-tabs
Q2: How do I change how the vendor cards are displayed?
A:
Use the Kanban and Card buttons in the toolbar to switch between views:
- Card — shows all vendors in a grid layout
- Kanban — shows vendors in column-based swimlanes based on your chosen classification
Use the dropdown next to the view buttons to classify cards by:
- Vendor Progress — Included, Contacted, Engaged, In Progress, Submitted, Completed
- Evaluation Status — Open, Reviewed, Shortlisted, Selected, Withdrawn, Disqualified
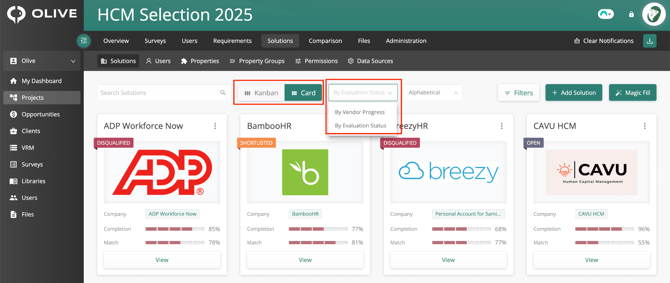
The view toggle and classification dropdown — switch between Kanban/Card and classify by Vendor Progress or Evaluation Status
|
💡 Tip: Use Kanban view with 'By Evaluation Status' to get a visual pipeline of all your vendors — it's the fastest way to see who's shortlisted, open, or disqualified at a glance. |
Adding Vendors
Q3: How do I add a new vendor to my project?
A:
Click '+ Add Solution' in the toolbar. A panel opens with three options:
- Add Solution — enter the vendor's solution name. If it exists in Olive, suggestions appear and you can add directly. Otherwise fill in company name and website, then click 'Add Solution'
- From My Library — search and add solutions you've already saved in your Olive library
- Recommend — opens Olive's AI chatbot, which recommends solutions based on your current project's requirements and vendors
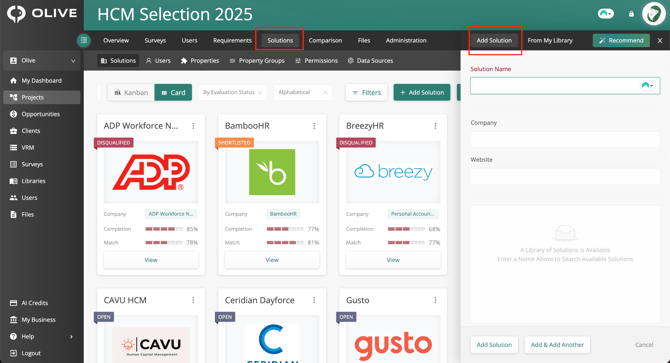
The Add Solution panel — type a solution name to search the Olive library or enter details manually
Q4: How do I get Olive to suggest vendors I should consider?
A:
- Click '+ Add Solution' in the toolbar
- Go to the Recommend tab
- Olive's AI chatbot will automatically search the internet and recommend solutions relevant to your project
- Keep chatting to refine suggestions, or ask it to add recommended vendors directly to your project
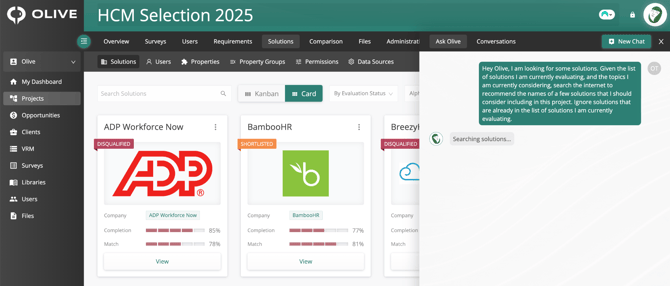
The Recommend tab — Ask Olive AI chatbot suggests vendors based on your project
Managing Vendors
Q5: How do I update a vendor's evaluation status or progress?
A:
- Click the ⋮ (3 dots) icon on the vendor's solution card and select 'Details'
- The Edit Solution panel opens on the right
- Use the Evaluation Status and Vendor Progress dropdowns to update the vendor's current status
- Click Save to apply the changes
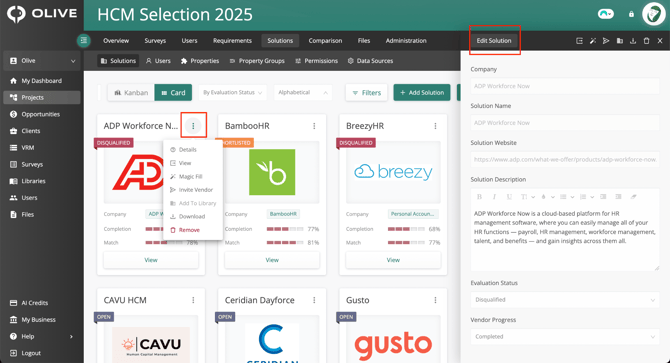
The 3-dots menu on a solution card and the Edit Solution panel for updating status
Q6: How do I use AI to fill in a vendor's responses automatically?
A:
Click the ⋮ icon on the vendor's card and select 'Magic Fill'. Olive's AI will research publicly available information and generate responses for all requirements for that vendor. Any responses it cannot find will be left blank, and your credits will be reimbursed.
|
⚠️ Important: Magic Fill responses are AI-generated from public sources — they are not submitted directly by the vendor. Always verify AI-generated responses before using them to make final decisions. |
Q7: How do I download a vendor's responses as a spreadsheet?
A:
Click the ⋮ icon on the vendor's card and select 'Download'. A message will confirm the file is being generated — it will appear in the Files tab when ready. Click OK to dismiss the message.
Q8: How do I remove a vendor from my project?
A:
Click the ⋮ icon on the vendor's card and select 'Remove'.
|
⚠️ Important: Removing a vendor permanently deletes them and all their data from the project. This action cannot be undone. |
Reviewing Vendor Responses
Q9: How do I see all the responses a vendor has submitted?
A:
- Click the View button on the vendor's solution card
- Click the Responses tab
- All requirement sections are listed with a score showing how well the vendor's responses match your requirements
- Click on any section to expand it and see the individual requirements and responses
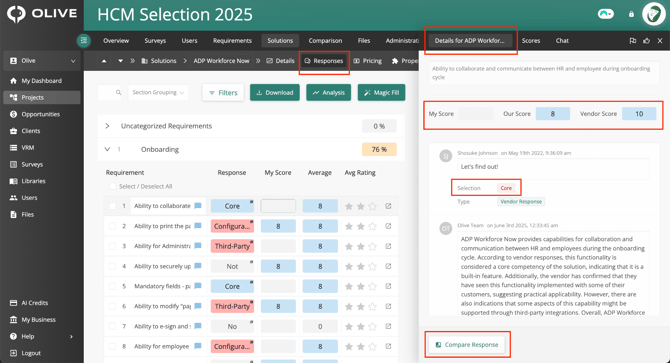
The Responses page — showing requirement sections, vendor responses, scores, and quick filters
Q10: How do I score a vendor's response to a requirement?
A:
On the Responses page, click on a vendor's response label (e.g. 'Core' or 'Configurable') to open the response detail panel. In the Details tab:
- My Score — enter your personal score for this response
- Our Score — the average score from all team members
- Vendor Score — the default score pre-assigned to the vendor's chosen response option
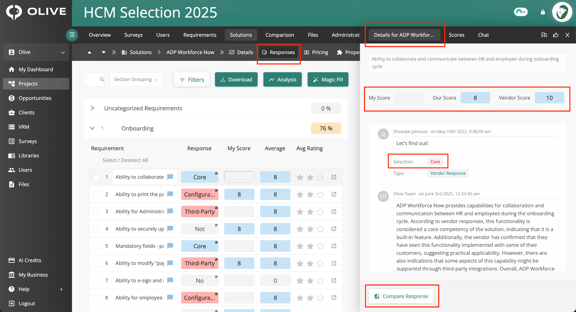
The response detail panel — showing the vendor's answer, My Score, Our Score, Vendor Score, and Compare Response
|
💡 Tip: Score every vendor consistently across the same requirements to make your final comparison fair and meaningful. |
Q11: How do I compare a vendor's response with another vendor's answer to the same requirement?
A:
Open the response detail panel by clicking on a vendor's response, then click the 'Compare Response' button at the bottom. A window opens where you select a second vendor to compare side by side — you can score both responses from this view.
Q12: How do I discuss a vendor's response with my team?
A:
- Open the response detail panel by clicking on the vendor's response
- Click the Chat tab
- Type your comment and click Send
- To share with the vendor, use the 'Share with Vendor' option in the Chat tab
You can Edit or Delete your own messages at any time.
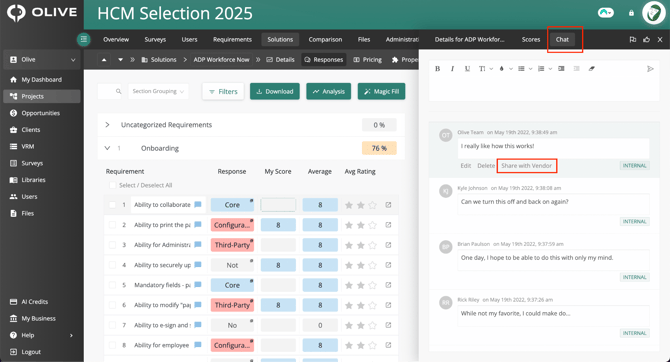
The Chat tab — for internal discussion or sharing a response with the vendor
Q13: How do I flag a response to bring up during a vendor demo or review meeting?
A:
Open the response detail panel and use the flag icons at the top of the panel:
- Add Agenda Item — flags this response for discussion in a vendor demo or meeting
- Mark as Reviewed — marks the response as evaluated to track your team's progress
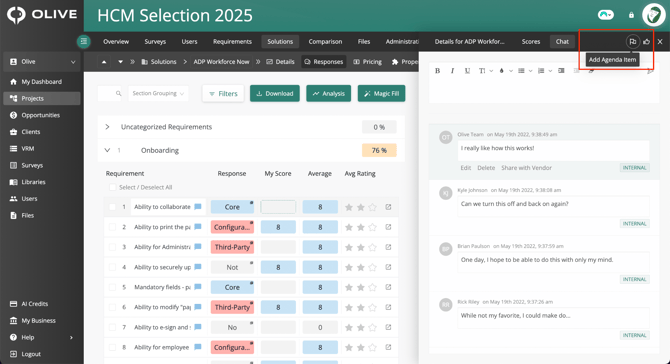
The response panel top bar — Add Agenda Item and Mark as Reviewed flag icons
Q14: How do I filter the responses to focus on specific types?
A:
On the Responses page, use the quick filters in the tab bar:
|
Quick filter |
Shows |
|
Updated |
Requirements updated from your side |
|
Must Have |
Requirements marked as must-have |
|
Agenda Items |
Requirements flagged for discussion |
|
Discussions |
Requirements with active team chat |
|
Answered |
Requirements the vendor has answered |
|
Unanswered |
Requirements the vendor hasn't answered yet |
Q15: How do I get an overall analysis of a vendor's performance?
A:
- On the Responses page, click the 'Analysis' button in the toolbar
- The Solution Analysis view opens showing Match %, Completion %, and Reviewed % at a glance
- Use the Analyze By dropdown to slice the data by Section, Tags, Department, or Stakeholder
- Use the Filter By buttons to focus on specific metrics
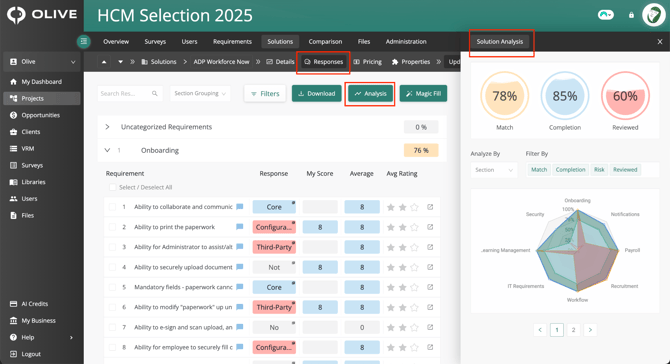
The Solution Analysis view — Match %, Completion %, and Reviewed % with a radar chart
Reviewing Vendor Pricing
Q16: How do I review a vendor's pricing submission?
A:
- Click the View button on the vendor's card
- Click the Pricing tab
- Enter the number of years in 'Years to View' and click Calculate
The page shows the vendor's pricing notes, a line-by-line pricing summary (License Fees, Maintenance & Support, Training, Services, Other Costs), and the Total Cost of Ownership.
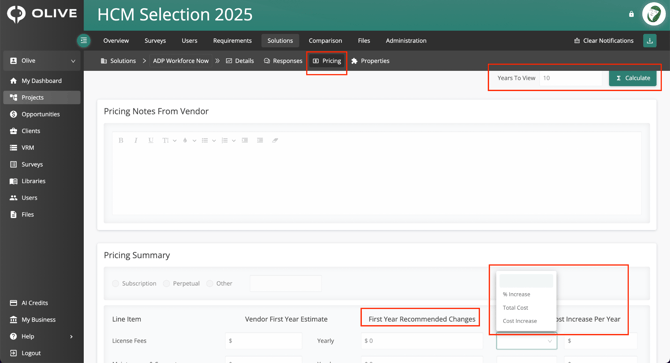
The Pricing tab — showing Pricing Notes, Pricing Summary, and First Year Recommended Changes
Q17: How do I enter my own adjusted cost estimates for a vendor?
A:
On the Pricing tab, find the 'First Year Recommended Changes' column in the Pricing Summary table. Enter your adjusted $ estimates for each line item. You can also set a Yearly Cost Increase estimate by choosing % Increase, Total Cost, or Cost Increase from the dropdown and entering a value.
|
💡 Tip: Use First Year Recommended Changes to model a negotiated pricing scenario and compare it against other vendors in the Comparison tab. |
Managing Vendor Users
Q18: How do I add a vendor contact to my project?
A:
- Click '+ Add Users' to open the Add Vendor Users panel
- Enter the vendor user's email address and click 'Add'
- Use the dropdown to assign them to the correct solution
- Invite Later: Adds the user to the staging area without sending an email. Status shows as Inactive until you send the invite. Best when adding multiple users in one session before notifying anyone.
- Invite Now: Skips staging entirely — the invitation modal opens immediately and the invite is sent as soon as you confirm. Best for adding one user who needs access straight away.
The user will appear in the Vendor Users table with a status of Inactive until they are invited.
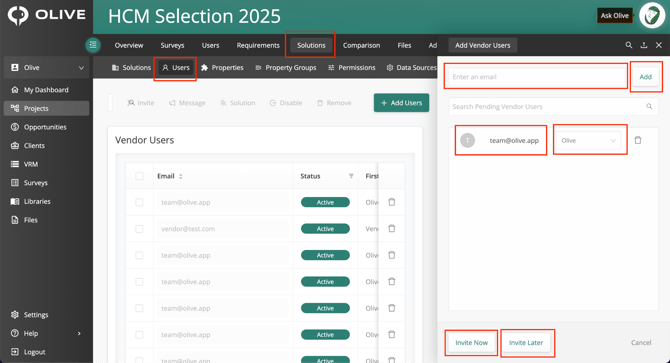
The Add Vendor Users panel — enter an email, assign a solution, and add the user
Q19: How do I send a vendor an invitation to access their RFP opportunity?
A:
- Tick the checkboxes next to the users you want to invite
- The users can be seen in the “Recipients” field
- Type in the “Opportunity Name”, Type in the invitation email “Subject”, Customise the Opportunity Name (defaults to the project name)
- Type the email body in the “Message Body”
- Click 'Send Invitation' to deliver — the invite is sent via info@olive.app
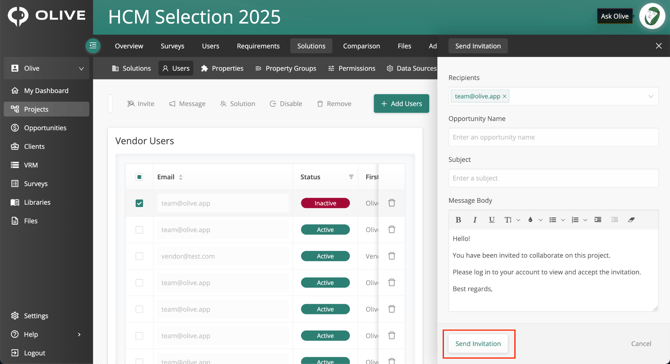
The Send Invitation panel — customise the opportunity name and invitation message
|
💡 Tip: You can invite vendors from different solutions separately — giving each a unique opportunity name and tailored invitation message. |
Q20: How do I send a message to one or more vendor users?
A:
- In the Users sub-tab, tick the checkboxes next to the users you want to message
- Click 'Message'
- Write your message in the Message Body field
- Click 'Send Message'
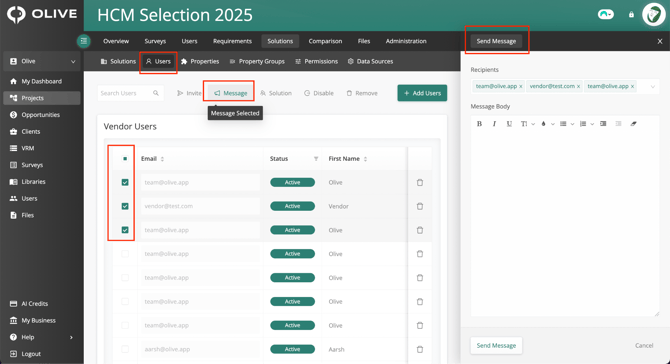
The Send Message panel — compose and send a direct message to selected vendor users
Q21: How do I move a vendor user to a different solution?
A:
- In the Users sub-tab, tick the checkbox next to the user you want to reassign
- Click 'Solution'
- Choose the new solution from the dropdown
- Click 'Apply' — the Solution column in the table will update
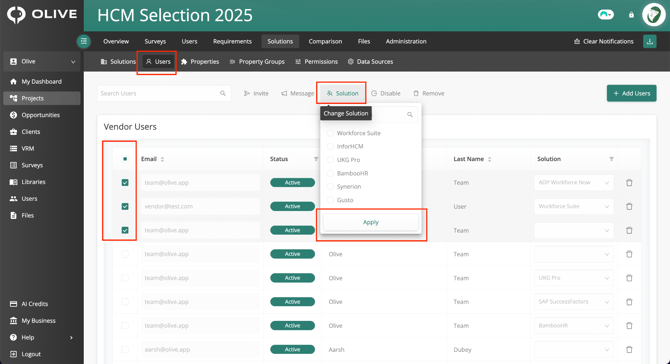
The Change Solution dropdown — reassign selected vendor users to a different solution
Q22: How do I understand the status shown next to each vendor user?
A:
The Status column shows where each vendor user is in the access lifecycle:
|
Status |
What it means |
|
Inactive |
Added to the project but not yet invited |
|
Pending |
Invited but hasn't accepted yet |
|
Active |
Has accepted the invite and logged in |
Q23: How do I filter the vendor users list by status or solution?
A:
- Status filter — click the filter icon in the Status column header to filter by Inactive, Pending, or Active
- Solution filter — click the filter icon in the Solution column header to filter by one or more solutions
In both cases, click OK to apply and Reset to clear the filter.
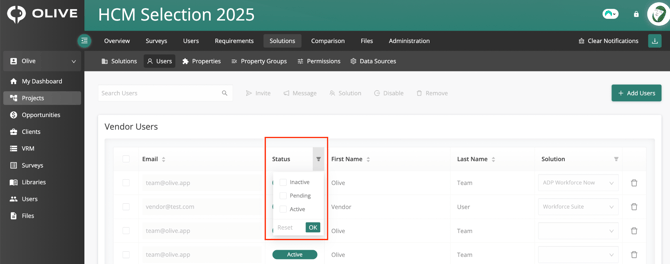
The Status filter — filter vendor users by Inactive, Pending, or Active
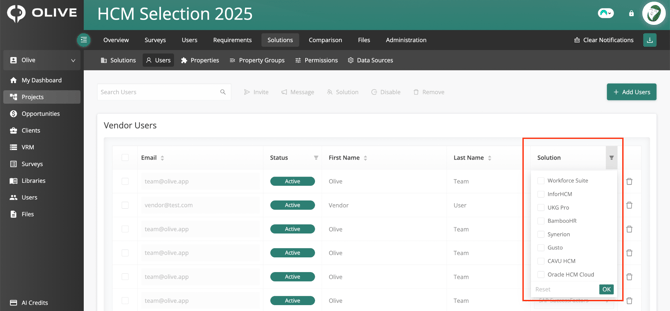
The Solution filter — filter vendor users by one or more solutions
Managing Solution Properties
Q24: How do I add a custom data field to track information about each vendor?
A:
- Click the Properties sub-tab, then click '+ Add Property'
- Give the property a Label (name)
- Choose a Property Type — text, single select, date, URL, etc.
- Assign it to a Property Group if applicable
- Set whether it's required for all solutions or must be unique
- Click 'Add Property' to save
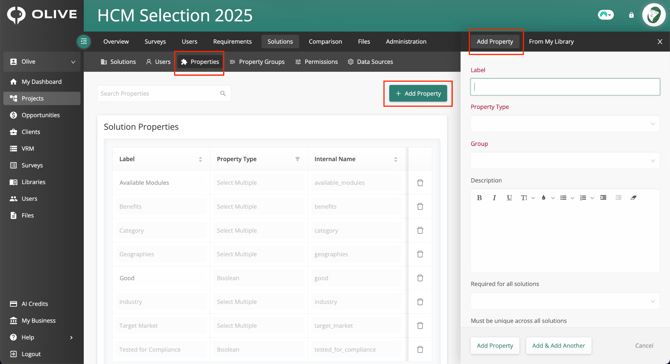
The Add Property panel — enter a label, choose a type, and configure the property settings
|
💡 Tip: Useful examples: ISO Approved, Contract Type, Contract Expiry Date, SOC 2 Approved, Payment Method. Create properties that are relevant to your specific evaluation criteria. |
Q25: How do I edit or update an existing property?
A:
- Go to the Properties sub-tab
- Hover over the Label of the property you want to edit
- Click 'View Details' — the Edit Property panel opens on the right
- Make your changes and click 'Save Property'
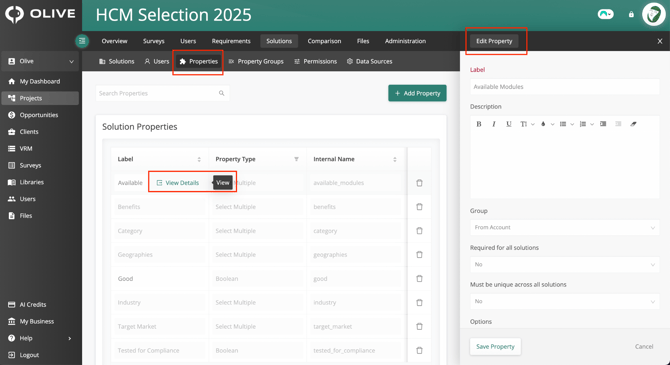
The Edit Property panel — hover over a label and click View Details to edit
Q26: How do I organise properties into groups?
A:
- Click the Property Groups sub-tab, then click '+ Add Property Group'
- Type the group name — for example: Financials, Security, Compliance
- Click 'Add Property Group' to create it
Once groups are created, you can assign properties to them when adding or editing a property.
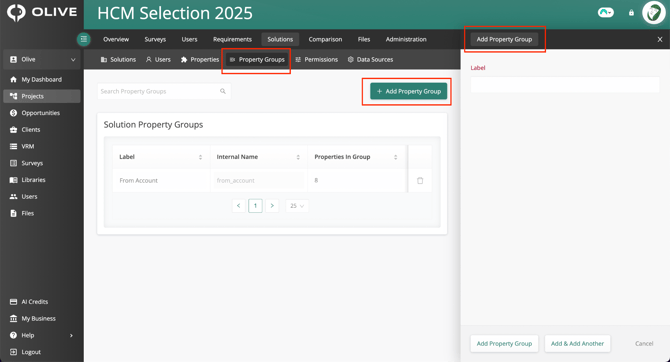
The Property Groups sub-tab — Add Property Group panel with label field
Managing Vendor Permissions
Q27: How do I control what a vendor can see and do in their RFP view?
A:
Click the Permissions sub-tab. The Opportunity Configuration table lists all available permissions, with each vendor as a column. Tick the checkbox for any permission in a vendor's column to enable it for that vendor. Use the Global column to apply a permission to all vendors at once.
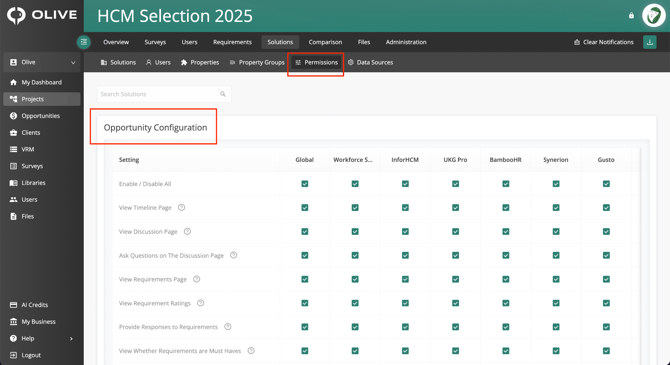
The Permissions sub-tab — Opportunity Configuration section with vendor columns and permission checkboxes
|
💡 Tip: Use 'Enable / Disable All' in the Global column to quickly set a baseline for all vendors, then fine-tune individual vendors as needed. |
Q28: How do I control which requirement sections a vendor can see?
A:
In the Permissions sub-tab, scroll down to the Section Visibility section. Tick the checkboxes for the sections you want each vendor to have access to. Unticking a section hides it from that vendor's requirements view.
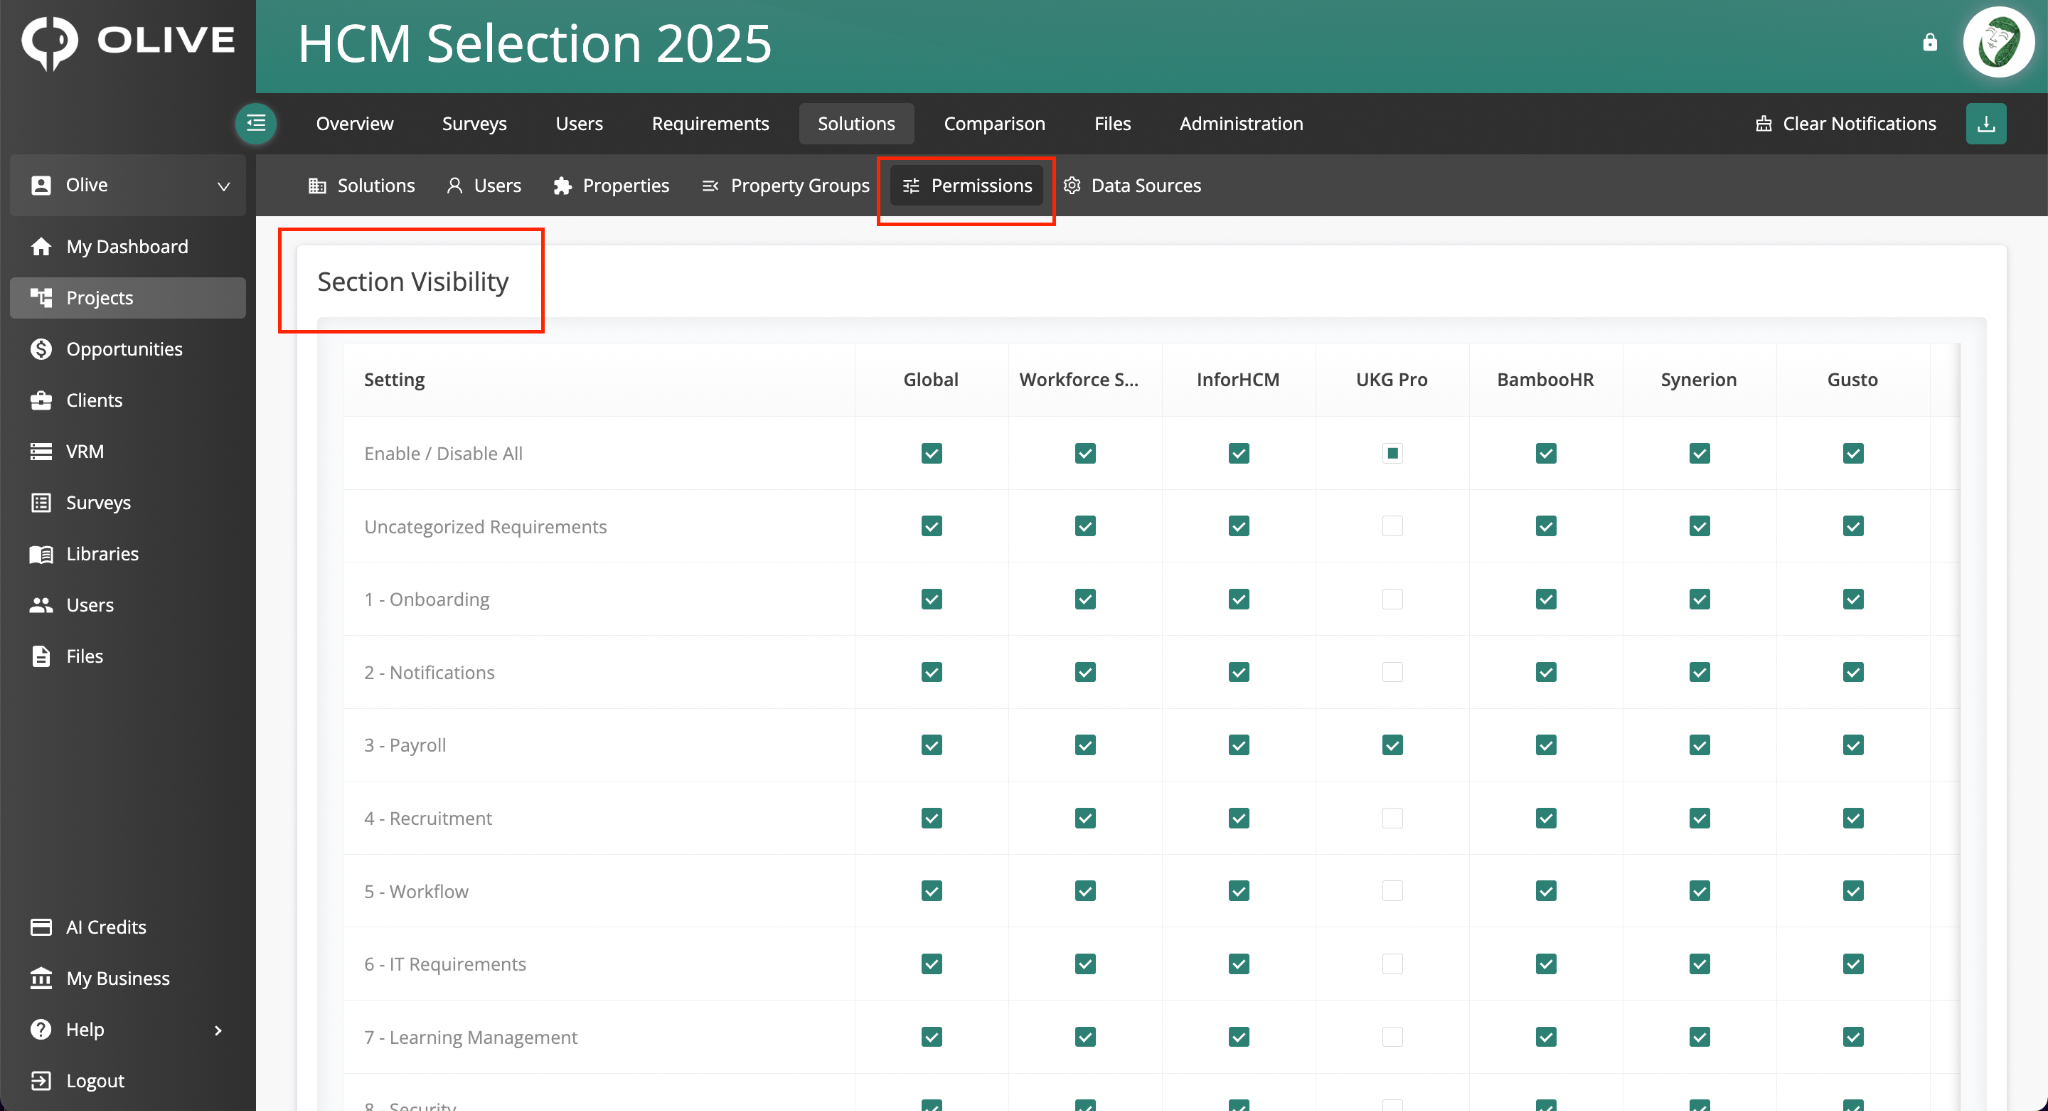
The Section Visibility section — control which requirement sections are visible per vendor
Q29: What happens to a disqualified vendor's permissions?
A:
When a vendor's evaluation status is set to Disqualified, all their Opportunity Configuration and Section Visibility permissions are automatically removed. They will no longer be able to access their opportunity view.
|
📌 Note: Disqualification is automatic — you do not need to manually revoke permissions. If you re-activate a disqualified vendor, you will need to restore their permissions manually in the Permissions sub-tab. |
Using Data Sources
Q30: How do I pull in vendor responses from another Olive project?
A:
- Click the Data Sources sub-tab
- Find the project whose vendor responses you want to import
- Click the Status toggle next to that project to switch it from Excluded to Included
When included, vendor responses from that project will be imported into the current project — provided the same vendors and requirements exist in both.
|
📌 Note: Data Sources only imports responses where the vendor and requirement already exist in the current project. If a vendor or requirement doesn't match, that response will not be imported. |
What's Next?
Once your vendors are added and invited, here's the recommended order for moving the evaluation forward:
- Send invitations to vendor users from the Users sub-tab
- Configure permissions in the Permissions sub-tab before vendors access their opportunity
- Monitor vendor progress using Kanban view with 'By Vendor Progress' classification
- Review and score responses in the Responses page for each vendor
- Use the Comparison tab to evaluate all vendors side by side once submissions are in
Still have questions? Contact your Olive project administrator or reach out to Olive support for assistance.