Overview
The Solutions tab is where you manage all the vendors in your RFP project. From here you can add vendors, track their progress and evaluation status, review their responses and pricing, manage vendor users, configure permissions, and set up custom properties for solutions.
The Solutions tab has six sub-tabs:
|
Sub-tab |
What you'll find there |
|
Solutions |
View and manage all vendor cards — your main workspace |
|
Users |
Add and manage vendor contacts, send invitations and messages |
|
Properties |
Create custom data fields to capture structured information about each vendor |
|
Property Groups |
Organise custom properties into logical categories |
|
Permissions |
Control what each vendor can see and do in their opportunity view |
|
Data Sources |
Pull in vendor responses from other Olive projects |
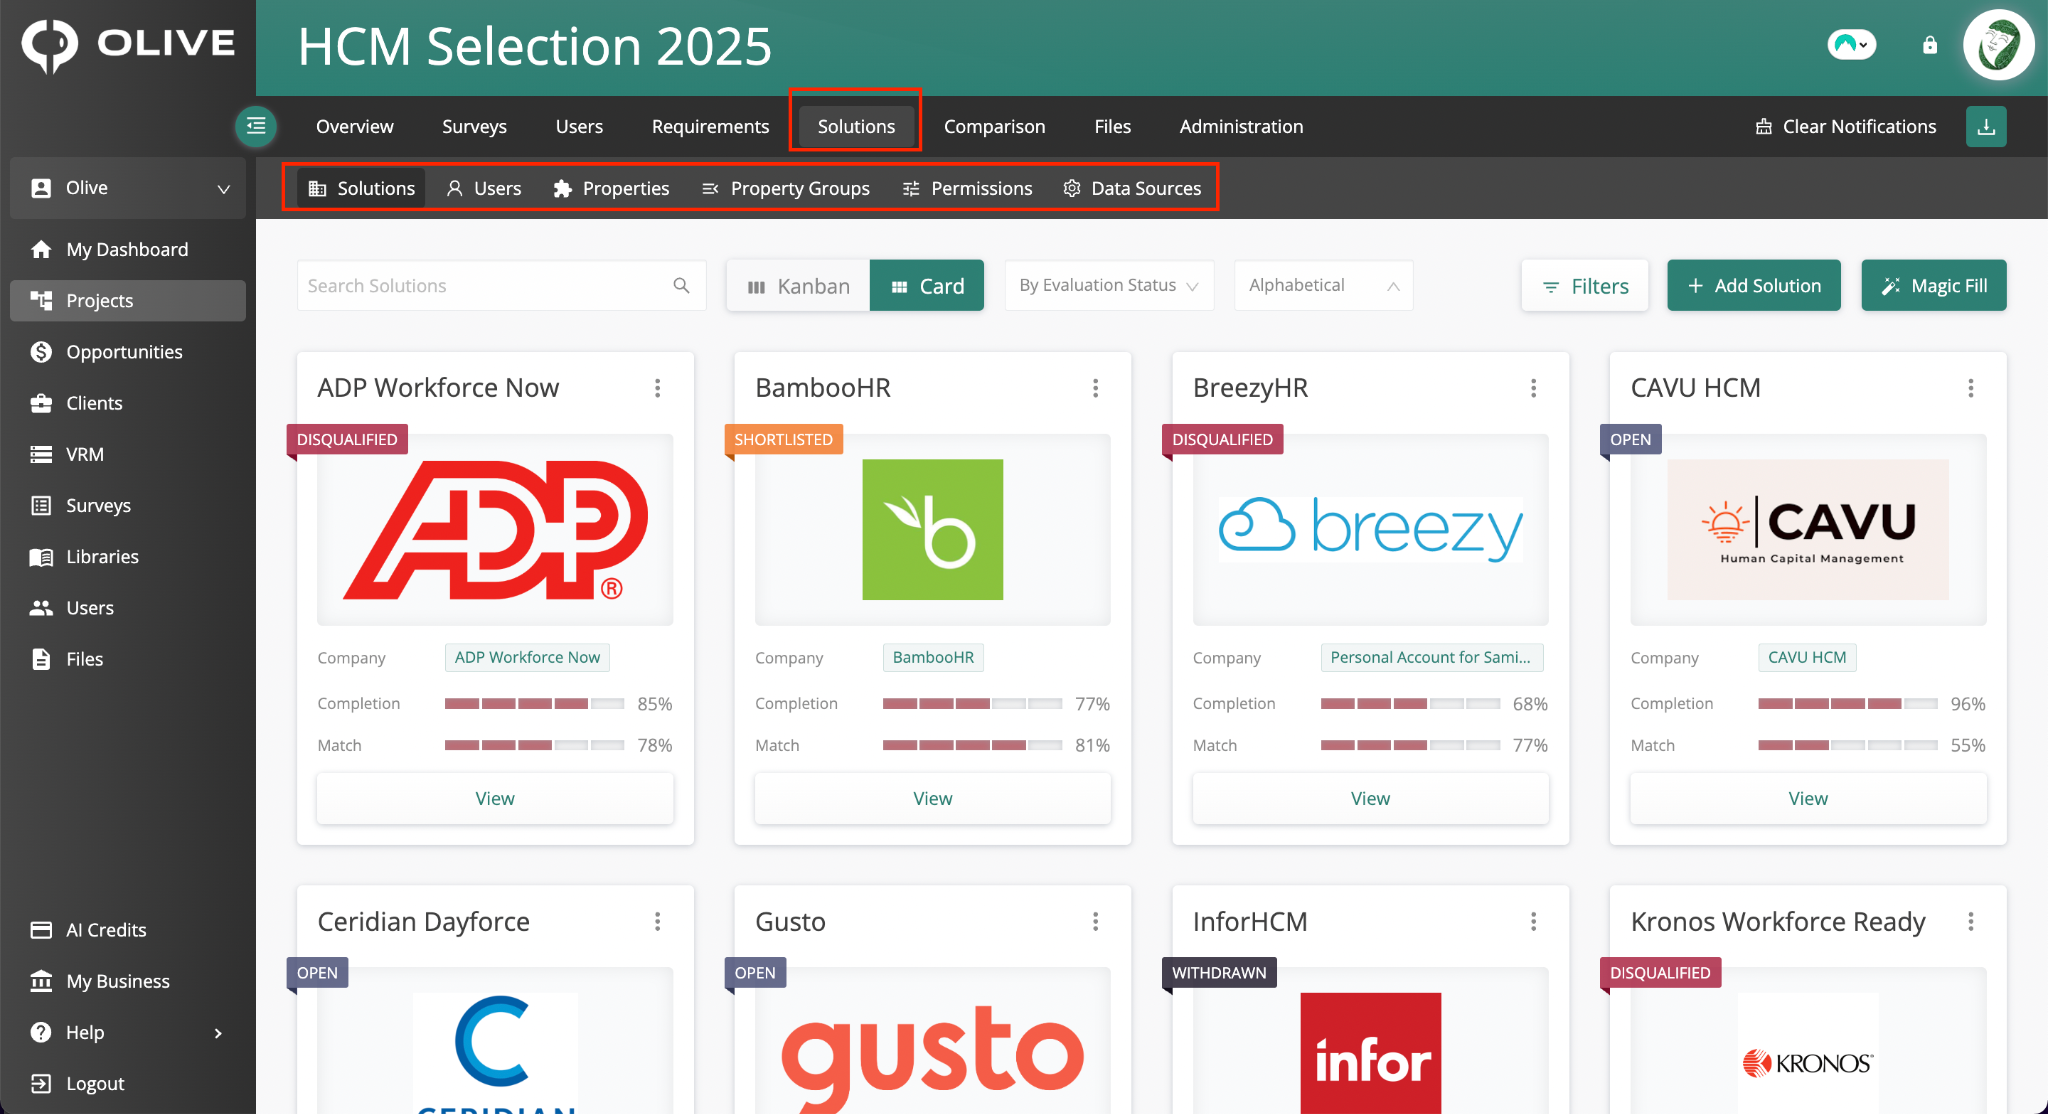
The Solutions tab — showing all six sub-tabs and the solution cards in Card view
Solutions Sub-tab
Click the Solutions sub-tab to see all vendors added to your project. Each vendor is displayed as a Solution Card showing key information at a glance.
Adding a Solution
Click '+ Add Solution' in the toolbar to open the Add Solution modal. It has three tabs:
Add Solution Tab
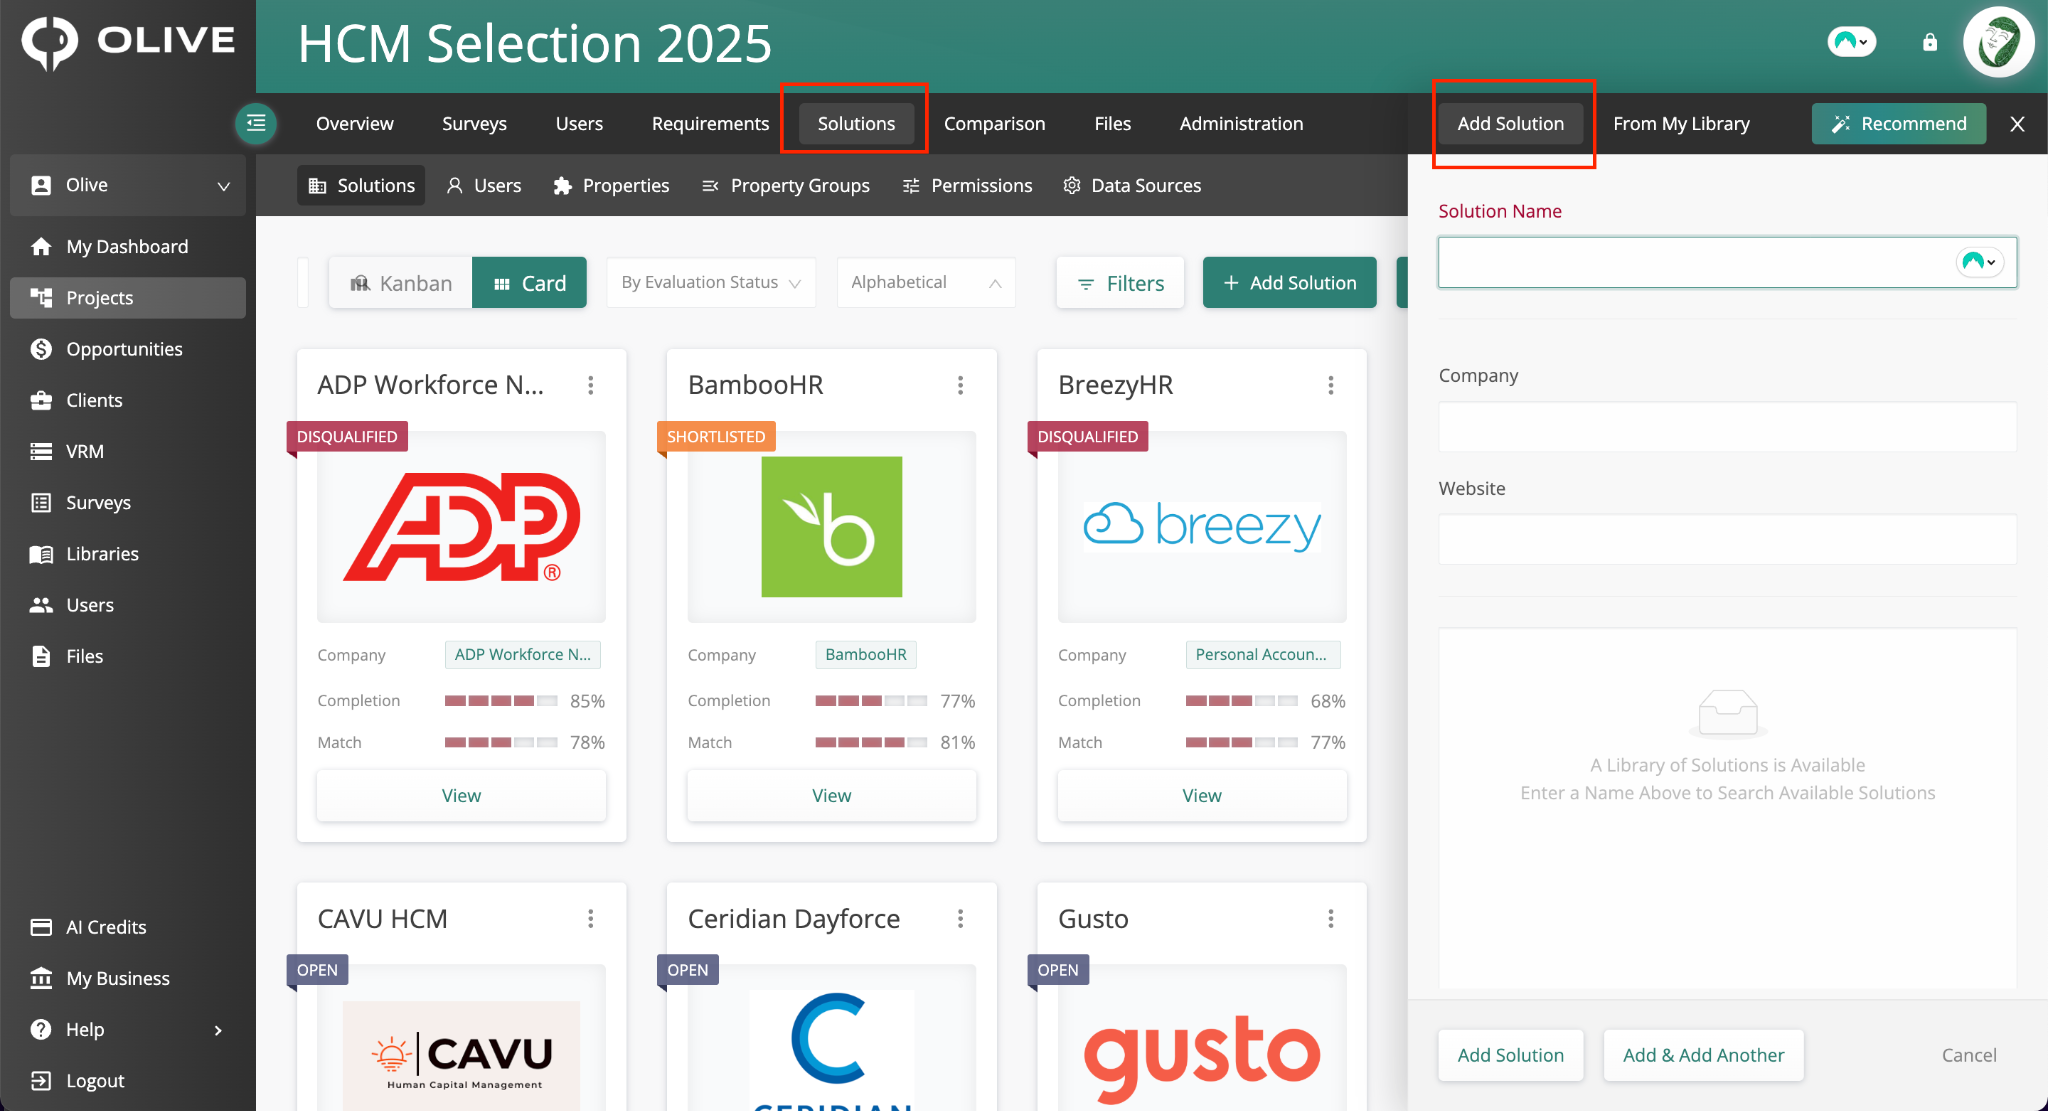
The Add Solution tab — enter a Solution Name to search the Olive library or fill in details manually
Type in the Solution Name. If the solution already exists in Olive, suggestions will appear — click one to add it directly. Otherwise, fill in the Company Name and Website, then click 'Add Solution'.
From My Library Tab
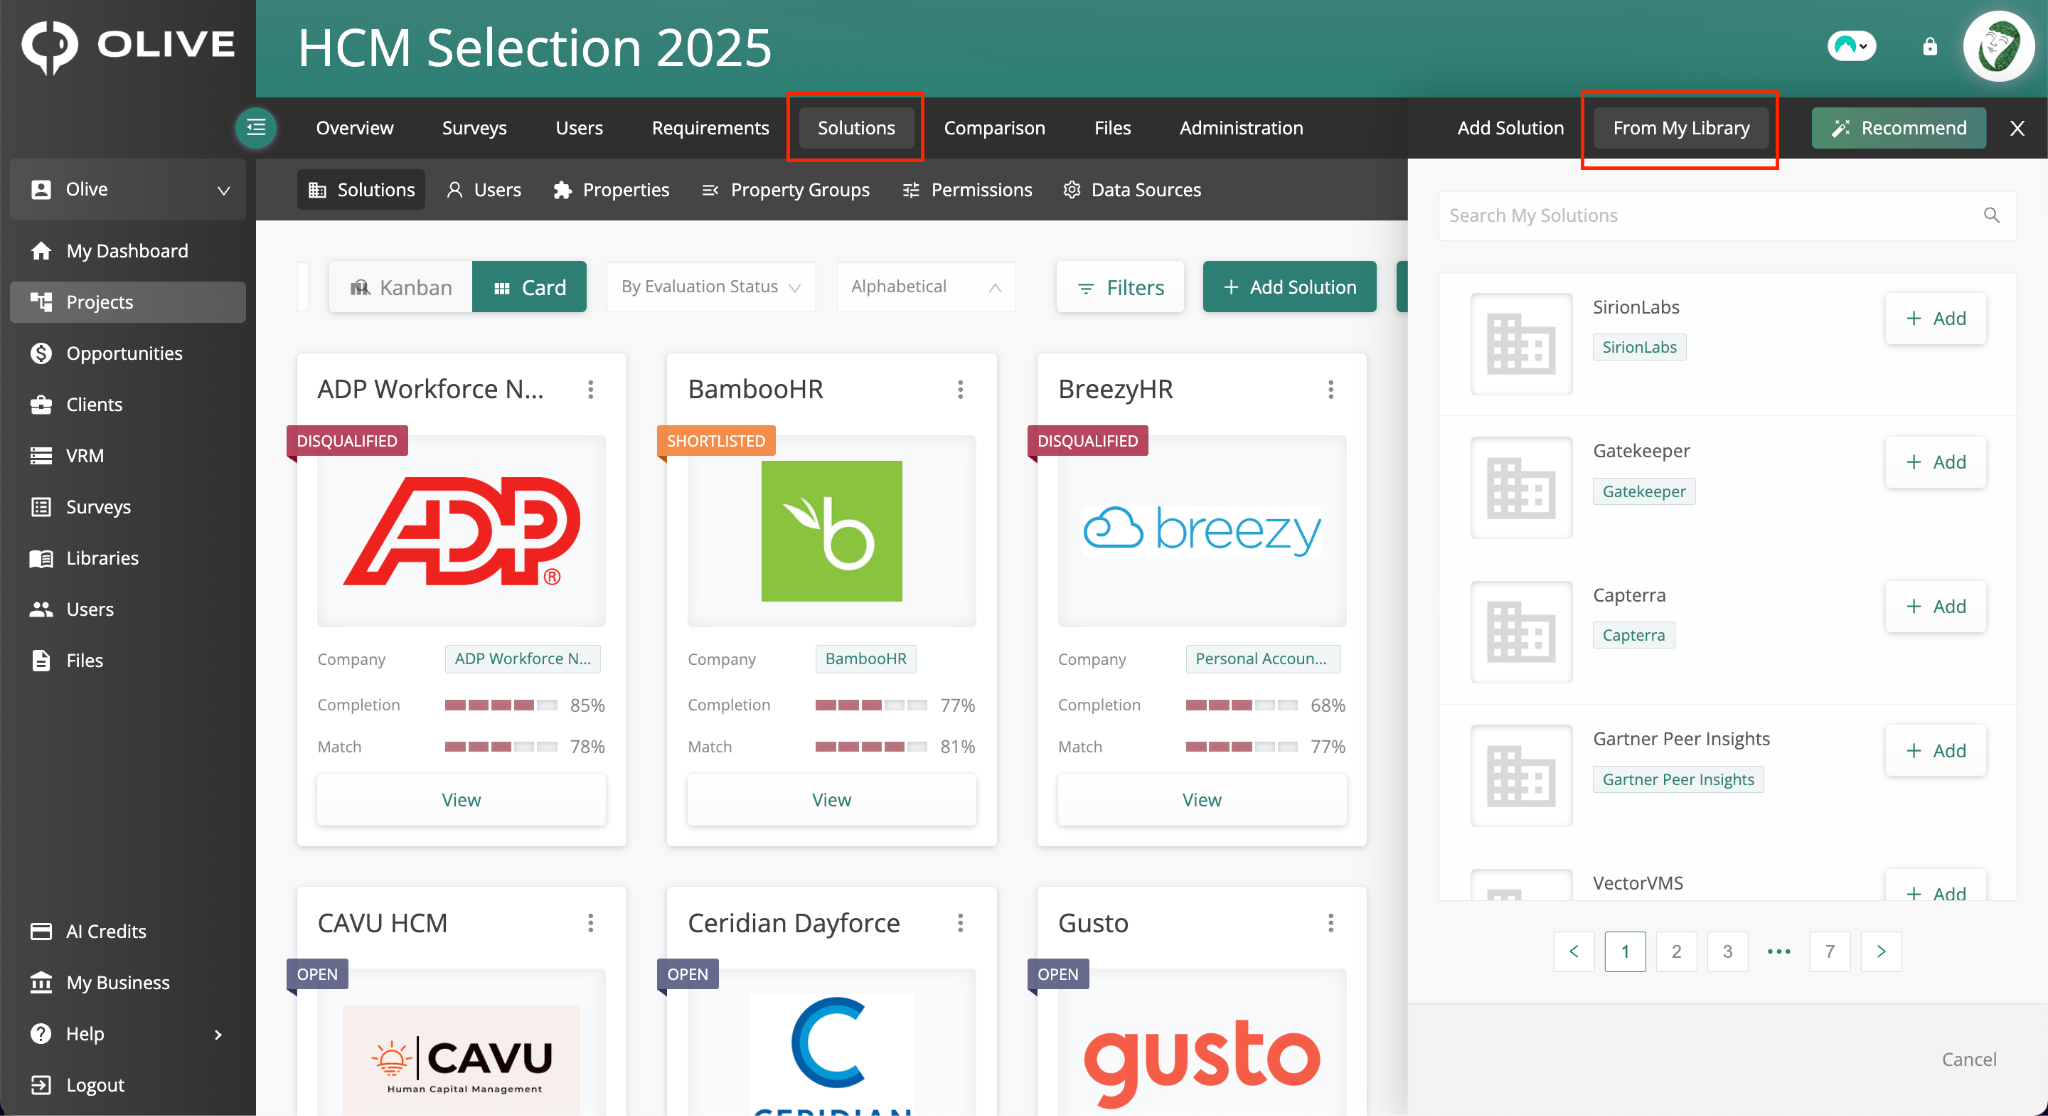
The From My Library tab — search and add solutions saved in your Olive library
Search for solutions already saved in your Olive library. Click '+ Add' next to any solution to add it to the project.
Recommend Tab
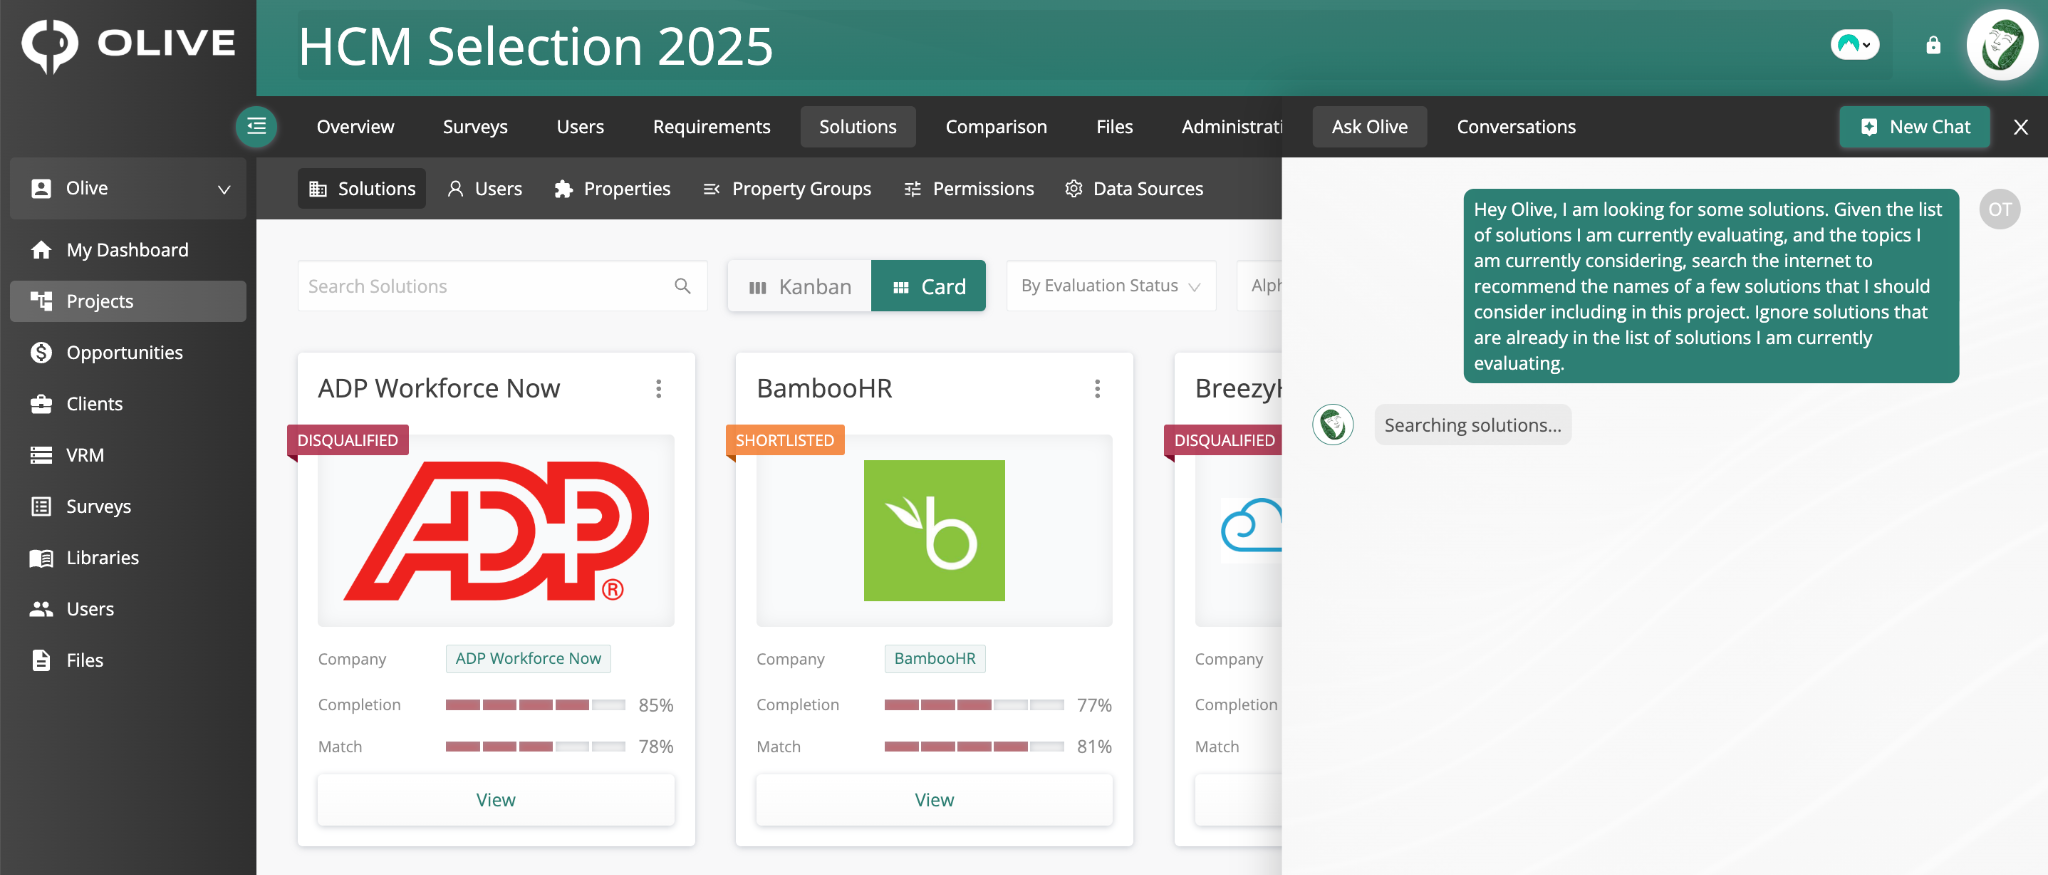
The Recommend tab — Ask Olive AI chatbot suggests solutions based on your project
Opens the Ask Olive AI chatbot, which automatically searches the internet and recommends solutions based on your project's current solutions and requirements. You can continue the conversation to refine suggestions, or ask it to add solutions directly to your project.
Viewing and Classifying Solution Cards
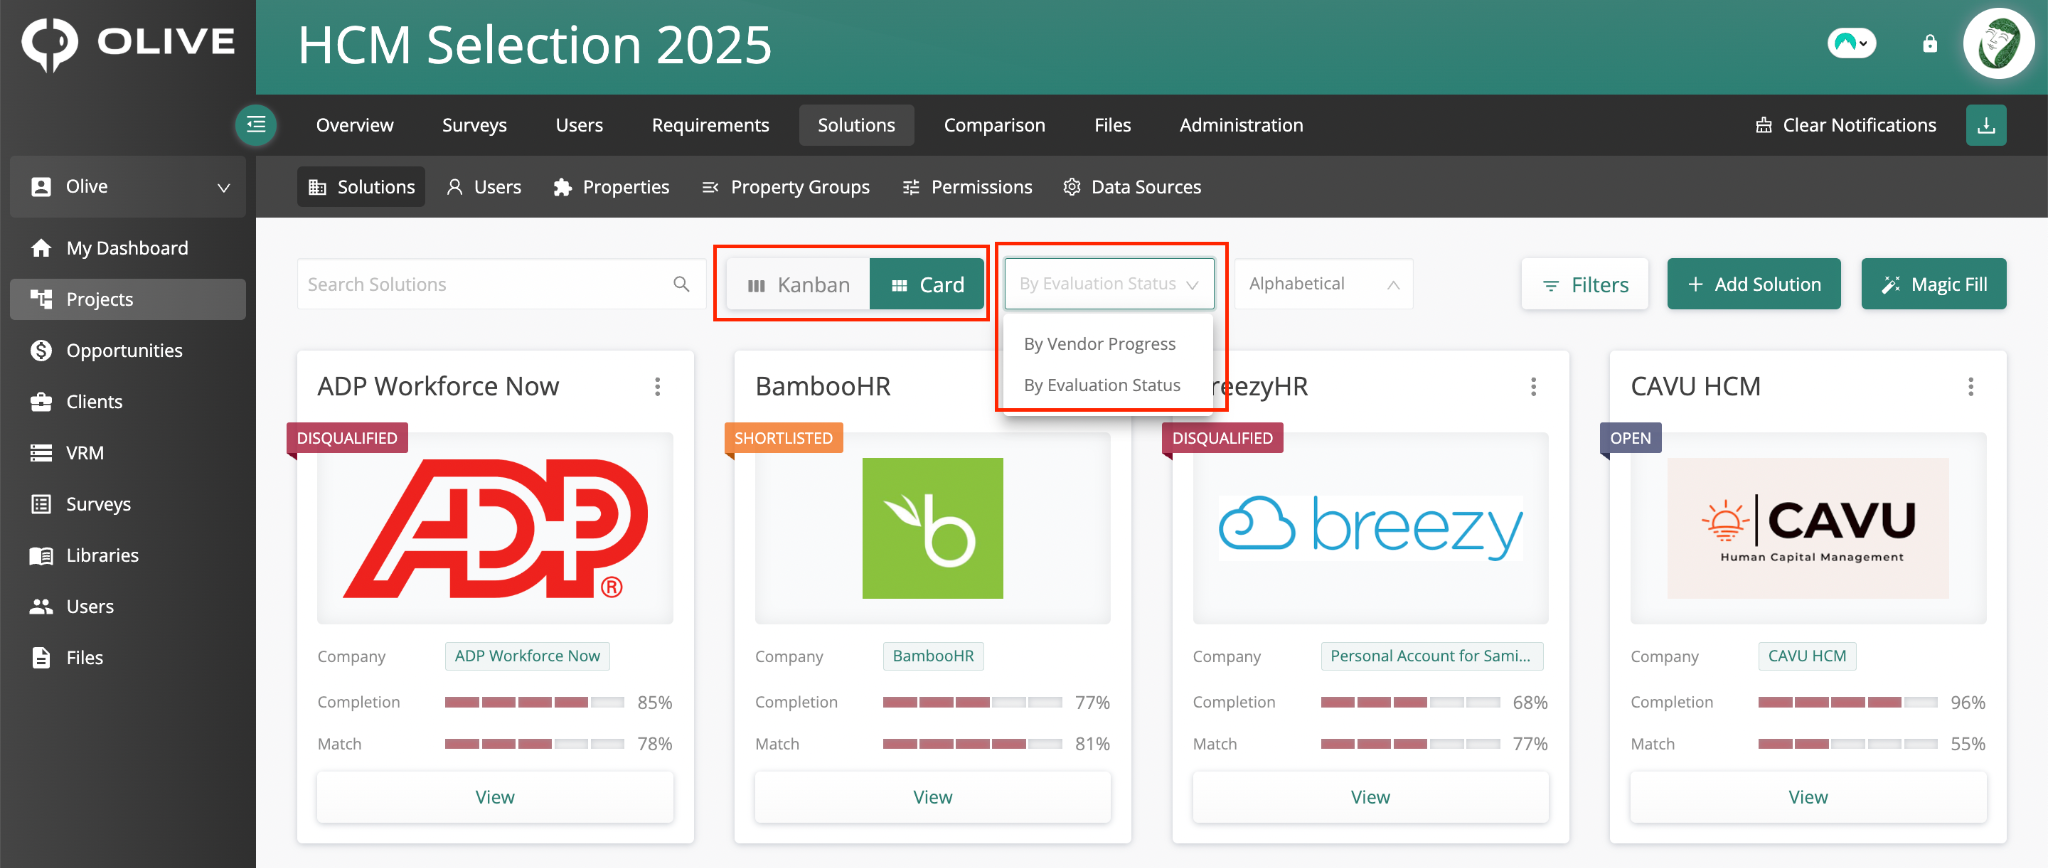
The Solutions toolbar — Kanban/Card toggle and By Vendor Progress/By Evaluation Status classification
Use the view and classification controls in the toolbar to customise how solution cards are displayed:
|
Option |
Description |
|
Card view |
Displays solution cards in a grid layout |
|
Kanban view |
Displays solution cards in column-based swimlanes based on the chosen classification |
|
By Vendor Progress |
Groups cards by: Included, Contacted, Engaged, In Progress, Submitted, Completed |
|
By Evaluation Status |
Groups cards by: Open, Reviewed, Shortlisted, Selected, Withdrawn, Disqualified |
|
💡 Tip: Use Kanban view with 'By Evaluation Status' to get a visual pipeline of where all your vendors stand at a glance. |
The Solution Card
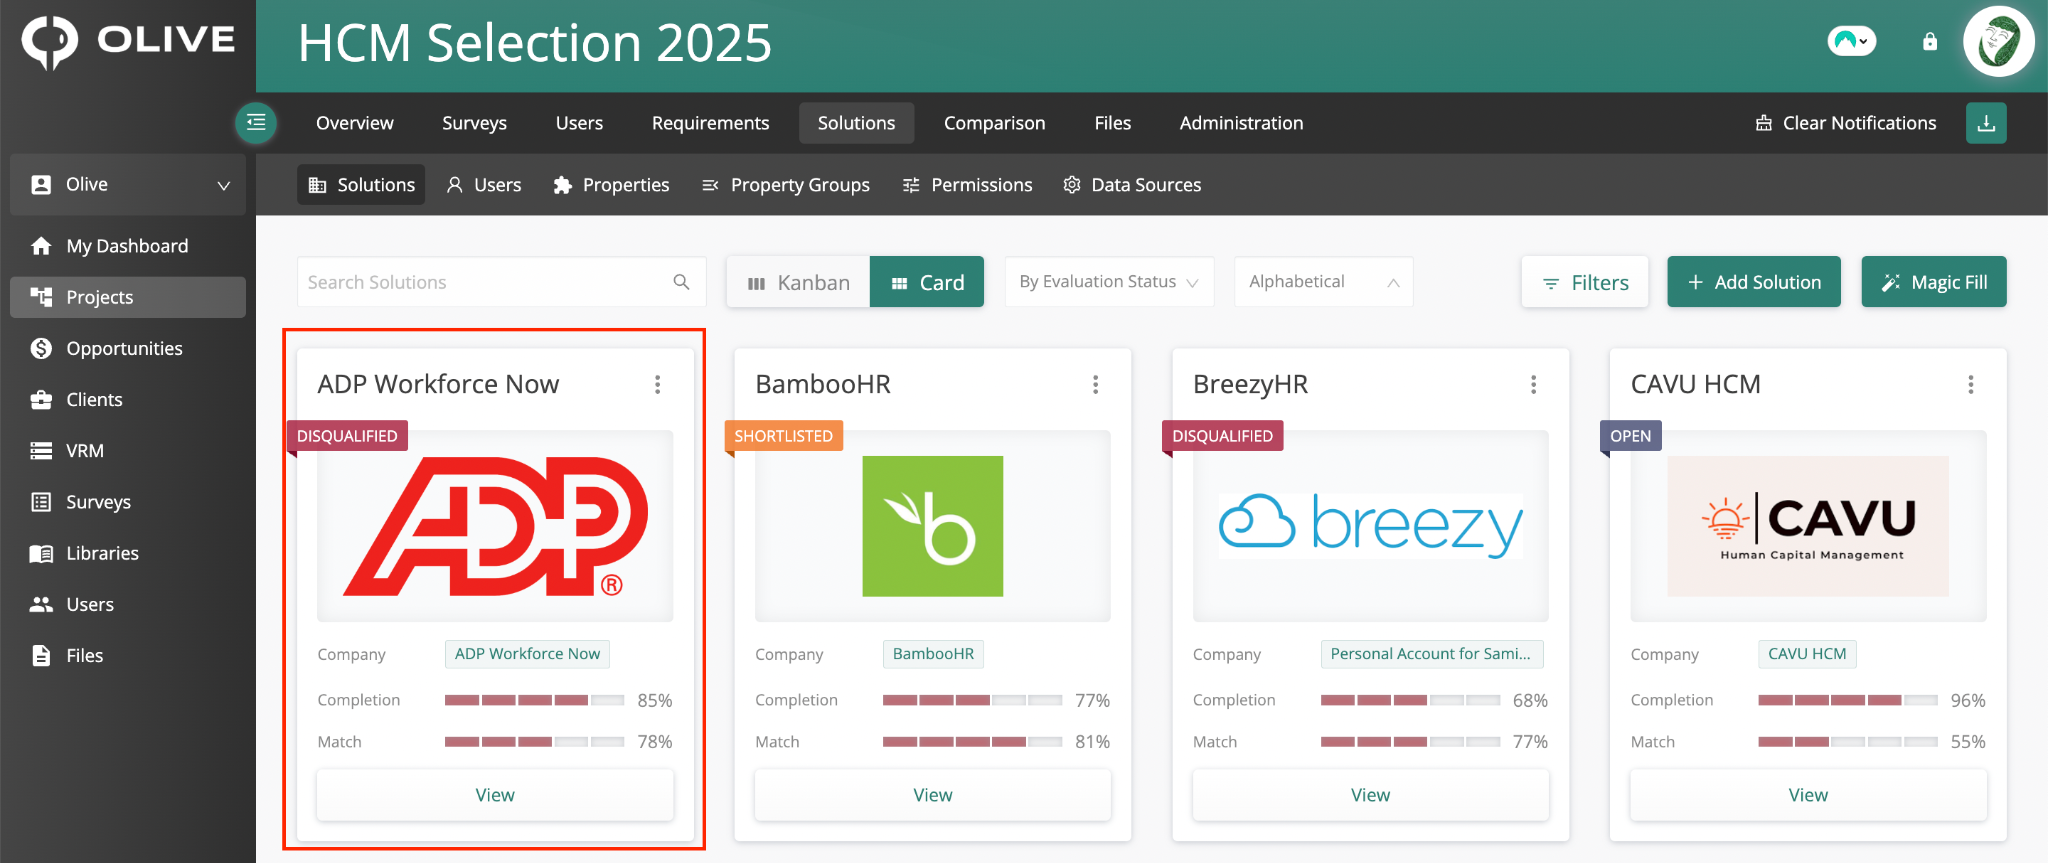
Solution Cards in Card view — showing completion %, match %, evaluation status badge, and View button
Each Solution Card displays:
- Solution name and logo
- Company name
- Completion % — how much of your RFP the vendor has responded to
- Match % — how well the vendor's responses match your requirements, based on your scores
- Evaluation status badge — e.g. Open, Shortlisted, Disqualified
- ⋮ (3 dots) menu — for quick actions (see below)
- View button — opens the full solution detail page
Solution Card 3-Dots Menu
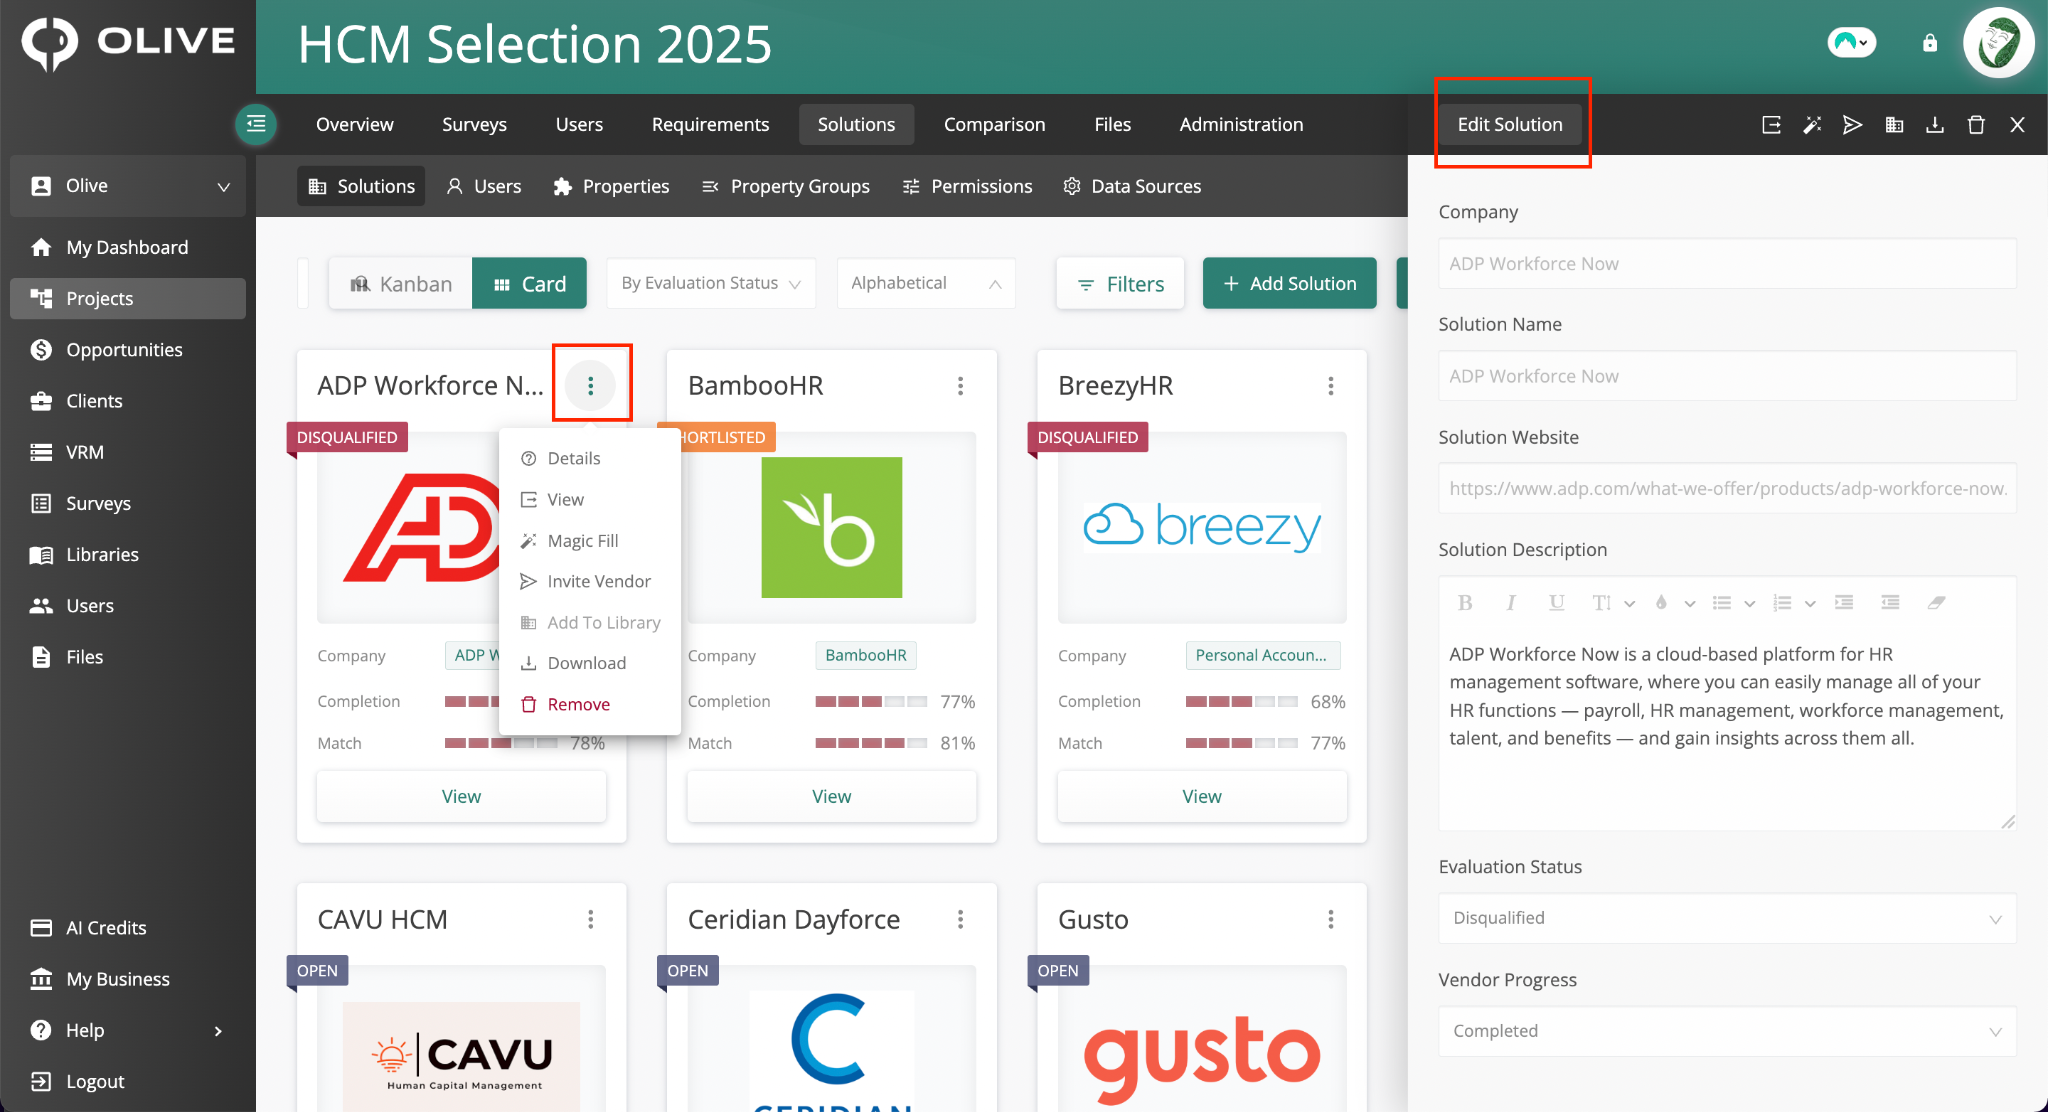
The 3-dots menu on a solution card and the Edit Solution panel
Click the ⋮ icon on any solution card to access the following actions:
|
Action |
What it does |
|
Details |
Opens the Edit Solution panel — update the Solution Description, Evaluation Status, and Vendor Progress |
|
View |
Opens the full solution detail page |
|
Magic Fill |
Uses AI to auto-generate responses for all requirements using publicly available information. Credits reimbursed for any unfound responses. |
|
Invite Vendor |
Opens the Users sub-tab to add and invite vendor users |
|
Add to Library |
Saves this solution to your Olive library |
|
Download |
Exports the vendor's responses as a spreadsheet |
|
Remove |
Permanently removes the solution and all its data from the project |
|
⚠️ Important: Removing a solution permanently deletes it and all its data from the project. This action cannot be undone. |
|
📌 Note: Magic Fill responses are AI-generated from public sources and are not provided directly by the vendor. Always verify AI-generated responses before using them to make final decisions. |
Viewing a Solution
Click the View button on any solution card to open the full solution detail page. This page has four tabs: Details, Responses, Pricing, and Properties.
Details Tab
The Details tab shows all key information about this vendor in your project:
- Solution logo, name, and website (non-editable)
- Opportunity Name — you can update the name of this vendor's opportunity from here
- Statistics — Vendor Progress status, overall Match %, and Completion %
- Notes from Vendor — any notes the vendor has shared with you
- Solution Description — as provided by the vendor
- Team Notes — internal notes visible only to your team, not to the vendor
- Reasons for Disqualification — visible to the vendor if they are disqualified
Responses Tab
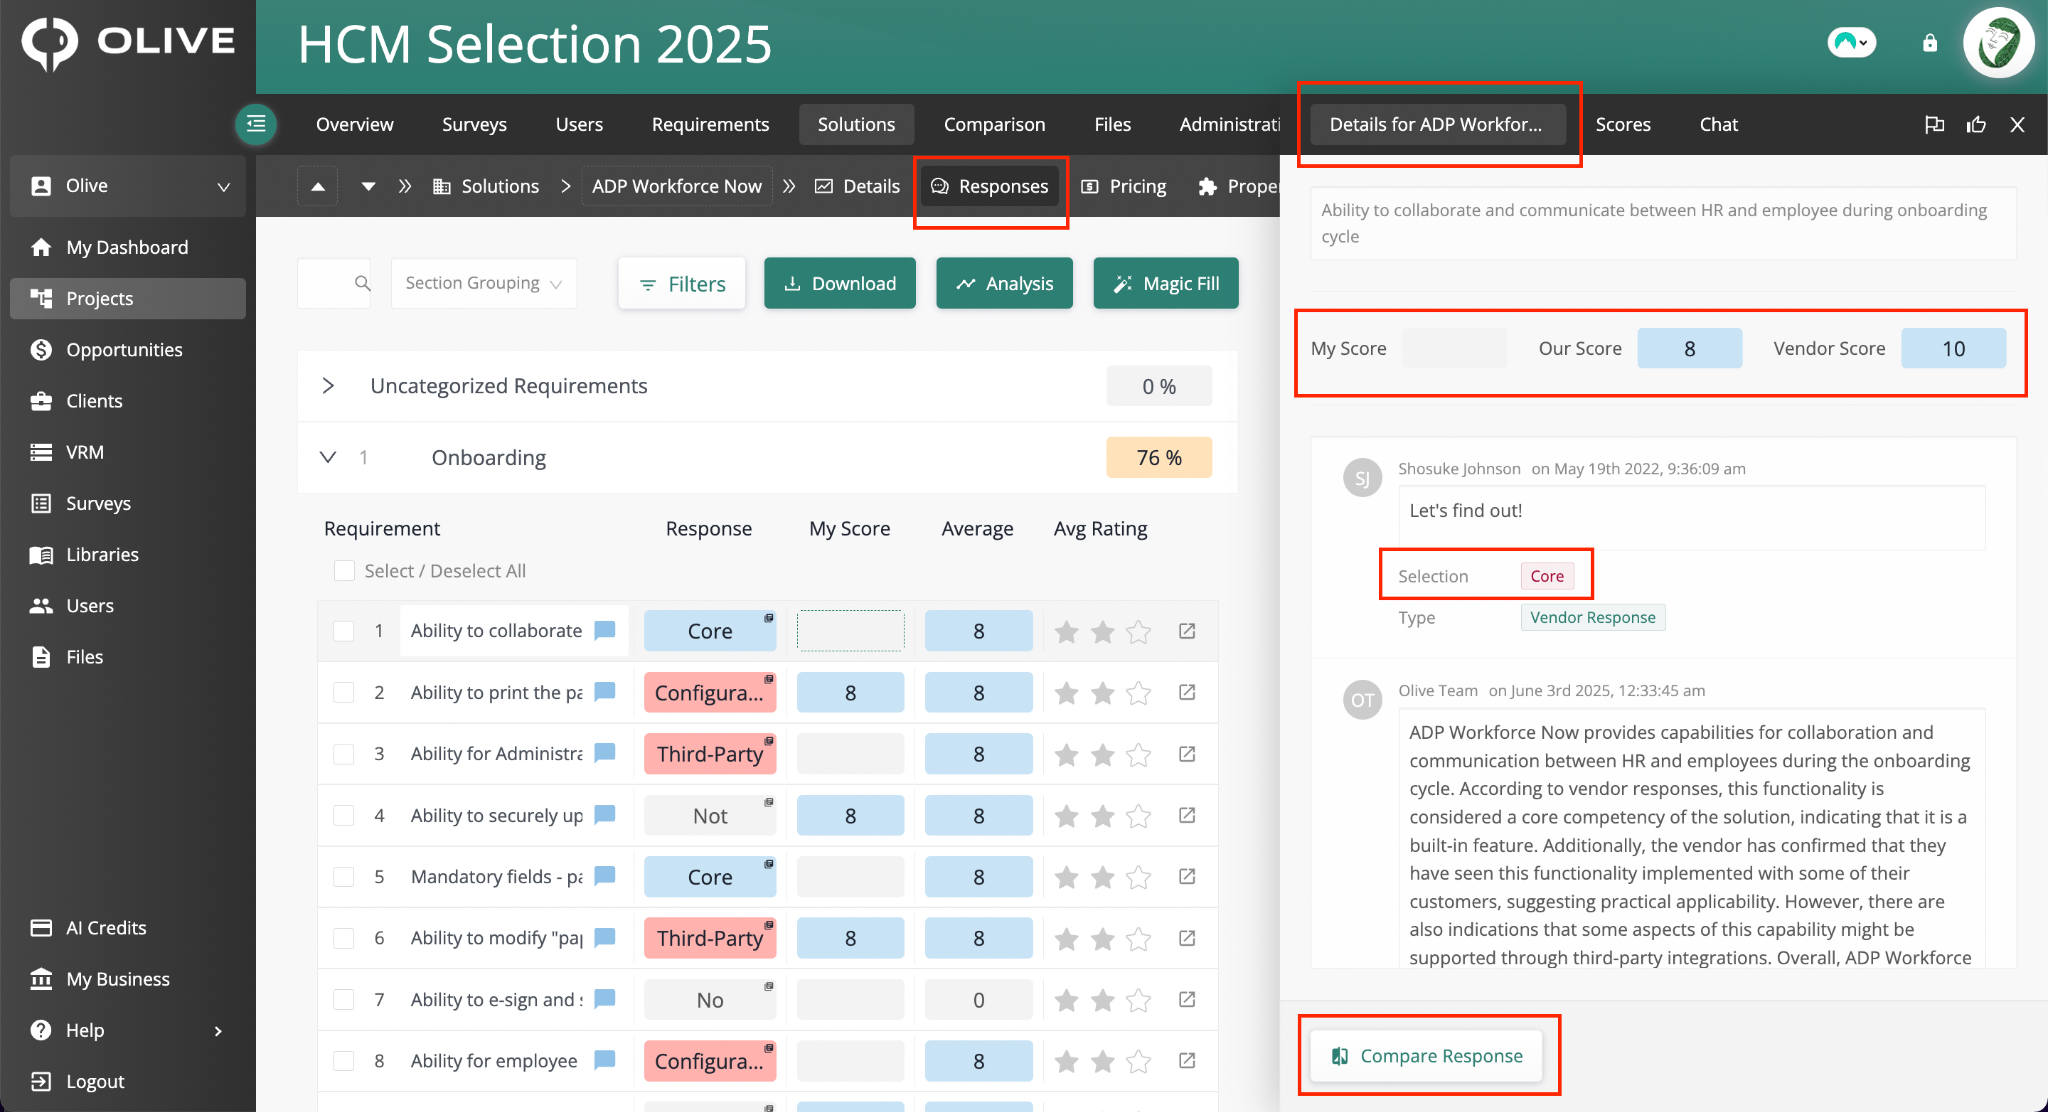
The solution Responses page — showing requirements, vendor responses, scores, and quick filters
The Responses tab is where you review and score all the vendor's responses to your requirements. Click on a section name to expand it and see each requirement and the vendor's answer.
Click on a vendor's response to open the Response Modal, which has three tabs:
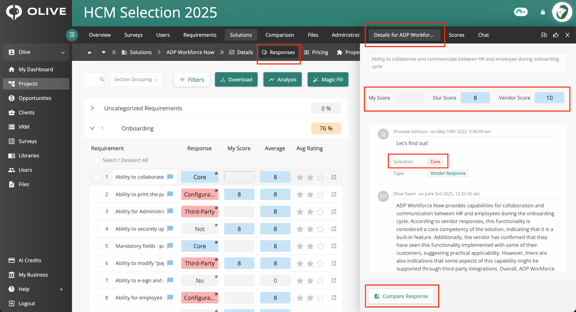
The Response Modal — Details tab showing the vendor's response, scoring fields, and Compare Response button
- Details tab — shows the vendor's chosen response and any description they provided. Enter your score in 'My Score', see the team average under 'Our Score', and the default score under 'Vendor Score'. Use 'Compare Response' to compare side by side with another vendor.
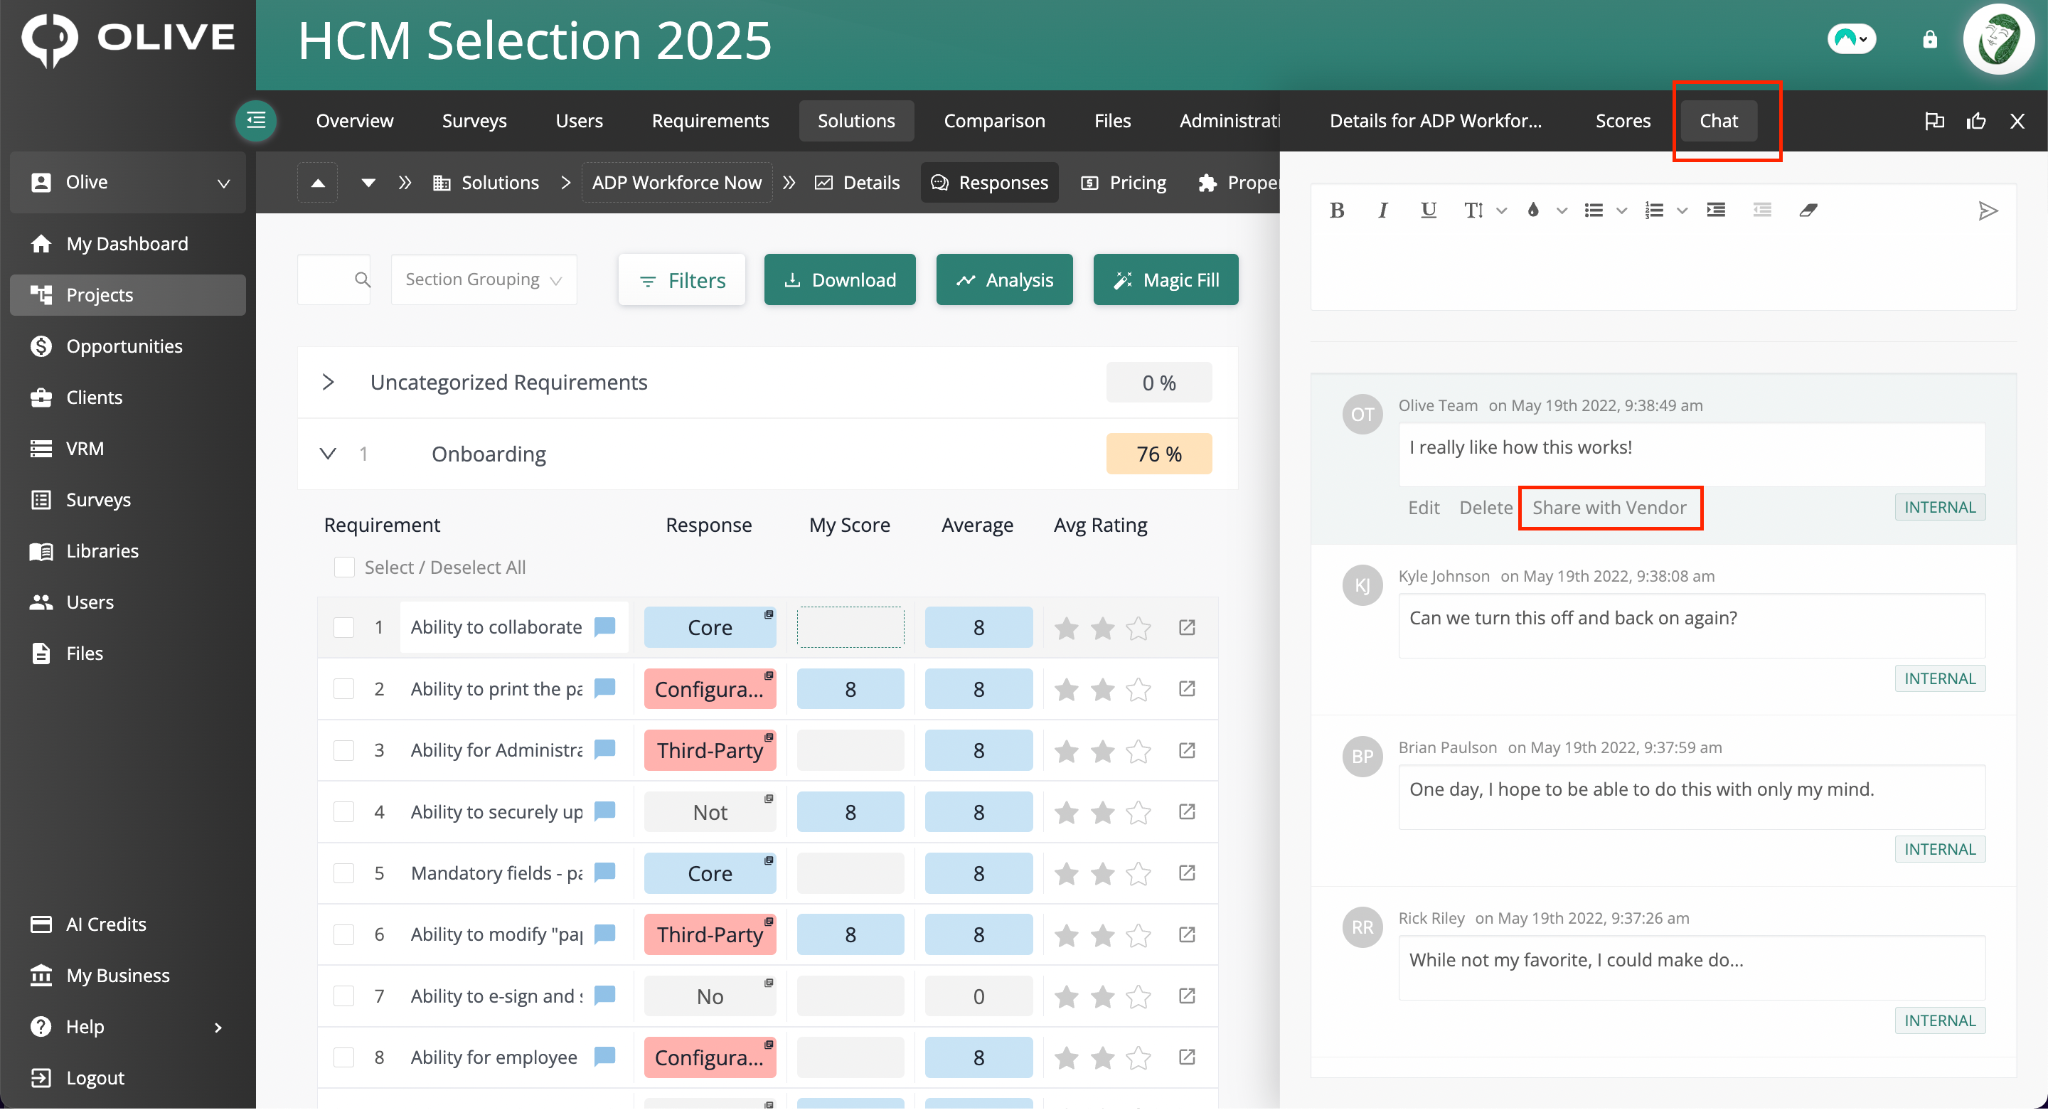
The Response Modal — Chat tab with the 'Share with Vendor' option highlighted
- Chat tab — discuss the response with your internal team. Use 'Share with Vendor' to share your comment with the vendor. You can Edit and Delete your own messages.
- Scores tab — see the individual scores given by each team member for this response.
At the top of the Response Modal, two flagging options are available:
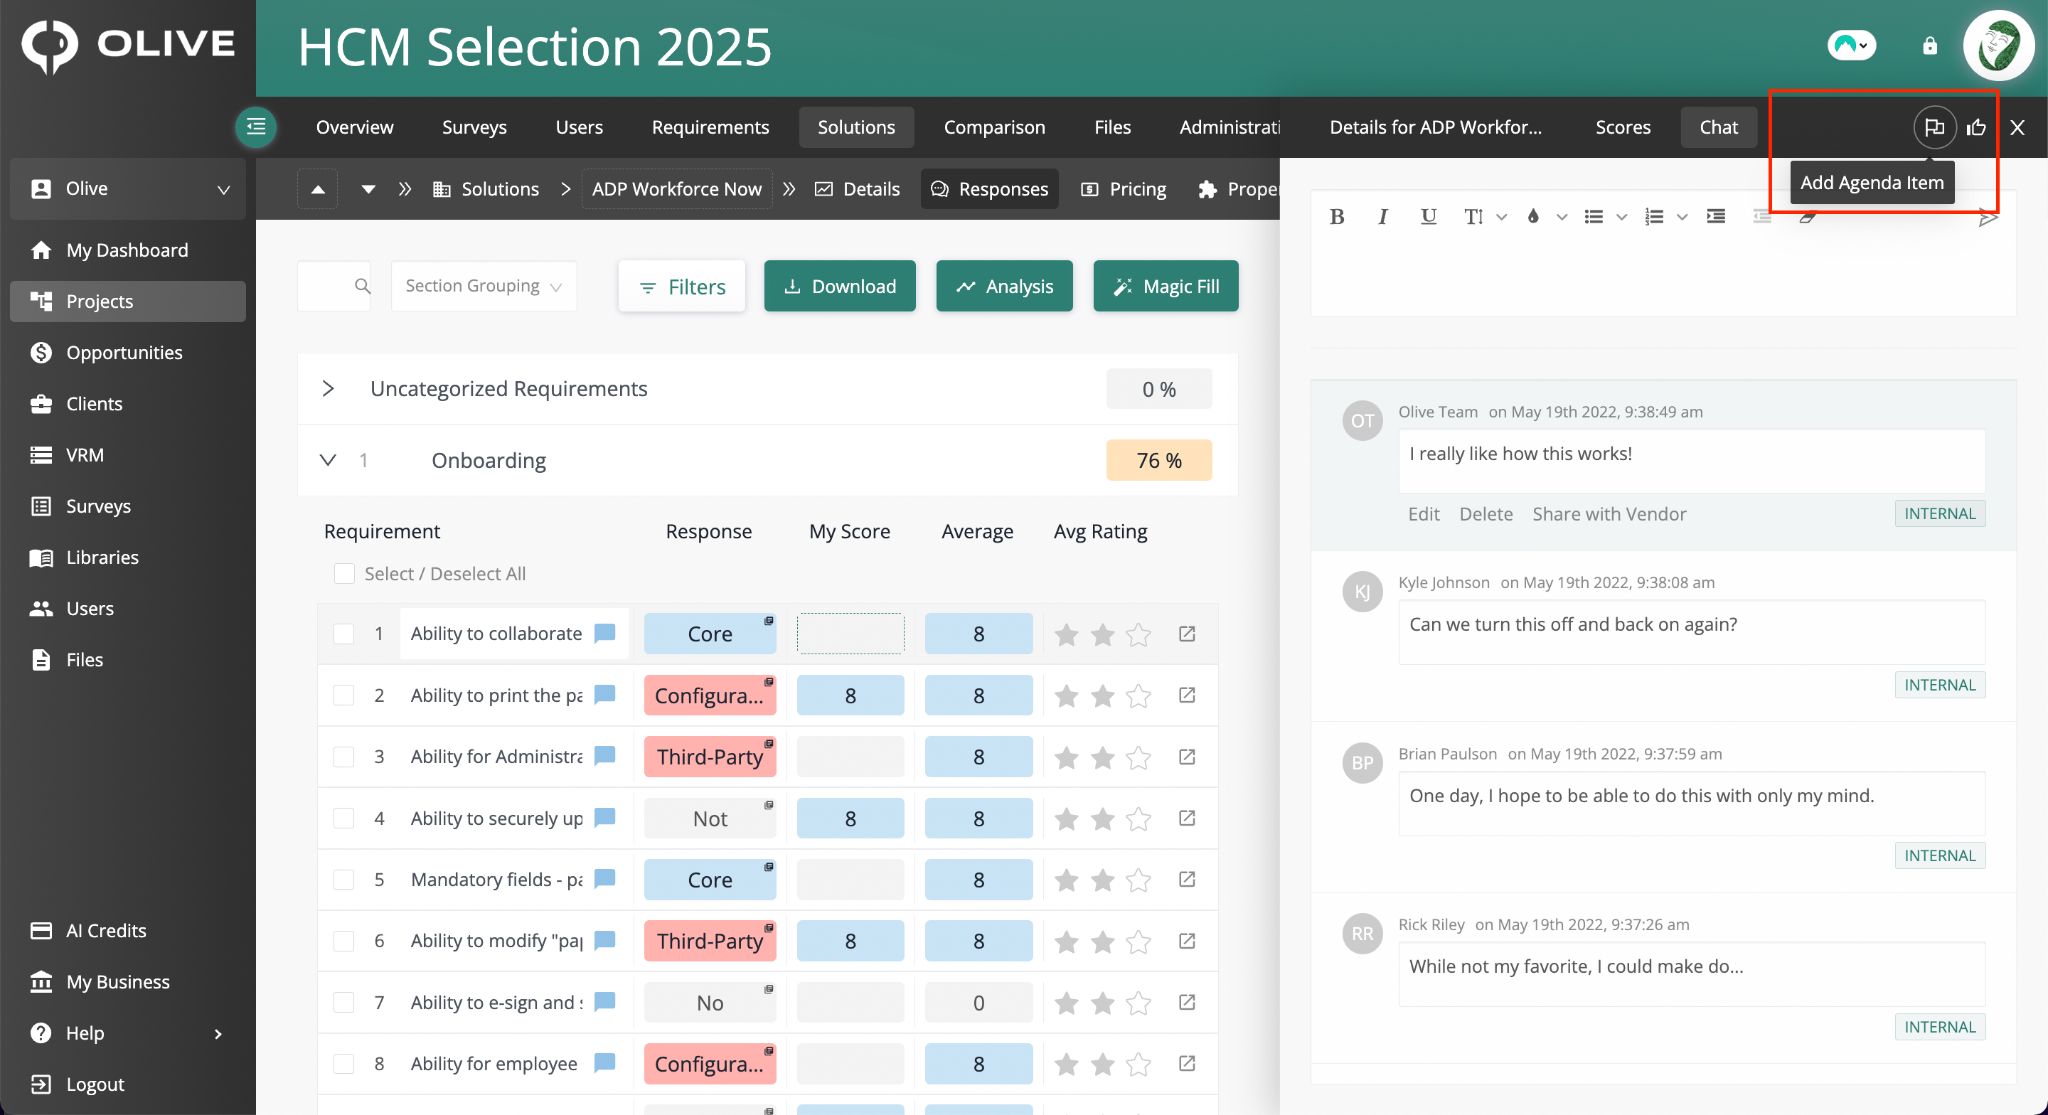
The Response Modal top bar — with 'Add Agenda Item' and 'Mark as Reviewed' flag icons
- Add Agenda Item — flags this response to discuss during a vendor demo
- Mark as Reviewed — marks the response as reviewed once you've evaluated it
Use the quick filters in the tab bar to narrow down the responses view:
|
Quick filter |
Shows |
|
Updated |
Requirements updated from your side |
|
Must Have |
Requirements marked as must-have |
|
Agenda Items |
Requirements flagged as agenda items |
|
Discussions |
Requirements with active team chat |
|
Answered |
Requirements the vendor has answered |
|
Unanswered |
Requirements the vendor hasn't answered yet |
Additional toolbar actions on the Responses page:
- Download — export the vendor's responses as a spreadsheet
- Magic Fill — AI-generate responses for this vendor for all requirements
- Analysis — opens the Solution Analysis view (see below)
Solution Analysis
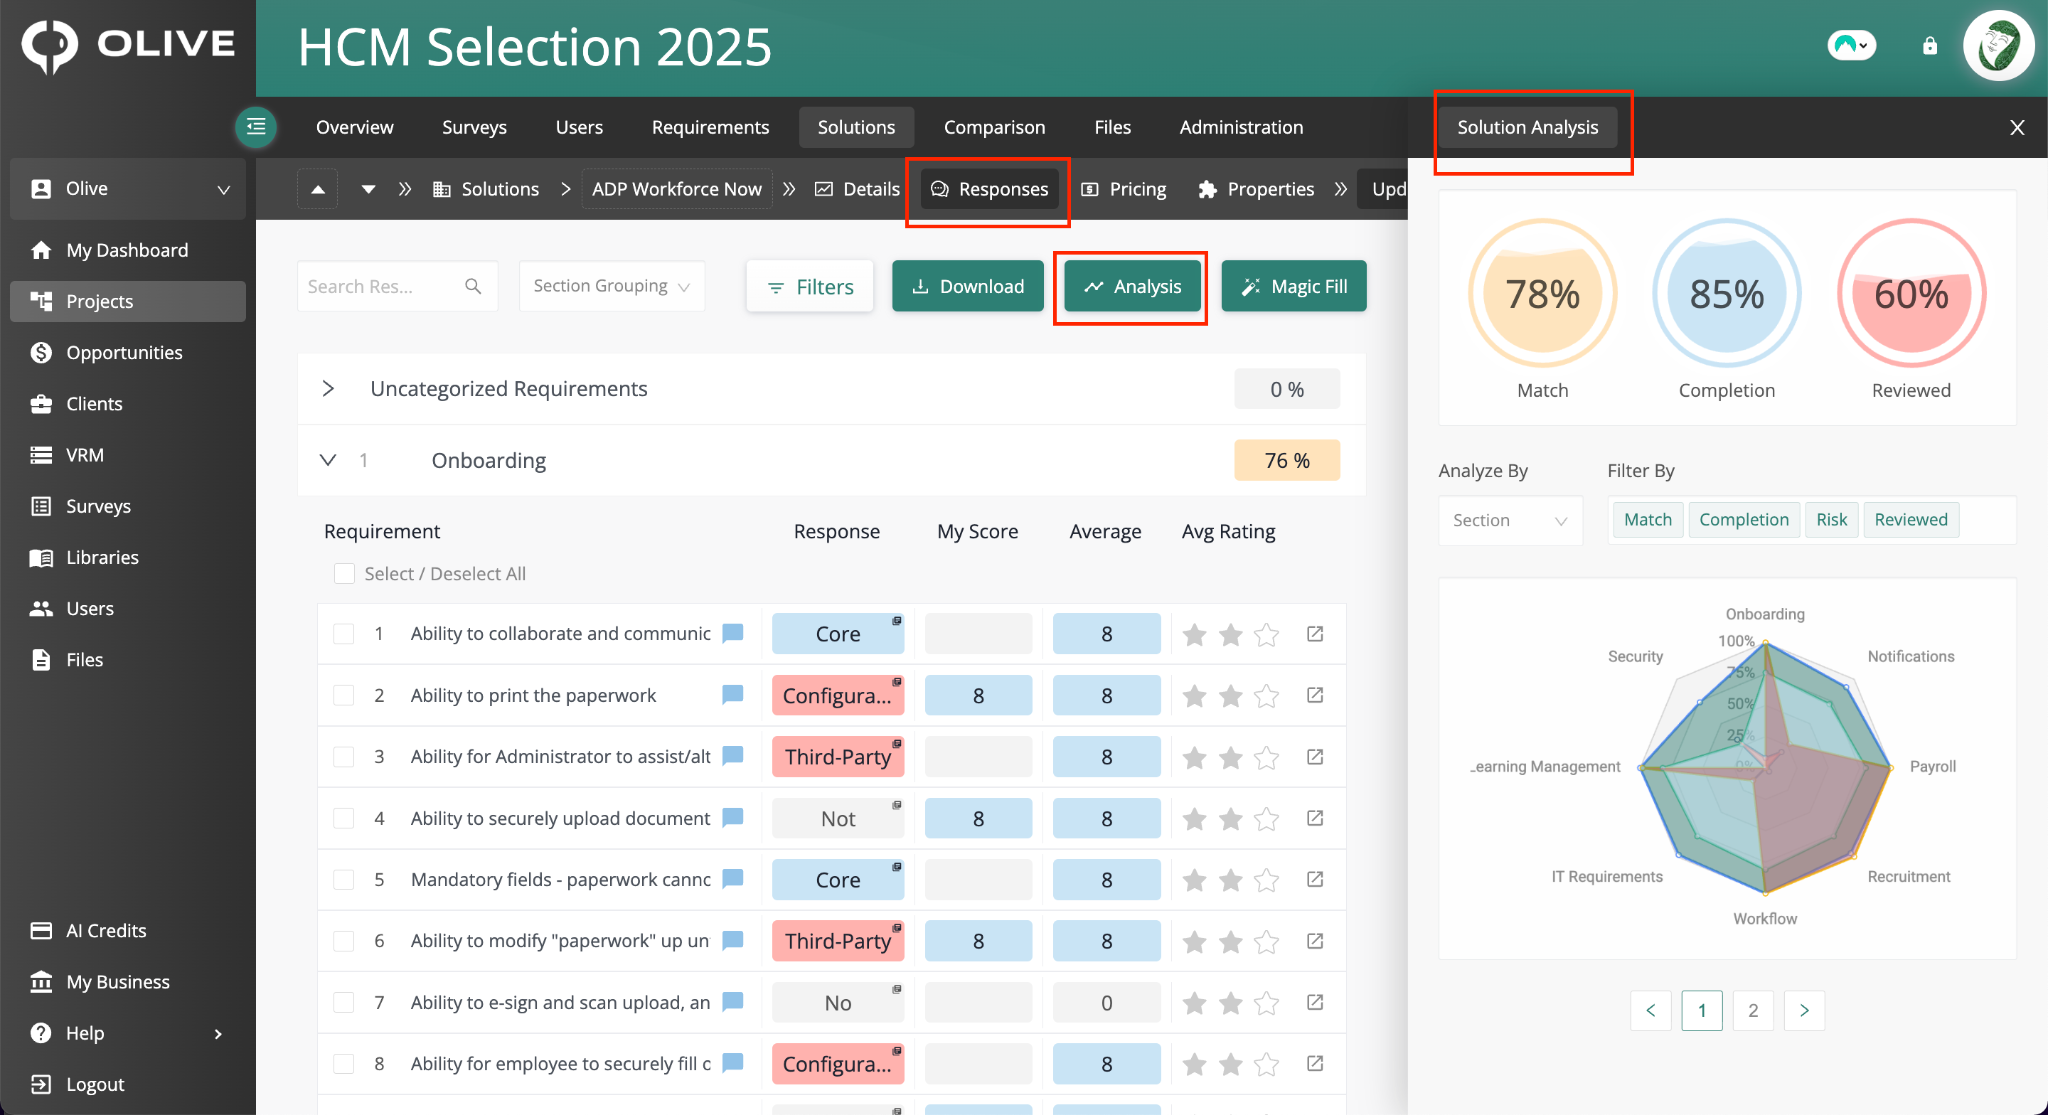
The Solution Analysis view — showing Match %, Completion %, and Reviewed % with a radar chart
Click the Analysis button on the Responses page to open the Solution Analysis view. This gives you a percentage-based overview of the vendor's performance:
- Match % — how well their responses match your requirements based on your scores
- Completion % — how much of the RFP they've completed
- Reviewed % — how many responses your team has marked as reviewed
Use the Analyze By dropdown to slice the data by Sections, Tags, Department, or Stakeholder. Use the Filter By buttons to focus on Completion, Risk, Reviewed, or Match. A radar chart visualises the data.
Pricing Tab
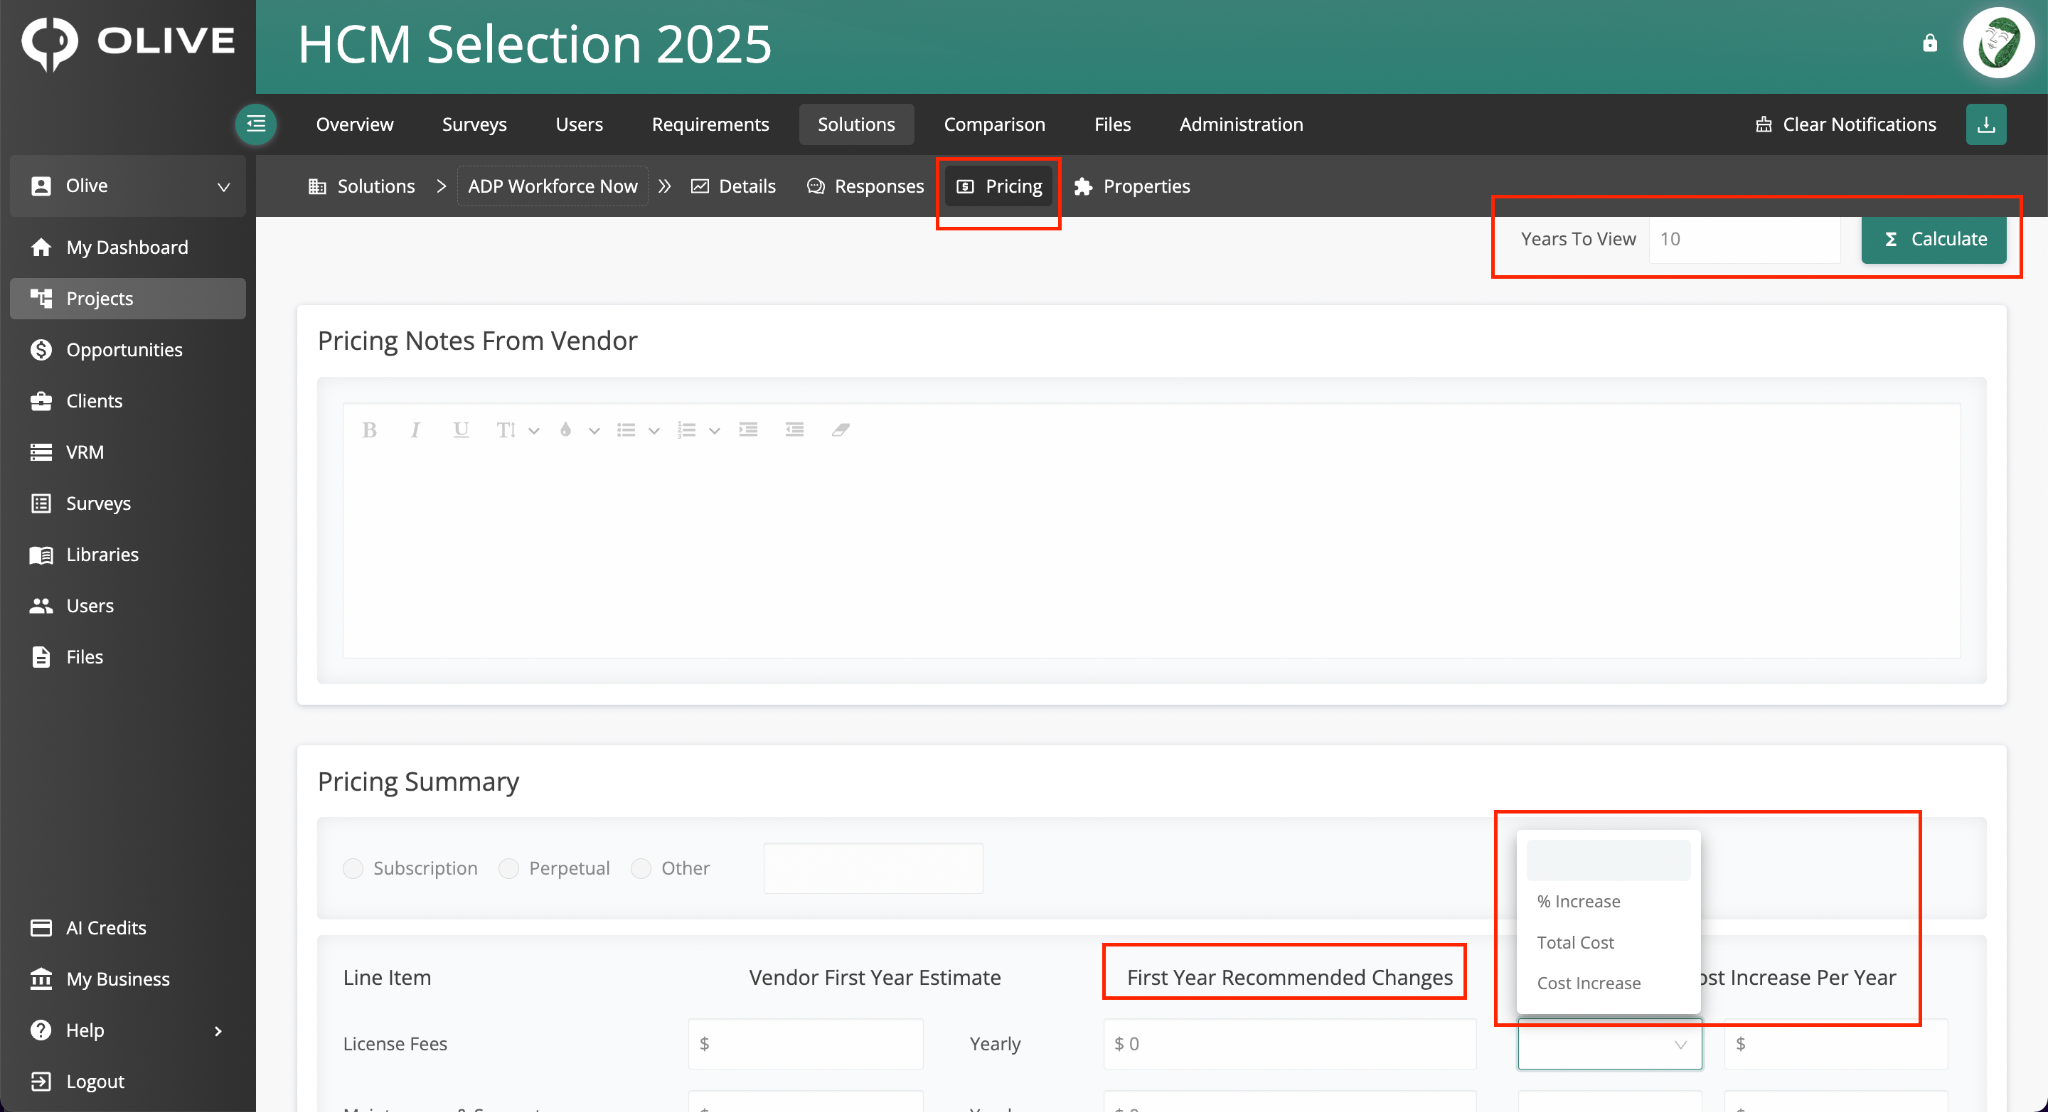
The solution Pricing tab — Pricing Summary, First Year Recommended Changes, and Estimated Cost Increase Per Year
Click the Pricing tab to review the vendor's pricing submission. Enter the number of years in 'Years to View' and click Calculate to update the pricing view. The page includes:
- Pricing Notes from Vendor — any notes the vendor has added about their pricing
- Pricing Summary — a line-by-line breakdown: License Fees, Maintenance & Support, Training, Services, Other Costs
- First Year Recommended Changes — enter your adjusted cost estimates in $ per line item
- Estimated Cost Increase Per Year — choose % Increase, Total Cost, or Cost Increase, then enter the value
- Vendor Pricing TCO — Total Cost of Ownership based on the vendor's submitted pricing
- TCO Based on Suggested Price Changes — TCO recalculated using your adjusted estimates
- Vendor Services Breakdown — a further breakdown of the vendor's services pricing
|
💡 Tip: Use First Year Recommended Changes to model a negotiated pricing scenario and compare it against other vendors in the Comparison tab. |
Properties Tab
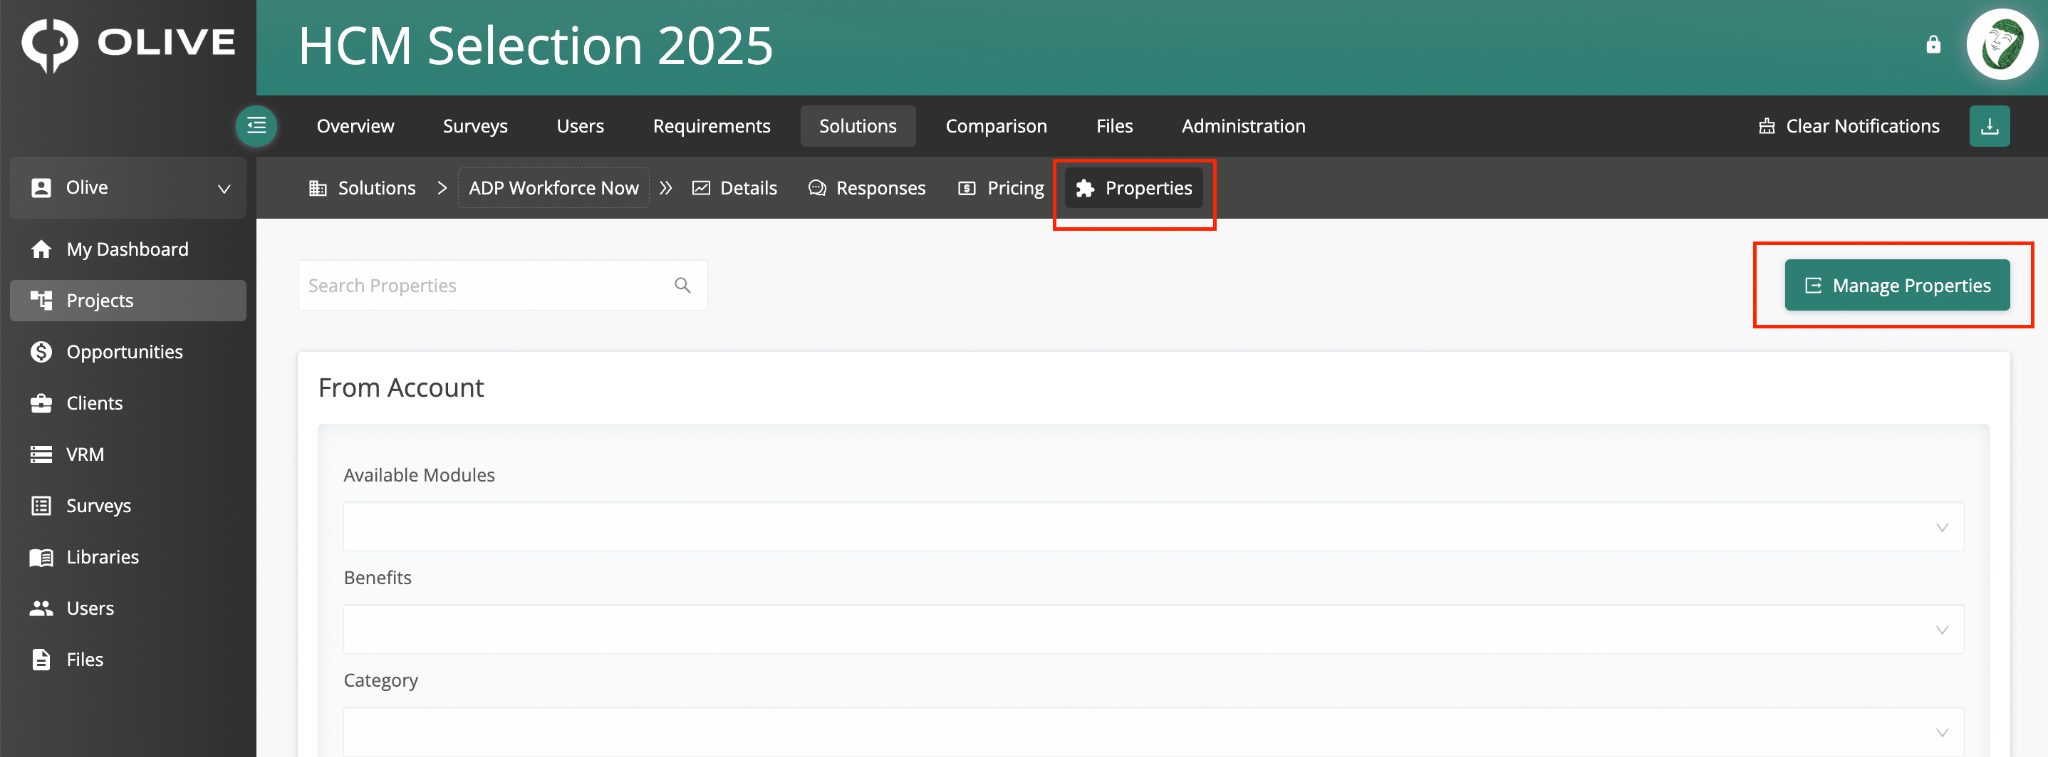
The solution Properties tab — showing all properties for this vendor with a Manage Properties button
Click the Properties tab to view and manage the custom property values for this specific vendor. Click 'Manage Properties' at the top right to navigate to the Properties sub-tab where you can add or edit the overall property template.
Users Sub-tab
Click the Users sub-tab to manage all vendor users across your project. This is where you add vendor contacts, invite them to their RFP opportunity, and manage their access.
Adding Vendor Users
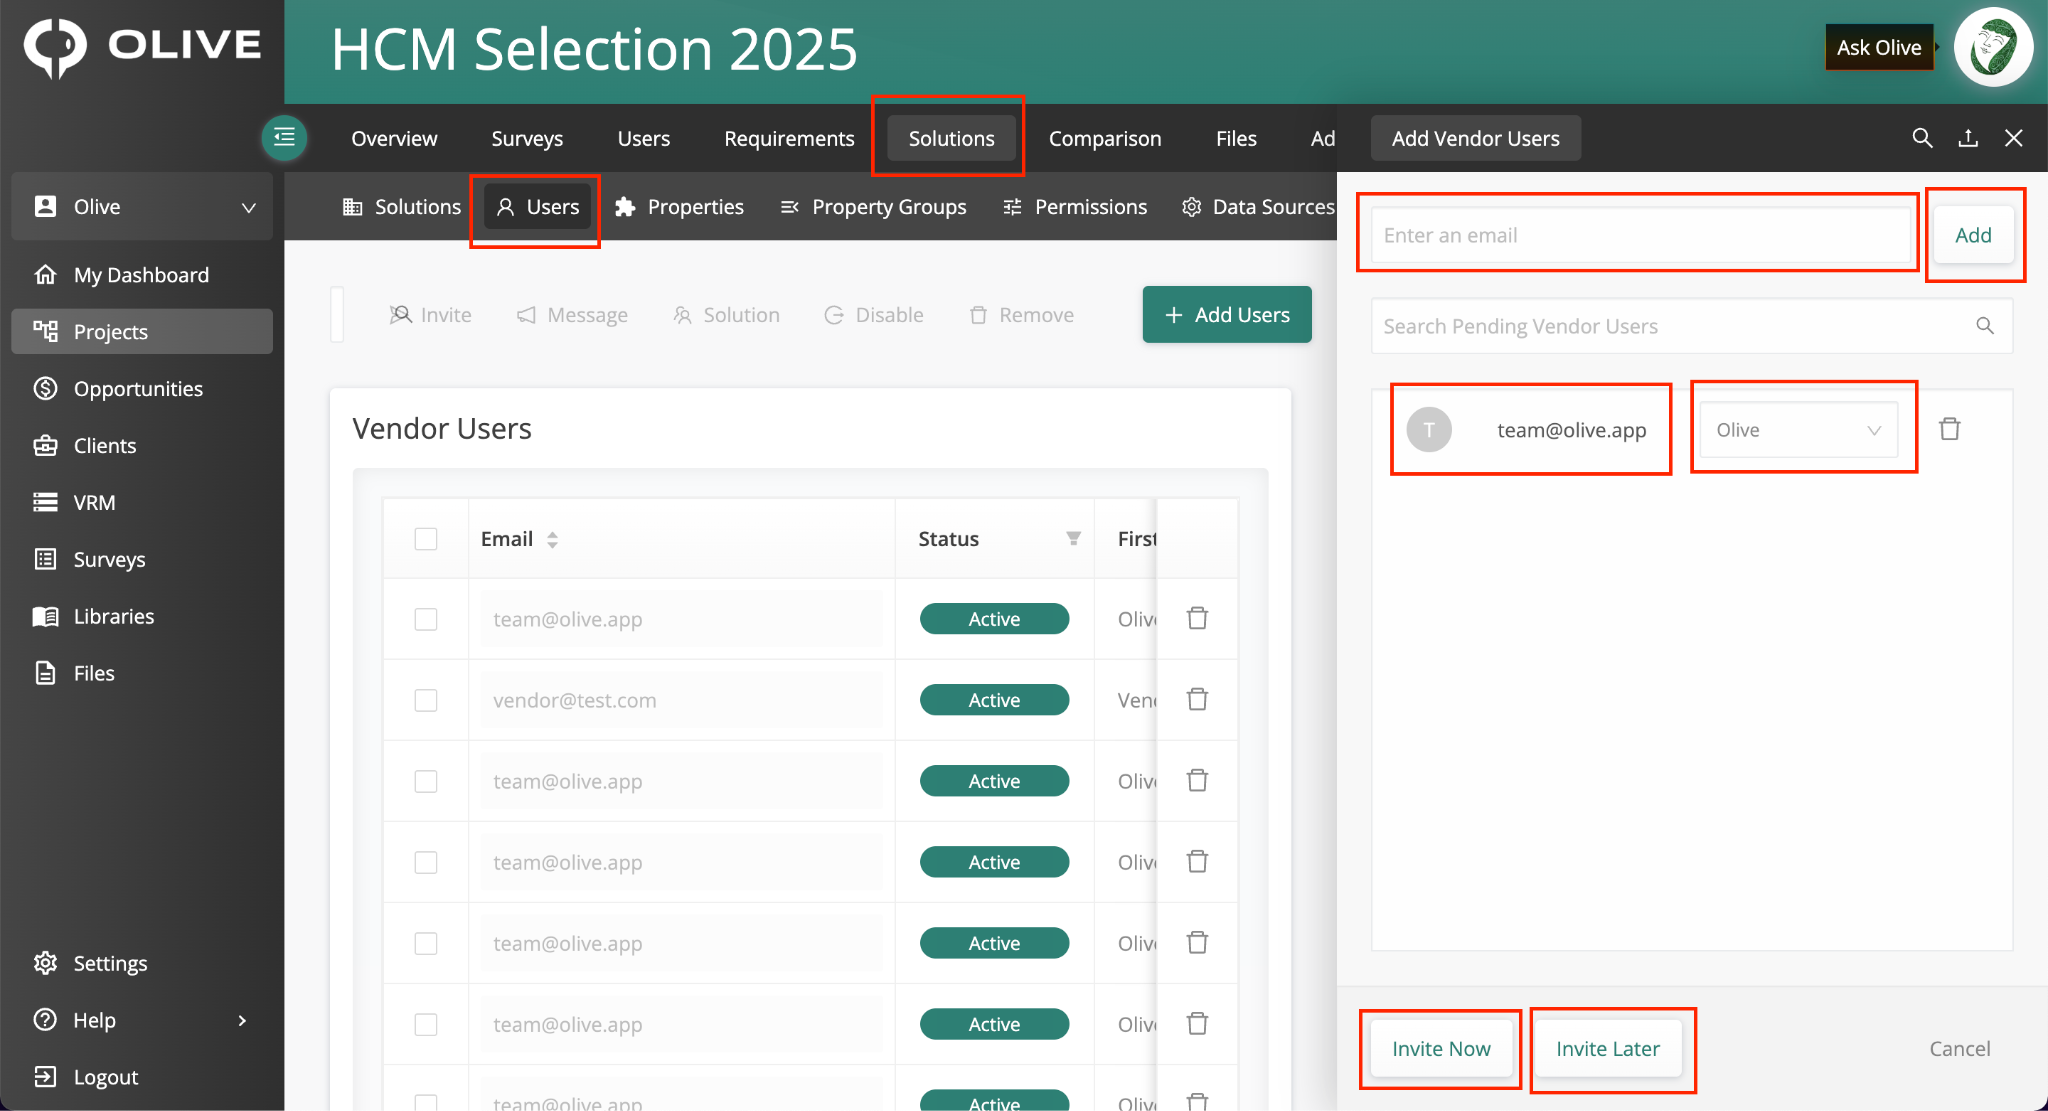
The Users sub-tab — Add Vendor Users panel open on the right
- Click '+ Add Users' to open the Add Vendor Users panel
- Enter the vendor user's email address and click 'Add'
- Use the dropdown to assign them to the correct solution
- Invite Later: Adds the user to the staging area without sending an email. Status shows as Inactive until you send the invite. Best when adding multiple users in one session before notifying anyone.
- Invite Now: Skips staging entirely — the invitation modal opens immediately and the invite is sent as soon as you confirm. Best for adding one user who needs access straight away.
The user will appear in the Vendor Users table with a status of Inactive until they are invited.
Inviting Vendor Users
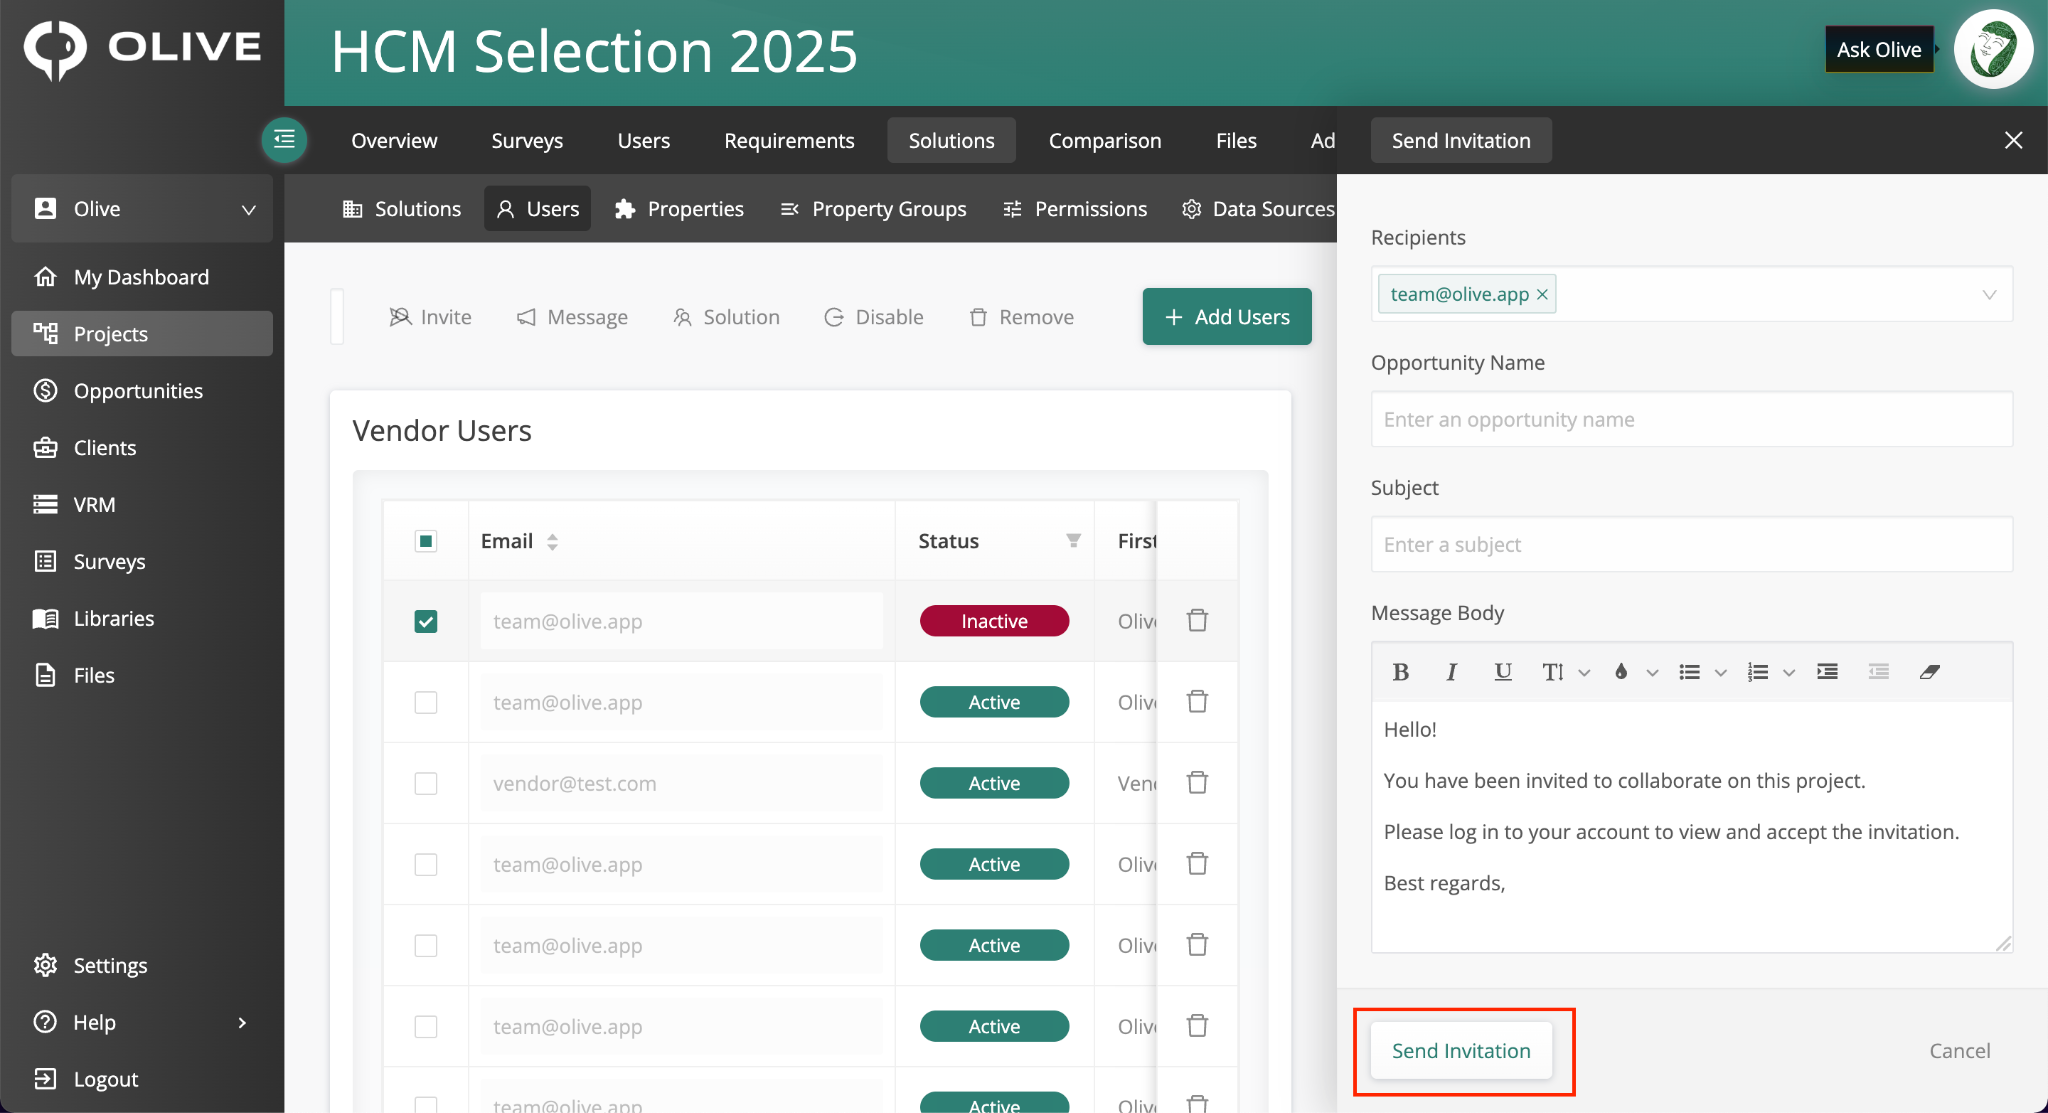
The Send Invitation panel — with Recipients, Opportunity Name, and Invitation Body fields
- Tick the checkboxes next to the users you want to invite
- The users can be seen in the “Recipients” field
- Type in the “Opportunity Name”, Type in the invitation email “Subject”, Customise the Opportunity Name (defaults to the project name)
- Type the email body in the “Message Body”
- Click 'Send Invitation' to deliver — the invite is sent via info@olive.app
|
💡 Tip: You can invite users from one solution at a time, giving each a customised opportunity name and invitation message — useful when running parallel RFP tracks with different vendors. |
Messaging Vendor Users
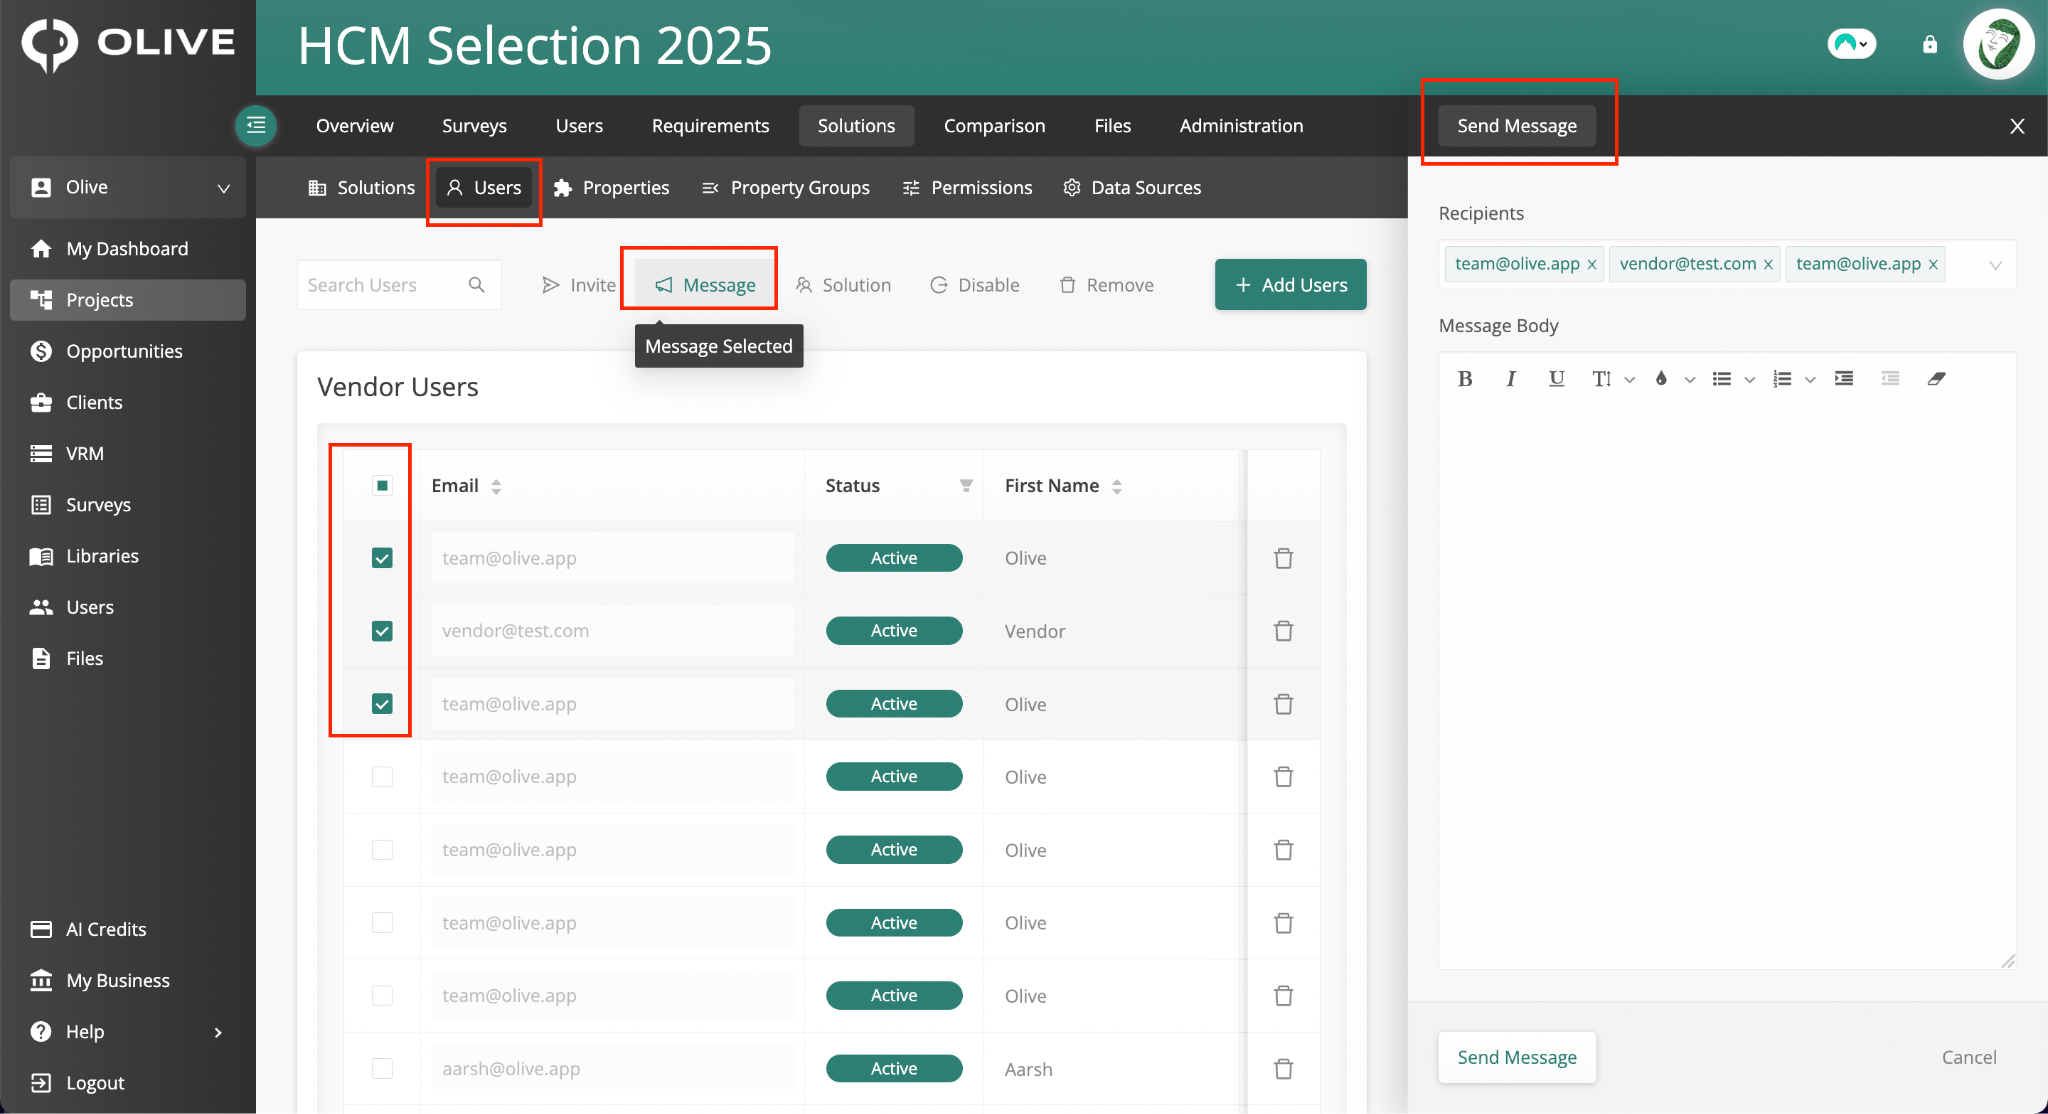
The Send Message panel — for sending a direct message to selected vendor users
- Select one or more vendor users using the checkboxes
- Click 'Message'
- Write your message in the Message Body field
- Click 'Send Message'
Changing a User's Solution Assignment
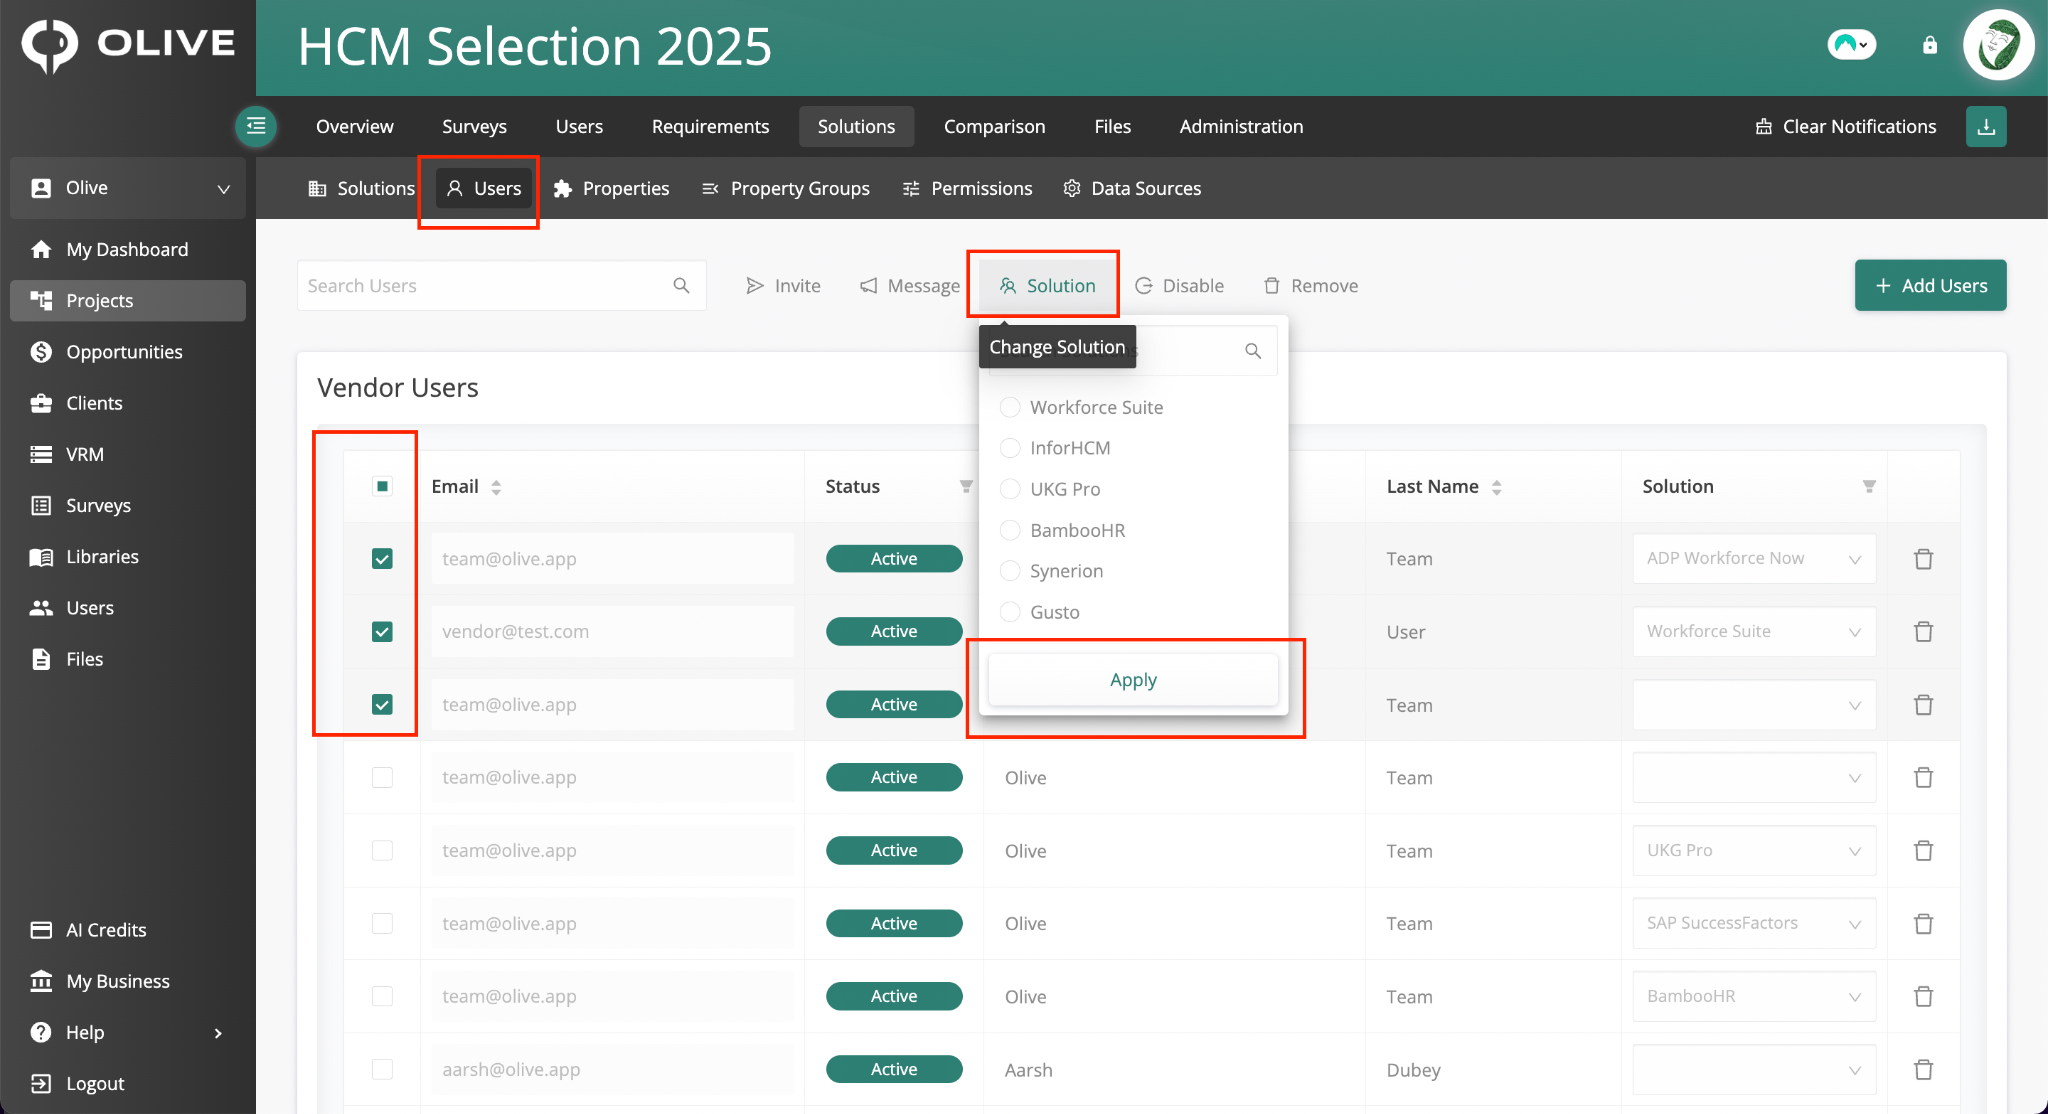
The Change Solution dropdown — for reassigning selected vendor users to a different solution
- Select one or more vendor users using the checkboxes
- Click 'Solution'
- Choose the correct solution from the dropdown
- Click 'Apply' — the Solution column in the Vendor Users table will update
Disabling and Removing Vendor Users
Select one or more vendor users, then click either:
- Disable — prevents the user from accessing their opportunity view, but keeps their record in the system. A confirmation prompt will appear.
- Remove — permanently removes the user from the project. To add them back, they will need to be re-invited. A confirmation prompt will appear.
Vendor User Status
The Status column in the Vendor Users table shows each user's current state:
|
Status |
What it means |
|
Inactive |
Added to the project but not yet invited to the opportunity |
|
Pending |
Invited but hasn't accepted yet |
|
Active |
Has accepted the invite and logged into their opportunity |
Filtering the Vendor Users Table
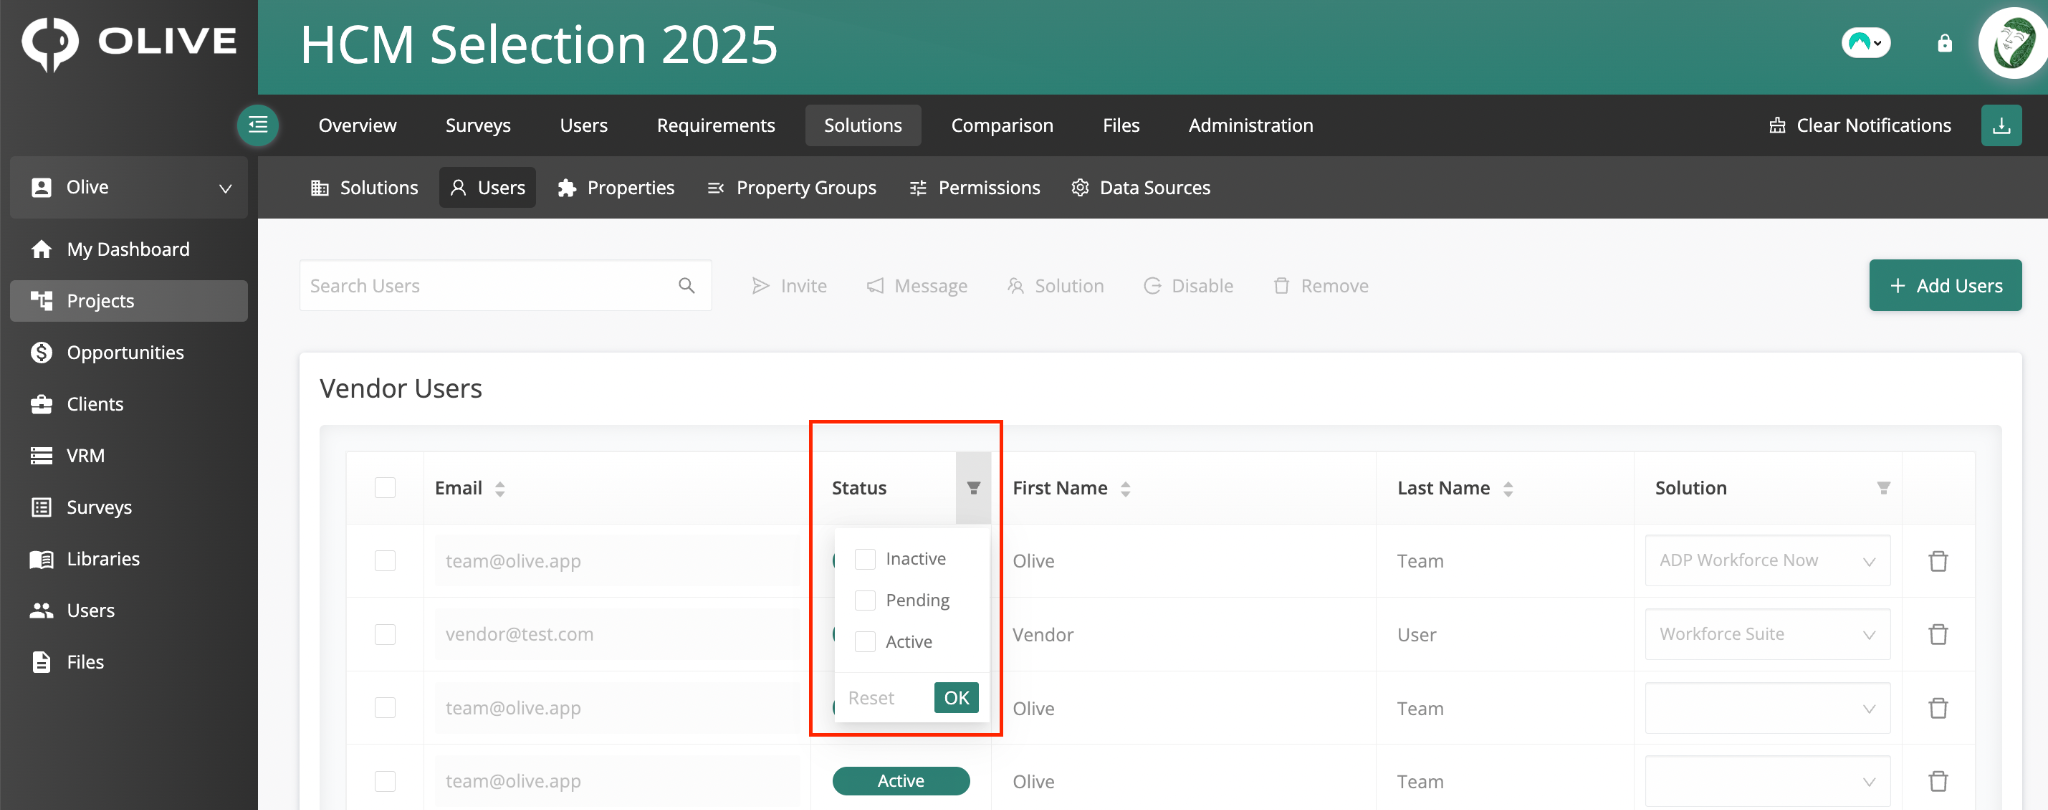
The Status filter dropdown — for filtering the Vendor Users table by Inactive, Pending, or Active
- Status filter — click the filter icon in the Status column header. Select Inactive, Pending, or Active, then click OK to apply. Click Reset to clear.
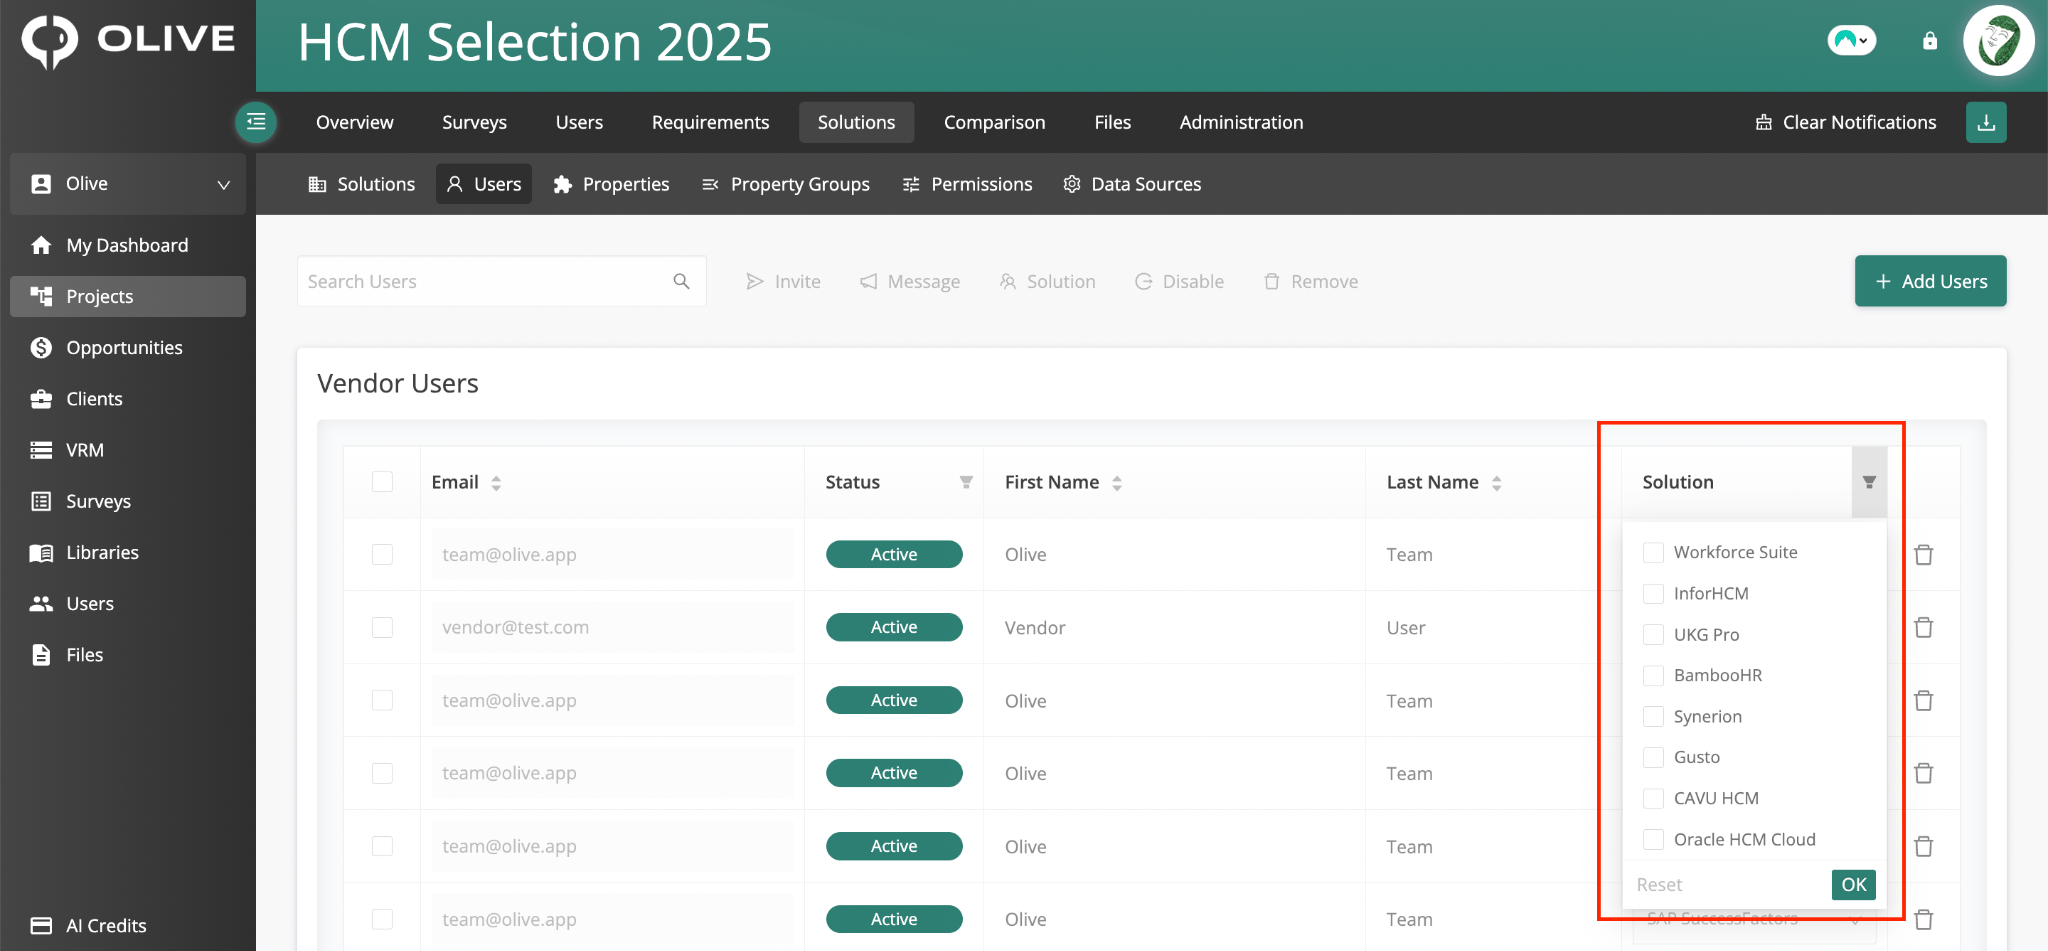
The Solution filter dropdown — for filtering the Vendor Users table by solution
- Solution filter — click the filter icon in the Solution column header. Select one or more solutions, click OK to apply, and Reset to clear.
Properties Sub-tab
Click the Properties sub-tab to create and manage custom data fields (Properties) for solutions in your project. Properties allow you to capture structured information about each vendor — such as ISO certifications, contract types, pricing models, and more.
Adding a Property
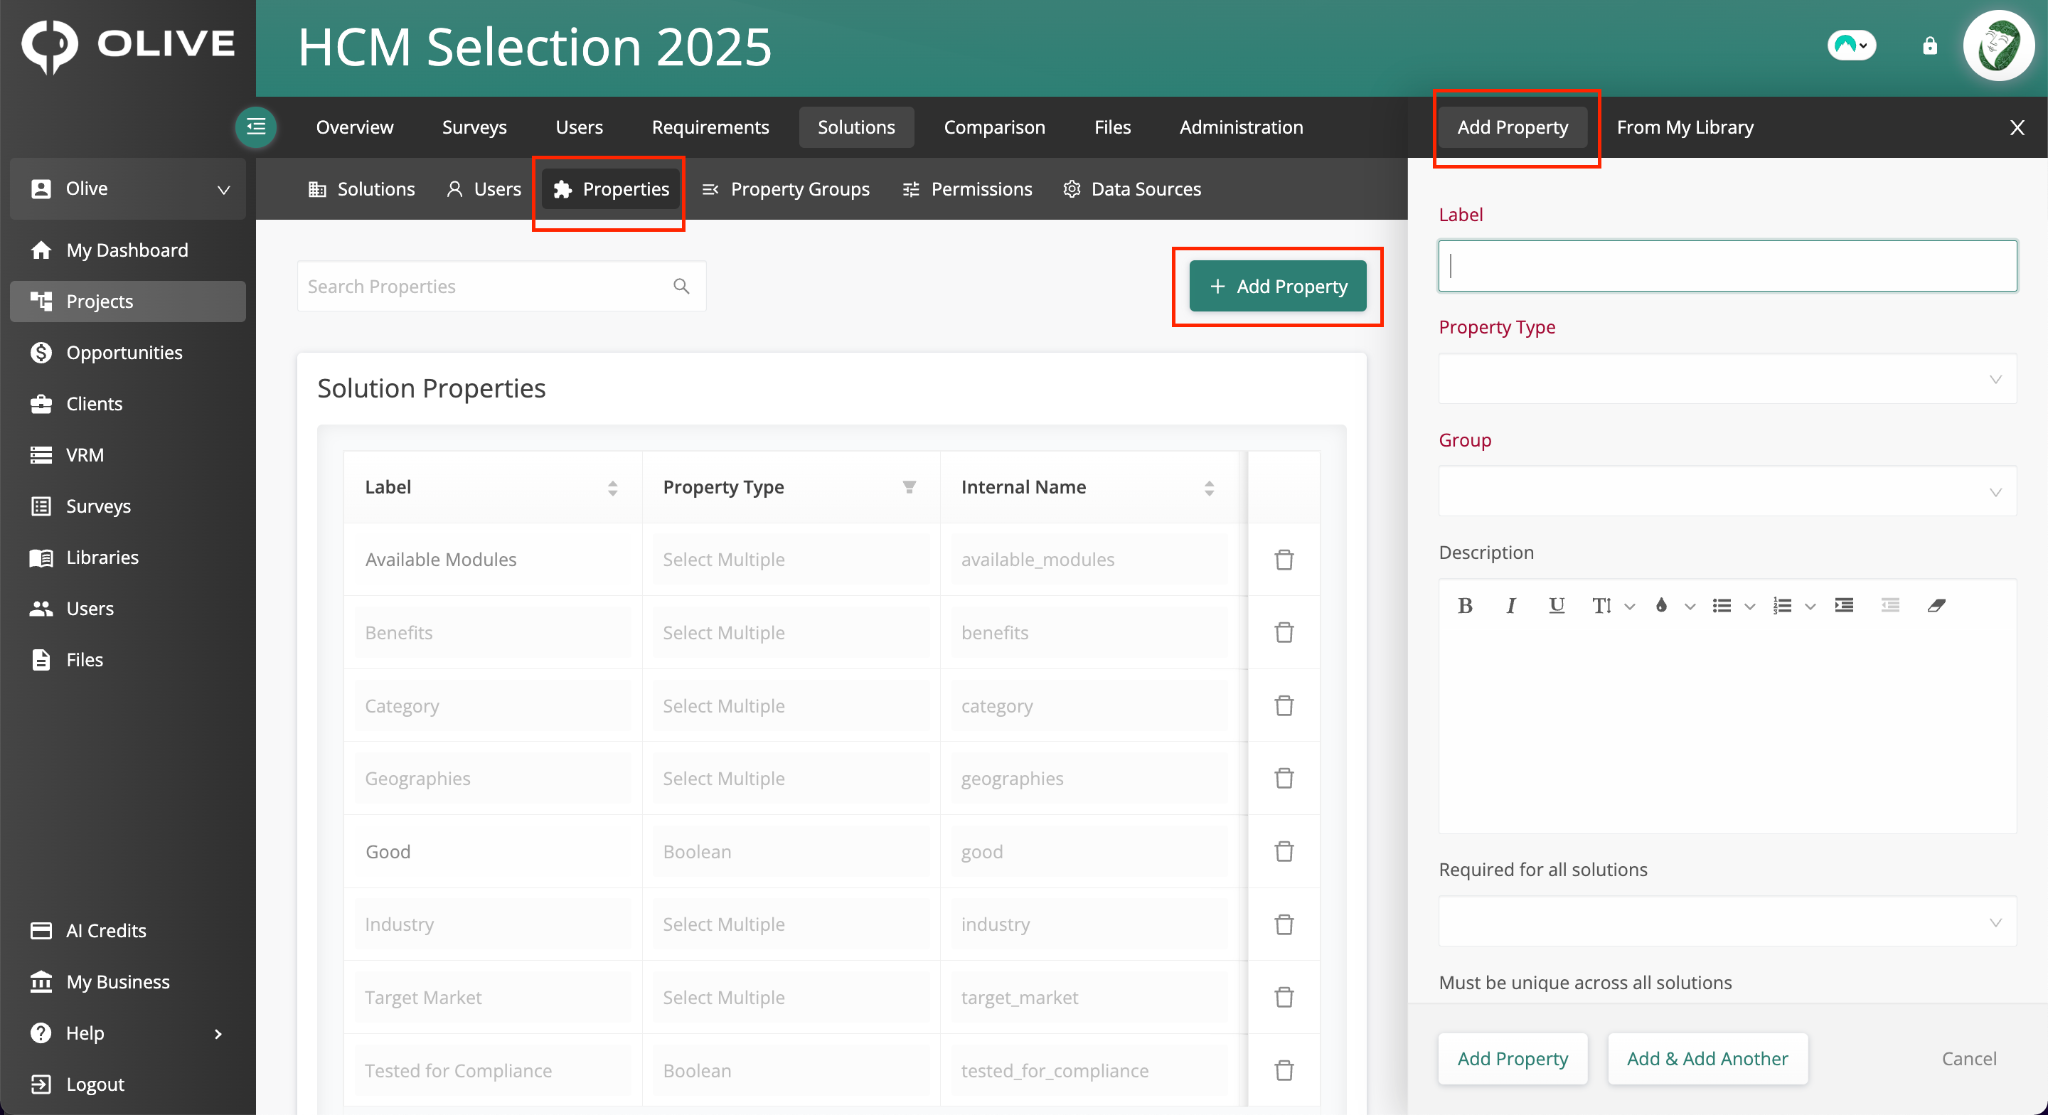
The Properties sub-tab — Add Property panel open on the right with Label, Property Type, and Group fields
- Click '+ Add Property' to open the Add Property panel
- Fill in the Label — the name of the property
- Choose a Property Type — text, single select, URL, phone number, date, boolean, and more
- Assign to a Group if applicable (see Property Groups sub-tab)
- Set optional settings — Required for all solutions, Must be unique, Visible for only these solutions
- Click 'Add Property' to save
|
💡 Tip: Useful property examples: Budget Owner, Contract Expiry Date, ISO Approved, SOC 2 Approved, Payment Method. Create properties relevant to your evaluation criteria. |
Editing a Property
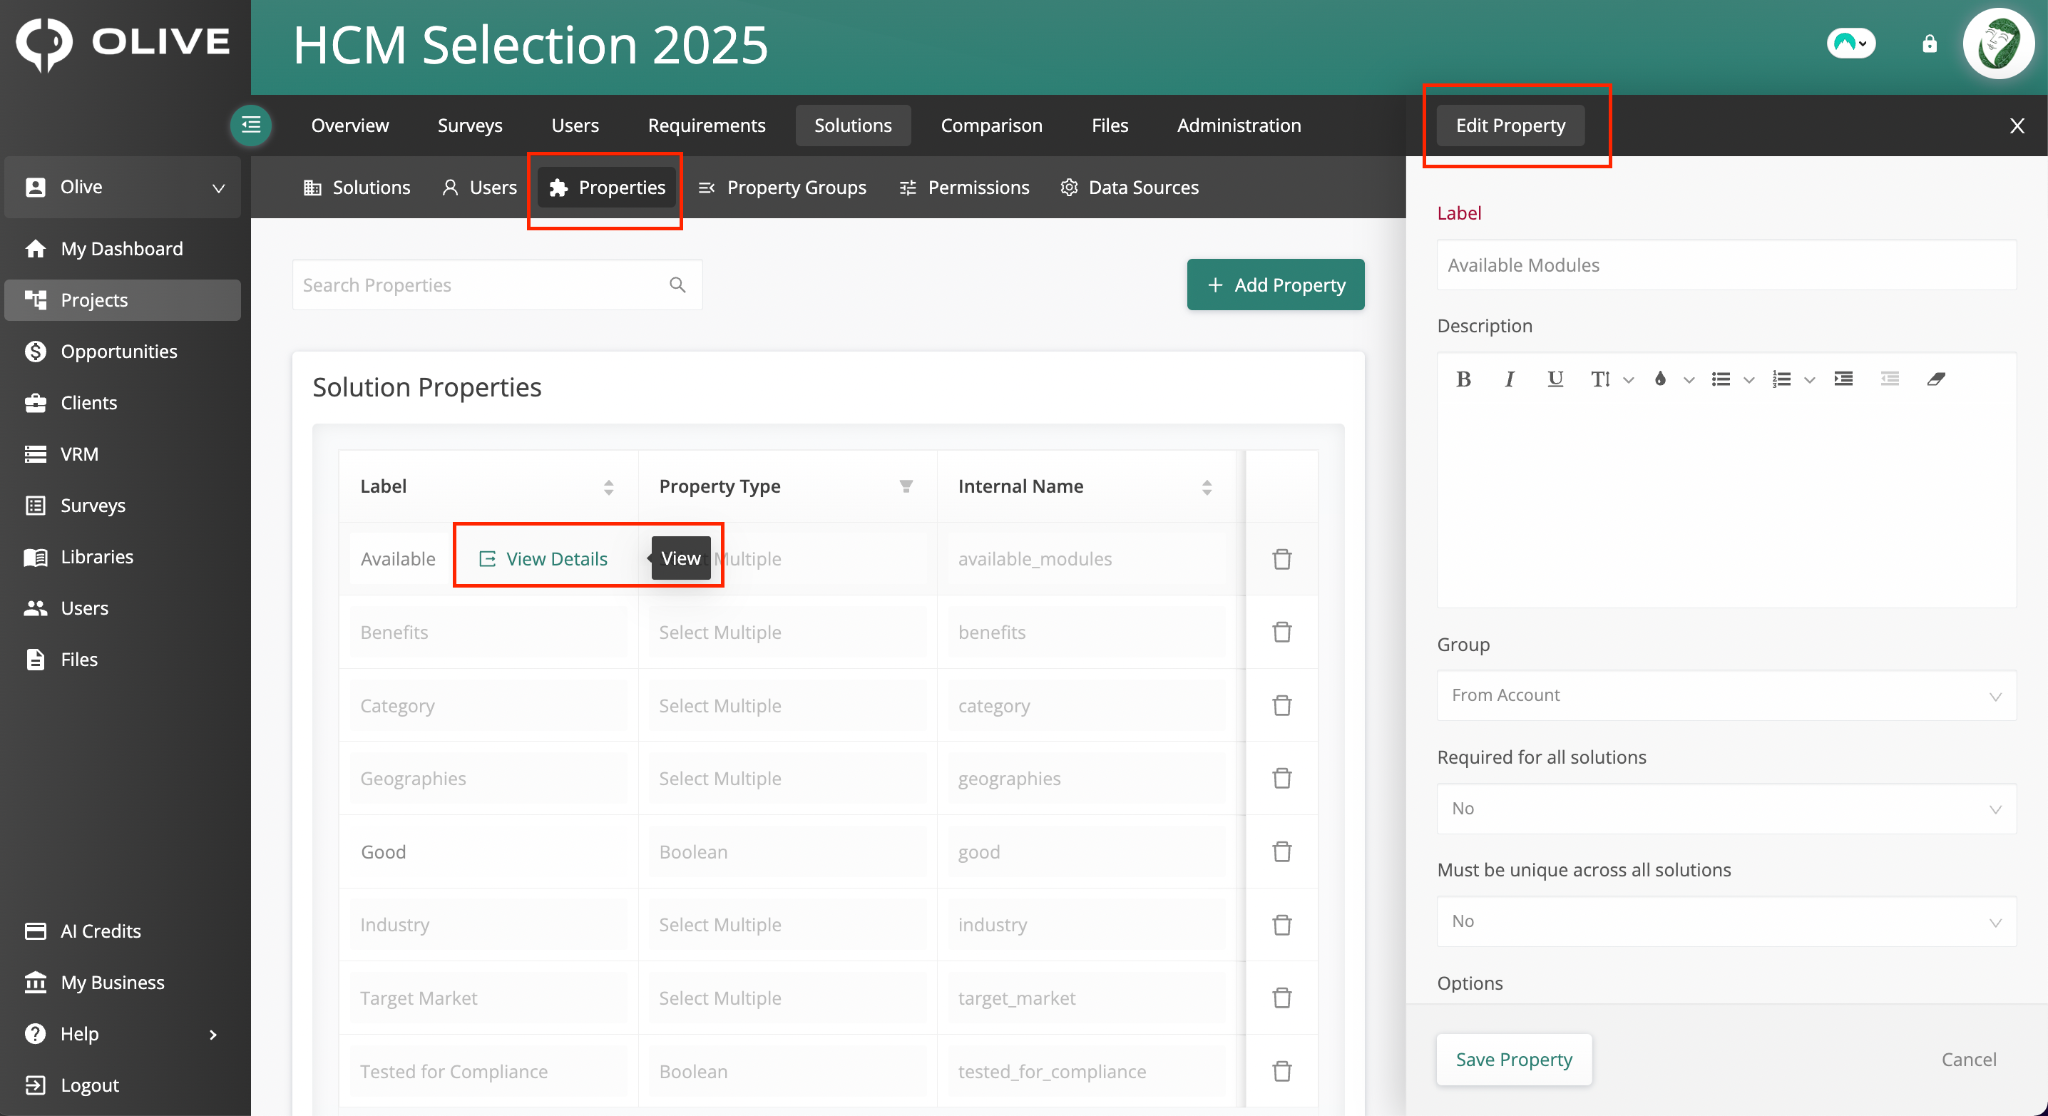
The Edit Property panel — hover over a property label and click 'View Details' to open it
In the Solution Properties table, hover over the Label of the property you want to edit and click 'View Details'. The Edit Property panel opens on the right. Make your changes and click 'Save Property'.
Removing a Property
In the Solution Properties table, click the Delete/bin icon at the end of the property's row to remove it.
|
⚠️ Important: Deleting a property removes it and all its values from every solution in the project. This action cannot be undone. |
Property Groups Sub-tab
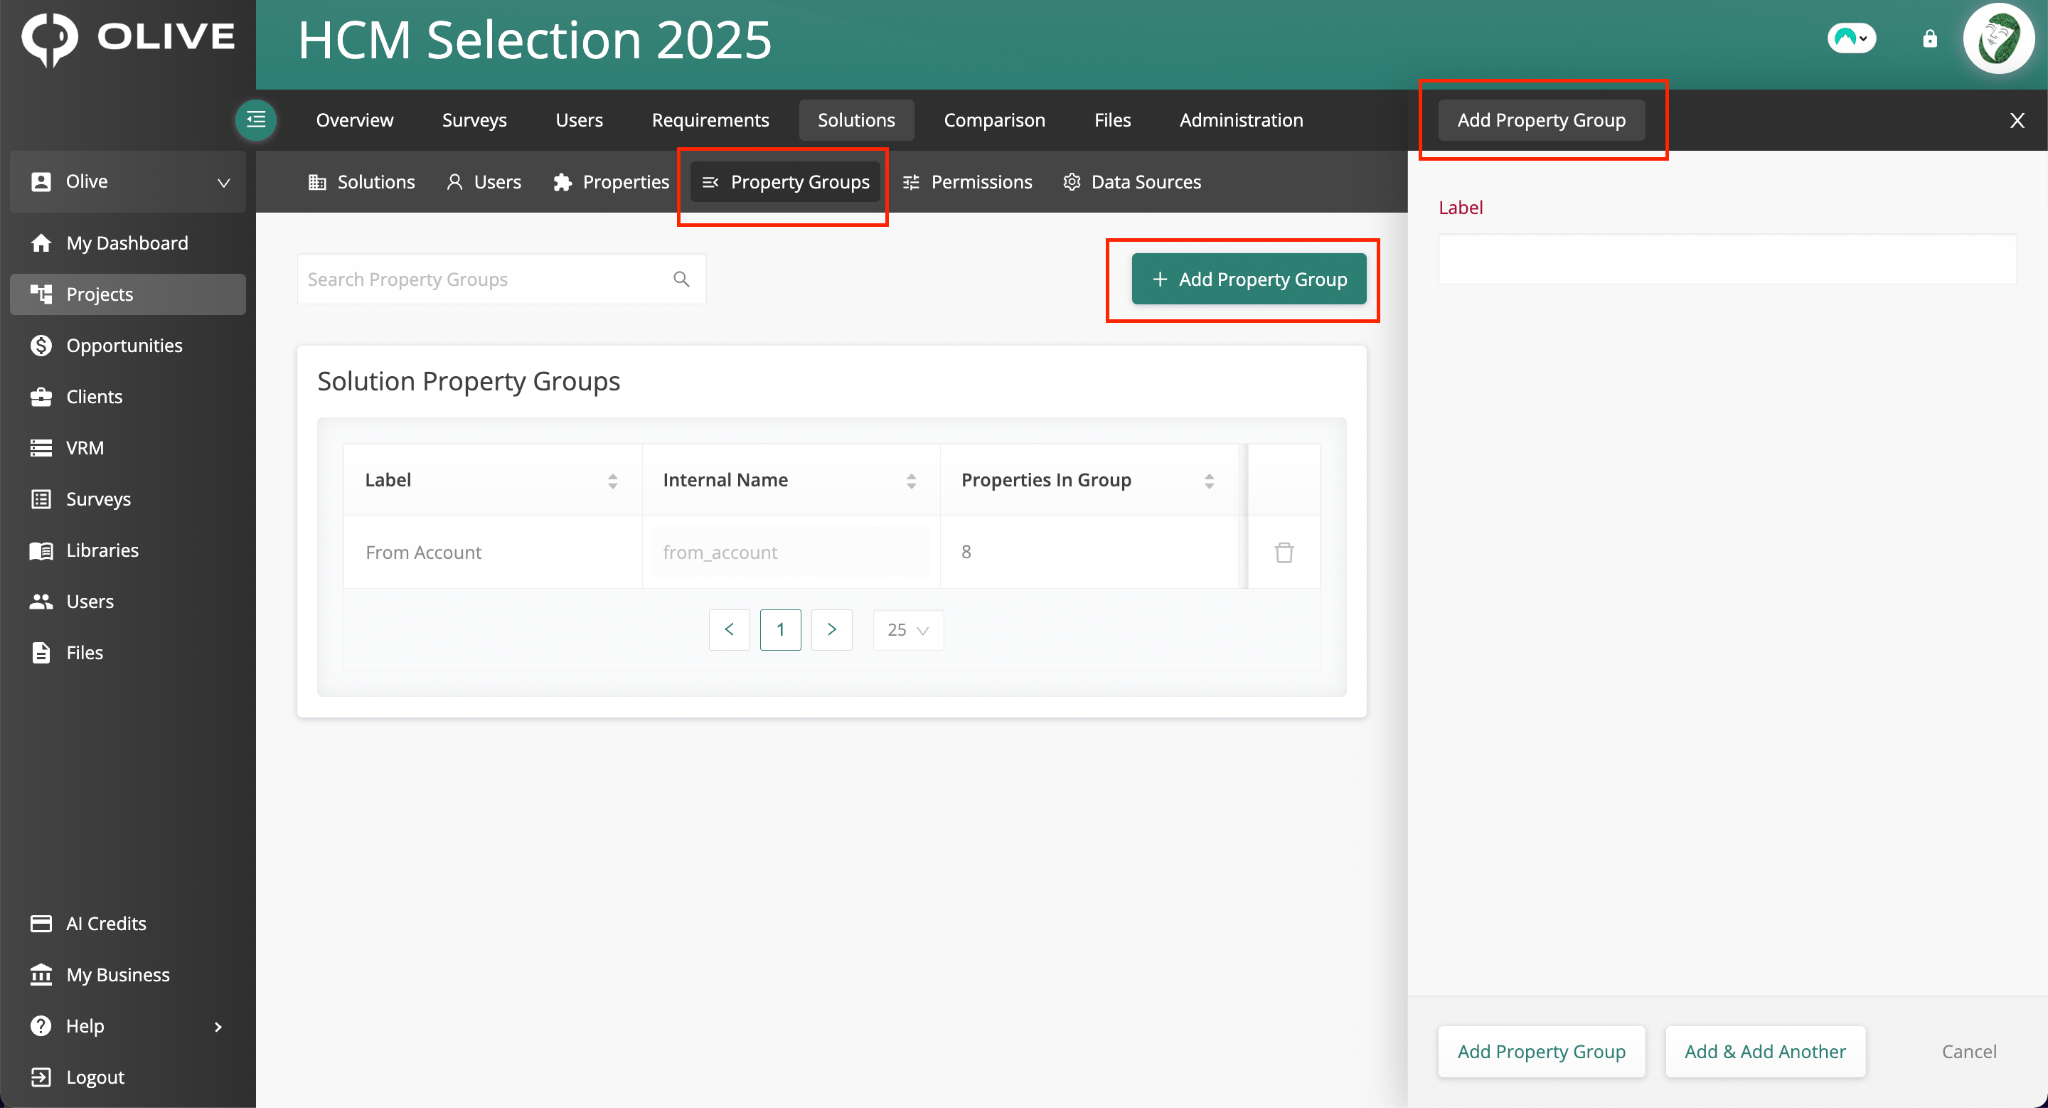
The Property Groups sub-tab — Solution Property Groups table with Add Property Group panel open
Click the Property Groups sub-tab to create groups that organise your properties into logical categories — for example: Basic, Financials, Security, Compliance.
Adding a Property Group
- Click '+ Add Property Group'
- Type the Label name for the group
- Click 'Add Property Group' — the group will appear in the Solution Property Groups table
Removing a Property Group
In the Solution Property Groups table, click the Delete/bin icon at the end of the group's row to remove it.
Permissions Sub-tab
Click the Permissions sub-tab to control exactly what each vendor can see and do within their opportunity view. Each vendor has its own column in the permissions table. Tick the checkbox against any permission in a vendor's column to enable it for that vendor. Use the Global column to apply a setting to all vendors at once.
Opportunity Configuration
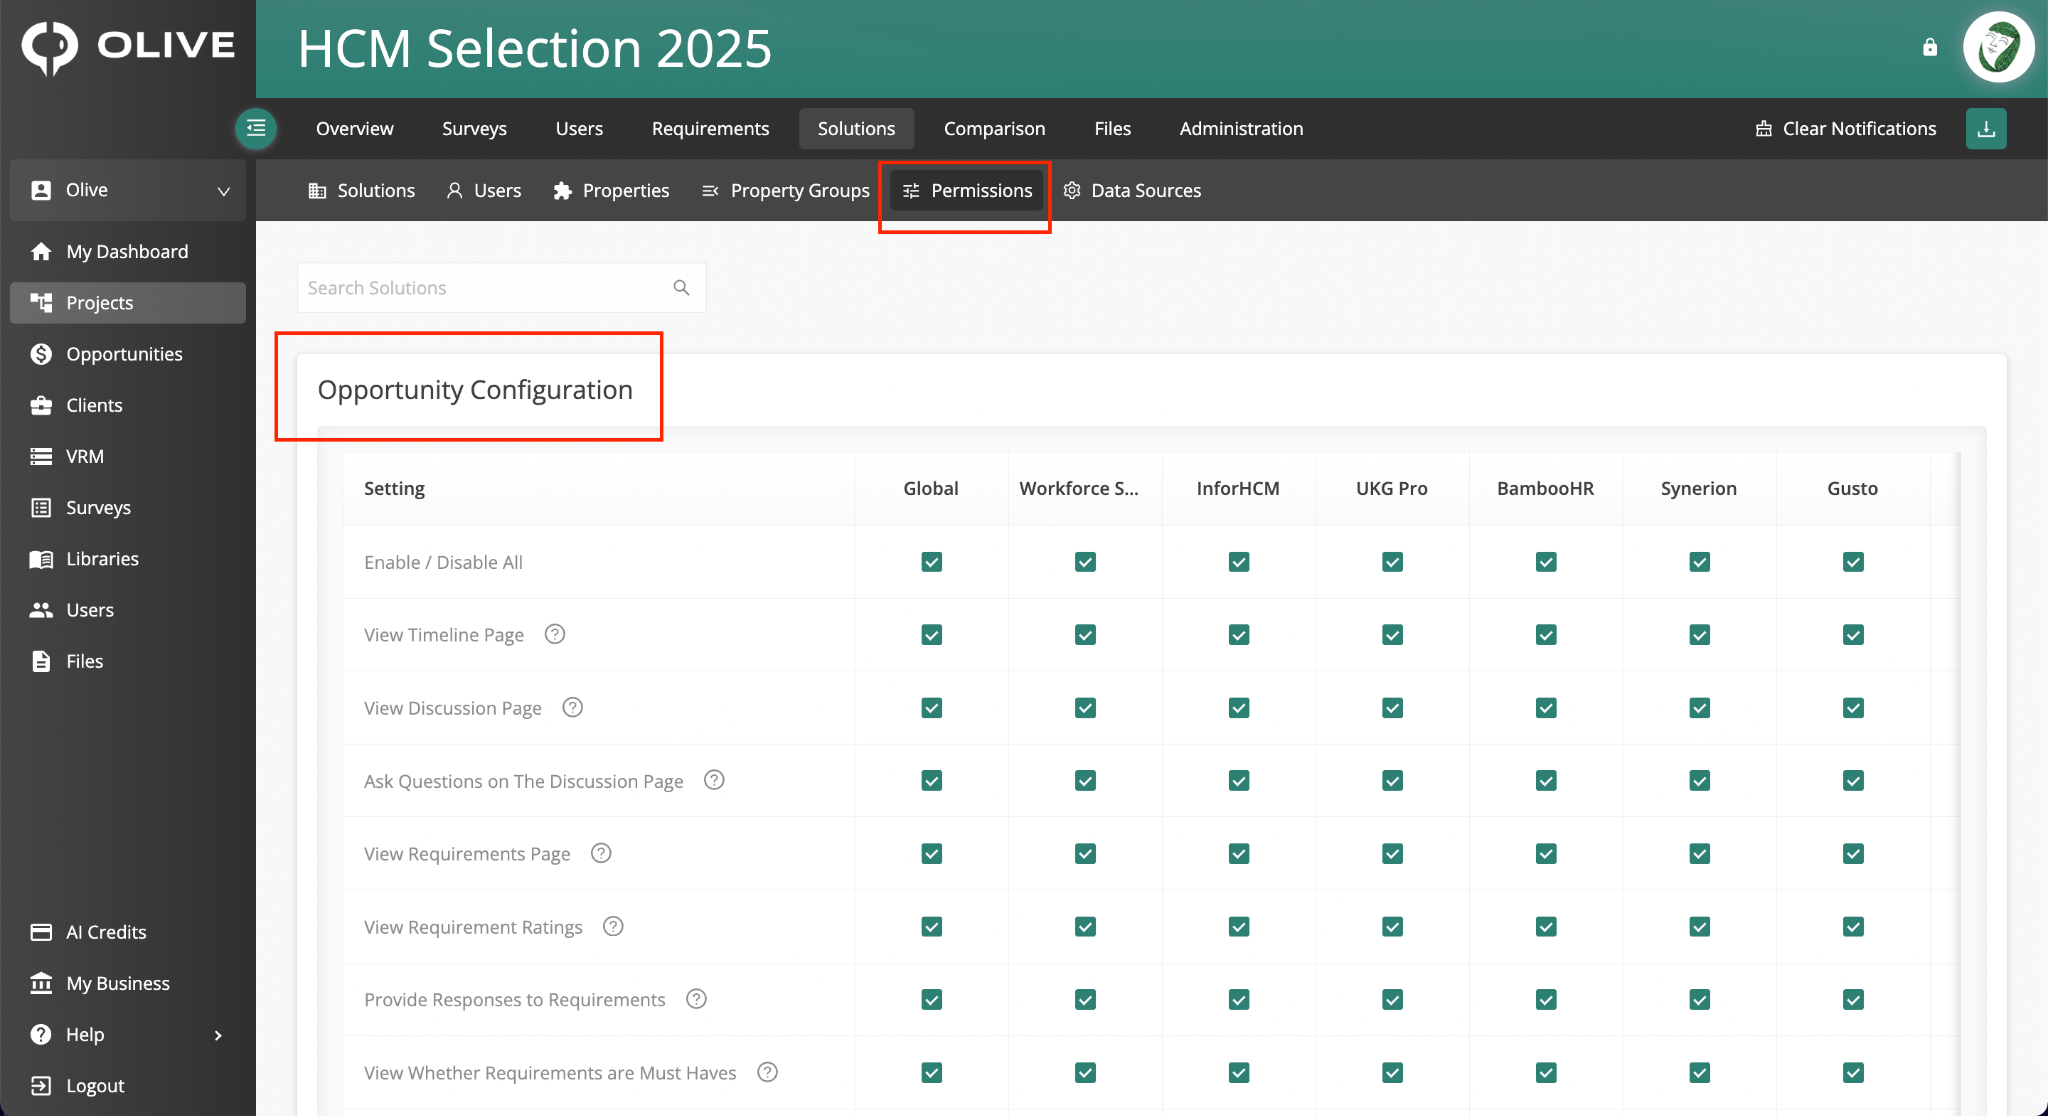
The Permissions sub-tab — Opportunity Configuration section showing all available permissions per vendor
The Opportunity Configuration section lists all available permissions. Below is a full reference:
|
Permission |
What it controls |
|
Enable / Disable All |
Toggle all permissions on or off for all vendors at once |
|
View Timeline Page |
Vendor can see the project timeline |
|
View Discussion Page |
Vendor can see the Project Discussion |
|
Ask Questions on the Discussion Page |
Vendor can post questions in the Project Discussion |
|
View Requirements Page |
Vendor can see and respond to requirements |
|
View Requirement Ratings |
Vendor can see the star ratings assigned to requirements |
|
Provide Responses to Requirements |
Vendor can submit answers to requirements |
|
View Whether Requirements are Must Haves |
Vendor can see which requirements are flagged as must-have |
|
View Chat Messages on Requirements |
Vendor can read team chat on requirements that have been shared with them |
|
Add Chat Messages on Requirements |
Vendor can post messages on requirements |
|
Edit Their Chat Messages on Requirements |
Vendor can edit their own messages |
|
Delete Their Chat Messages on Requirements |
Vendor can delete their own messages |
|
Download Requirements |
Vendor can export the requirements as a spreadsheet |
|
View Files Page |
Vendor can see the Files tab |
|
Add Files |
Vendor can upload files |
|
Delete Files |
Vendor can delete files they've uploaded |
|
View Pricing Budget Details |
Vendor can see your budget expectations from the Solicit Vendor Pricing section |
|
View Solution Page |
Vendor can view their solution profile page |
|
💡 Tip: Use 'Enable / Disable All' in the Global column to quickly set a baseline for all vendors, then fine-tune individual vendors as needed. |
Section Visibility
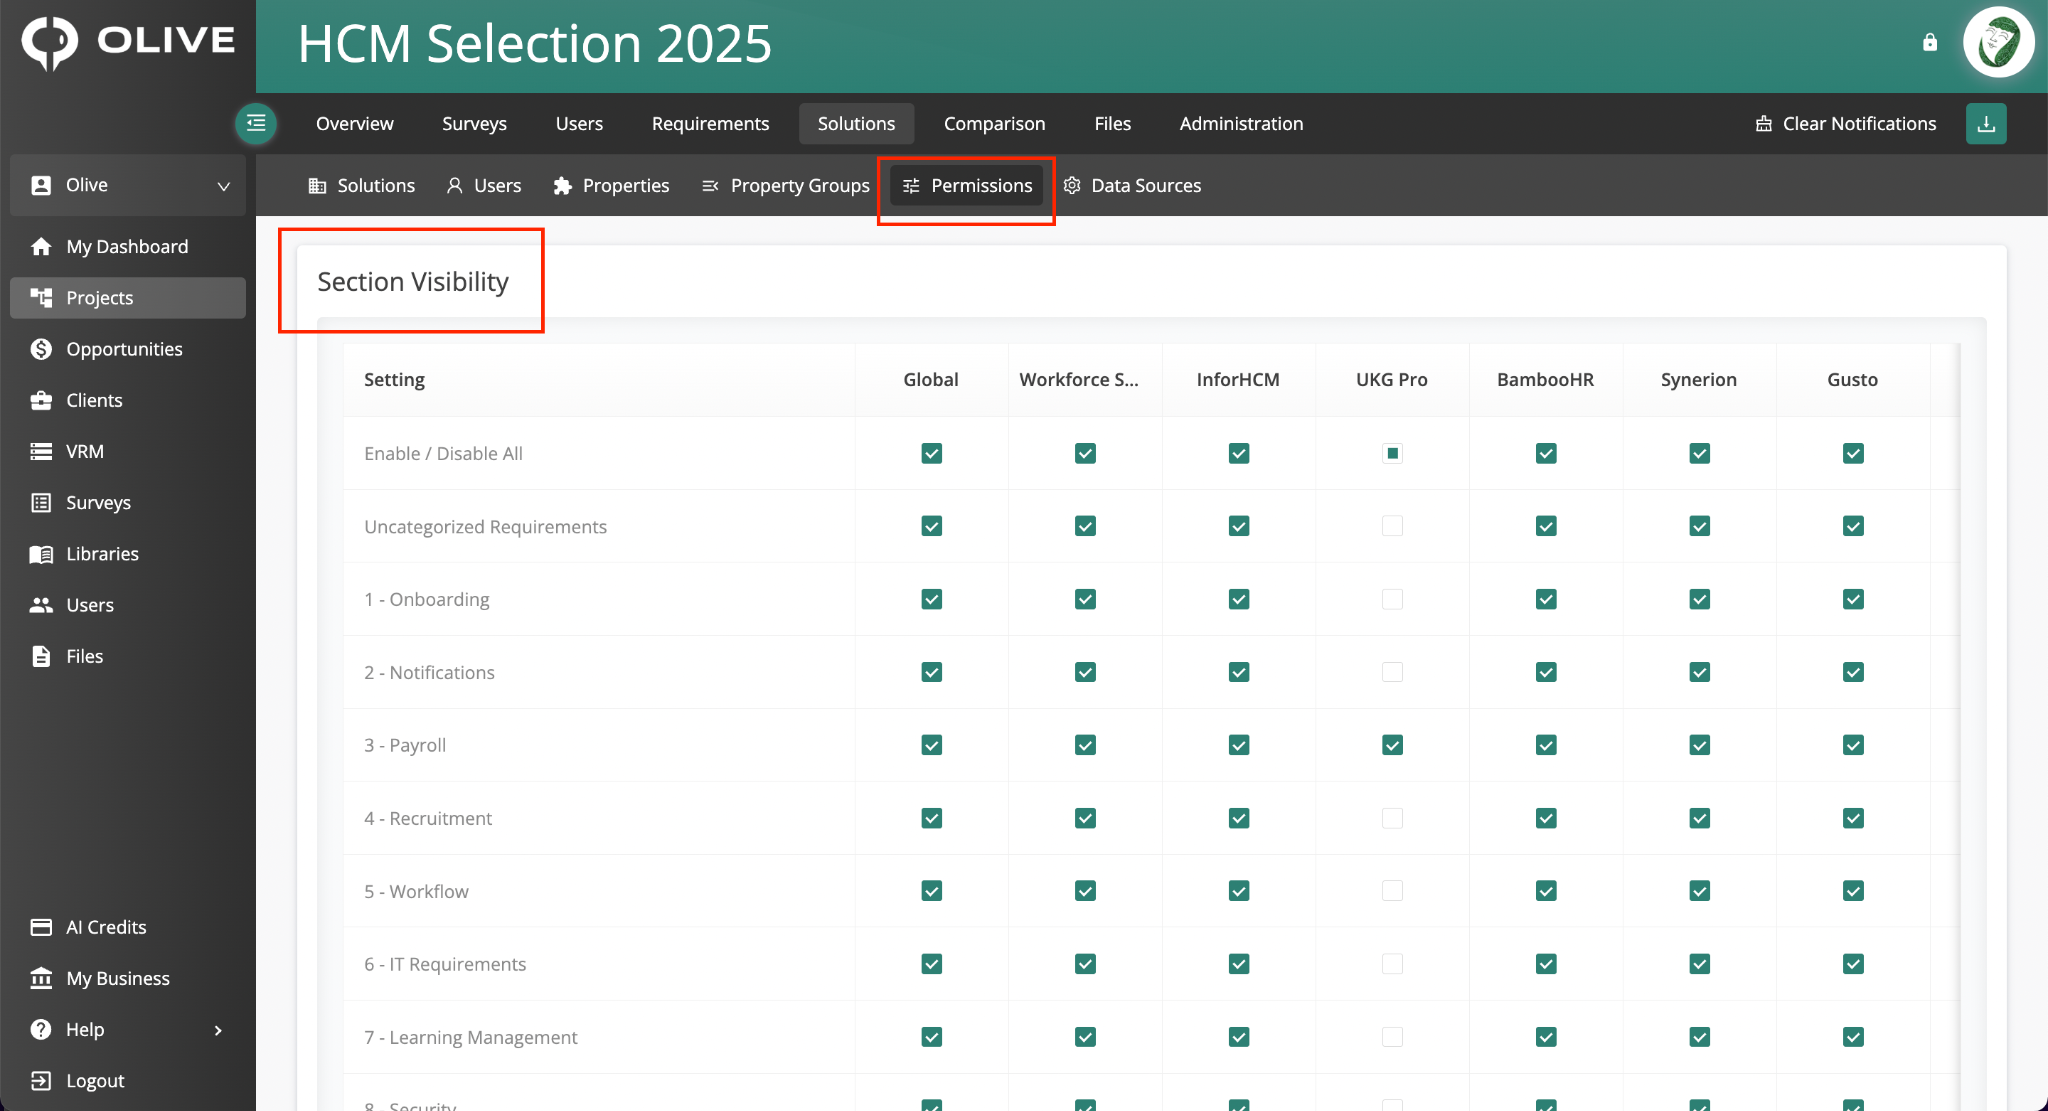
The Permissions sub-tab — Section Visibility section showing which requirement sections are visible per vendor
The Section Visibility section lets you control which requirement sections each vendor can see on their Requirements page. Tick the checkbox for each section you want a vendor to have access to. Unticking a section hides it from that vendor's view.
Disqualified Vendors
When a vendor's evaluation status is set to Disqualified, all their Opportunity Configuration and Section Visibility permissions are automatically removed. Disqualified vendors will no longer have access to their opportunity view.
|
📌 Note: Disqualification removes permissions automatically — you do not need to revoke them manually. If you re-activate a disqualified vendor, you will need to restore their permissions manually in this sub-tab. |
Data Sources Sub-tab
Click the Data Sources sub-tab to pull in vendor responses from other Olive projects. This is useful when the same vendors and requirements appear across multiple projects and you want to avoid re-entering data.
Each other project in your Olive account is listed in the Data Sources table. Use the Status toggle in each row to Include or Exclude that project as a data source. When included, vendor responses from that project (where the same solution and requirements exist) will be imported into the current project.
|
📌 Note: Data Sources only imports responses where the vendor and requirement already exist in the current project. If a vendor or requirement doesn't match, that response will not be imported. |
What's Next?
Once your vendors are added and configured, here's the recommended order for moving the evaluation forward:
- Configure permissions in the Permissions sub-tab before vendors access their opportunity
- Add vendor users and send invitations from the Users sub-tab
- Monitor vendor progress using Kanban view with 'By Vendor Progress' classification
- Review and score responses in the Responses tab for each vendor
- Use the Comparison tab to evaluate all vendors side by side once submissions are in
Need help? Contact your Olive project administrator or reach out to Olive support.