Overview
The Requirements tab is where you build and manage all the requirements for your RFP project. This is the foundation of your evaluation — the requirements you create here will be sent to vendors to respond to, and later evaluated in the Comparison tab.
You can create requirements manually, upload them from a spreadsheet, add them from a library, or use Olive's AI chatbot to suggest them.
The Requirements tab has three sub-tabs and four quick filters:
|
Sub-tab |
What you'll find there |
|
Requirements |
Build, manage, and organise all your project requirements by section |
|
Responses |
Set up and manage the response format templates vendors use to answer requirements |
|
Tags |
Create and manage tags for organising and filtering requirements |
|
Quick Filter |
Shows |
|
Updated |
Recently added or changed requirements |
|
Must Have |
Only requirements marked as must-have |
|
Discussions |
Requirements with active team chat |
|
My Requirements |
Requirements assigned to you |
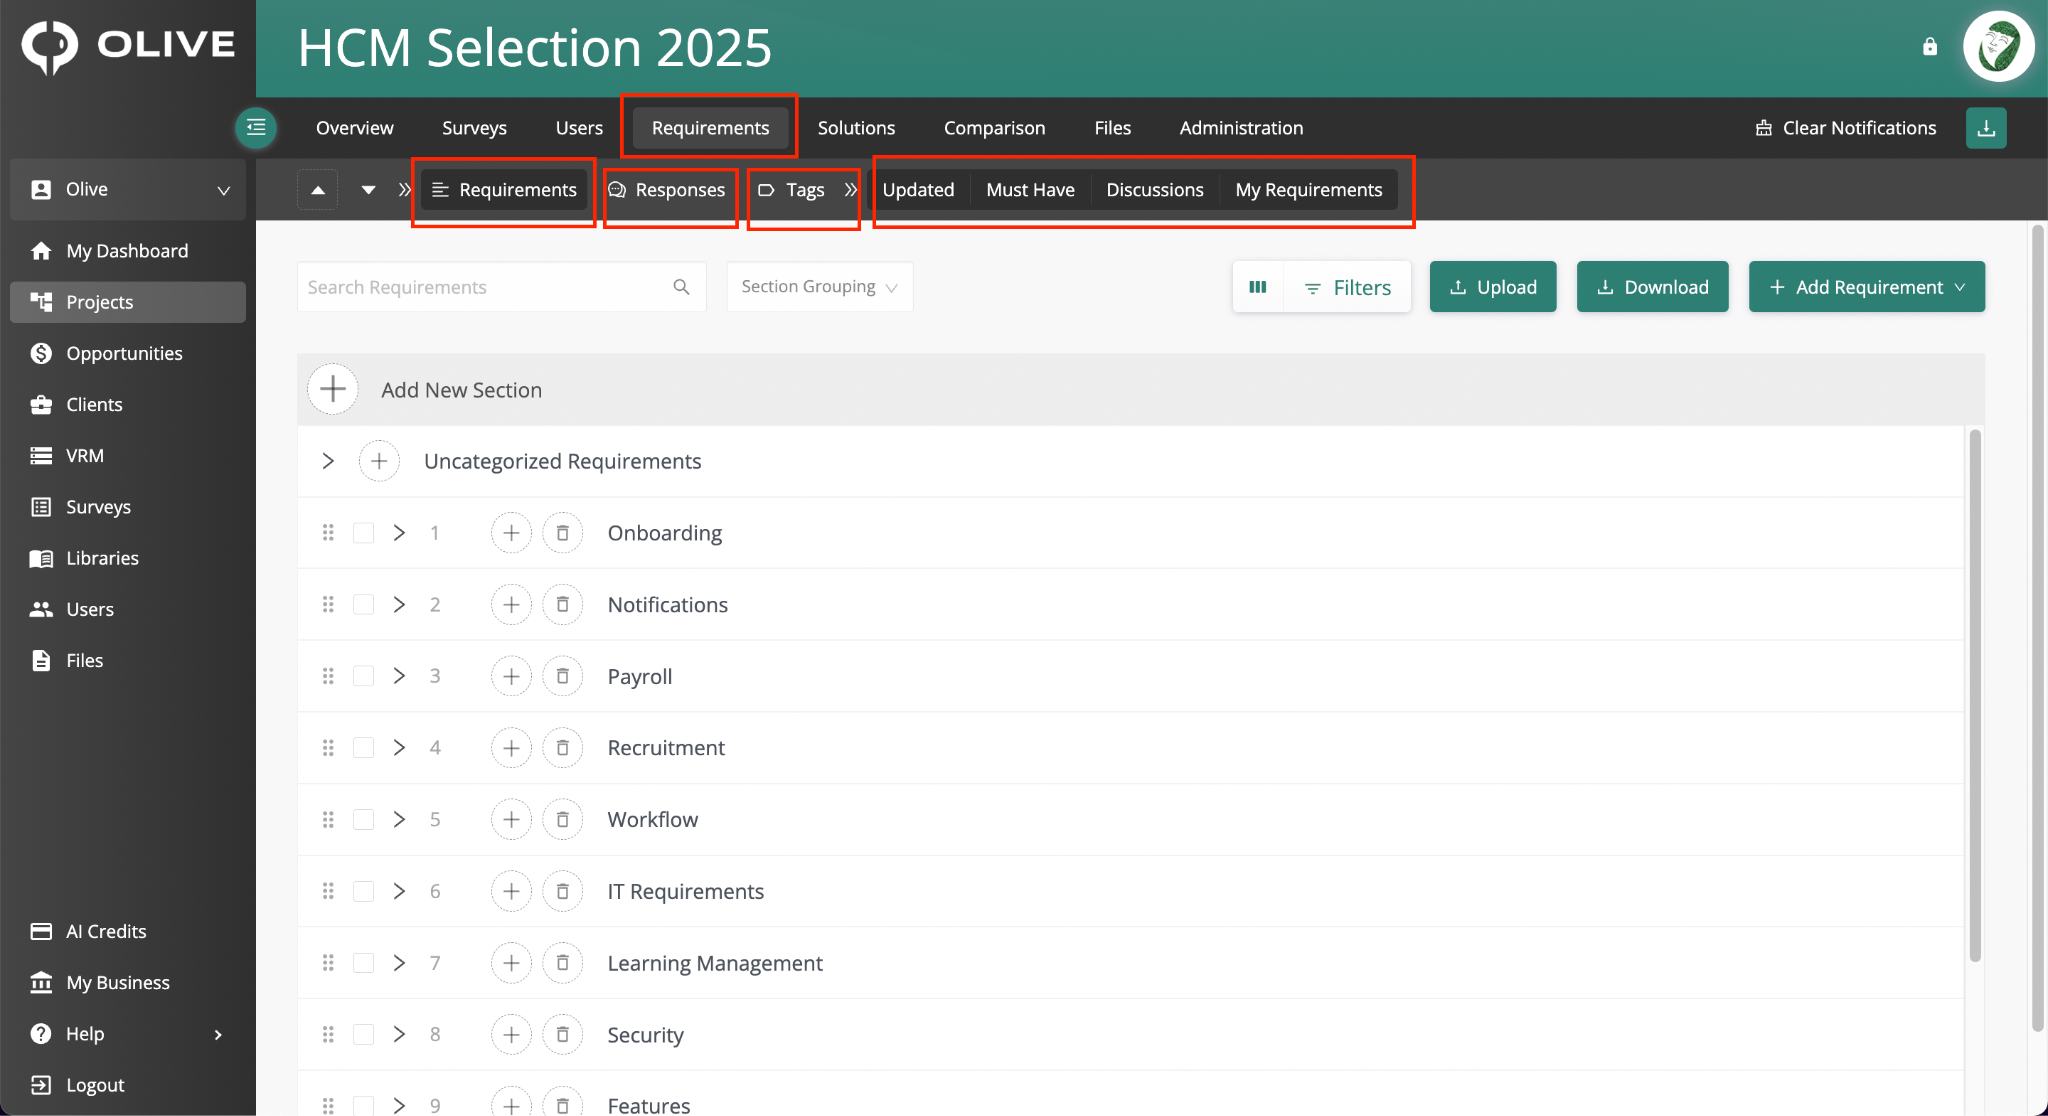
The Requirements tab — showing the Requirements, Responses, Tags sub-tabs and Quick Filters
Requirements Sub-tab
Click the Requirements sub-tab to access your project's requirements. This is where you create sections to organise your requirements, add individual requirements, and manage all their details.
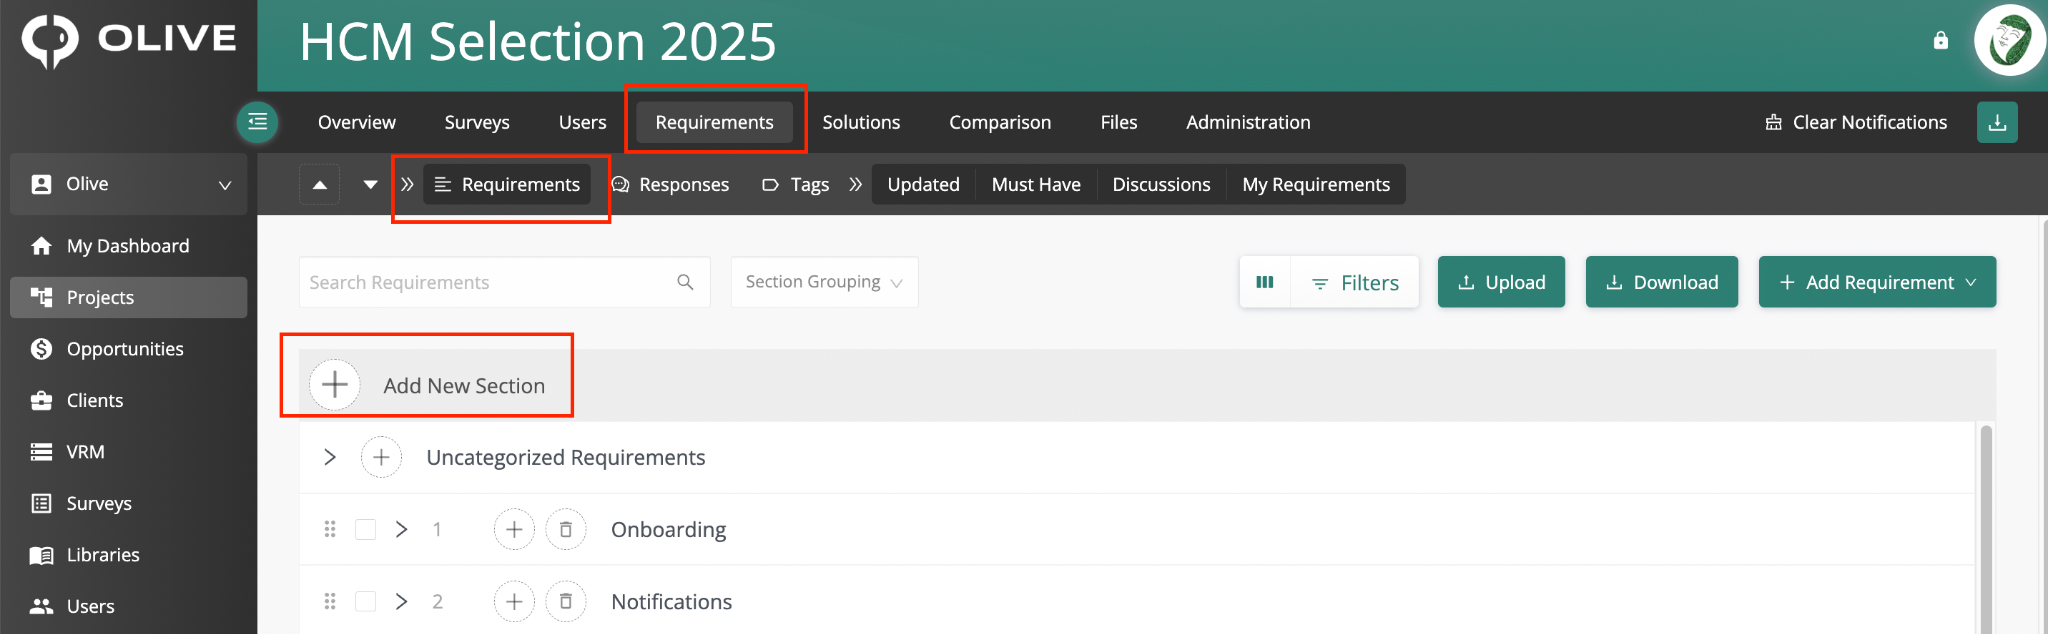
The Requirements sub-tab — sections view with Add New Section and toolbar
Adding a New Section
Sections help you organise your requirements into logical groups — for example: Onboarding, Payroll, Security.
- Click the '+ Add New Section' button at the top of the page
- Type the section name in the text field that appears
- Click the Save icon to create the section
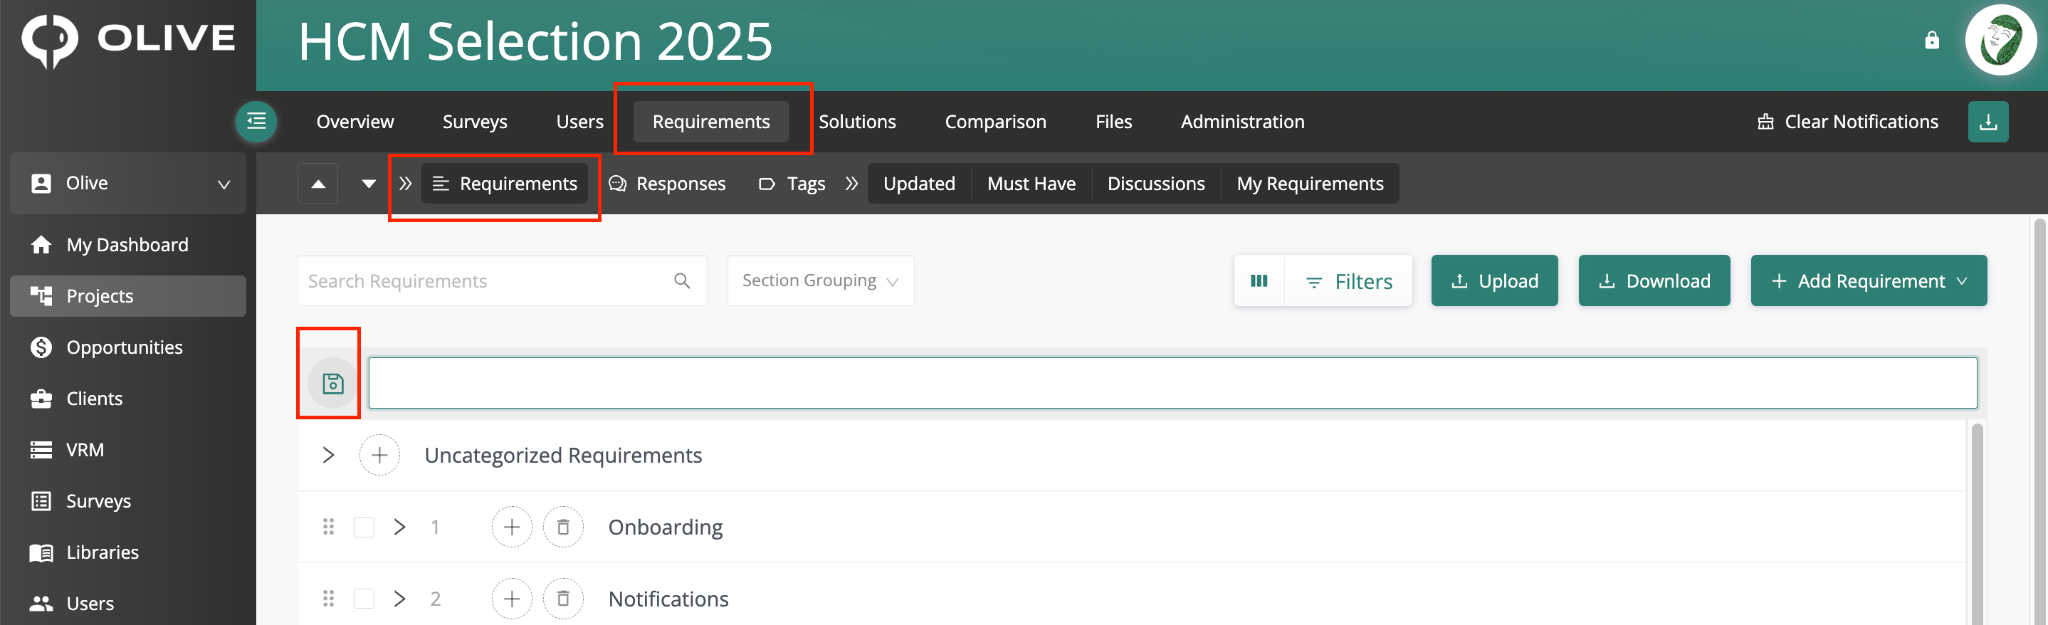
Clicking '+ Add New Section' opens an inline text field to name the section
|
💡 Tip: Group requirements by business area or topic (e.g. Payroll, Recruitment, Security) to make evaluation easier in the Comparison tab later. |
Adding Requirements to a Section
The quickest way to add a single requirement is inline:
- Click the '+' button next to the section name
- Type the requirement in the text field that appears
- Click outside the text box to save
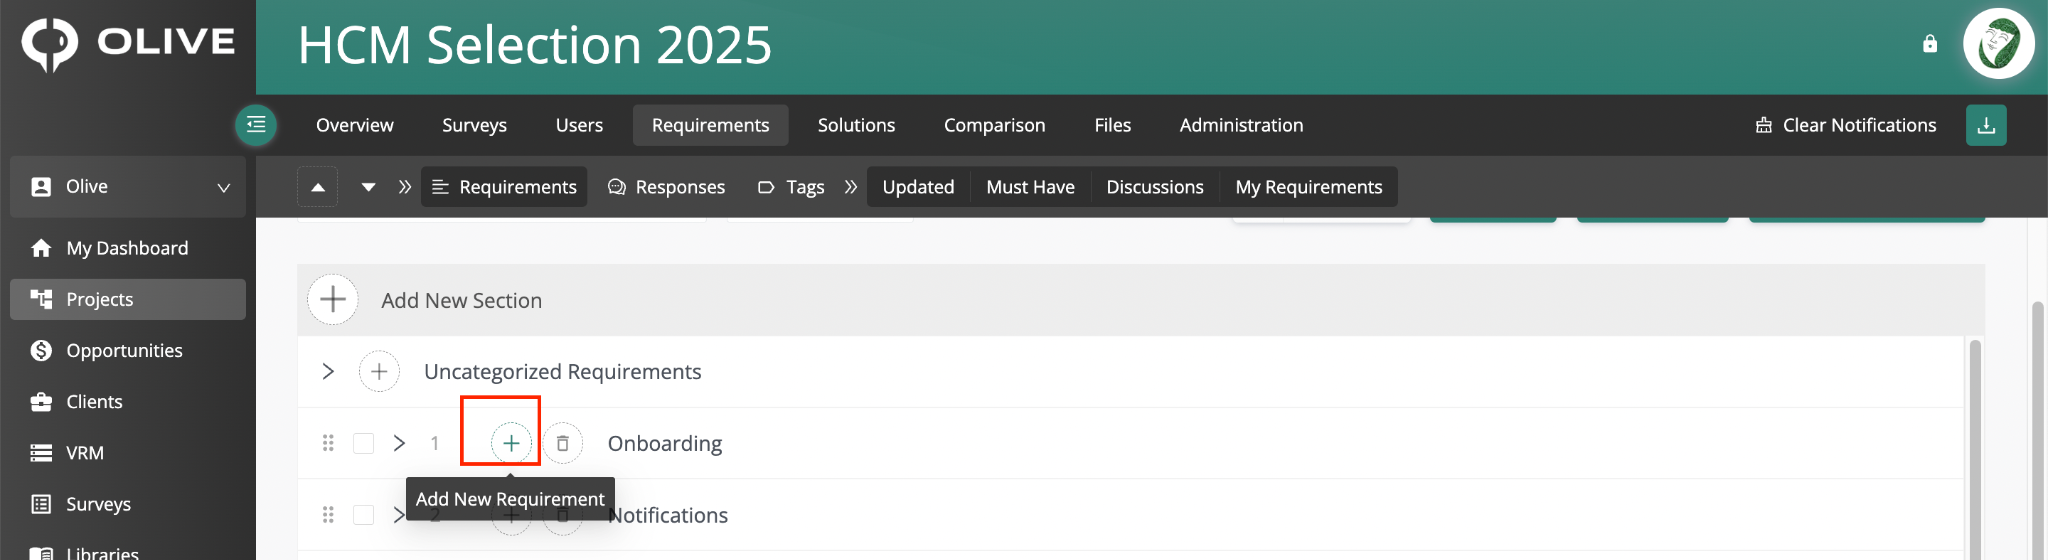
The '+' button next to a section name — click to add a new requirement inline
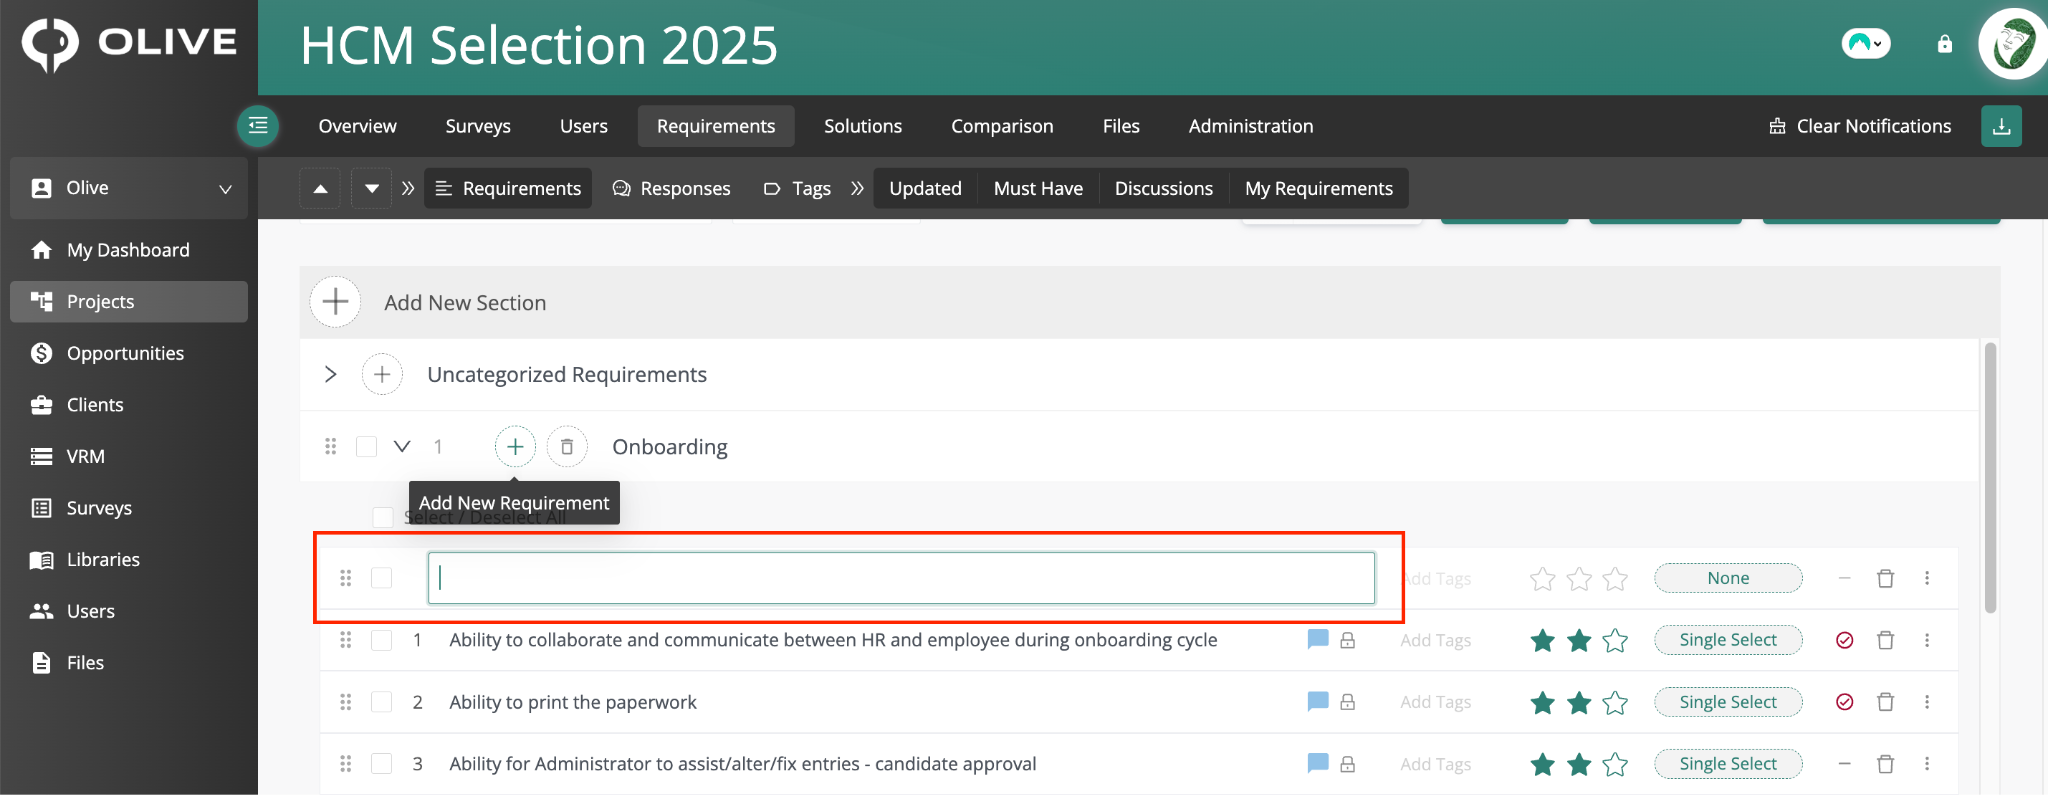
An inline text field appears — type the requirement and click outside to save
|
💡 Tip: For requirements that need more detail (section, tags, departments, users, description), use '+ Add Requirement' in the toolbar to open the full creation modal — see the Toolbar Features section below. |
The Requirement Table
Click on any section name to expand it and reveal all requirements underneath. Use the table below as a quick reference for each column:
|
Column |
What it does |
|
Requirement Number/ID |
The unique identifier for the requirement |
|
Requirement Label |
The requirement text. Hover over a row to reveal the Details button |
|
Tag / Add Tag |
Add or view tags for this requirement |
|
Star Rating |
Your star rating. Click the stars to set or change it |
|
Response Type |
The response format assigned. Click to open the Response tab in the Requirement Modal |
|
Must-Have Flag |
Click to mark or unmark the requirement as must-have |
|
Delete Icon |
Permanently deletes the requirement |
|
⋮ (3 dots) |
Opens the full Requirement Modal for that requirement |
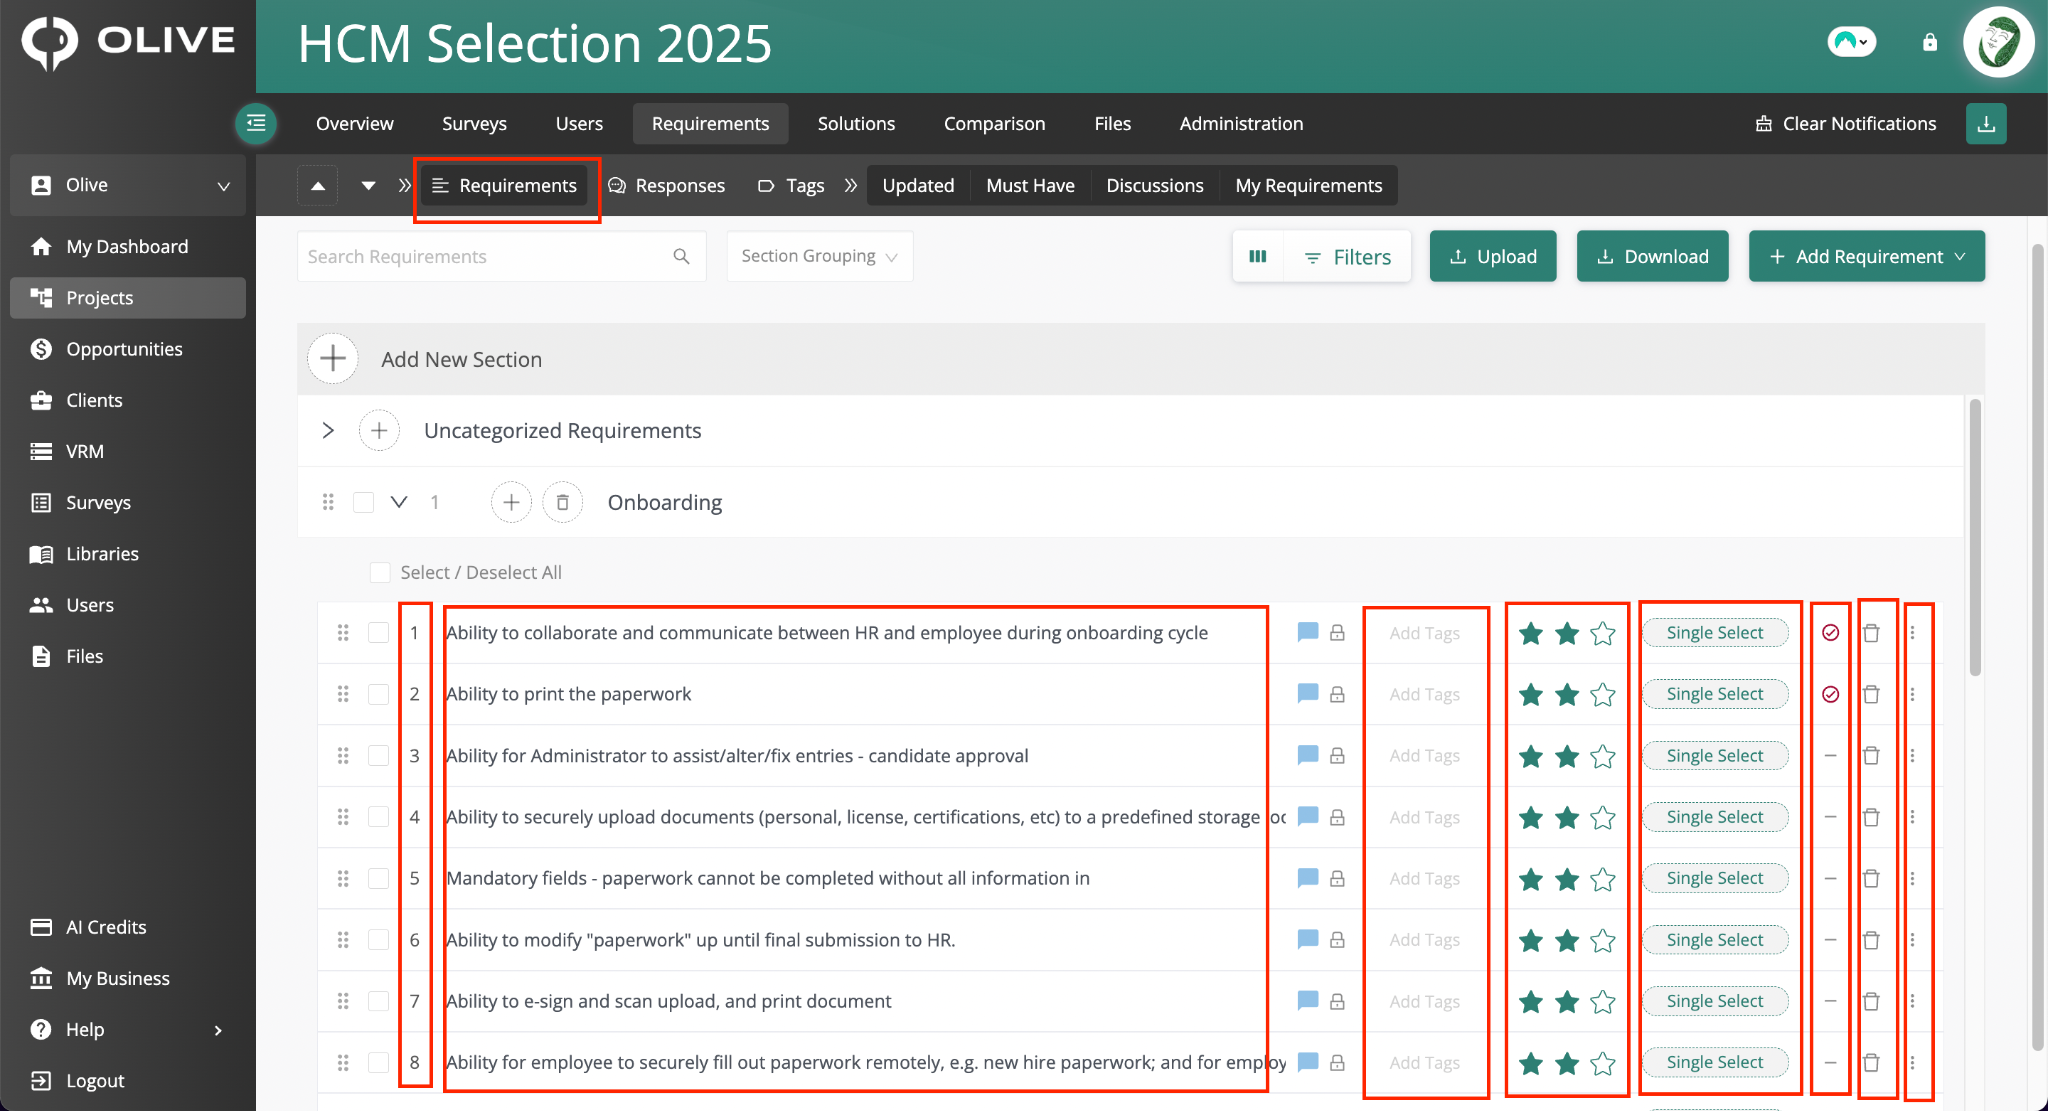
The expanded Requirement Table — showing all columns for each requirement
|
💡 Tip: Reserve the must-have flag for genuine deal-breakers — requirements that would rule a vendor out entirely if they can't meet them. This keeps must-have meaningful and makes vendor rankings more accurate. |
Requirement Modal
To open the Requirement Modal for any requirement, click the Details button that appears when hovering over the row, or click the ⋮ (3 dots) icon. The Requirement Modal has five tabs:
|
Tab |
What you can do |
|
Details |
Edit requirement text, change section, set star ranking, add tags, write a description. Click 'Save Requirement' to save. |
|
Ranking |
See the star ratings given by every team member (visible to project Admins) |
|
Chat |
View and participate in the internal team discussion for this requirement |
|
Response |
Assign a response format template to this specific requirement |
|
History |
See a full chronological log of every change made to this requirement |
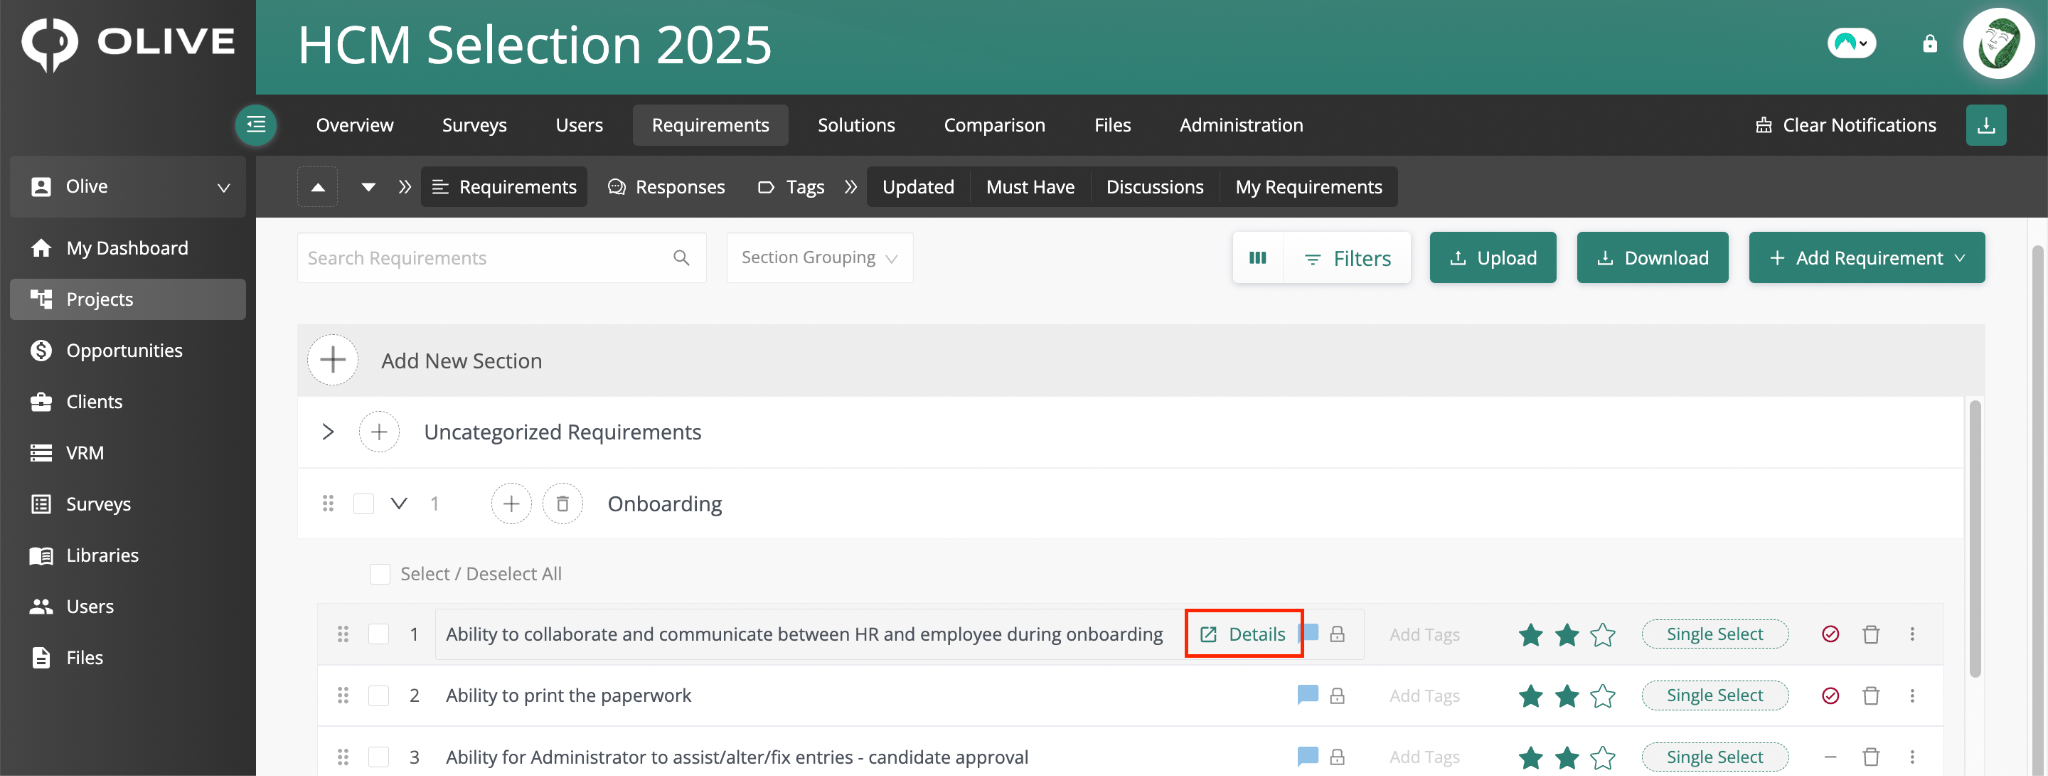
Hovering over a requirement row reveals the Details button
Details Tab
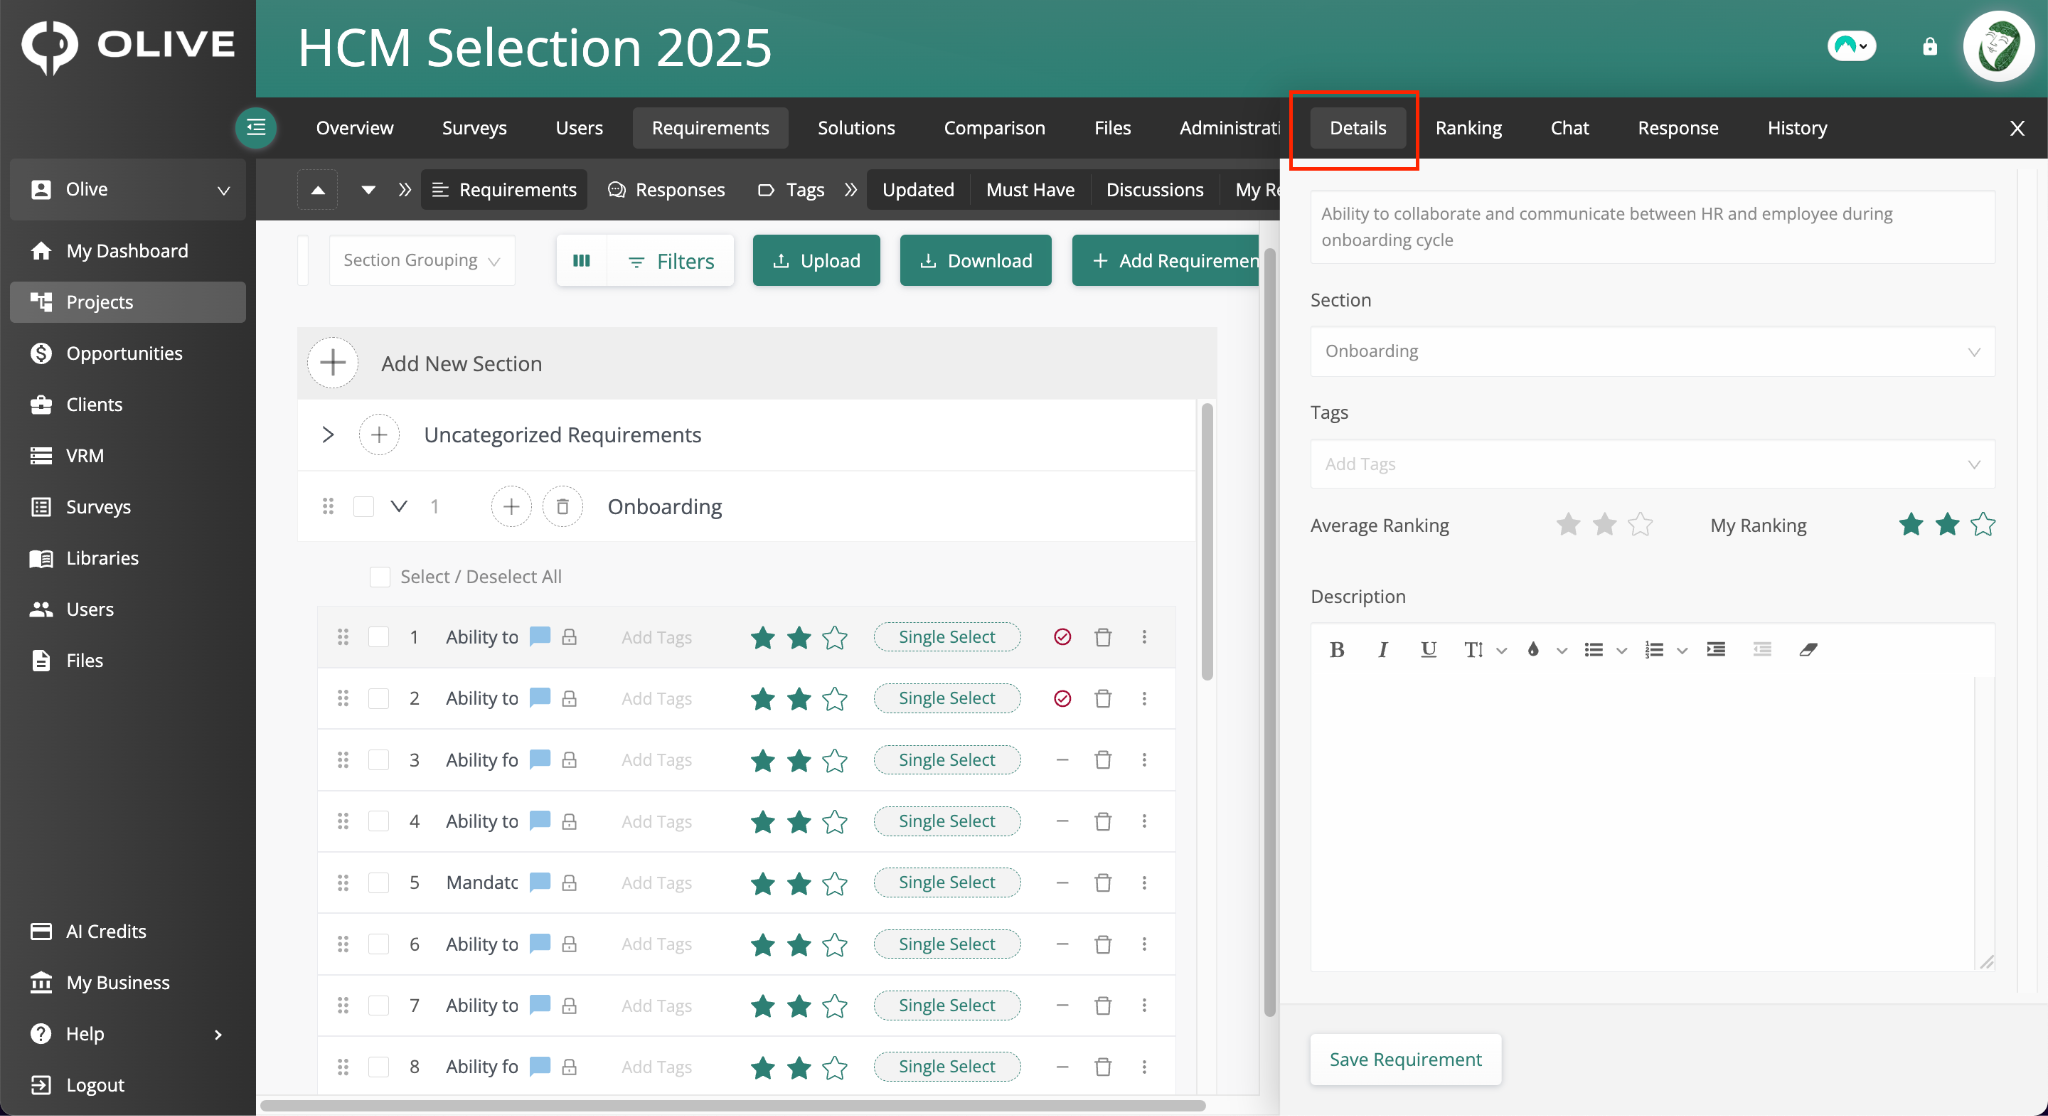
The Requirement Modal — Details tab, showing Section, Tags, Rankings, and Description fields
The Details tab is where you view and edit the core information for a requirement. Fields include the requirement text, Section dropdown, My Ranking (your star rating), Average Ranking (team average), Tags, and Description. Click 'Save Requirement' to save all changes.
Ranking Tab
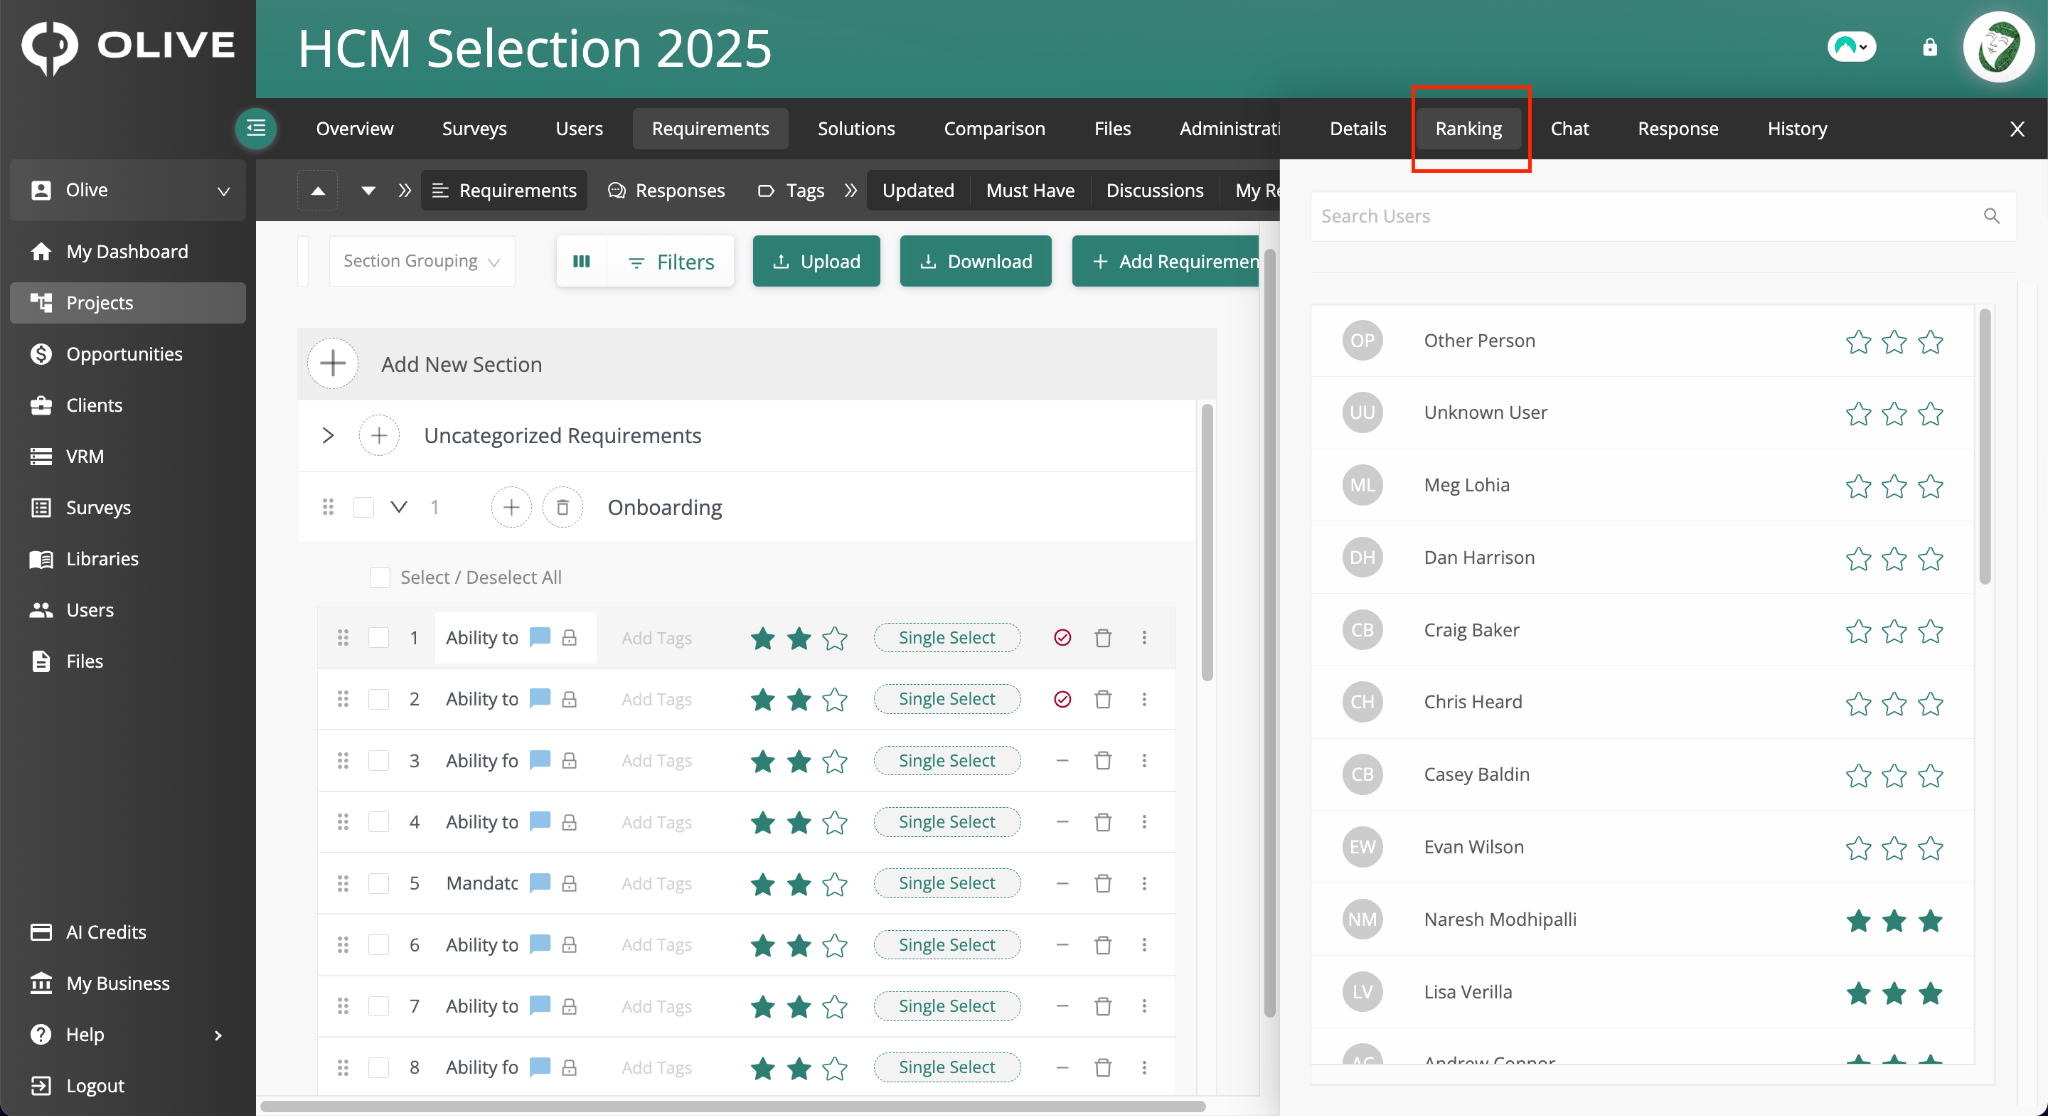
The Ranking tab — showing individual star ratings from all team members
Shows the star ratings given by every team member for this requirement. Visible to project Admins — useful for understanding how your team has collectively prioritised each requirement.
Chat Tab
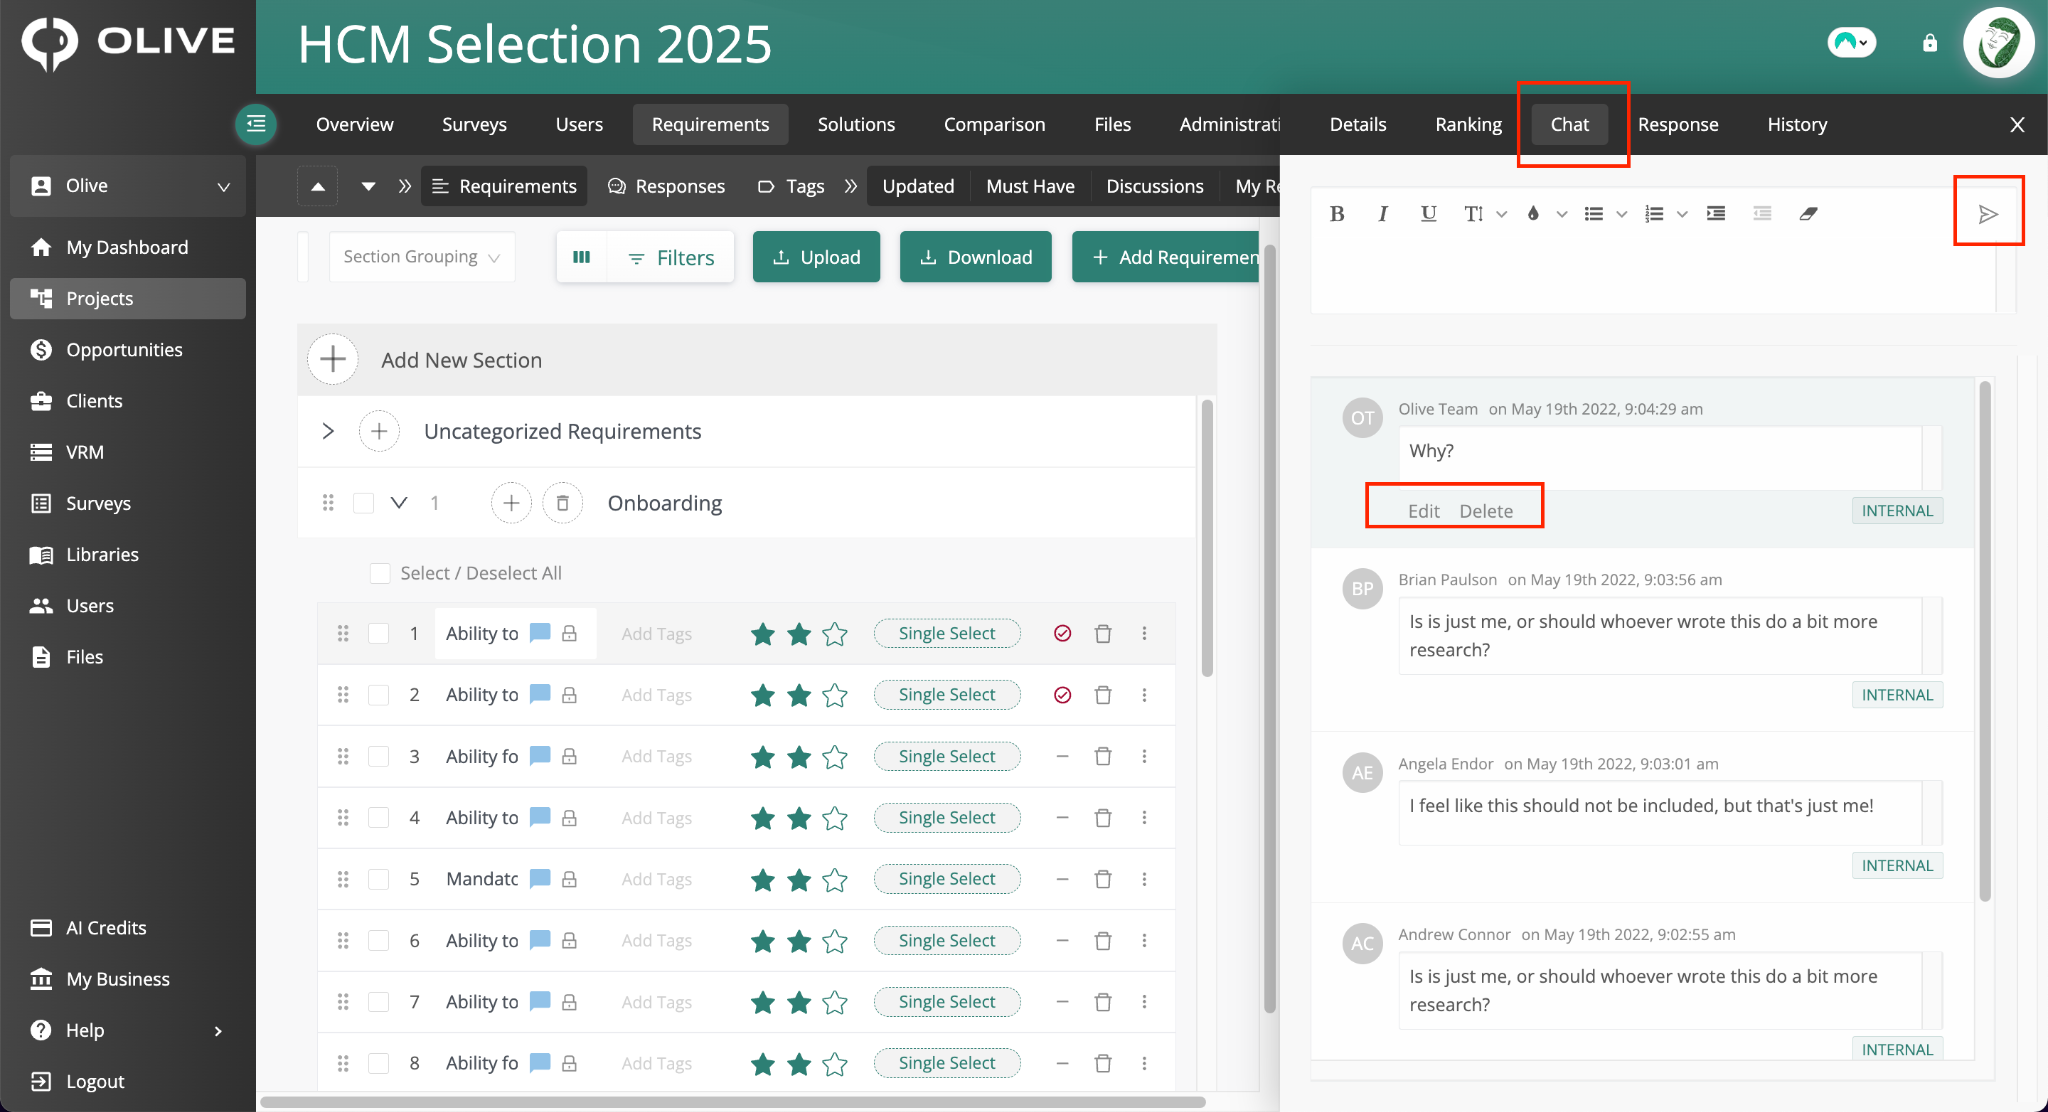
The Chat tab — for internal team discussions on a specific requirement
Discuss a specific requirement with your internal team. Type your comment in the text box, click the Send icon to post it, and hover over your own message to Edit or Delete it.
Response Tab
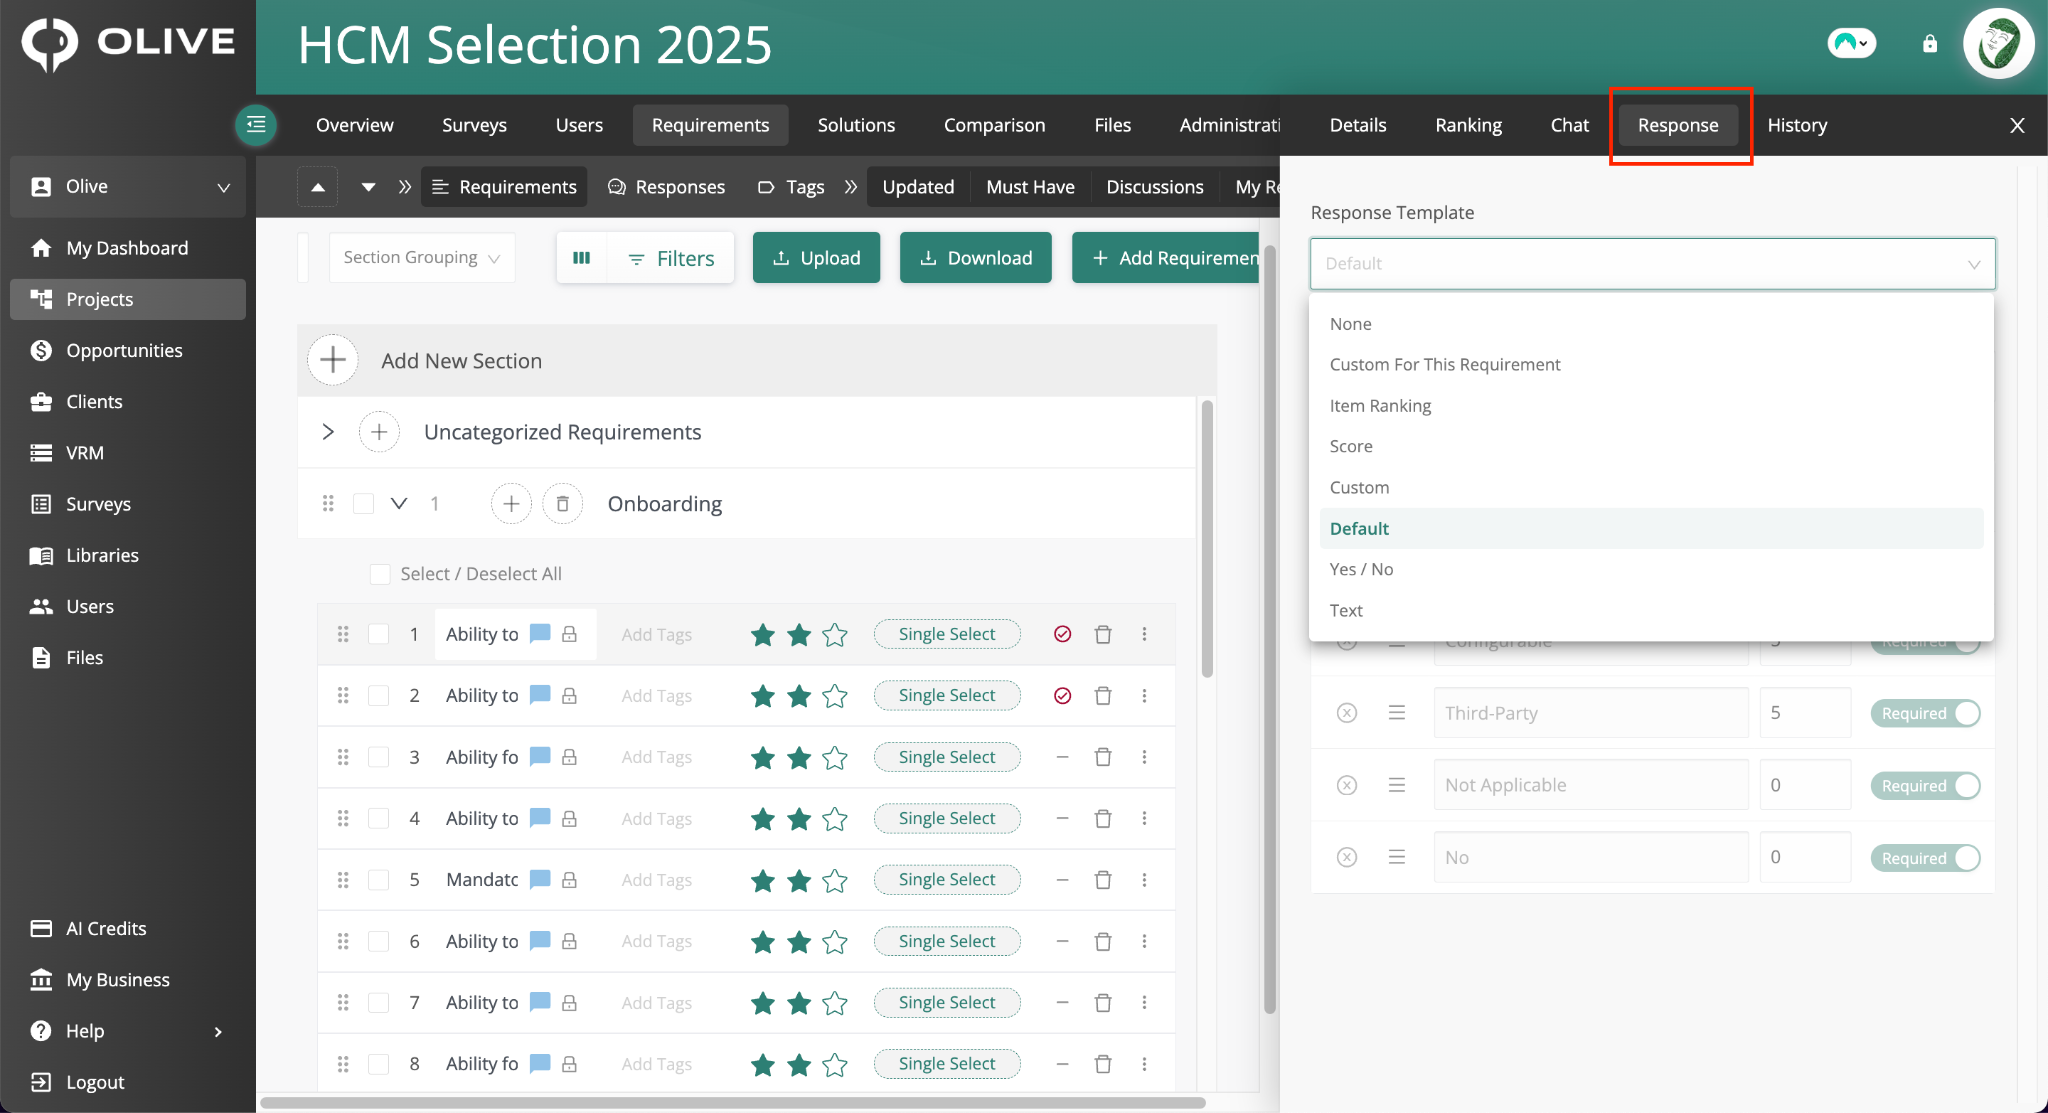
The Response tab — dropdown showing all available Response Template options
Assign a response format to this specific requirement. Click the 'Response Template' dropdown to choose from the available templates. For a full description of each template, see the Responses Sub-tab section below.
|
💡 Tip: The Default response template (Core, Configurable, Third-Party, Not Applicable) is the most commonly used format for RFP requirements. Set it as the project default in the Responses sub-tab so it applies automatically to new requirements. |
History Tab
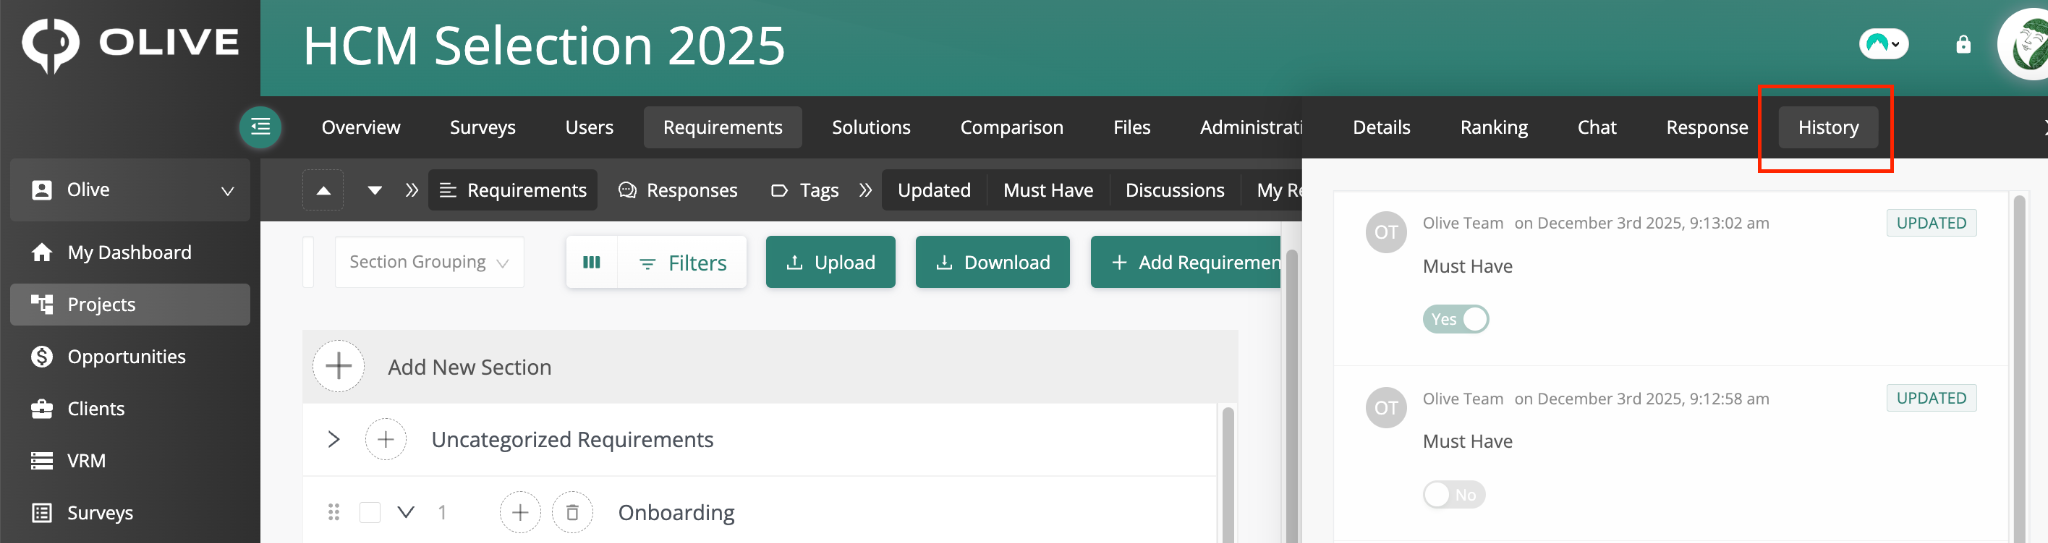
The History tab — a log of all changes made to this requirement
Shows a chronological log of every change made to this requirement — including updates to the label, tags, section, and must-have status. Use it to track how a requirement has evolved during your project.
Bulk Actions
Tick the checkbox next to one or more requirements to activate the bulk actions panel on the left side of the screen. The following actions can be applied to all selected requirements at once:
|
Action |
What it does |
|
Assign Rating |
Assign star ratings to selected requirements, then click Apply |
|
Magic Fill |
Auto-fill vendor responses for selected requirements using AI |
|
Set Agenda Item |
Flag selected requirements as agenda items for vendor demos |
|
Assign to Section |
Move selected requirements to a different section |
|
Assign Tag |
Apply one or more tags to selected requirements |
|
Assign to User |
Assign selected requirements to a team member |
|
Assign to Department |
Assign selected requirements to a department |
|
Assign Response |
Apply a response type to selected requirements |
|
Copy to Project |
Copy selected requirements to one or more other projects |
|
Must Have |
Set or unset selected requirements as must-have |
|
Add to Library |
Add selected requirements to one or more requirement libraries |
|
Remove |
Delete selected requirements permanently |
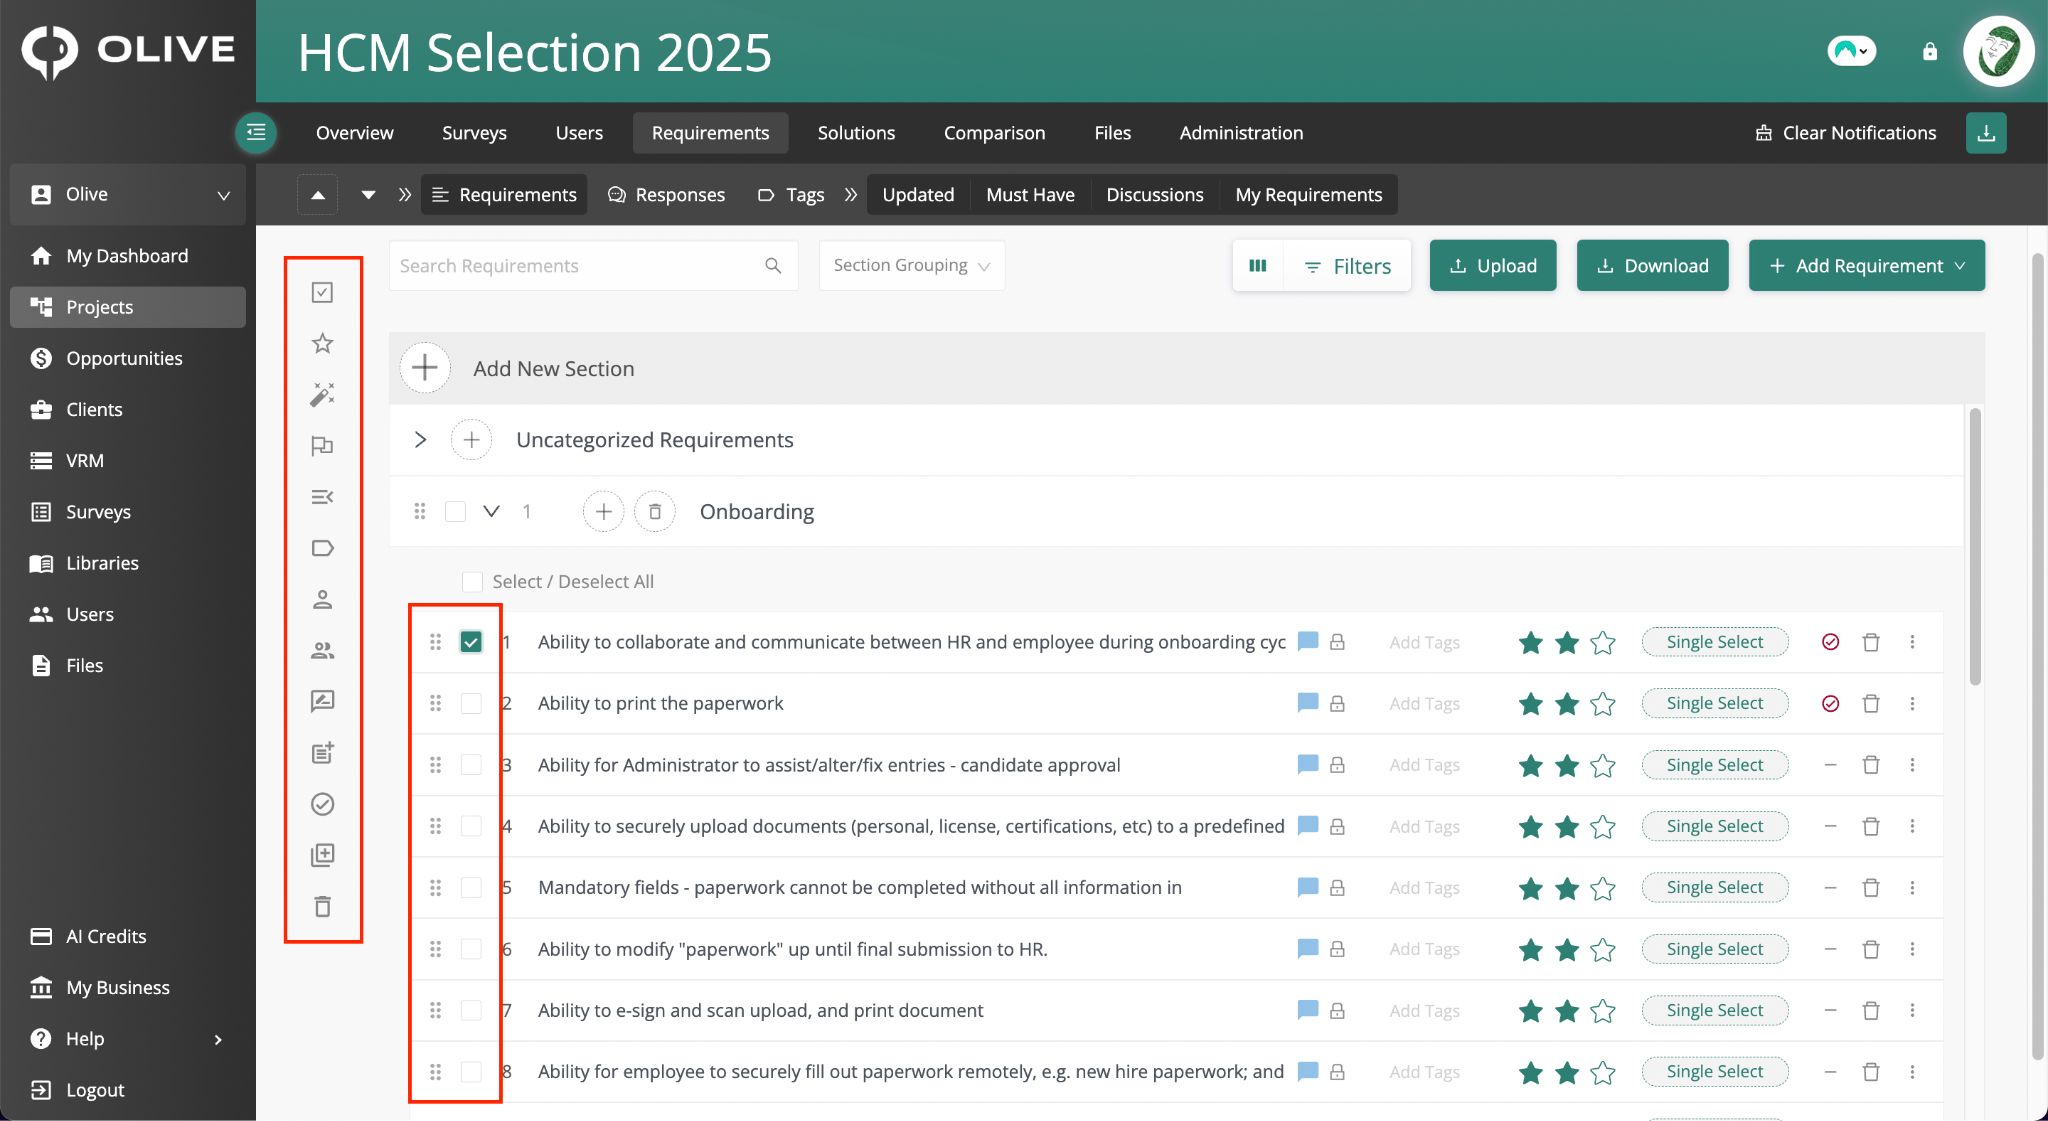
Selecting requirements reveals the bulk actions panel on the left
|
💡 Tip: Use bulk actions to save time when setting up a new project — select all requirements in a section and assign their response type, star ratings, and tags in one go. |
Toolbar Features
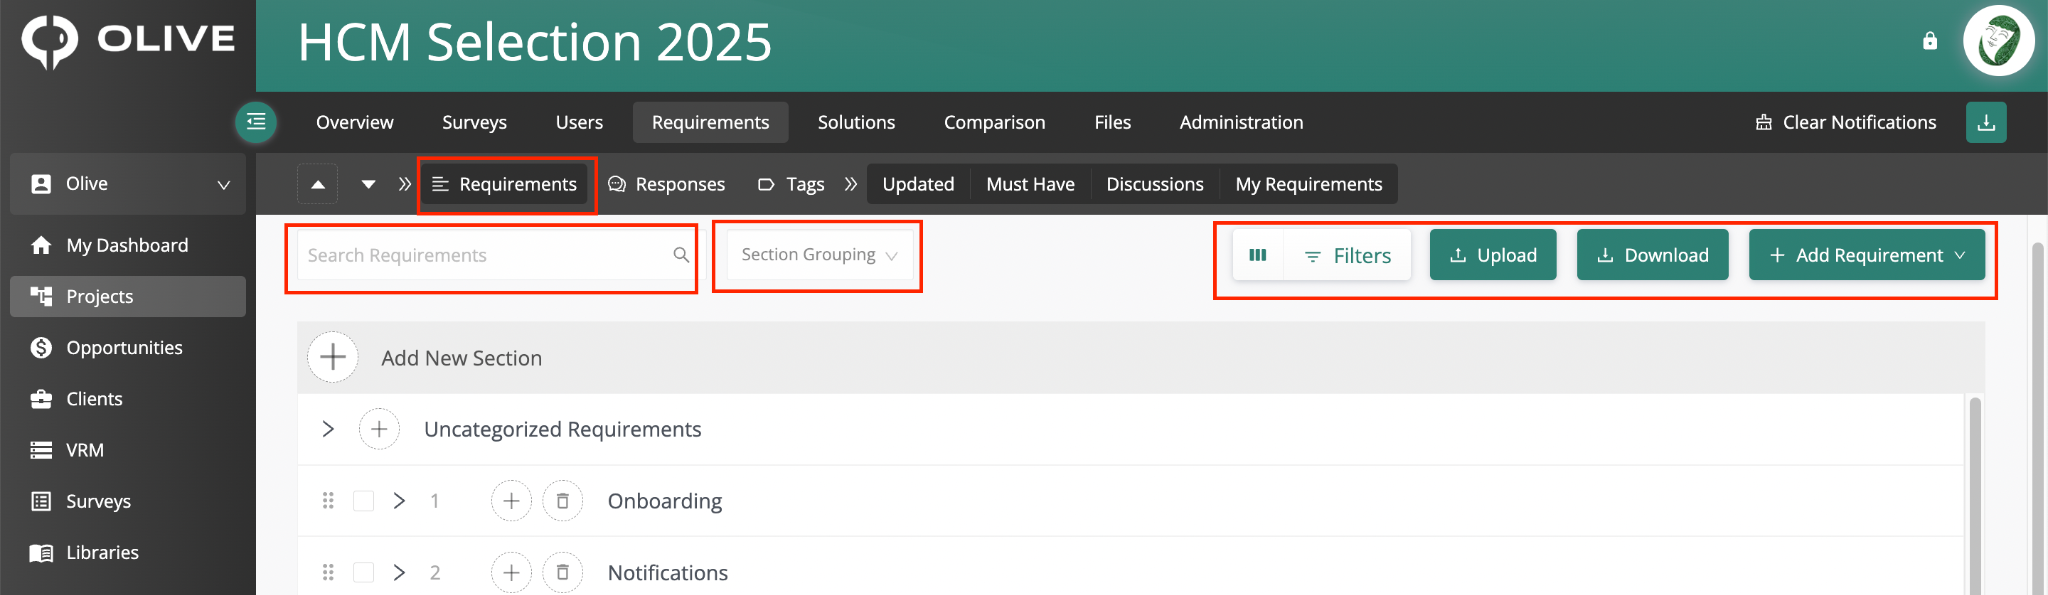
The Requirements toolbar — Search, Section Grouping, Filters, Upload, Download, and Add Requirement
Search Requirements
Type a keyword in the Search Requirements box to instantly filter the Requirement Table to show only matching requirements. Clear the search to return to the full view.
Section Grouping
Use the Section Grouping dropdown to change how requirements are displayed:
- Section Grouping — default view, requirements grouped by section
- No Grouping — all requirements listed flat without section headers
Upload
Click the Upload button to import requirements from a spreadsheet. The Requirement Upload wizard guides you through three steps:
- Select File — click or drag your spreadsheet into the upload area
- Map Columns — match your spreadsheet columns to Olive's requirement fields
- Upload Requirements — confirm and complete the upload
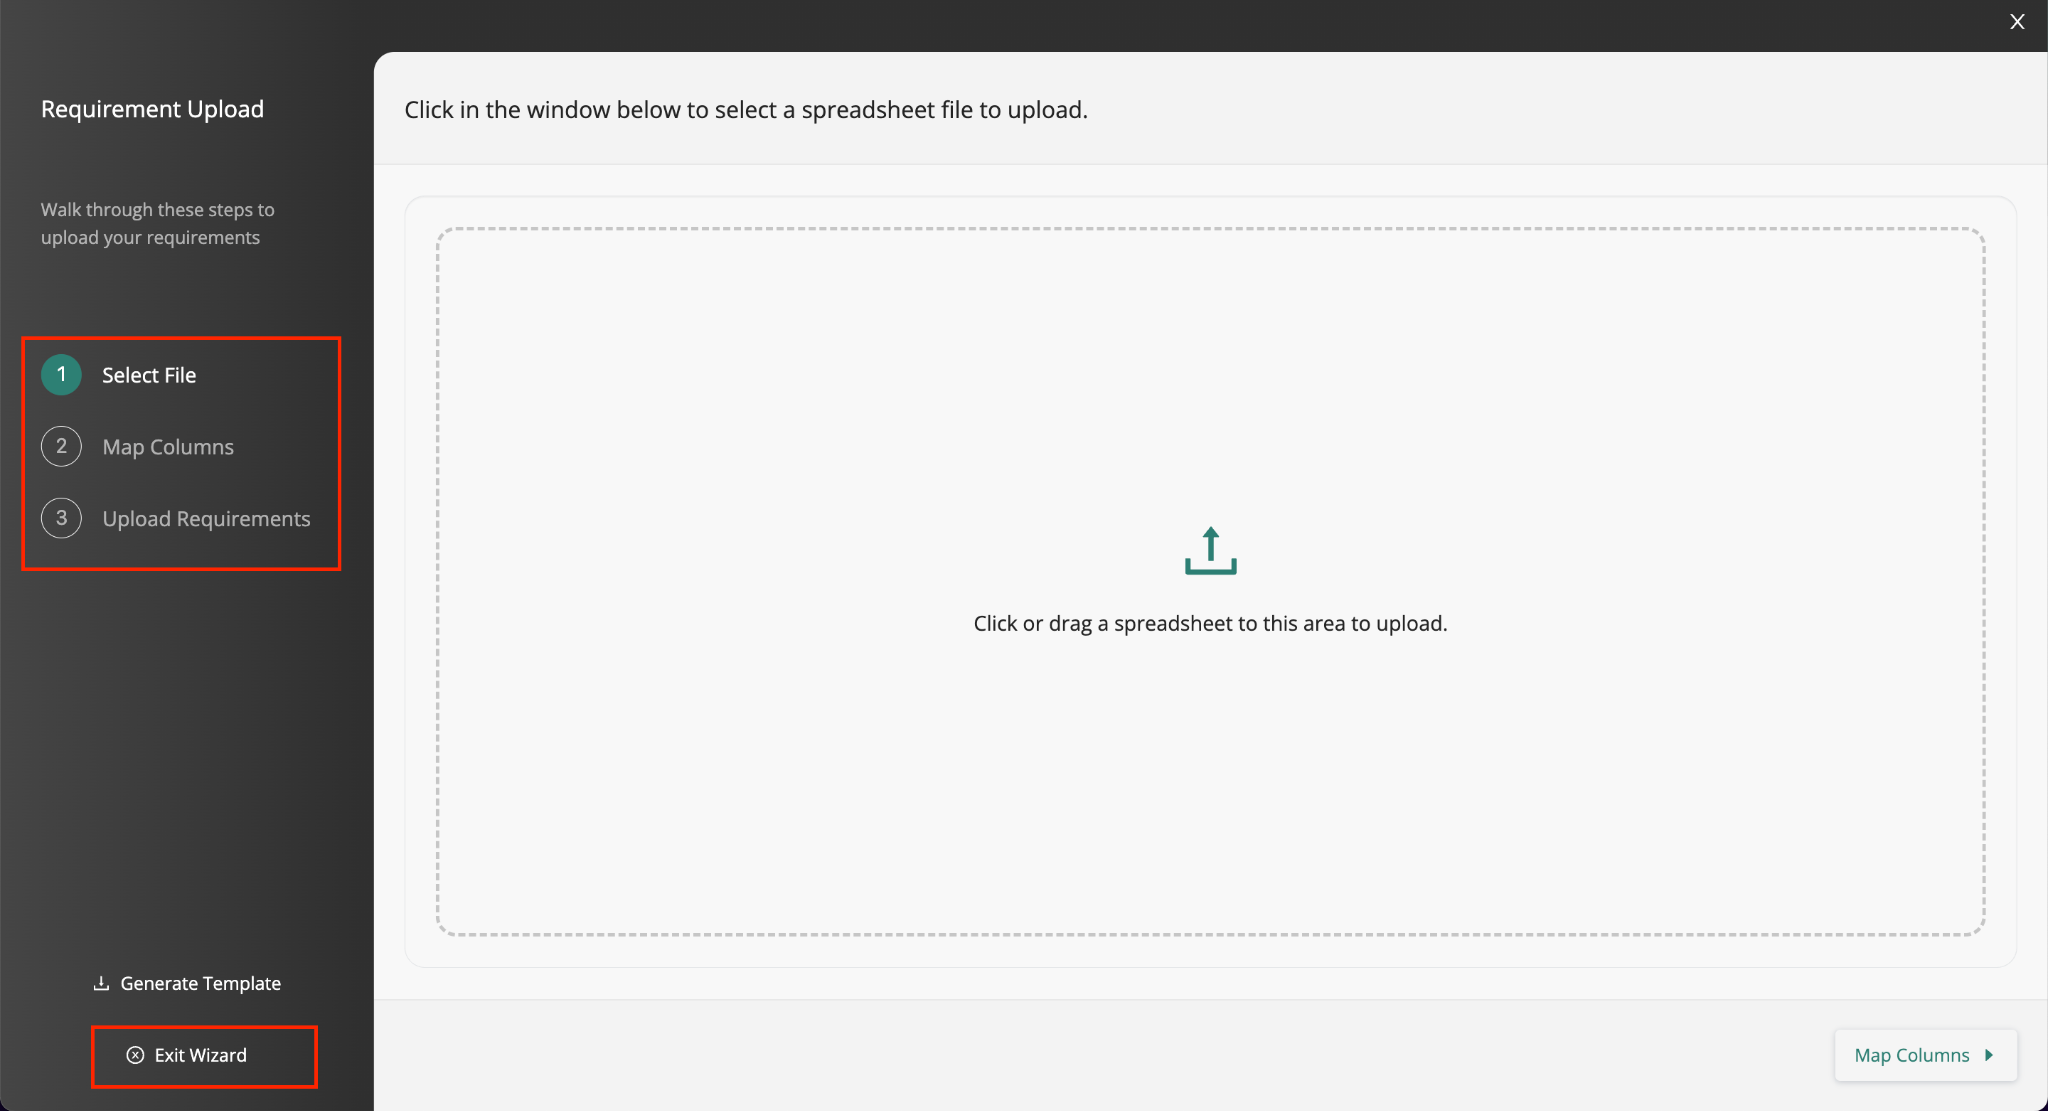
The Requirement Upload wizard — a 3-step process to import requirements from a spreadsheet
|
📌 Note: If any requirements have errors, Olive will generate and download an error file highlighting the issues in each row. Fix the errors and re-upload the corrected spreadsheet. |
Download
Click the Download button to export all requirements as a spreadsheet. A message will confirm the file is being generated and will appear in the Files tab when ready. You can navigate away while it processes.
Add Requirement
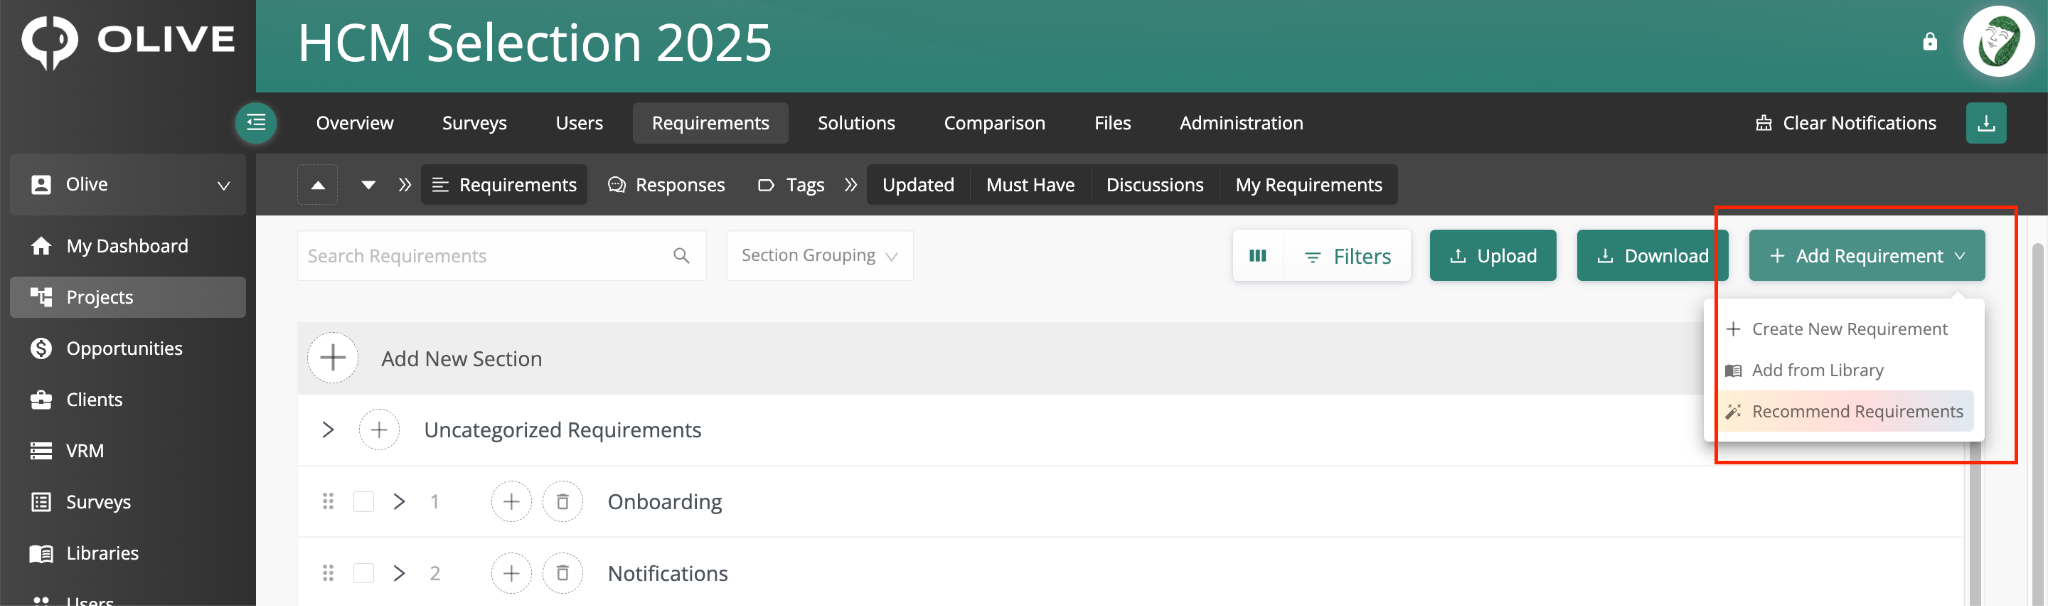
The '+ Add Requirement' dropdown — showing Create New, Add from Library, and Recommend Requirements
Click '+ Add Requirement' to open a dropdown with three options:
Create New Requirement
Opens a creation modal where you can fill in all details: requirement text, section, tags, departments, users, and description. Click 'Create and Close' to save and close, or 'Create and Add Another' to save and immediately create the next one.
Add from Library
- Search for and select from existing requirement libraries in Olive
- Click 'View Library' on any library to open it
- Select entire sections or individual requirements to add
- Use the dropdown to choose which section of your current project to add them to
- Click Confirm to complete the import
Recommend Requirements
Opens the Ask Olive AI chatbot, which automatically suggests requirements based on your project's current overview, topics, and solutions. You can continue chatting to refine the recommendations or ask it to add suggestions directly to your project.
Quick Filters and Filters
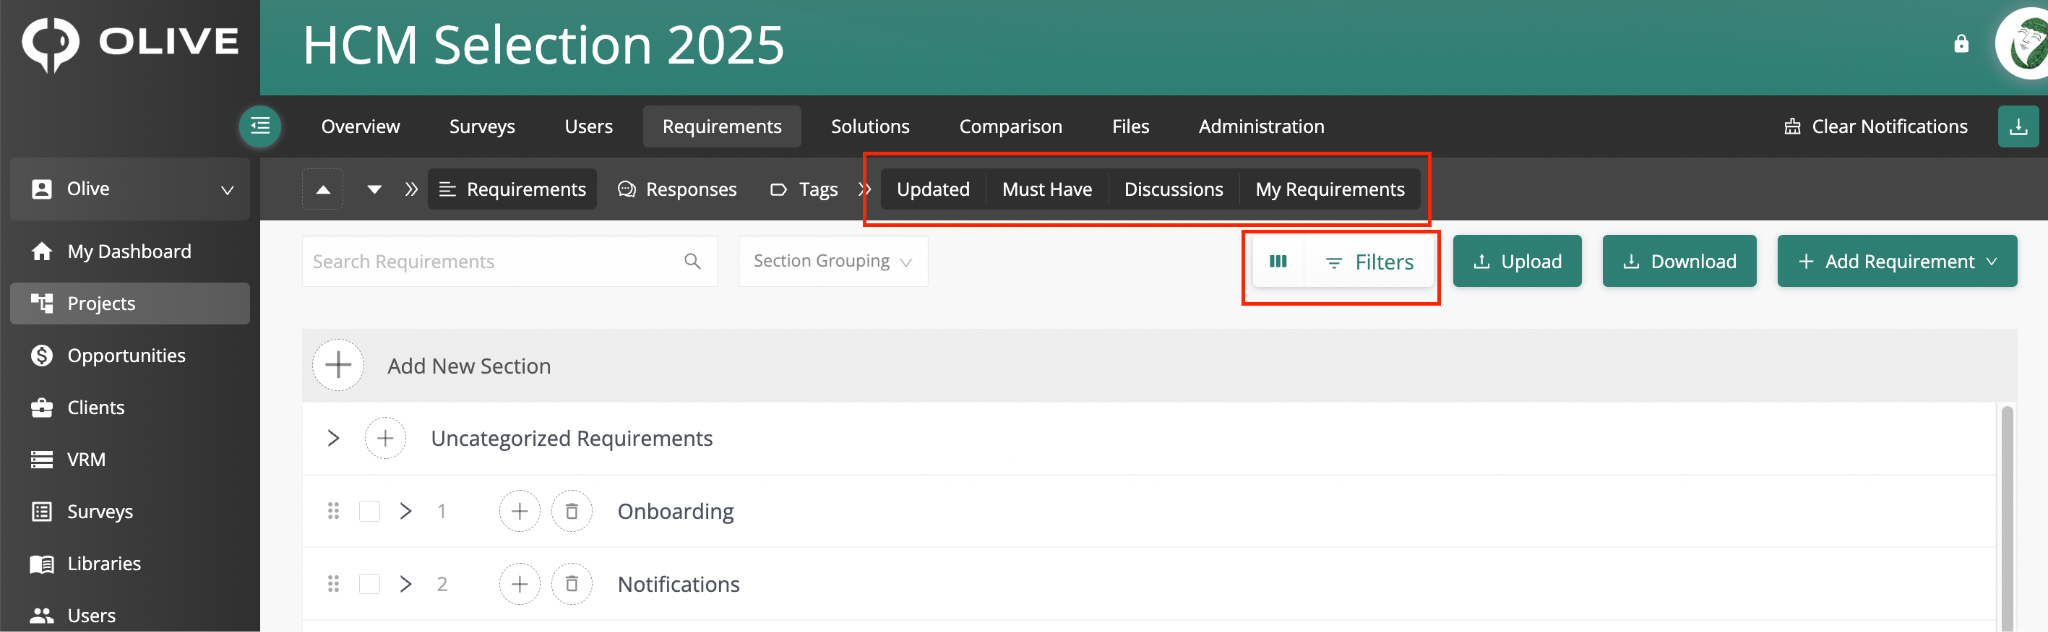
Quick filters in the sub-tab bar and the Filters button in the toolbar
Quick Filters
The quick filters in the sub-tab bar instantly narrow down the requirements view. Click any filter to apply it; click again to clear it.
- Updated — shows requirements recently added or modified
- Must Have — shows only requirements marked as must-have
- Discussions — shows requirements with comments in their Chat tab
- My Requirements — shows requirements assigned to you
Filters Button
Click the Filters button to open the Filter Requirements panel for more granular filtering:
- Click 'Add a Property to Filter'
- Choose a property — Must Have, Rating, Sections, Tags, Stakeholders, Departments, Assigned To, or Created By
- Stack multiple filters for a more precise view
- Click 'Clear Filter' to reset all filters
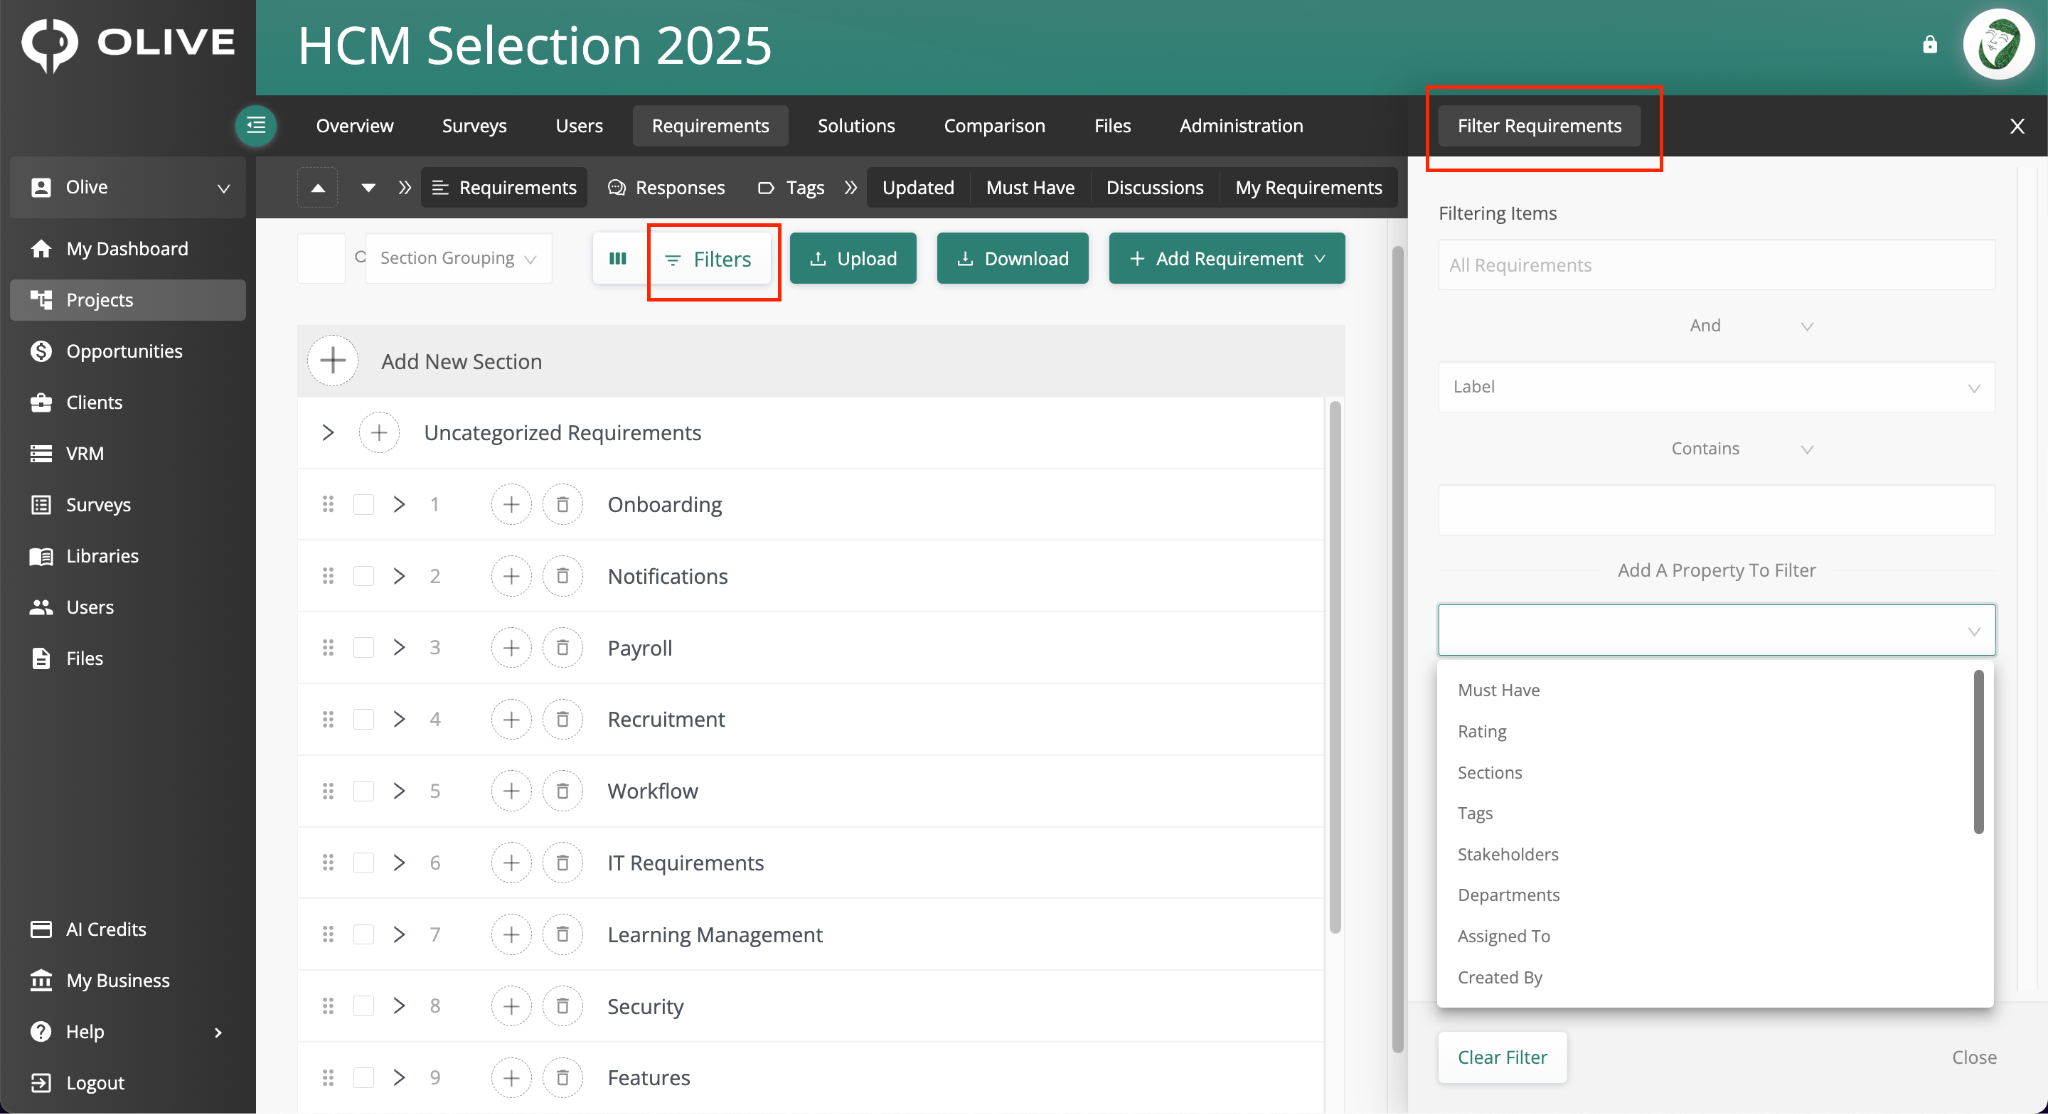
The Filter Requirements panel — with Add a Property to Filter dropdown open
Responses Sub-tab
Click the Responses sub-tab to manage the Response Templates available in your project. Response Templates define the format vendors will use when answering your requirements.
The page is split into two panels: the Response Templates list on the left, and the Response Details panel on the right. Click any template to view and edit its details.
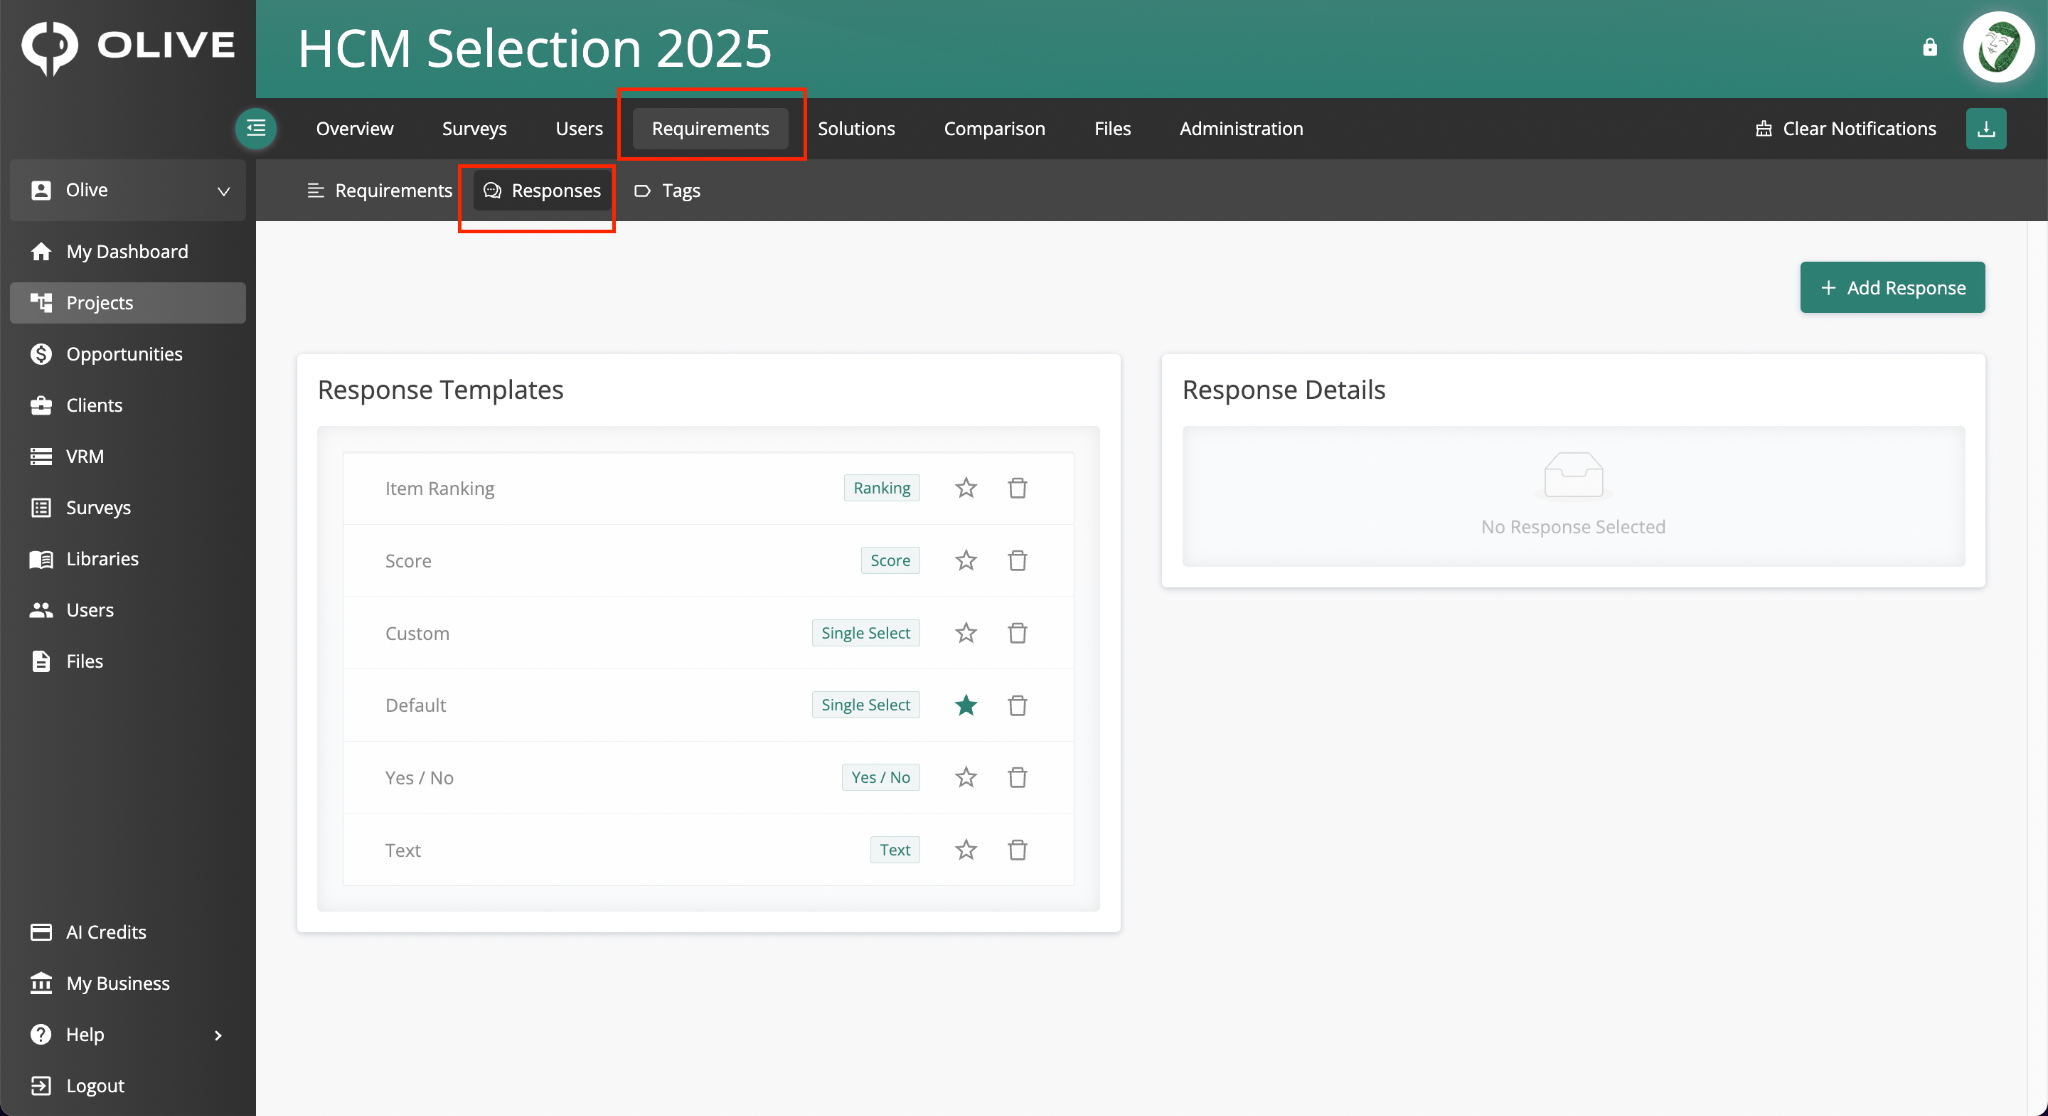
The Responses sub-tab — showing the Response Templates list and Response Details panel
Built-in Response Templates
Ten response templates are available by default. Use the table below as a quick reference before exploring each in detail:
|
Template |
Description |
|
Default |
Single Select: Core, Configurable, Third-Party, Not Applicable, No. The standard RFP format. |
|
Yes / No |
Vendors respond Yes, No, or Other. Configurable scores and optional explanation. |
|
Text |
Free-text answer. No scoring options. |
|
Single Select |
Vendors choose one option from a list you define. Configurable scores per option. |
|
Score |
Vendors provide a numeric score. Set minimum and maximum values. |
|
Custom |
Fully customisable Single Select with your own options and scores. |
|
Number |
Vendors provide a numeric value. No min/max scale. |
|
Item Ranking |
Vendors rank a list of items you create. Useful for prioritisation requirements. |
|
Multiple Select |
Vendors choose one or more options from a list you define. |
|
Number Scale |
Vendors respond on a number scale. Set the minimum and maximum values. |
|
💡 Tip: Click the star icon next to any template to set it as the default. The default template will be automatically applied to new requirements unless you override it per requirement. |
Default
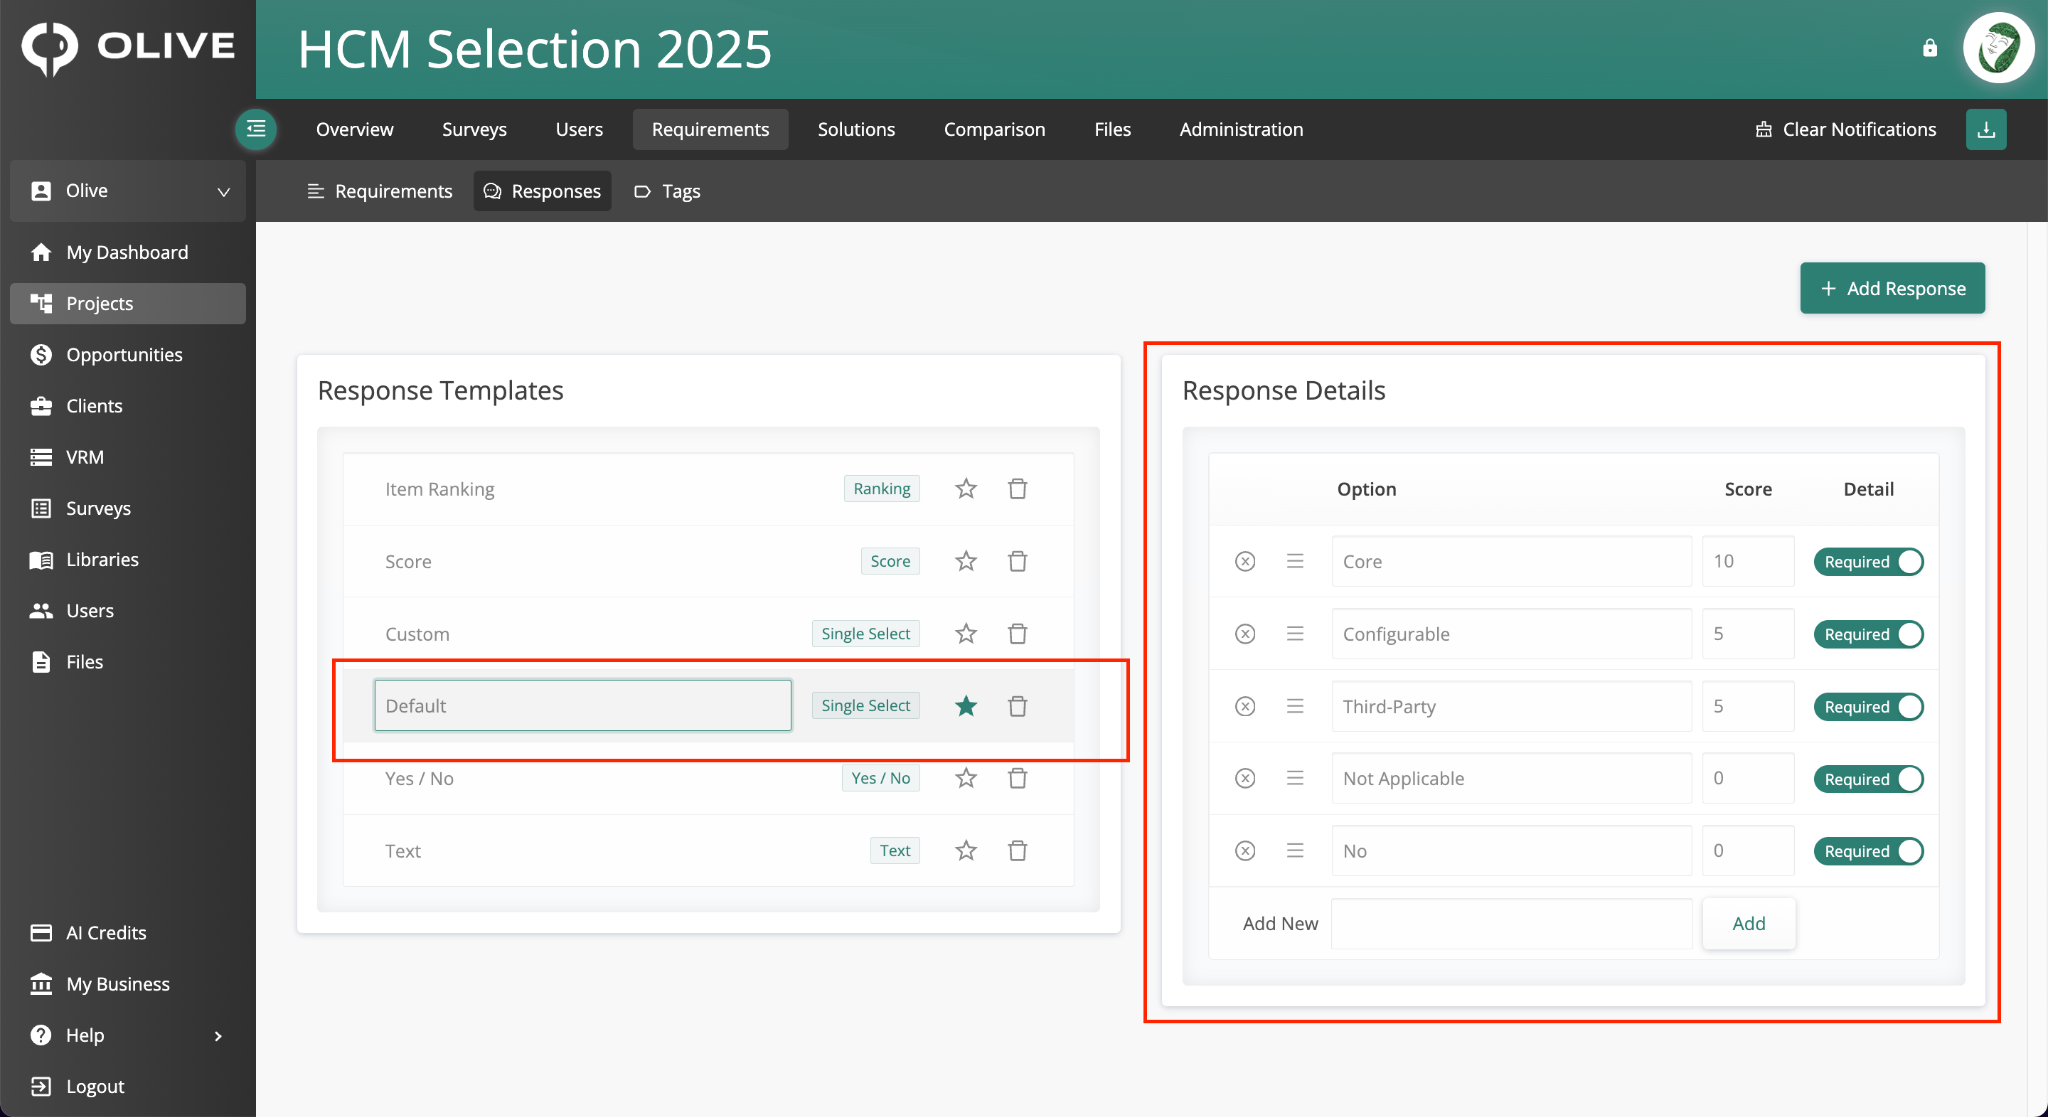
The Default template — Single Select with options Core, Configurable, Third-Party, Not Applicable
A Single Select template with the standard RFP options: Core, Configurable, Third-Party, Not Applicable, and No. You can add new options, remove existing ones, set a score per option, and toggle whether vendors must provide an explanation.
|
📌 Note: The four standard options mean: Core = fully included in the vendor's standard product; Configurable = available but requires setup or configuration; Third-Party = requires an additional tool or integration; Not Applicable = not relevant to this vendor's offering. |
Yes / No
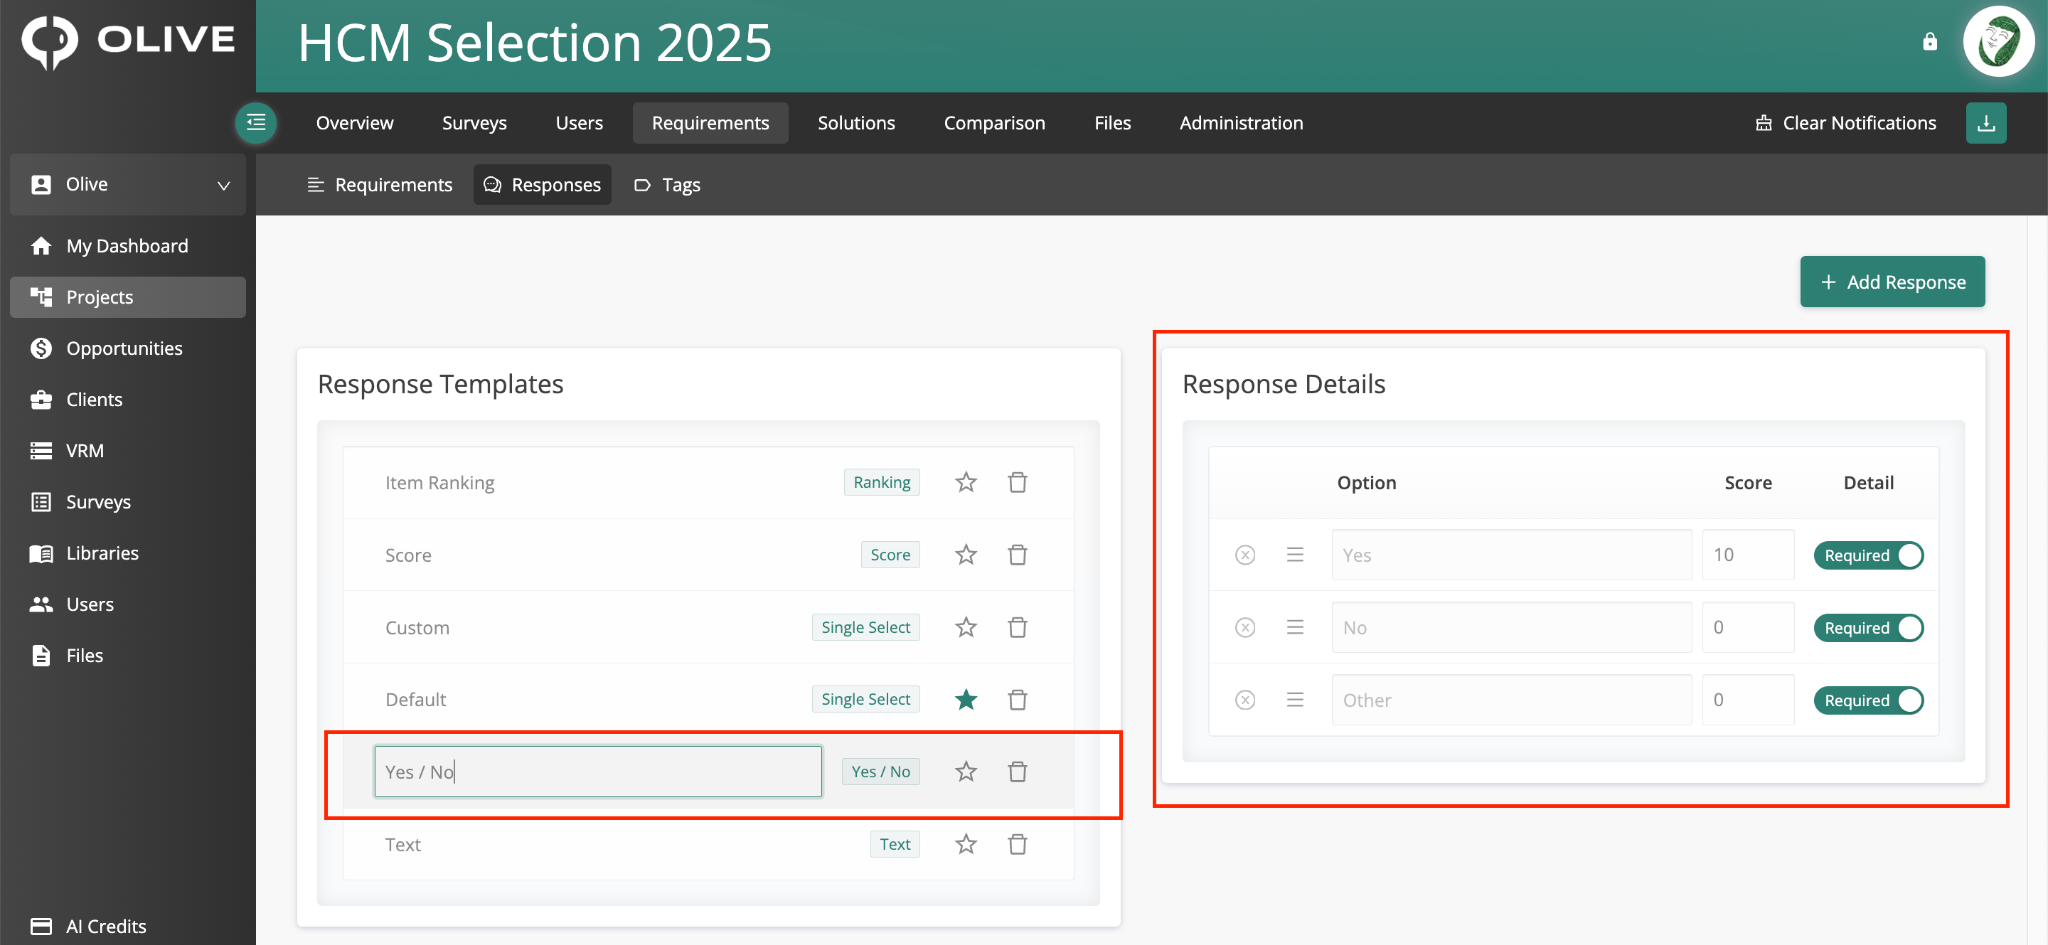
The Yes/No template — with Yes, No, and Other options and configurable scores
Vendors respond with Yes, No, or Other. Assign a score to each answer and choose whether a detailed explanation is Required or Optional.
Text
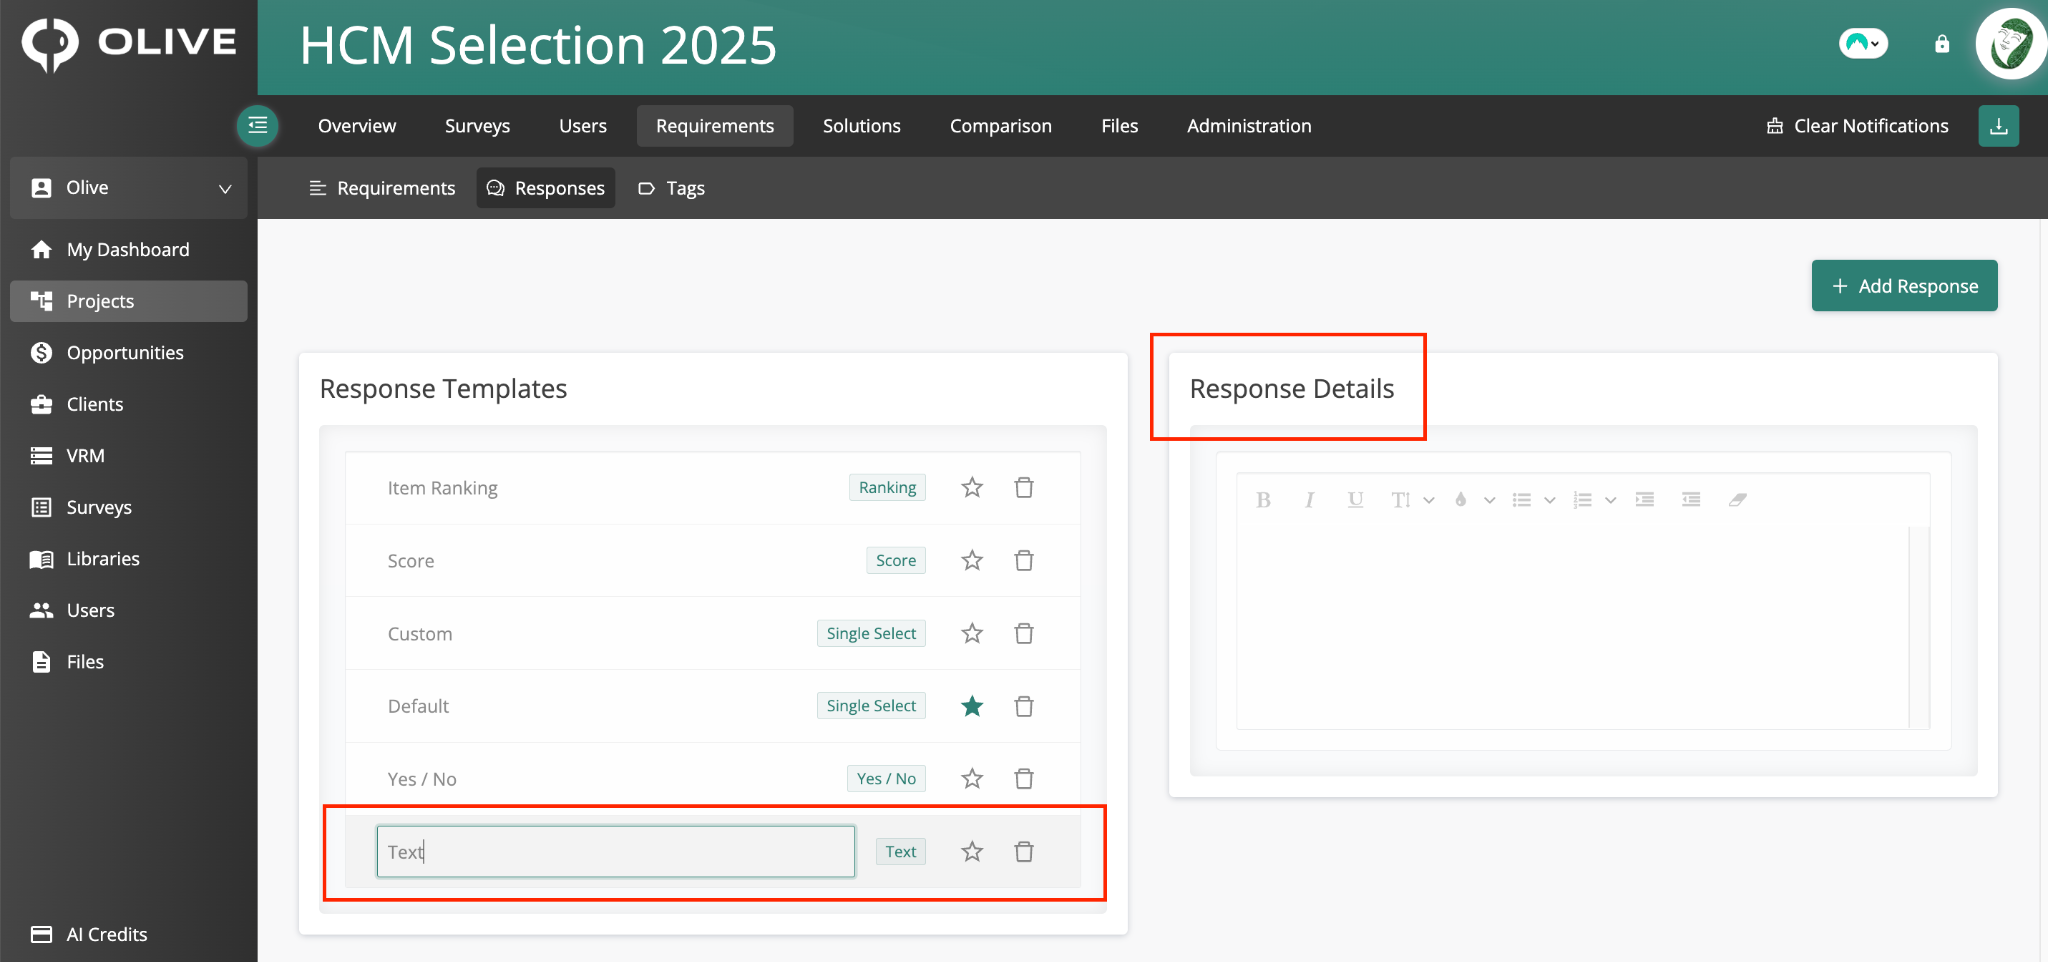
The Text template — a free-text response with no scoring
Vendors provide a free-text answer. No scoring options are available for this type.
Single Select
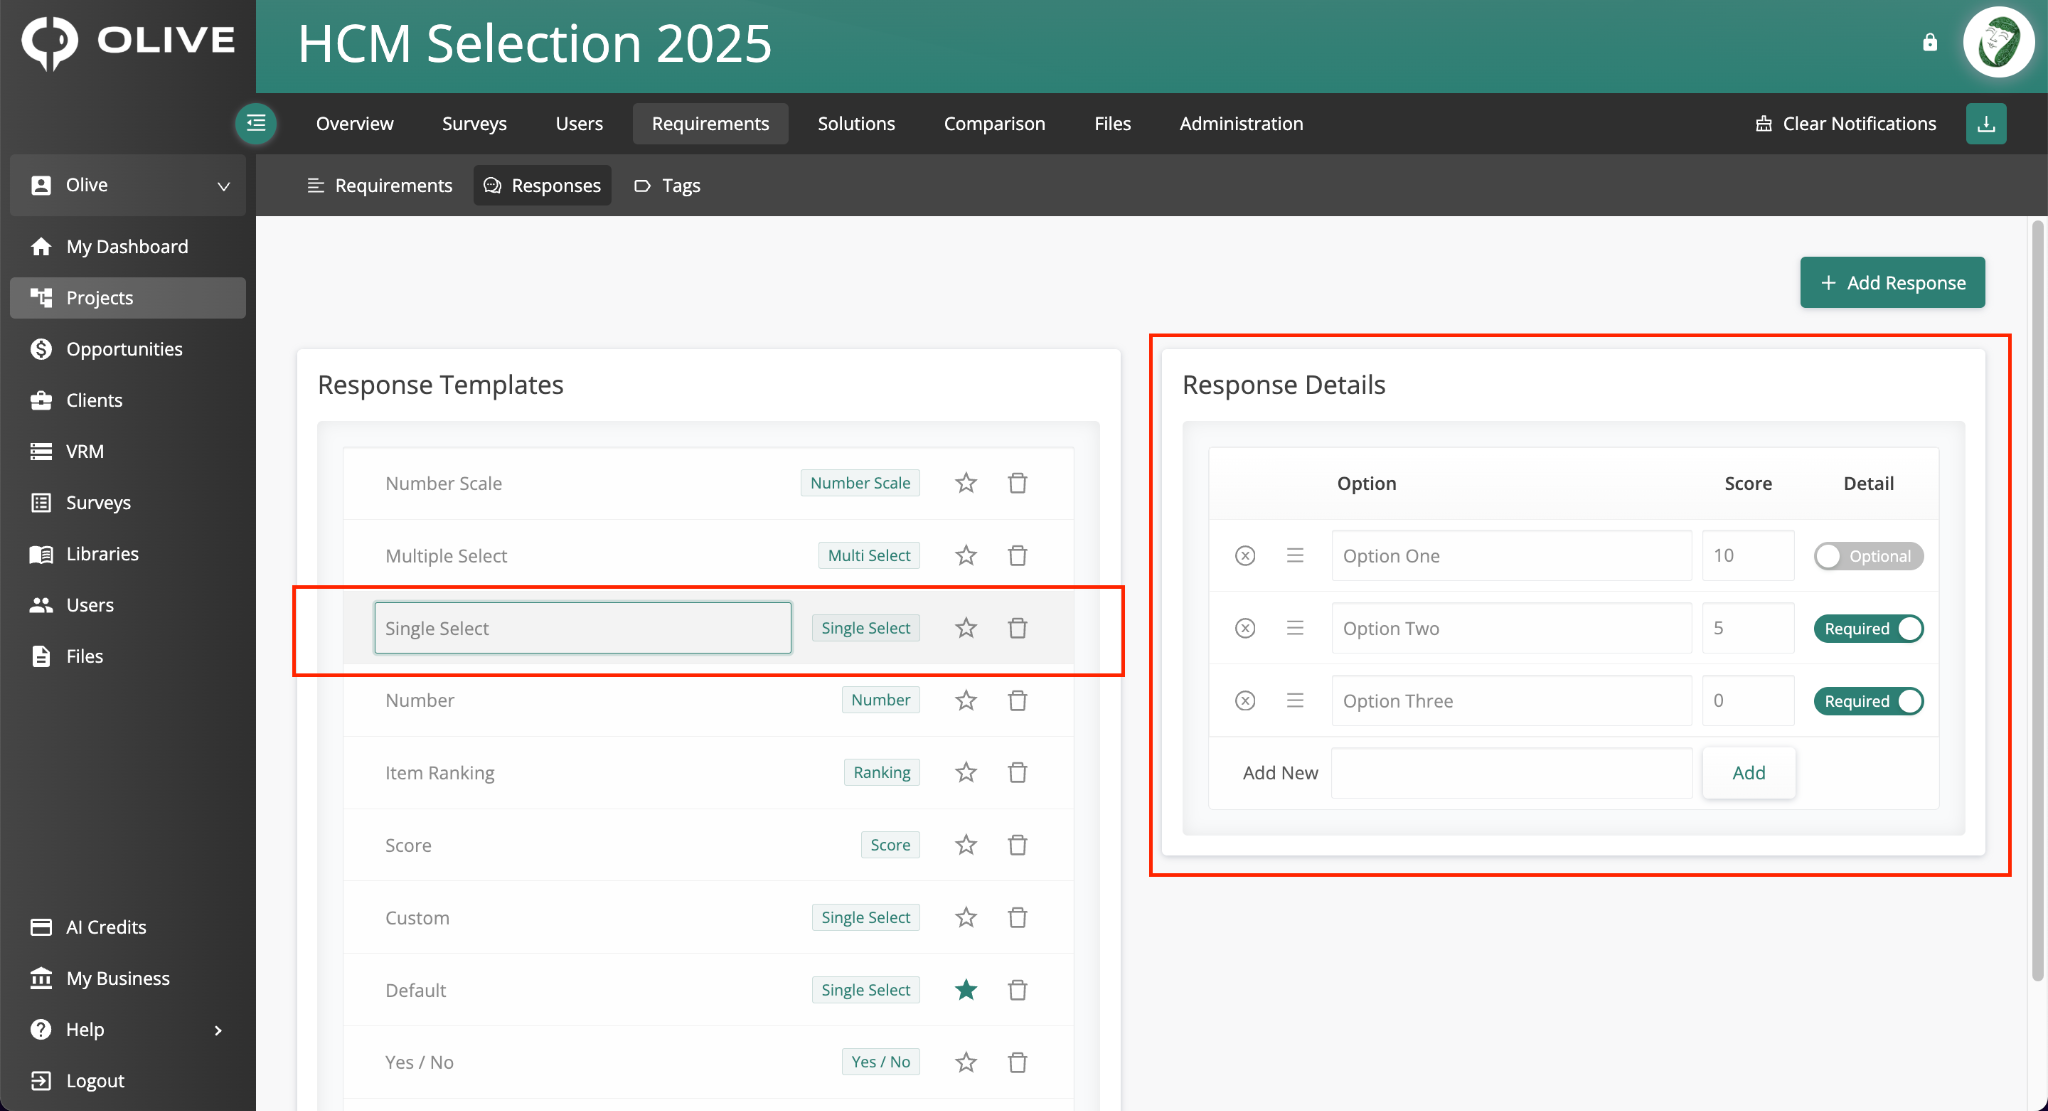
The Single Select template — with custom options and configurable scores per option
Vendors choose one option from a list you define. Set a score for each option and toggle whether an explanation is Required or Optional. Use the 'Add' button to create new options.
Score
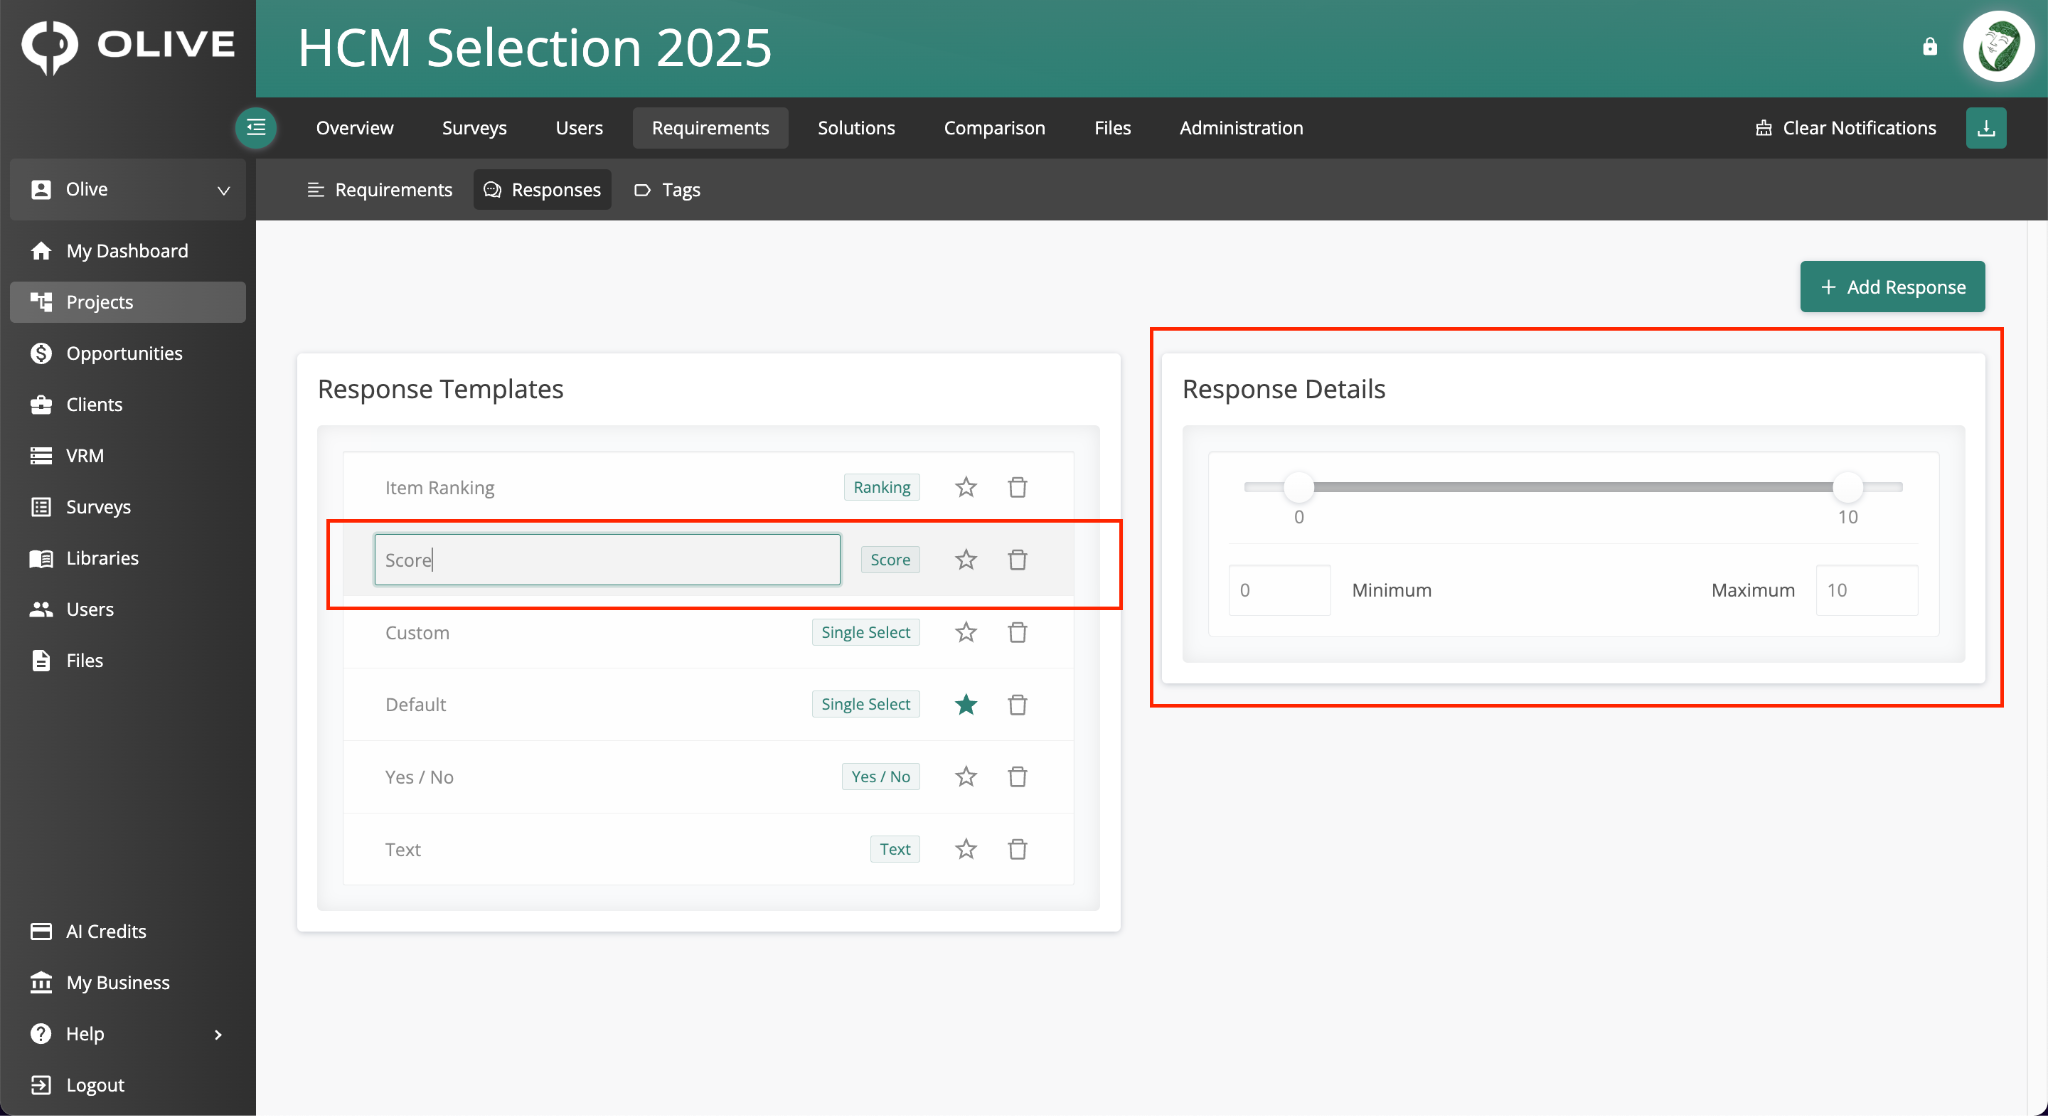
The Score template — with configurable minimum and maximum score values
Vendors provide a numeric score. Set the minimum and maximum values for the scoring scale.
Custom
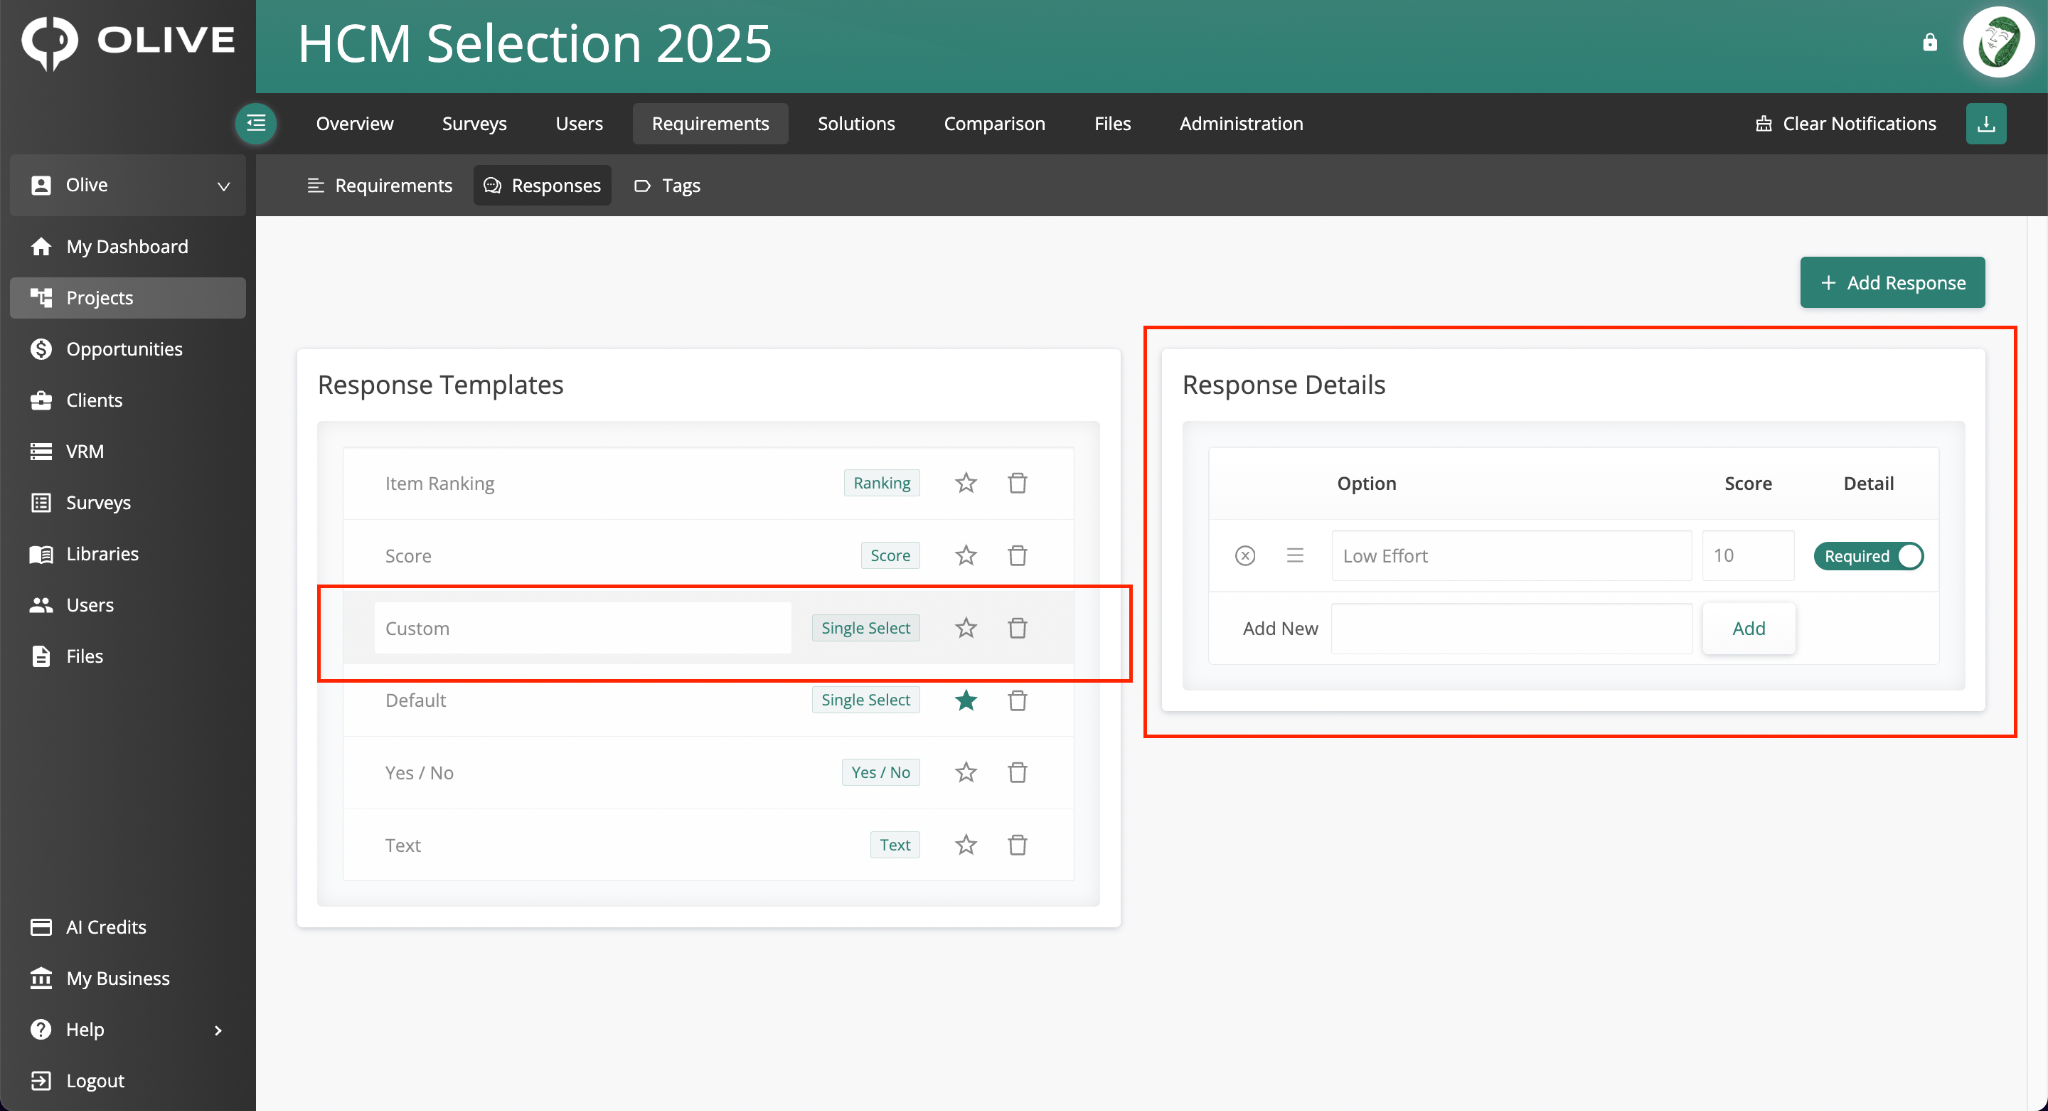
The Custom template — a Single Select template with your own custom options
A fully customisable Single Select template. Create your own answer options, assign scores, and toggle detail requirements as needed.
Number
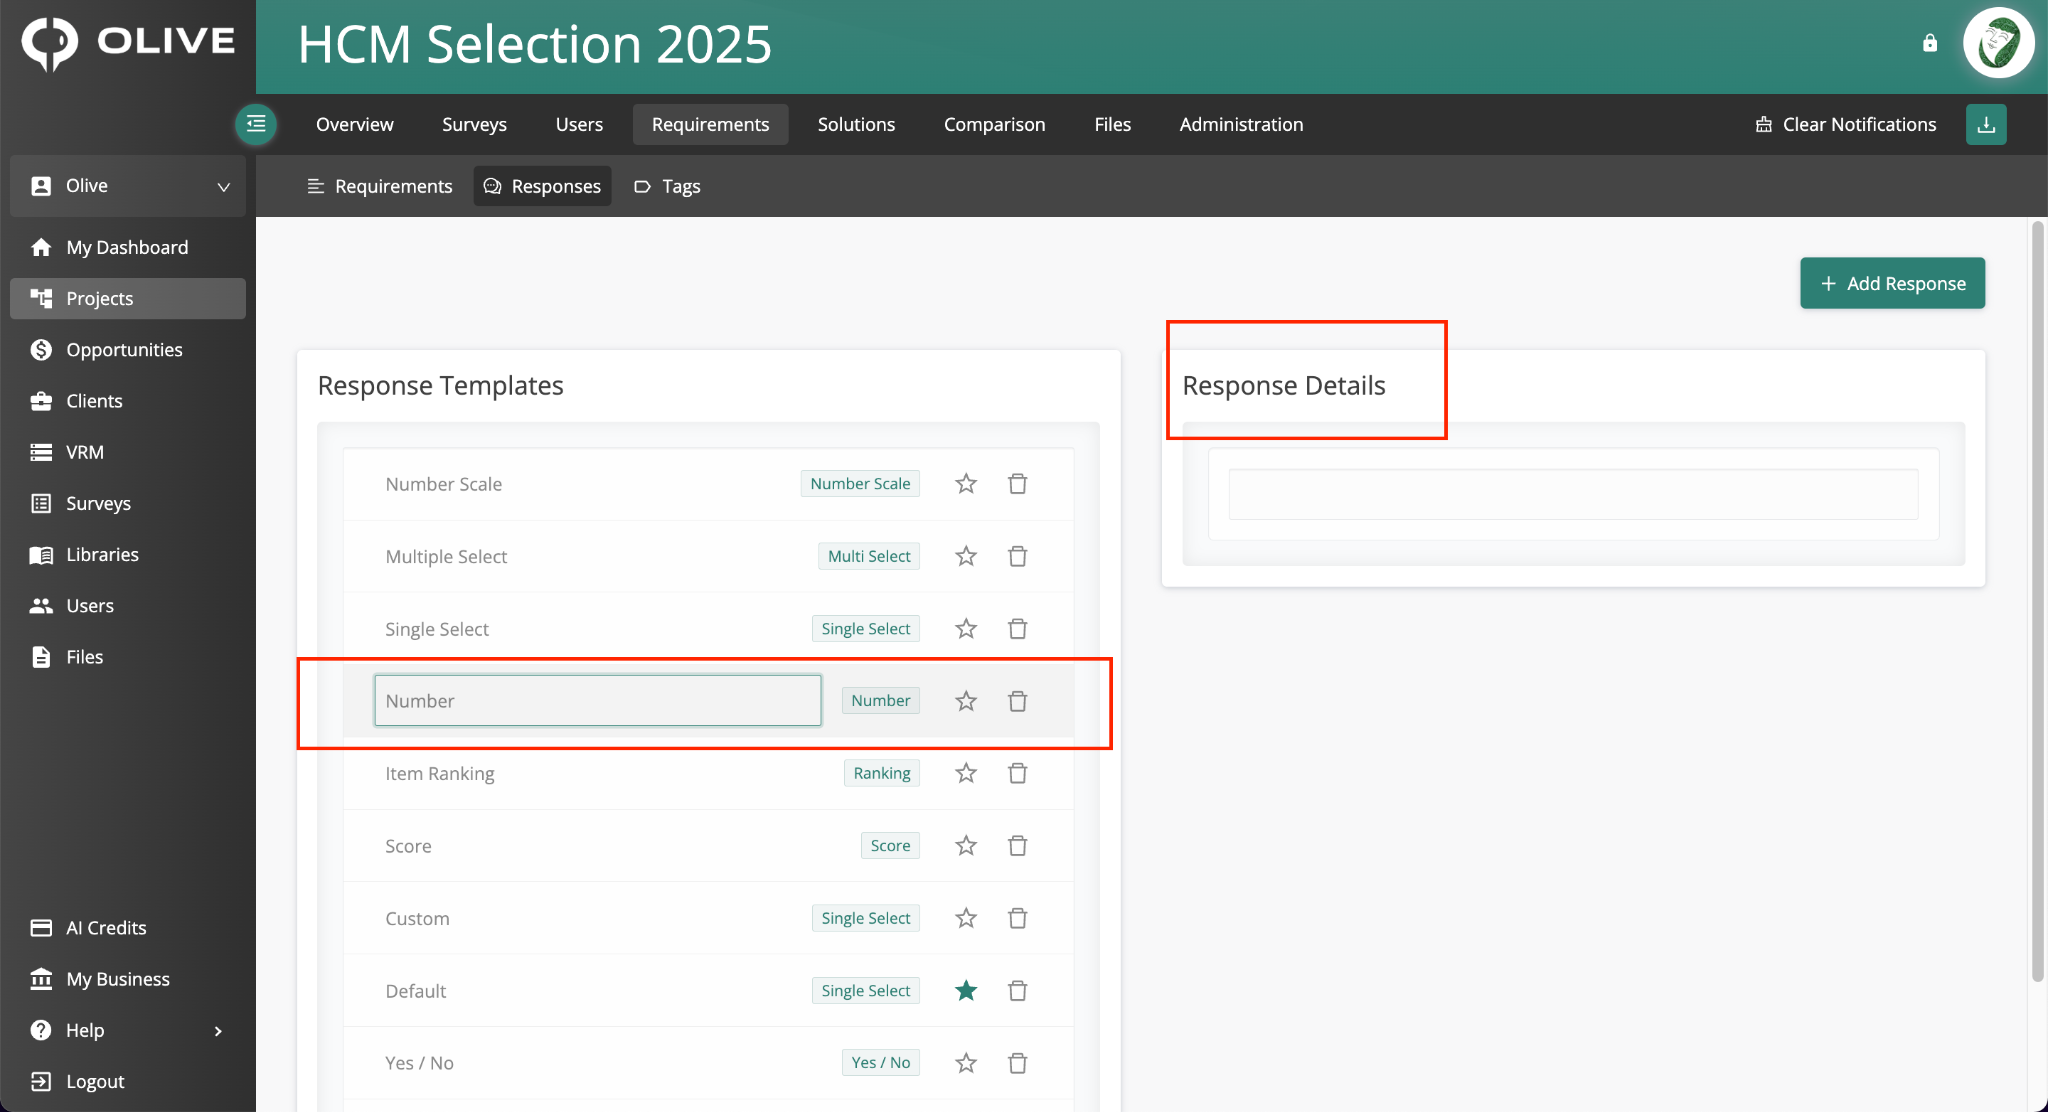
The Number template — for numeric responses with no scoring scale
Vendors provide a numeric value. No minimum or maximum is set.
Item Ranking
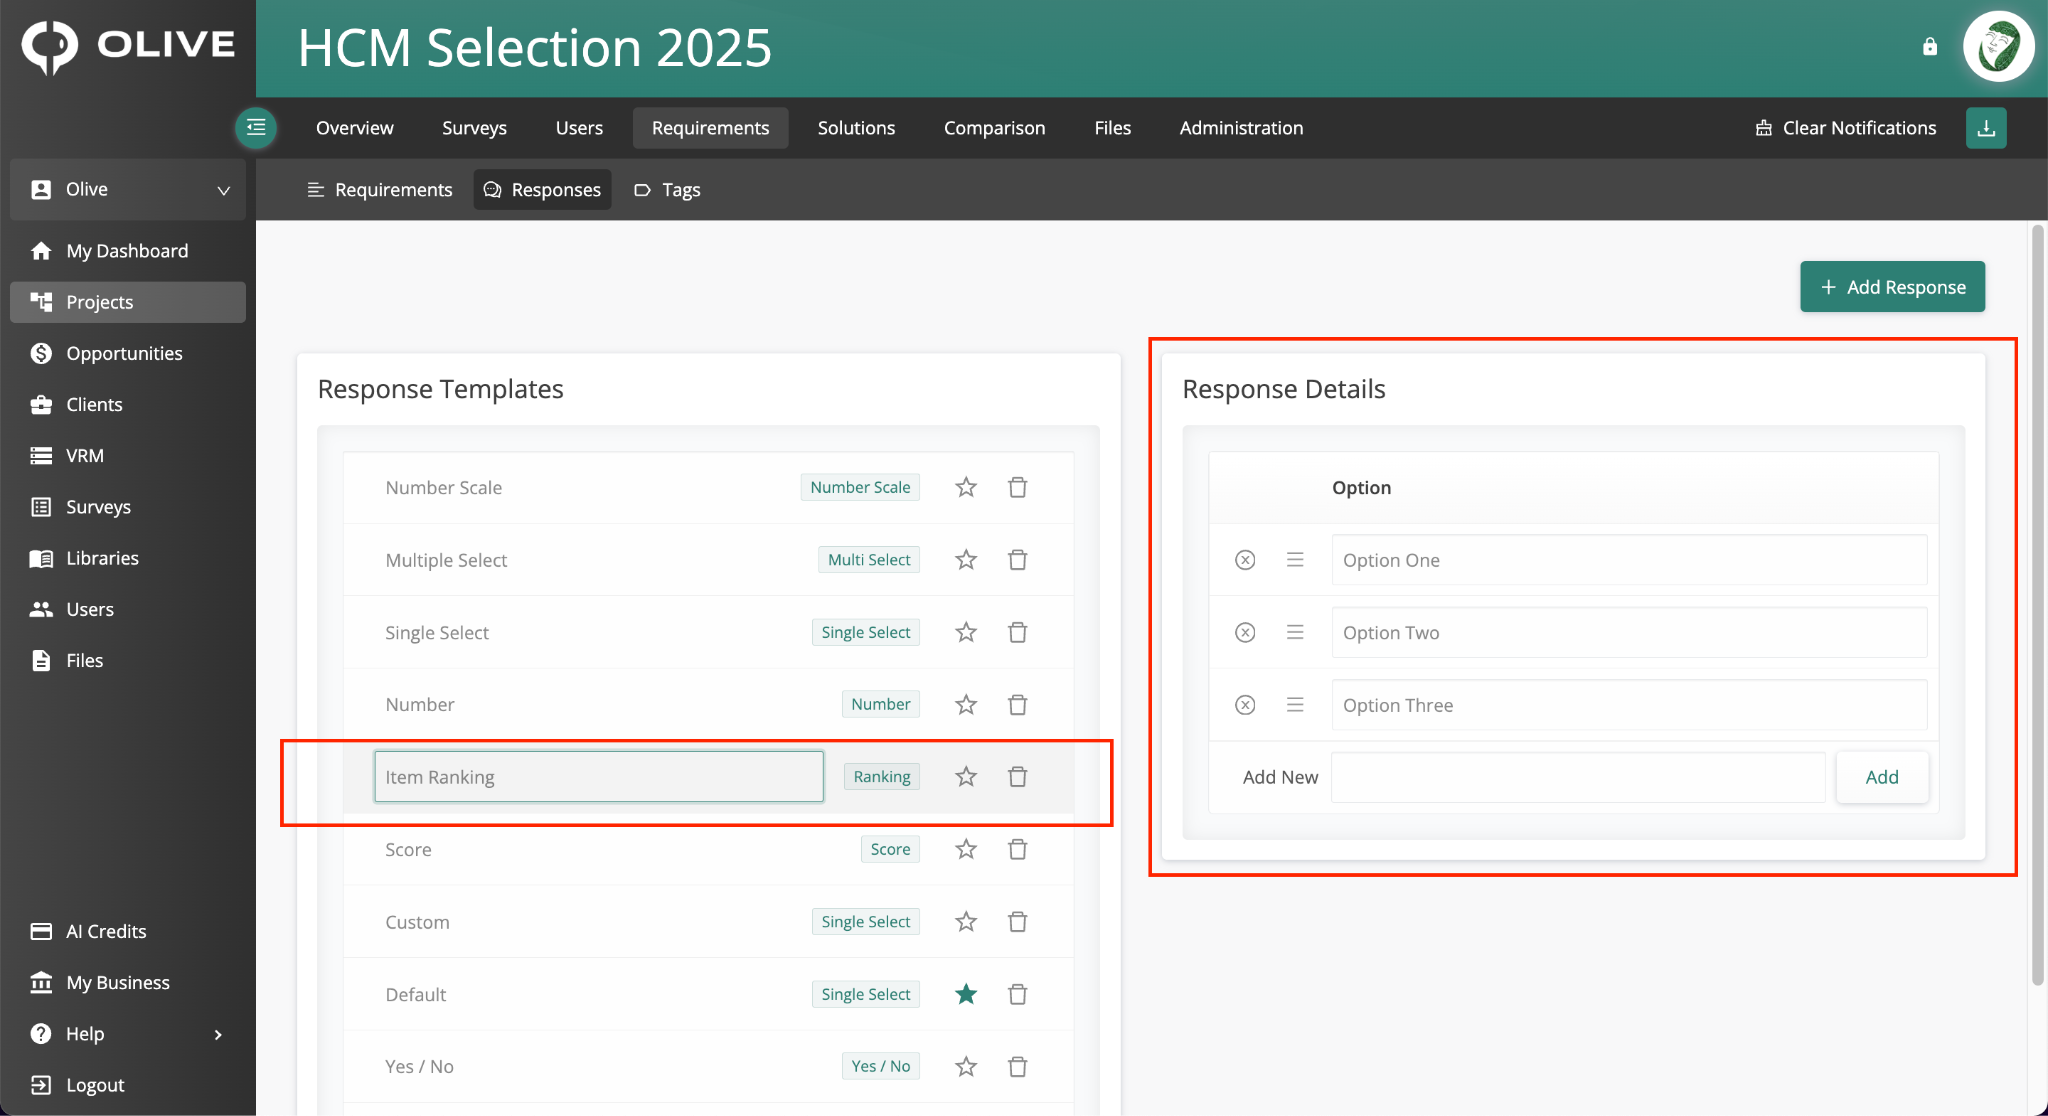
The Item Ranking template — vendors rank a list of options you define
Vendors rank a list of options you create. Add your ranking items using the 'Add' button. Useful for prioritisation-type requirements.
Multiple Select
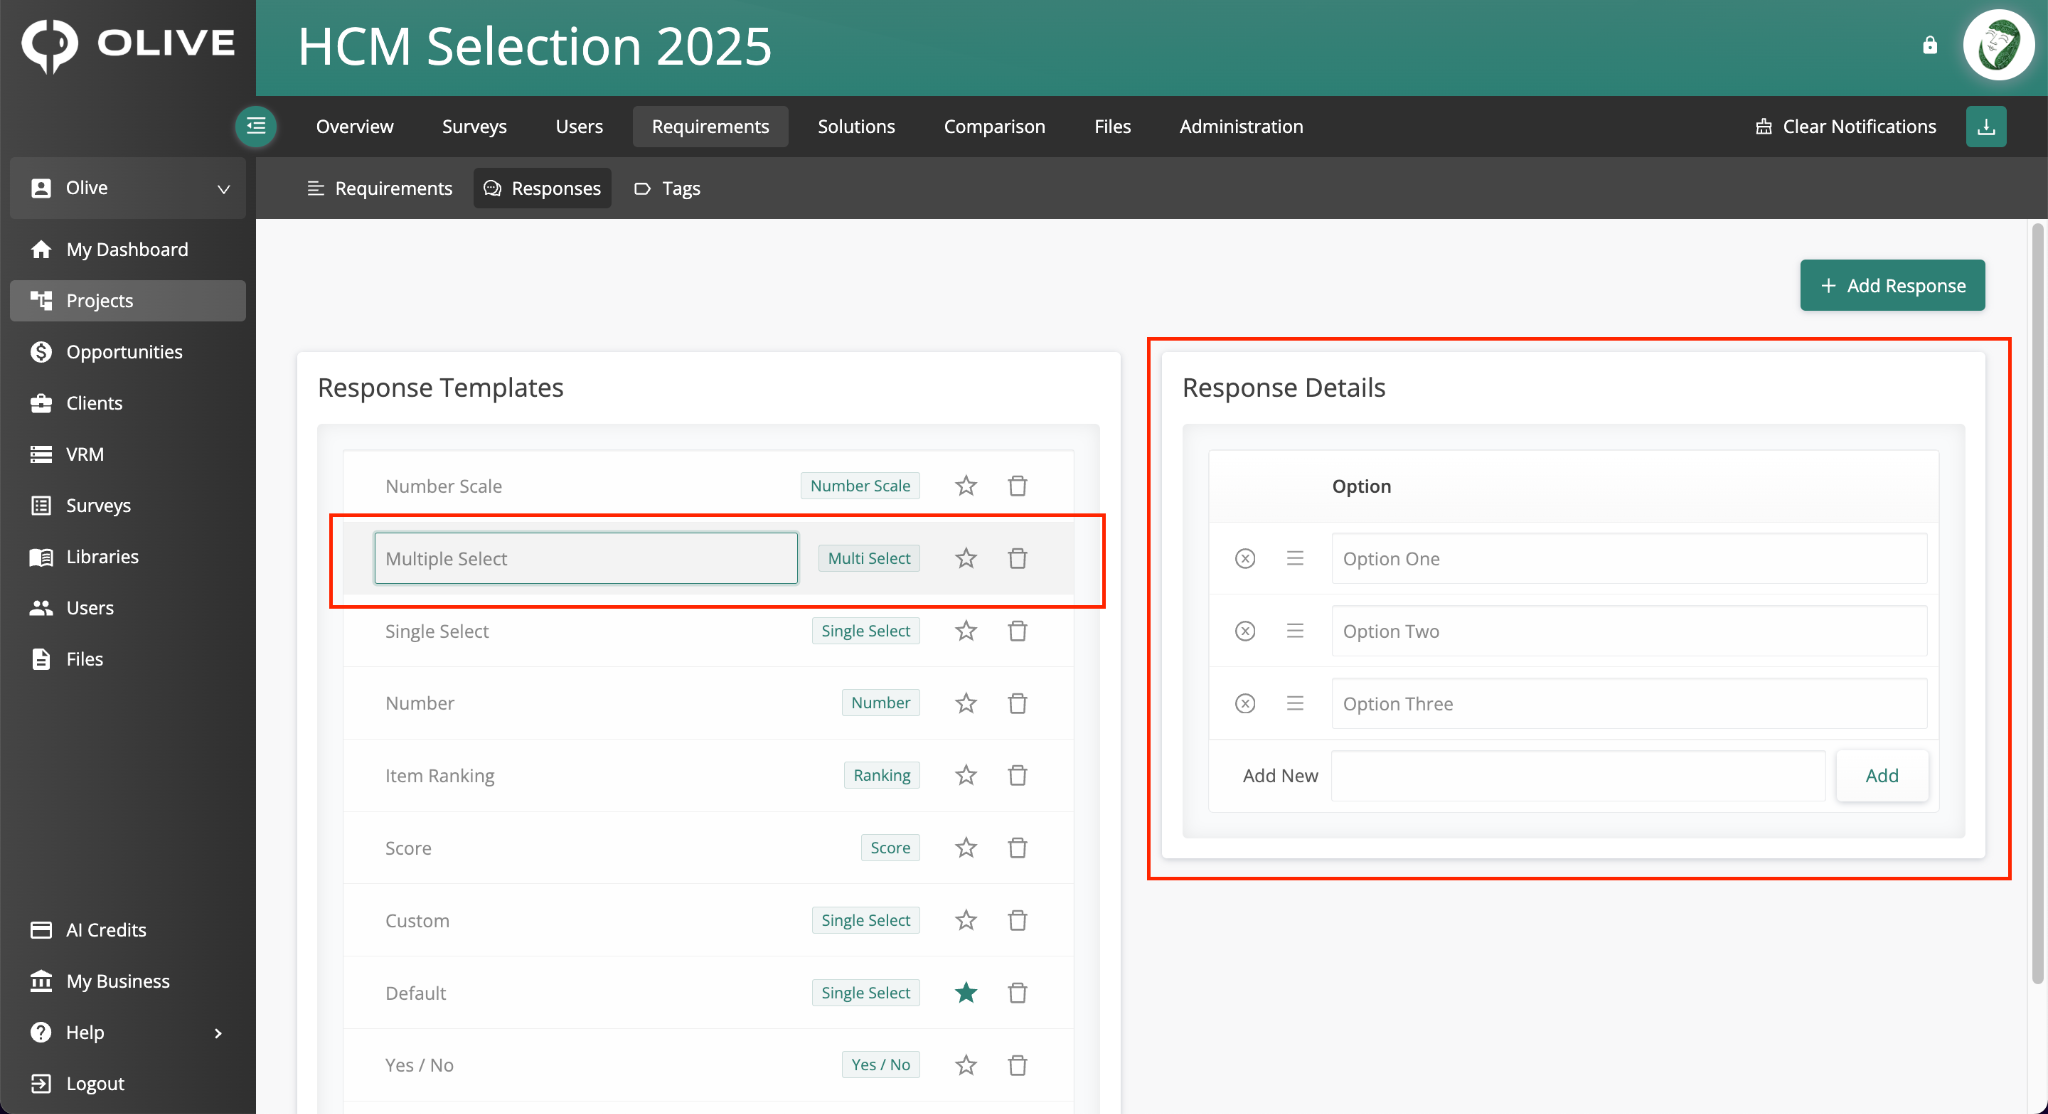
The Multiple Select template — vendors can choose multiple options from your list
Vendors can select more than one option from a list you define. Add options using the 'Add' button.
Number Scale
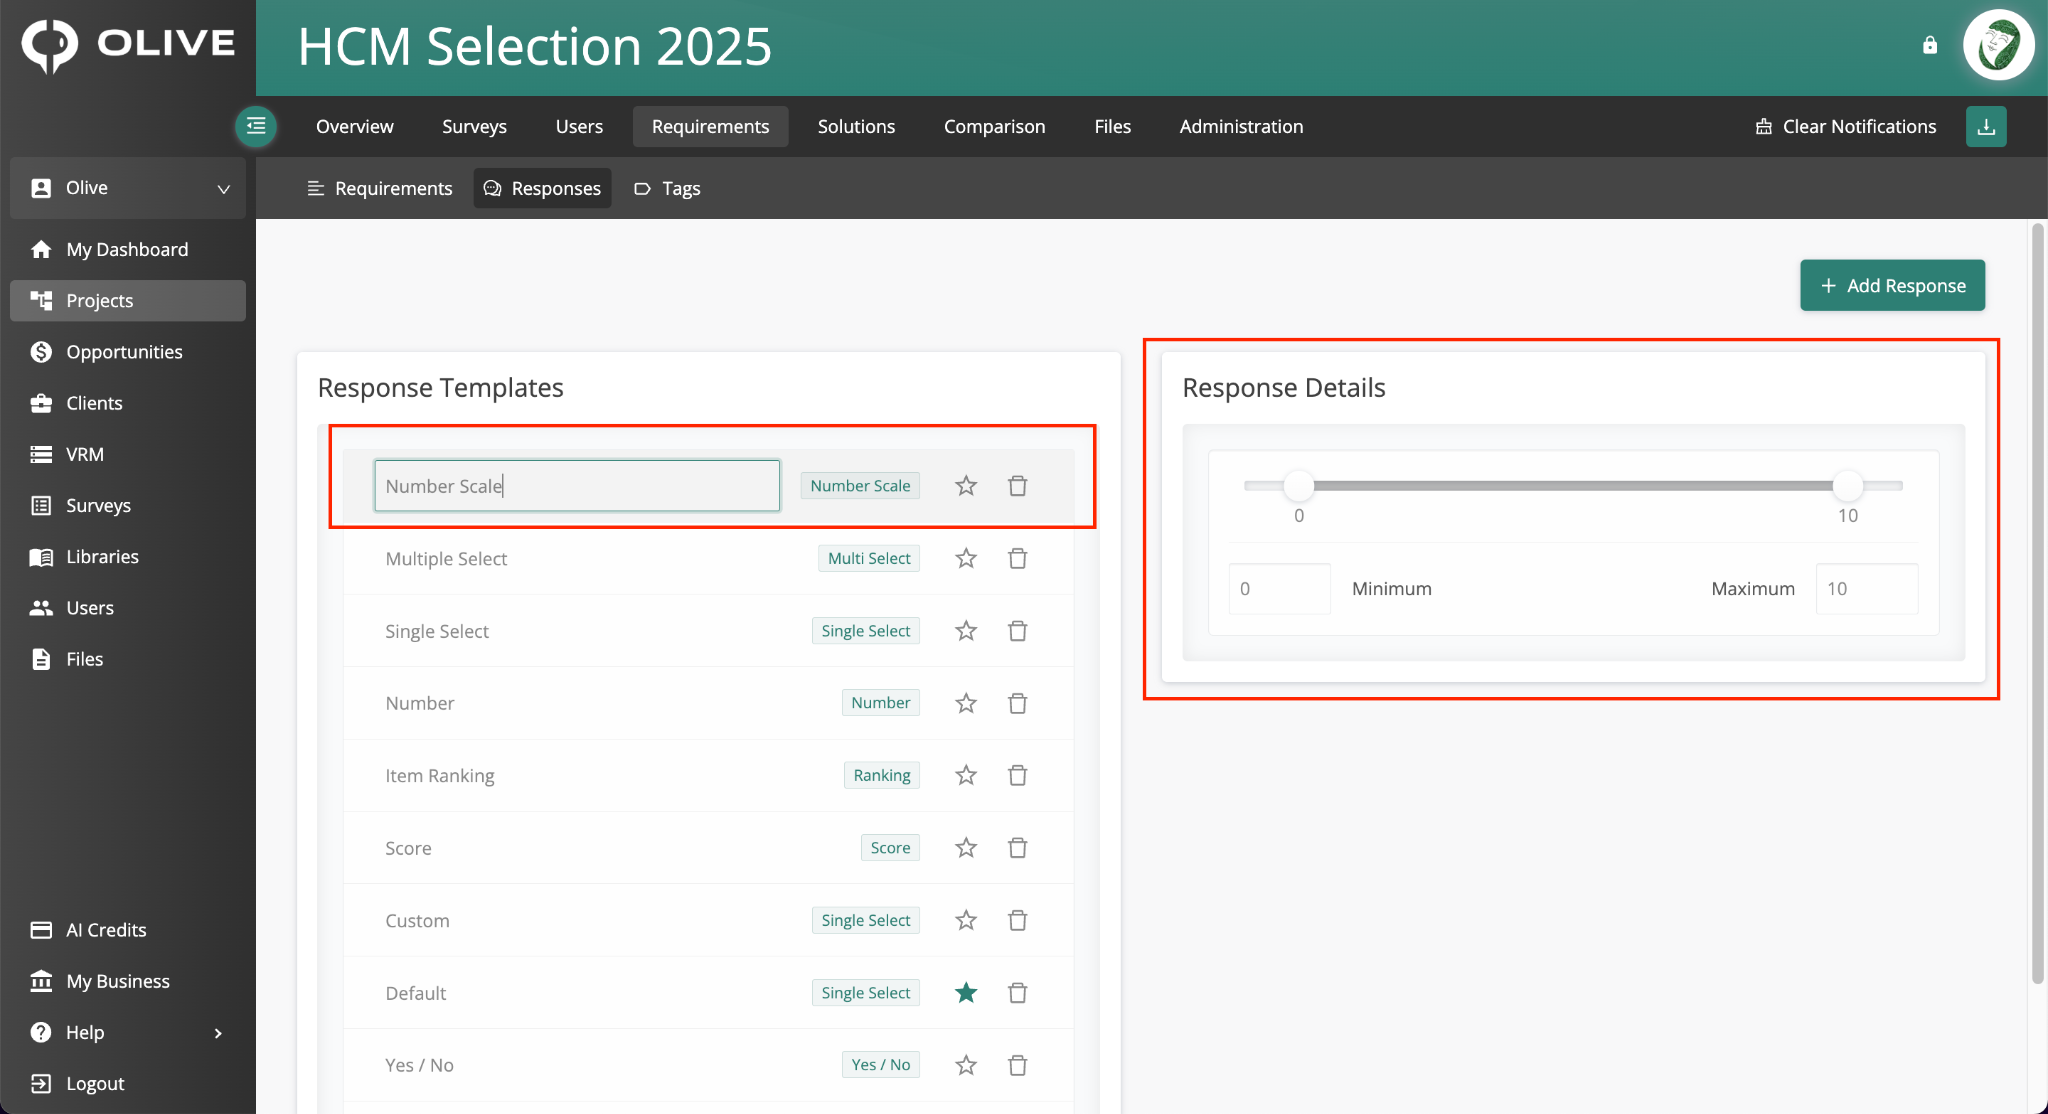
The Number Scale template — with configurable minimum and maximum values for the scale
Vendors respond on a number scale. Set the minimum and maximum values to define the range.
Adding a New Response Template
Click '+ Add Response' at the top right of the Responses sub-tab to create a custom response template:
- Type a Label name for the template
- Choose a Response Type from the dropdown: Number, Item Ranking, Single Select, Multiple Select, or Number Scale
- Configure the Response Details as needed
- Click 'Add Response' to save the new template
Tags Sub-tab
Click the Tags sub-tab to create and manage the tags used to categorise your requirements. Tags are a flexible way to organise requirements across sections — for example by topic, business area, or priority.
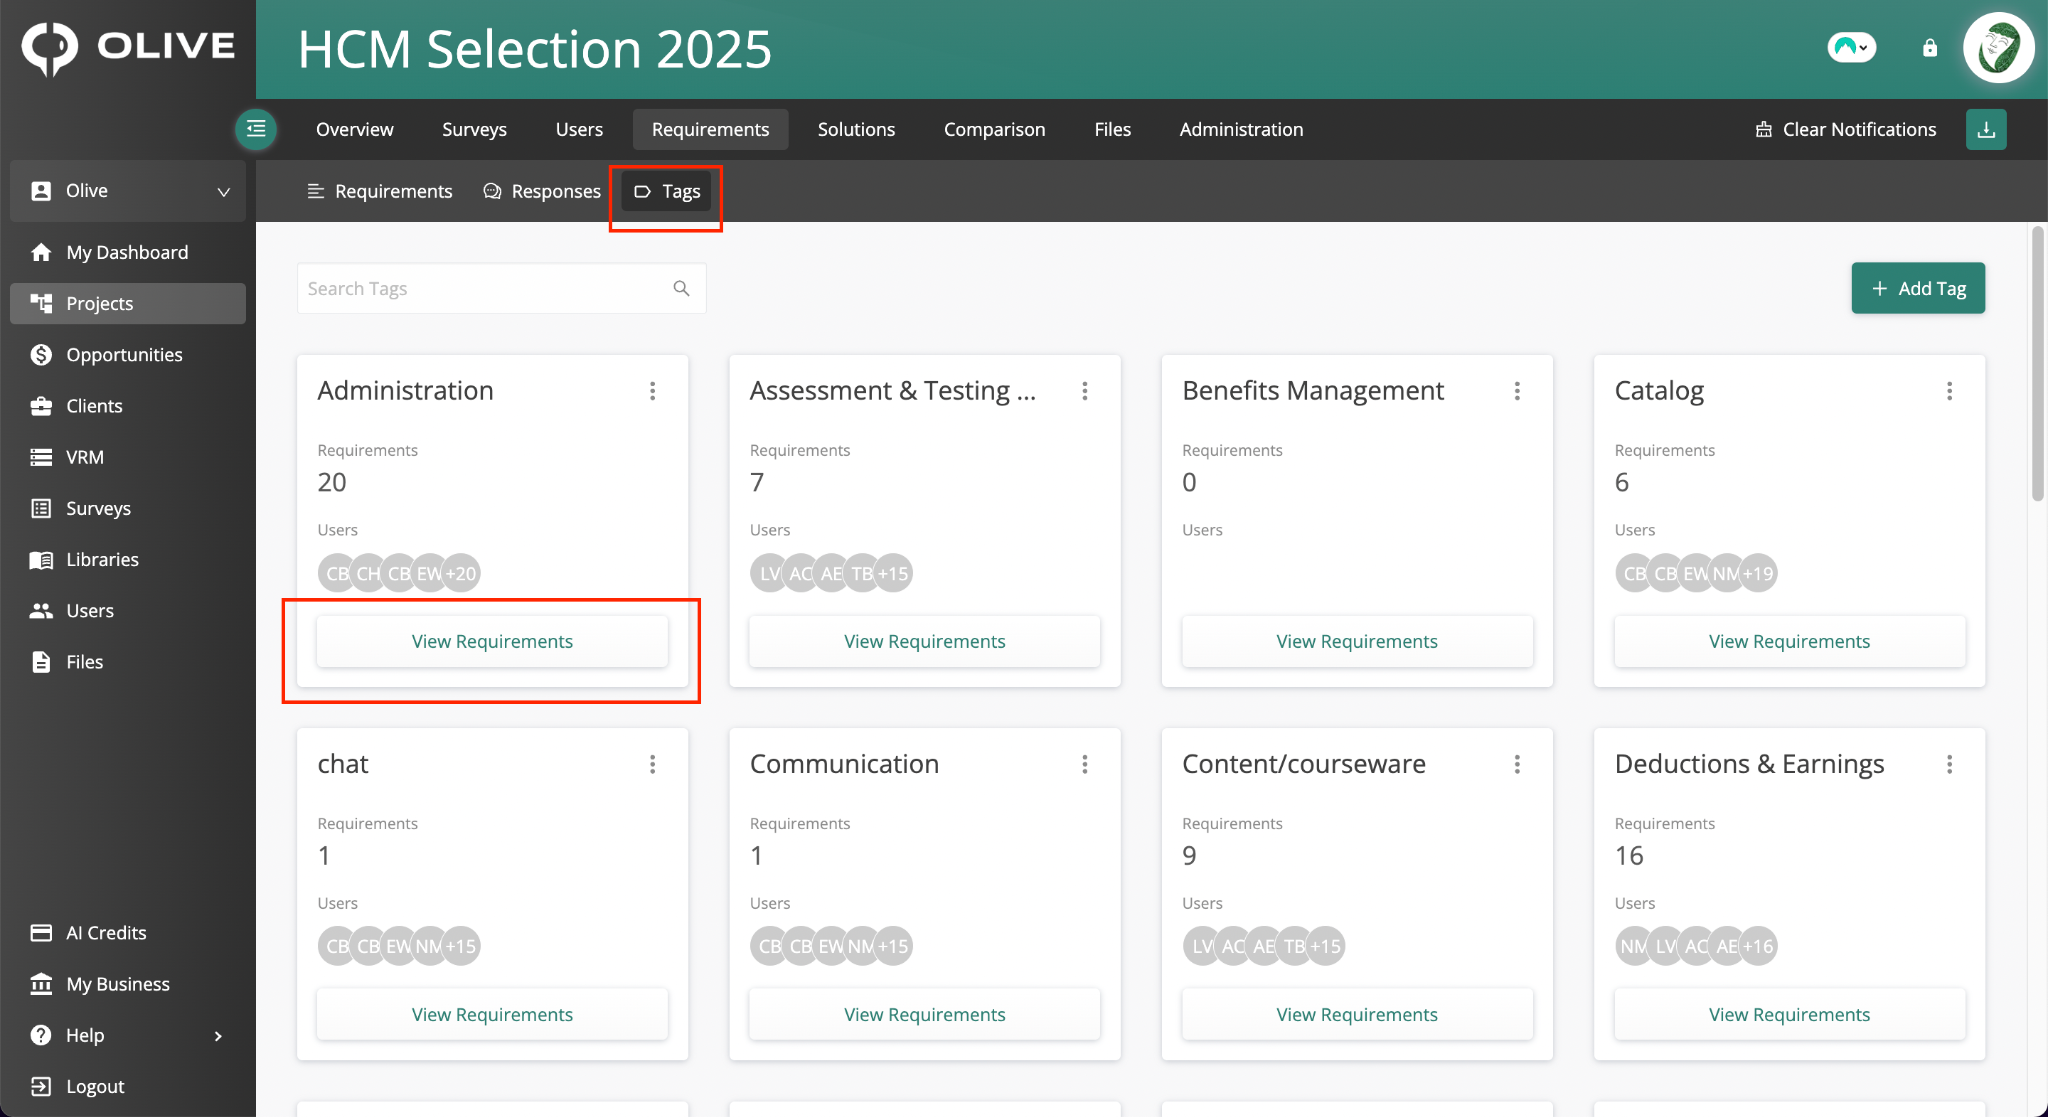
The Tags sub-tab — showing Tag Cards with requirements count and View Requirements button
Creating a Tag
- Click '+ Add Tag' at the top right of the Tags sub-tab
- Type the tag label in the panel that opens on the right
- Click 'Add Tag' to create it
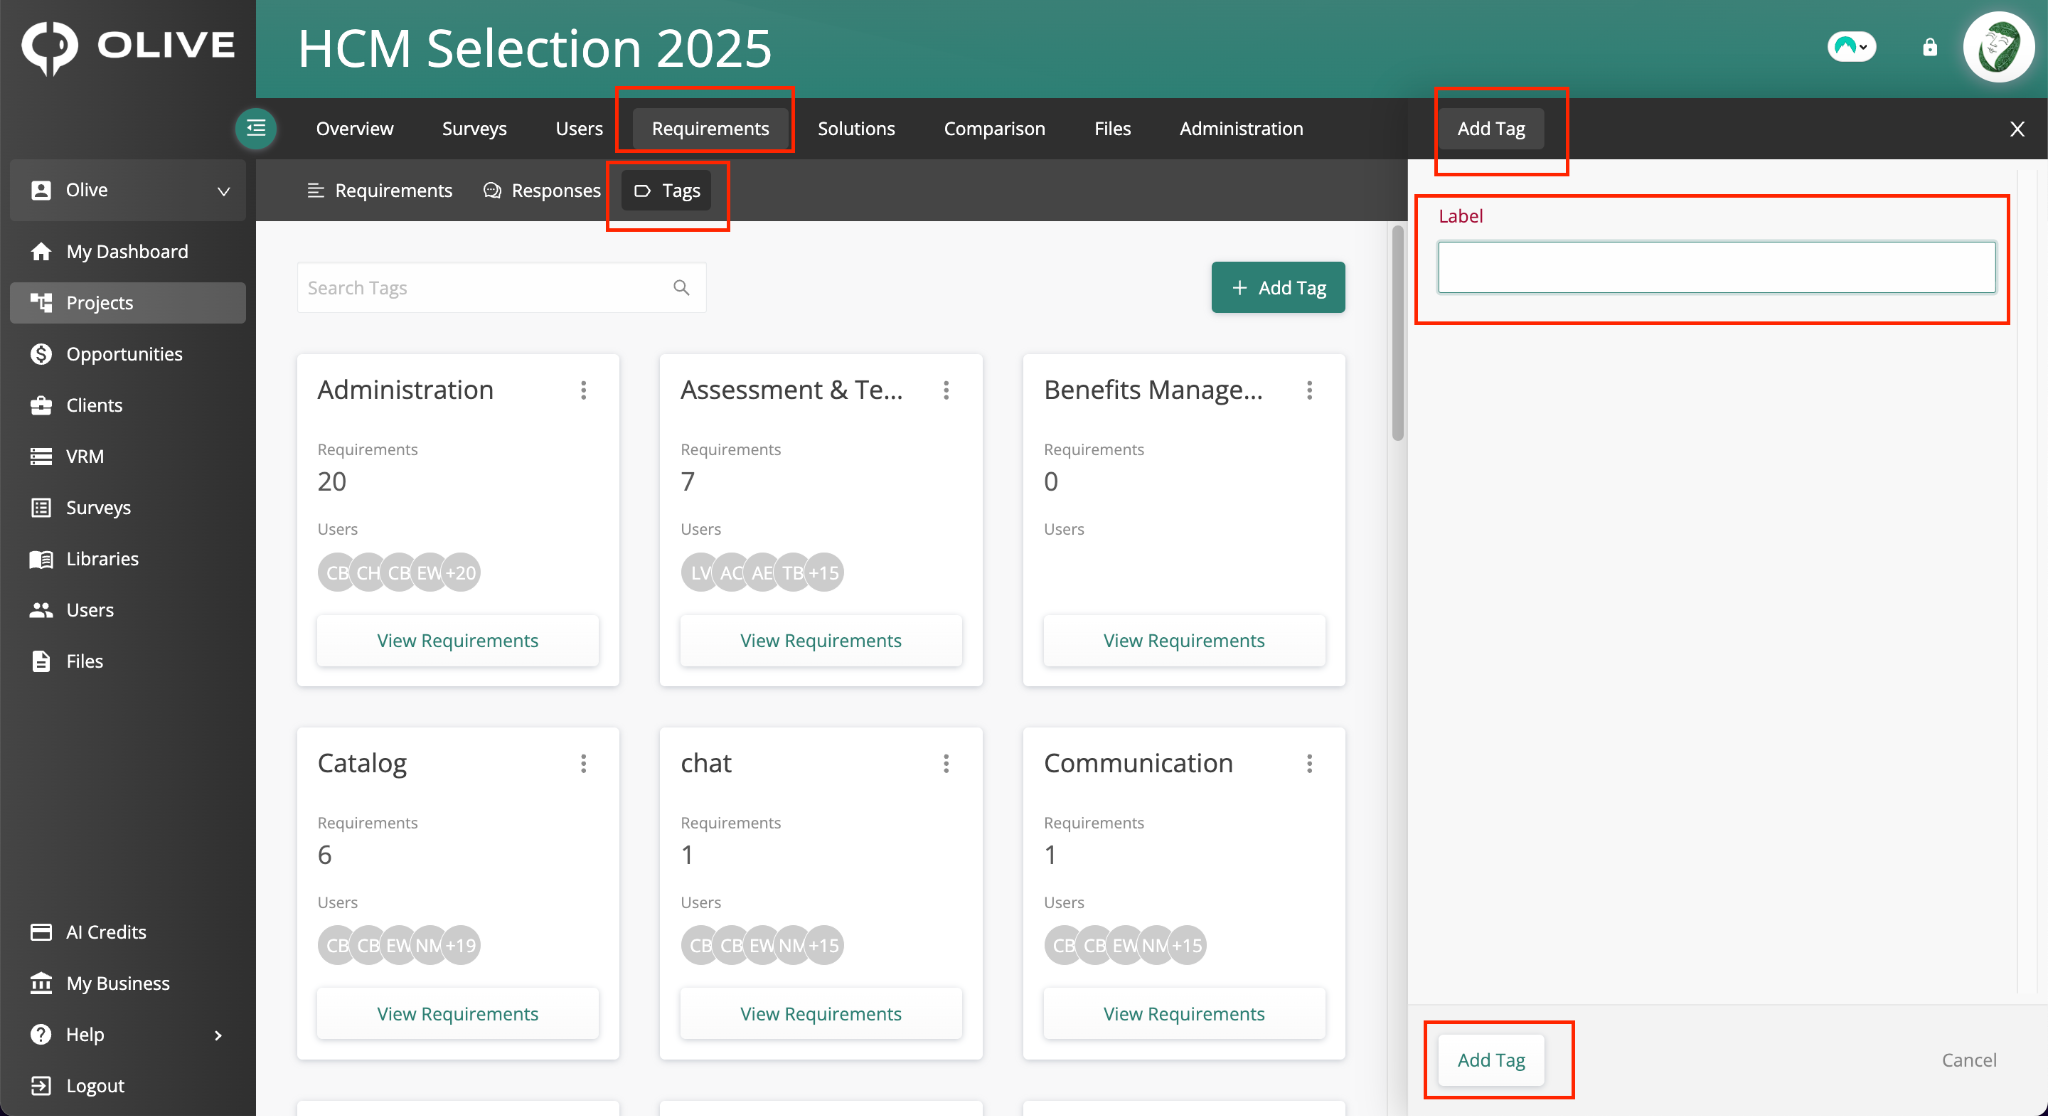
Clicking '+ Add Tag' opens a panel to enter the tag label
Tag Cards
Each tag is displayed as a Tag Card showing the tag name, the number of requirements assigned to it, and the users associated with those requirements. Click 'View Requirements' on any Tag Card to see all requirements assigned to that tag.
|
💡 Tip: Tags can be assigned to requirements from the Requirement Modal (Details tab), directly in the Requirement Table (Tag column), or in bulk using the Bulk Actions panel. |
What's Next?
Once your requirements are built and configured, you're ready to move the evaluation forward. Recommended next steps:
- Review all requirements — ensure must-have flags and star ratings accurately reflect your priorities before inviting vendors
- Set your default response template in the Responses sub-tab so it applies automatically to all new requirements
- Configure Administration settings — Scoring Scale, Star ratings, and Section/Department Weighting — before your team starts scoring
- Invite vendors to submit their responses through the Solutions tab
- Use the Comparison tab to evaluate and score vendor responses once submissions are in
Need help? Contact your Olive project administrator or reach out to Olive support.