This guide answers common questions about responding to an RFP or RFI opportunity in Olive — from accepting your invitation and reading the project brief, to submitting requirements, pricing, and supporting documents.
At a Glance: Opportunity Tabs
Once inside an Opportunity, use the tab bar at the top of the page to move between sections. Here is what each tab contains:
|
Tab |
What you'll find there |
|
Overview |
The client's project description, key dates (Timeline), and the public Q&A forum (Public Discussion) |
|
Requirements |
All requirements you need to respond to, organised into sections by the client |
|
Colleagues |
Invite and manage team members who will help you respond |
|
Pricing |
Enter your licence fees, services pricing, and submit your pricing to the client |
|
Files |
Download files shared by the client and upload your own supporting documents |
|
My Profile |
Complete your company and solution information for the client |
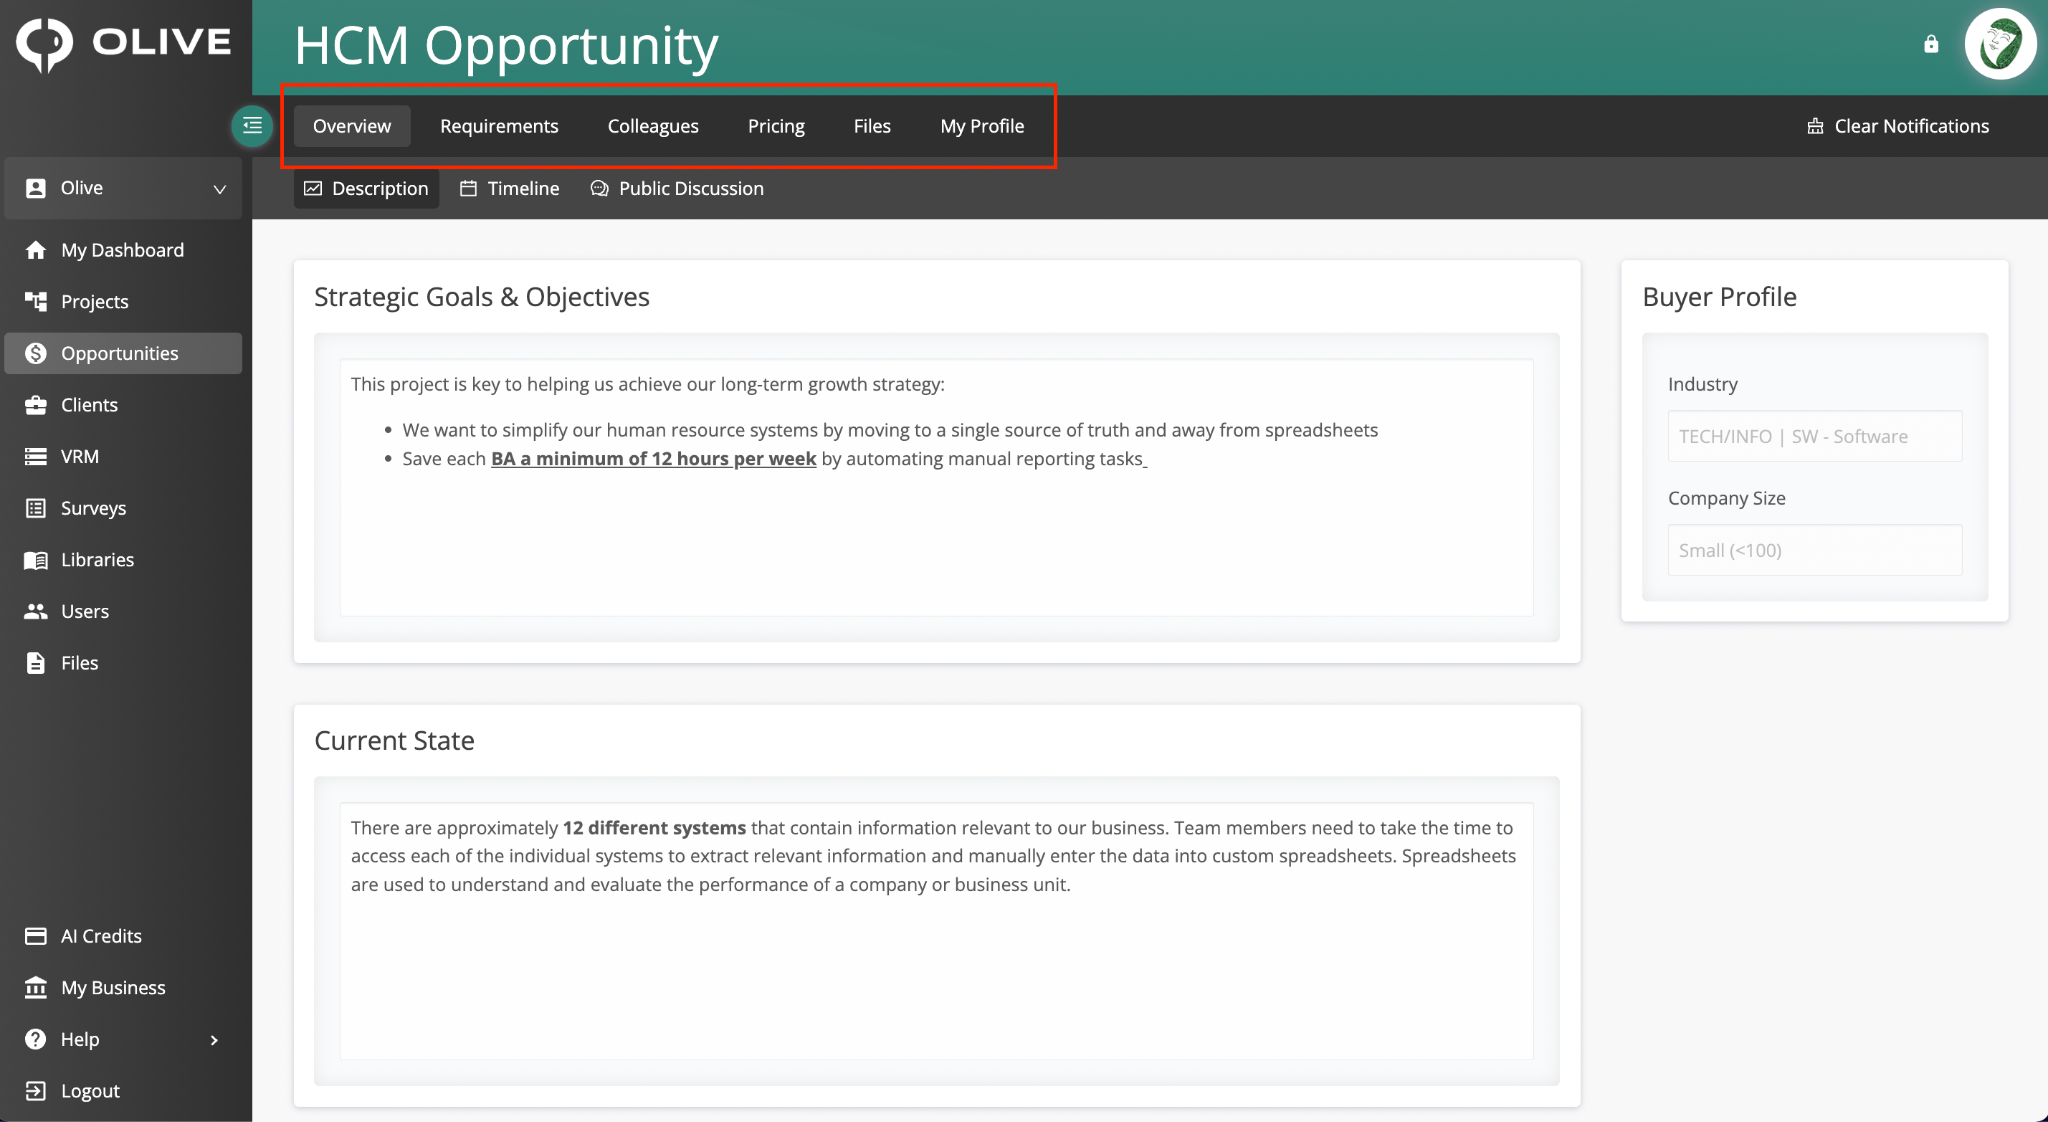
Figure 1: The six tabs within an Opportunity — use the tab bar to move between sections
Getting Started
Q1: How do I accept an invitation to respond to an RFP or RFI?
A:
- Open the invitation email from info@olive.app and click 'Click here to accept'
- If you are new to Olive, complete the sign-up form to create your account. If you already have an account, sign in as normal.
- Once logged in, click Opportunities in the left-hand navigation
- Find the relevant Opportunity and click its View button to open it
|
📌 Note: If the invitation email is not in your inbox, check your spam or junk folder. The sender address is info@olive.app — add it to your safe senders list so future Olive notifications arrive reliably. |
Q2: How do I navigate between the different parts of an Opportunity?
A:
Use the tab bar at the top of the page to move between sections. See the 'At a Glance' table above for a summary of what each tab contains.
Understanding the Project
Q3: How do I read the client's project description before I start responding?
A:
- Click the Overview tab in the top navigation
- Select the Description sub-tab
- Read the sections the client has shared — these typically include the Overall Project Overview, Strategic Goals & Objectives, Current State, Desired Future State, and any additional context
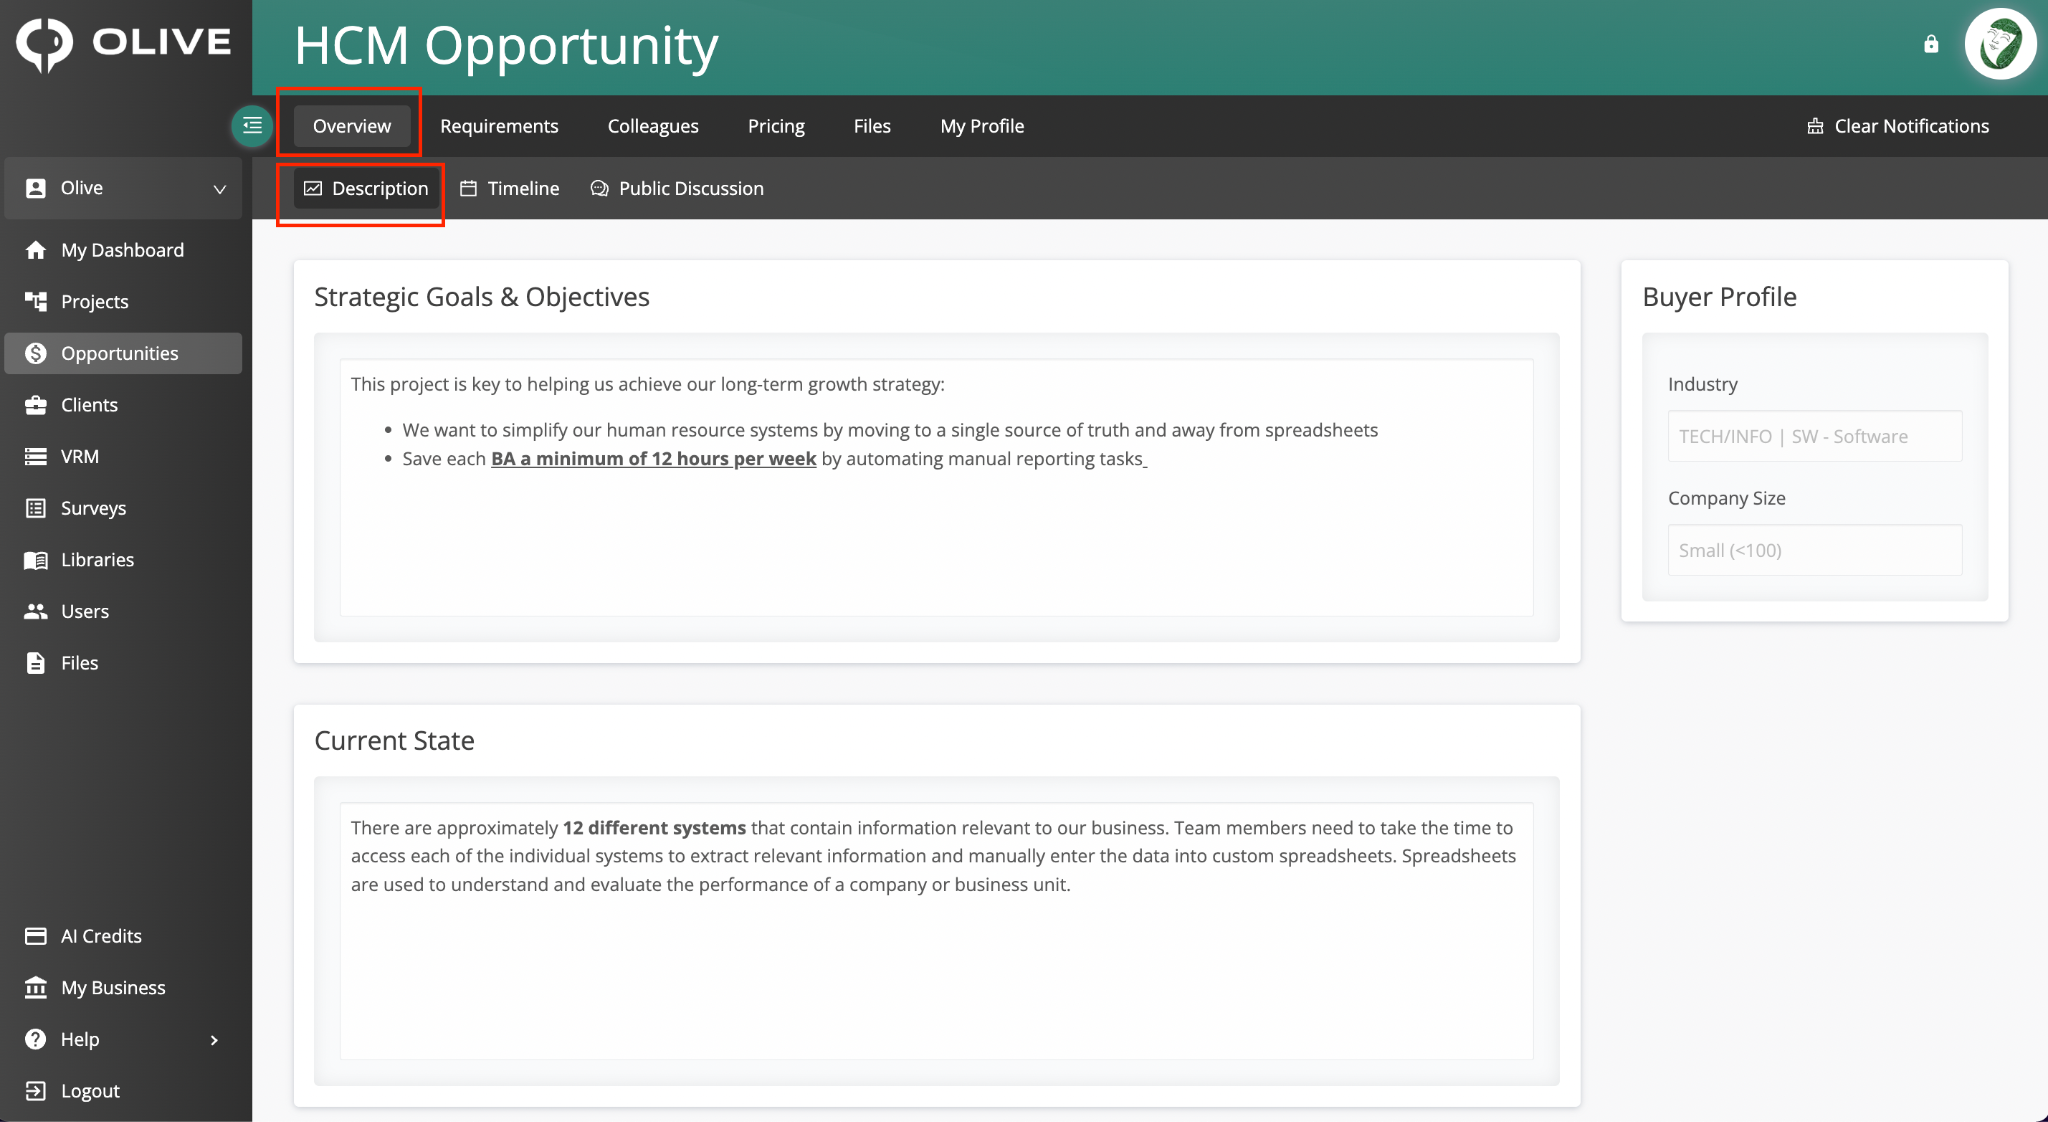
Figure 2: The Description sub-tab — read the client's full project context before starting your response
|
💡 Tip: Read the Description thoroughly before you begin answering requirements. Understanding the client's goals and pain points will help you write more targeted responses and frame your pricing narrative more effectively. |
Q4: How do I find out when my response is due?
A:
- Click the Overview tab in the top navigation
- Select the Timeline sub-tab
All key project dates set by the client are listed here — including the Vendor Response Submission deadline, Shortlist date, and any Demo dates.
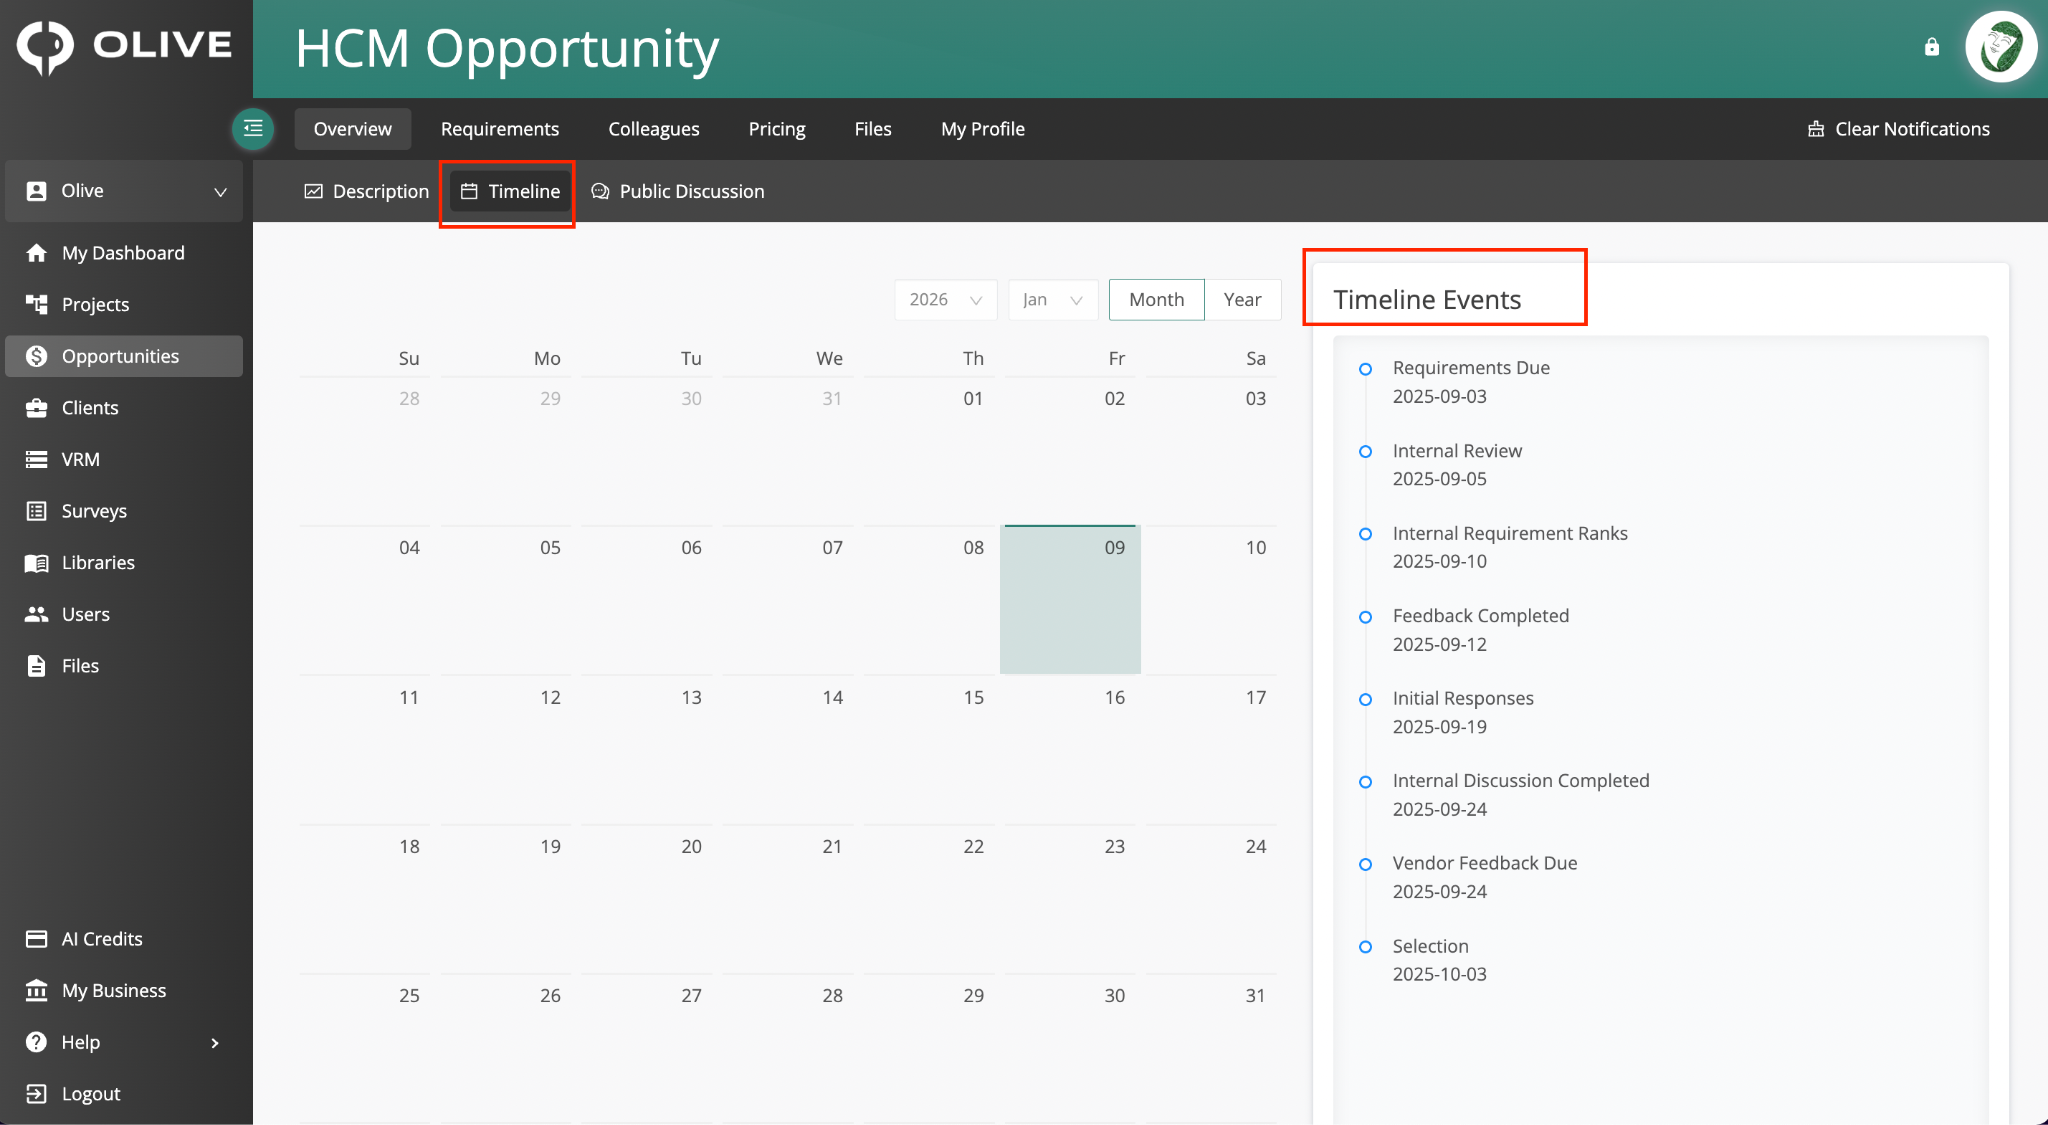
Figure 3: The Timeline sub-tab — all key dates for this Opportunity
|
💡 Tip: Note the submission deadline as soon as you open the Opportunity and work backwards to plan your time. Remember that both your requirement responses and pricing must be submitted separately before the deadline. |
Q5: How do I ask the client a question about the project?
A:
- Click the Overview tab, then select Public Discussion
- Type your question in the text box
- Click Post Question
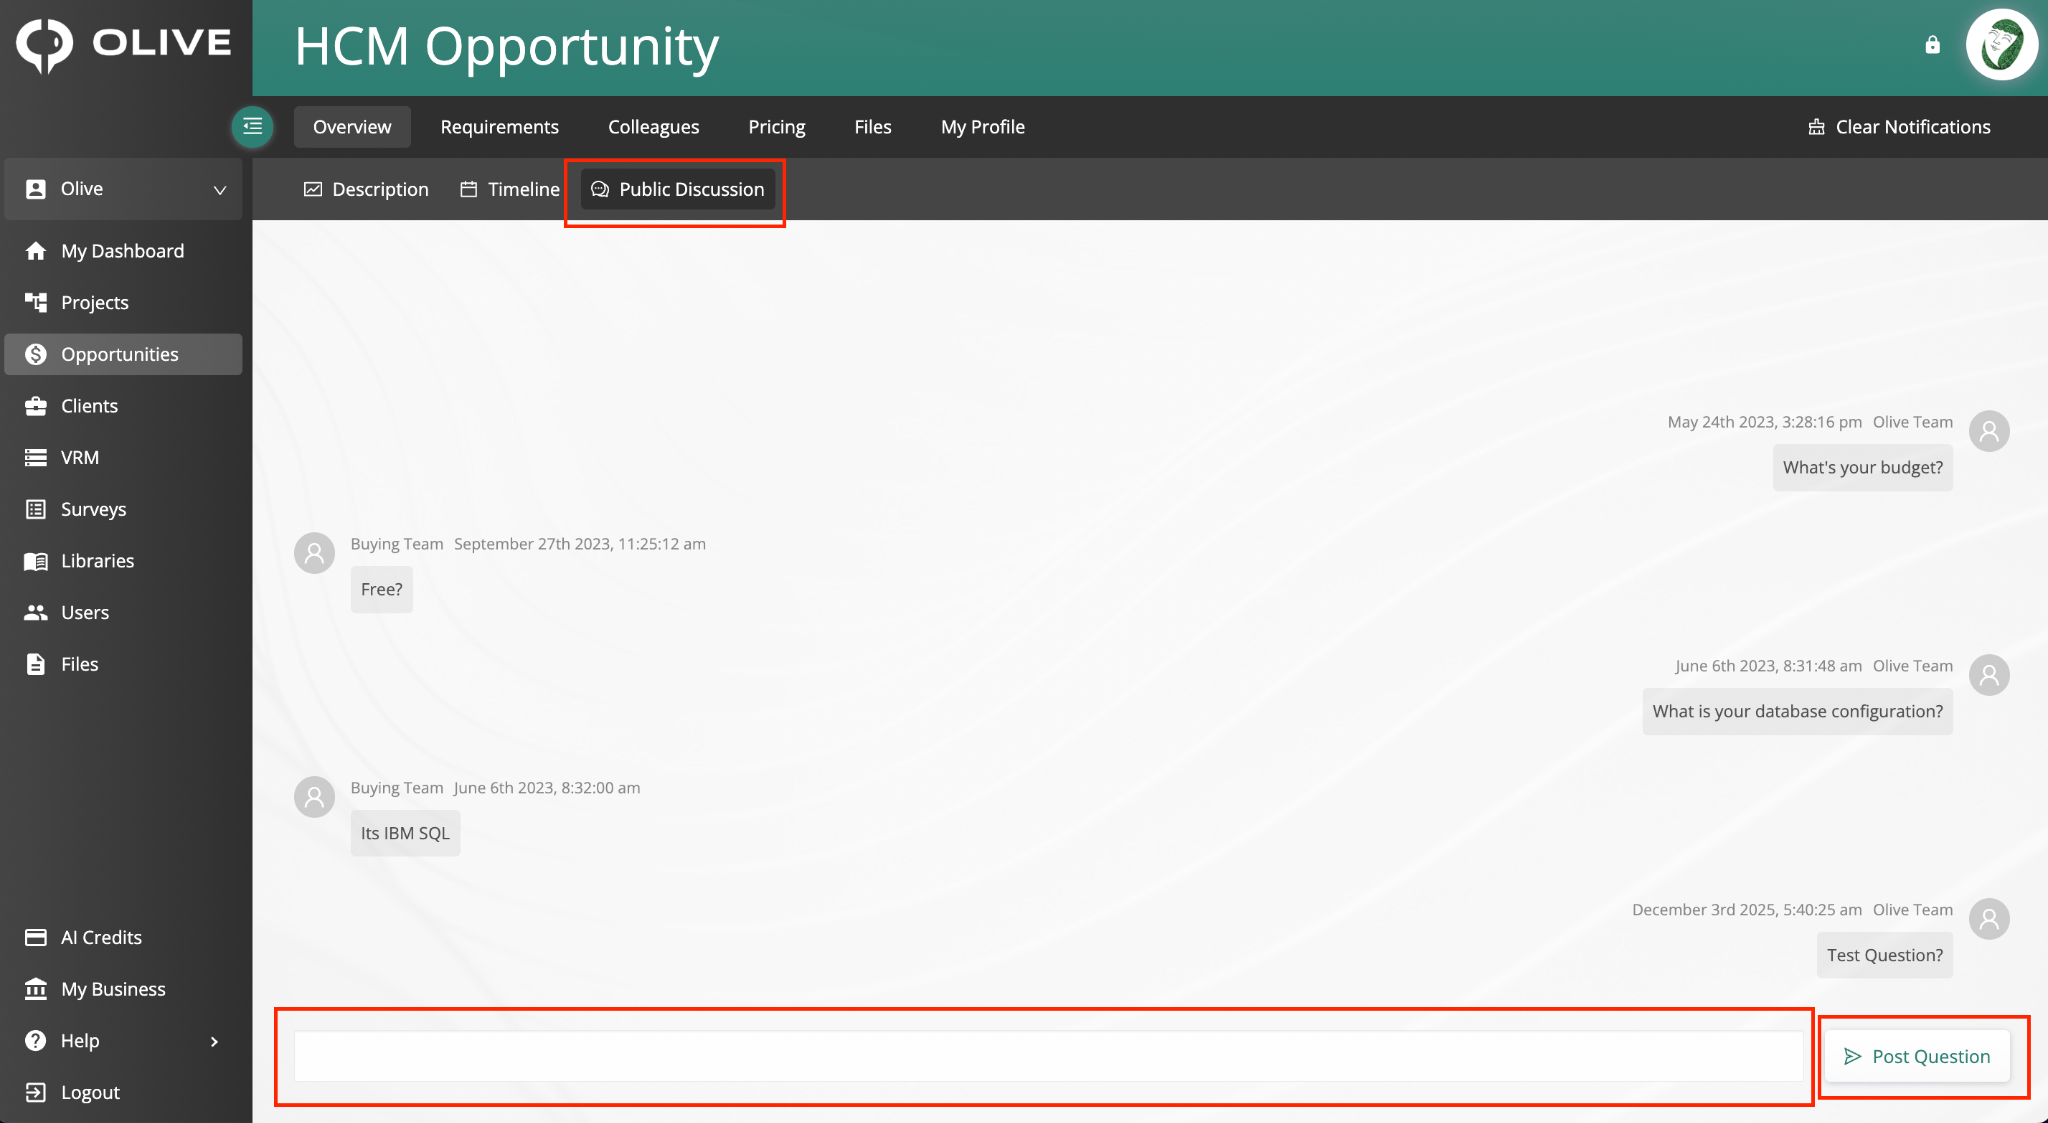
Figure 4: The Public Discussion sub-tab — post questions to the client and view their responses
|
📌 Note: All questions and the client's answers are visible to every vendor in the project. Your question will appear labelled as a "Vendor User" — other vendors will not see your company name unless you include it in the text. The client can see which vendor submitted each question. |
Responding to Requirements
Q6: How do I find and open the requirements I need to respond to?
A:
Click the Requirements tab in the top navigation. Requirements are organised into sections by the client — click any section header to expand it and view the individual requirements inside.
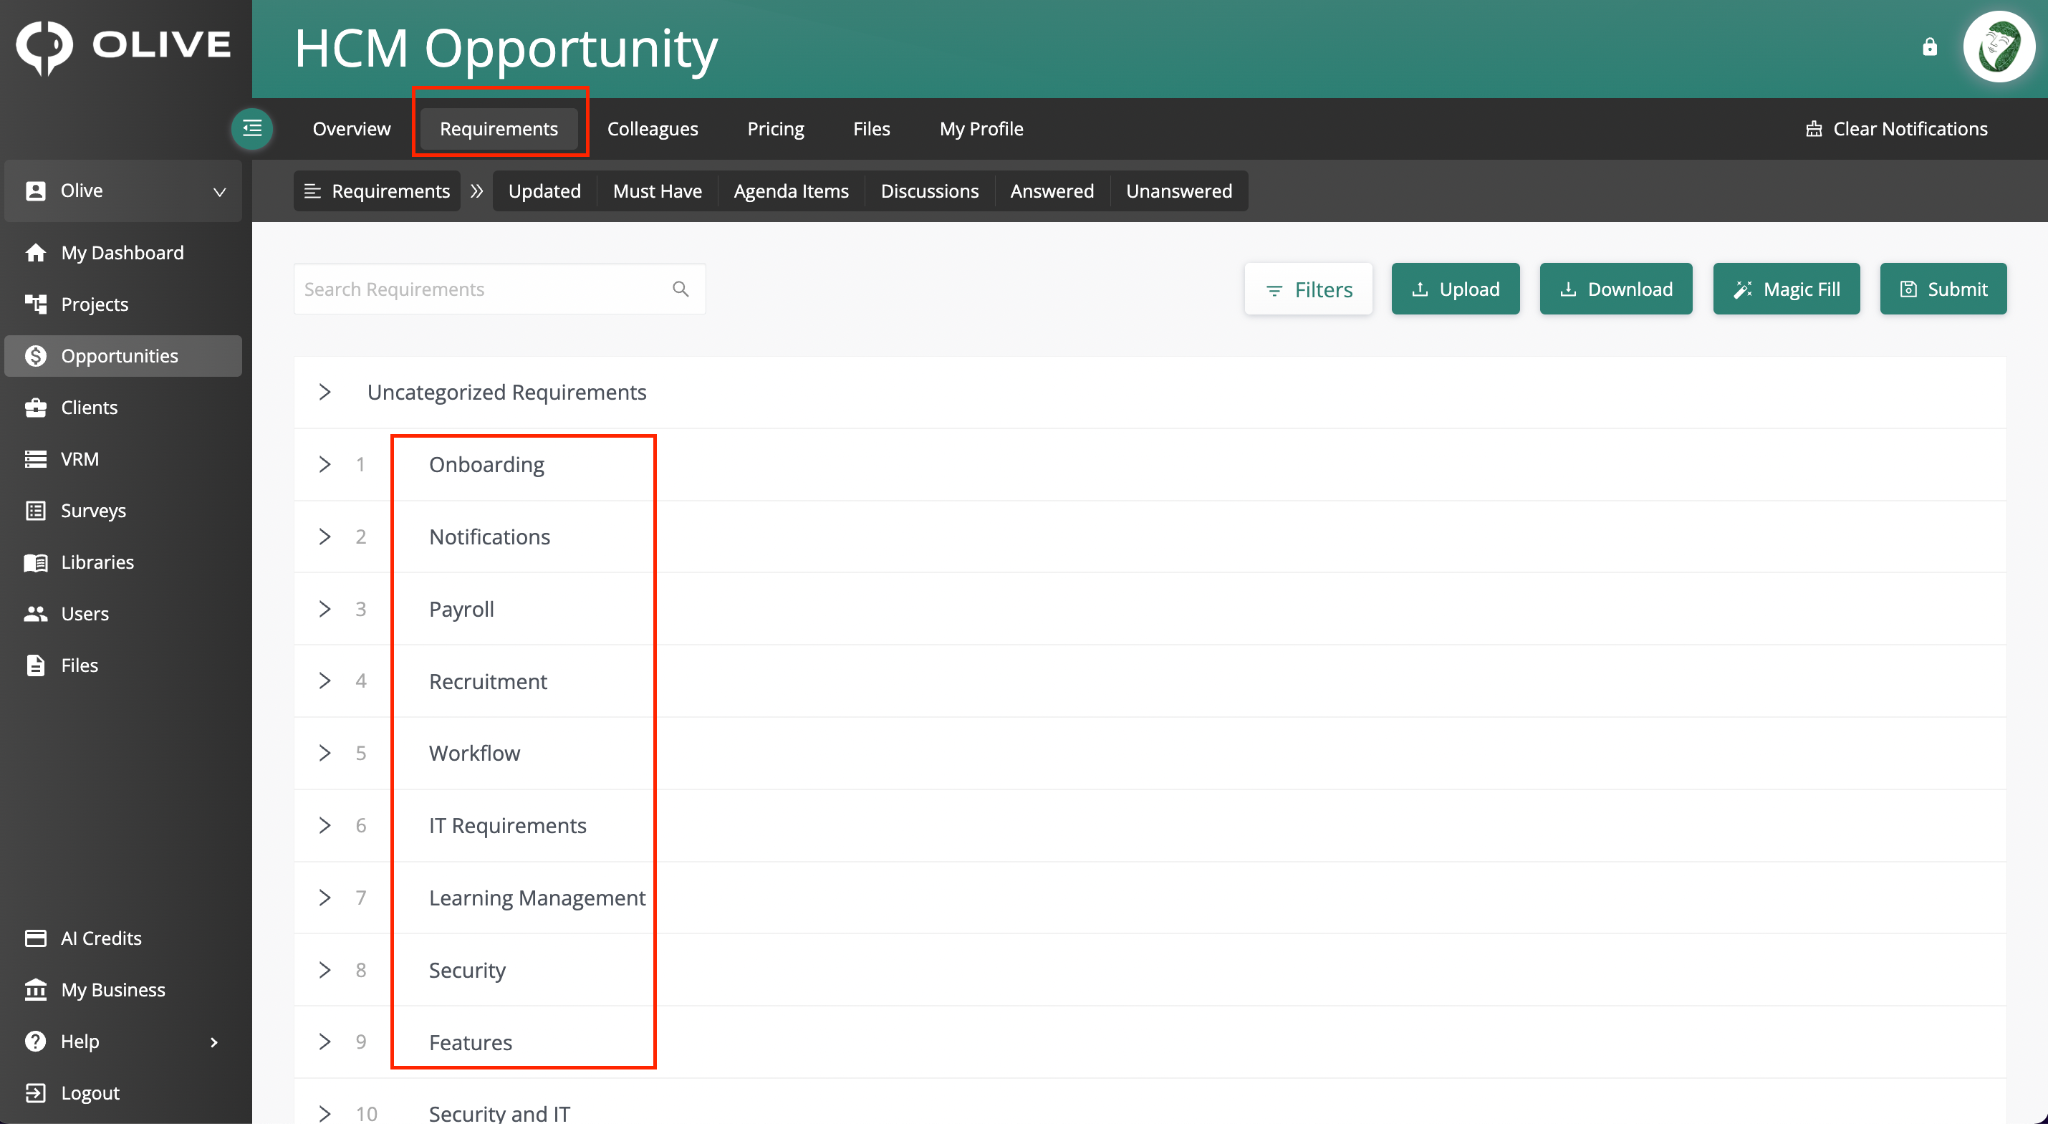
Figure 5: The Requirements tab — click a section header to expand it and view its requirements
Q7: How do I enter my response to a requirement?
A:
- Click the Details button on the requirement row — a panel opens showing the requirement details
- Read the requirement text. If the client has added context, review it in the Details from Buyer section.
- Select your answer from the Response drop-down
- Add any supporting explanation in the Response Details field
- Click Save Response
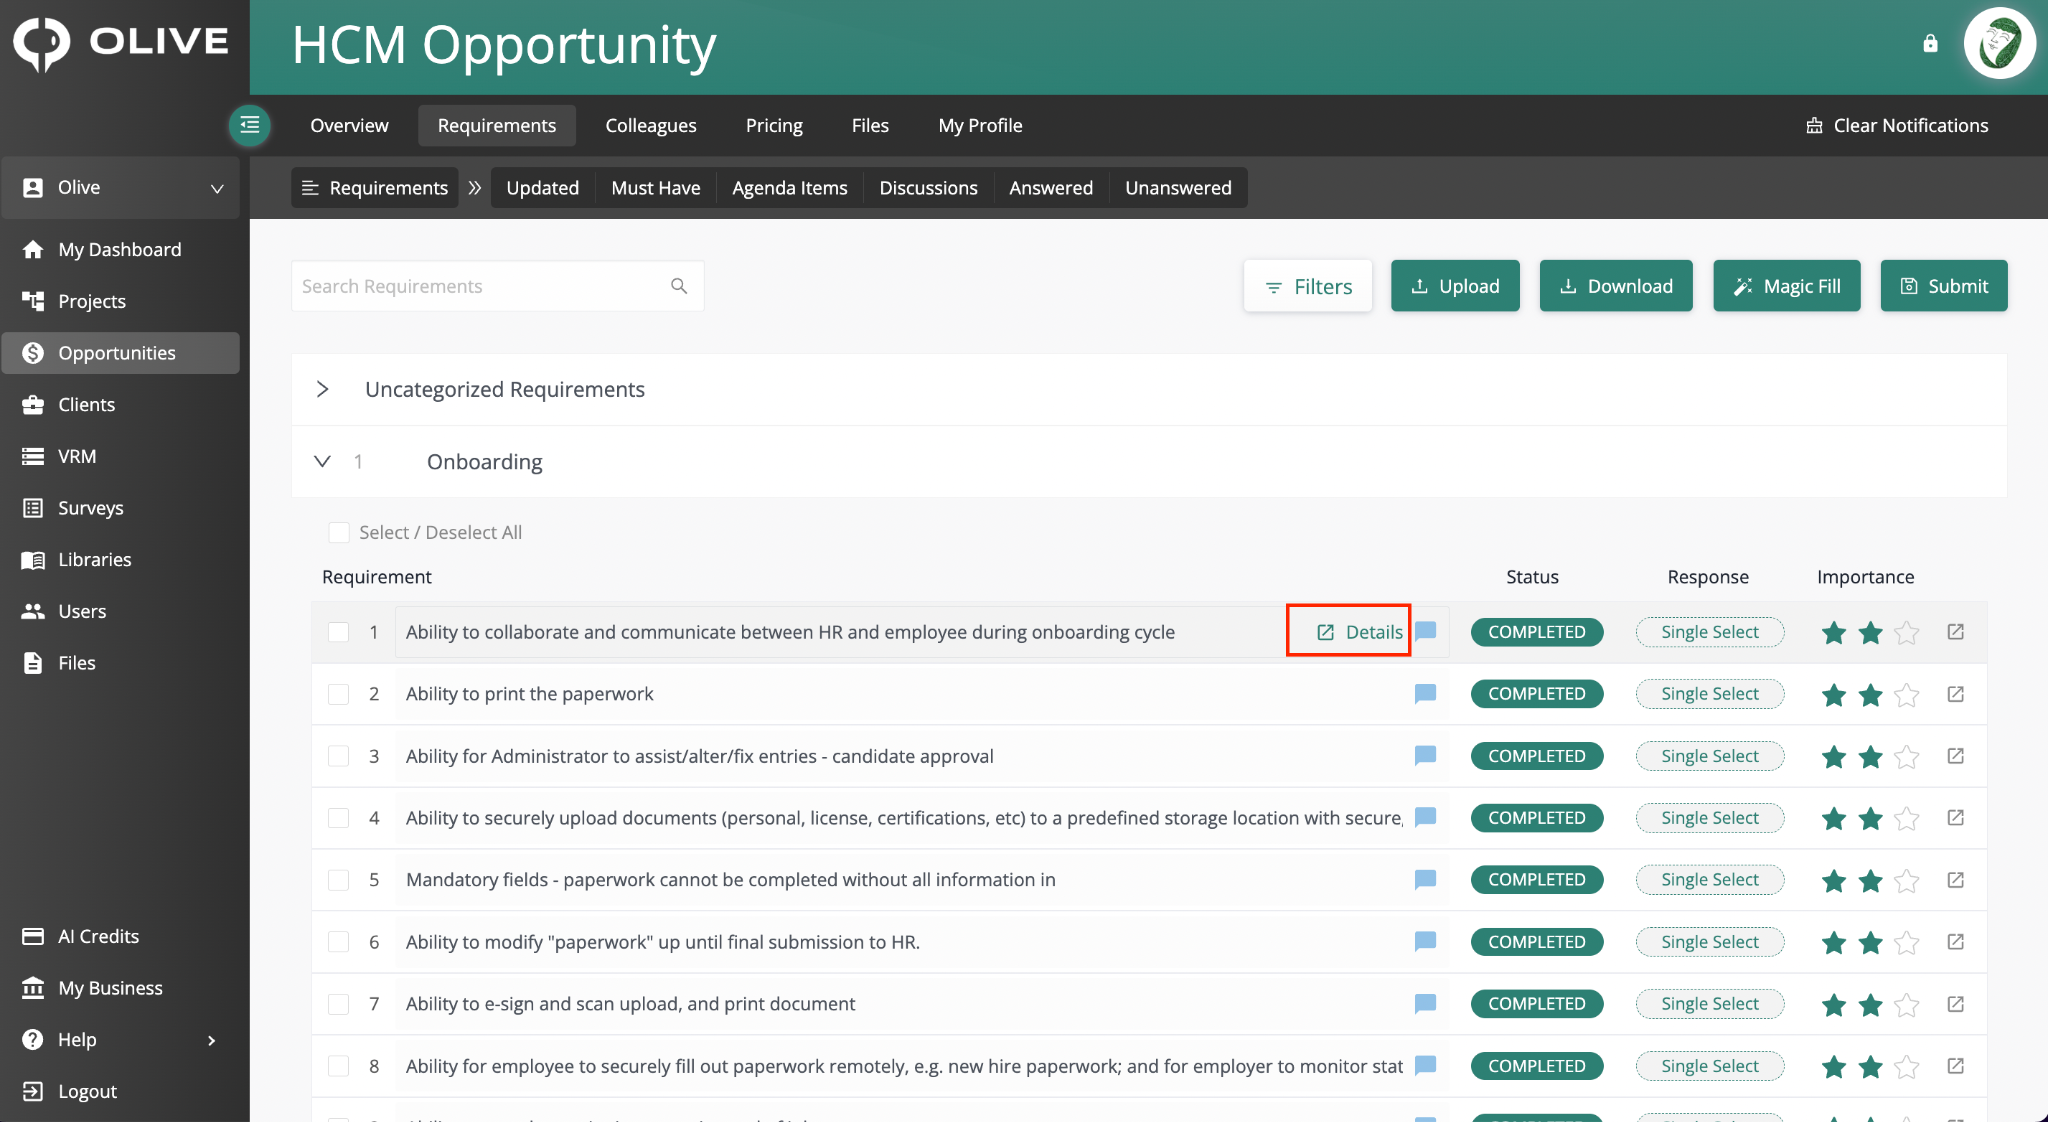
Figure 6: The requirement details panel — showing the requirement text, Details from Buyer, and the Response drop-down
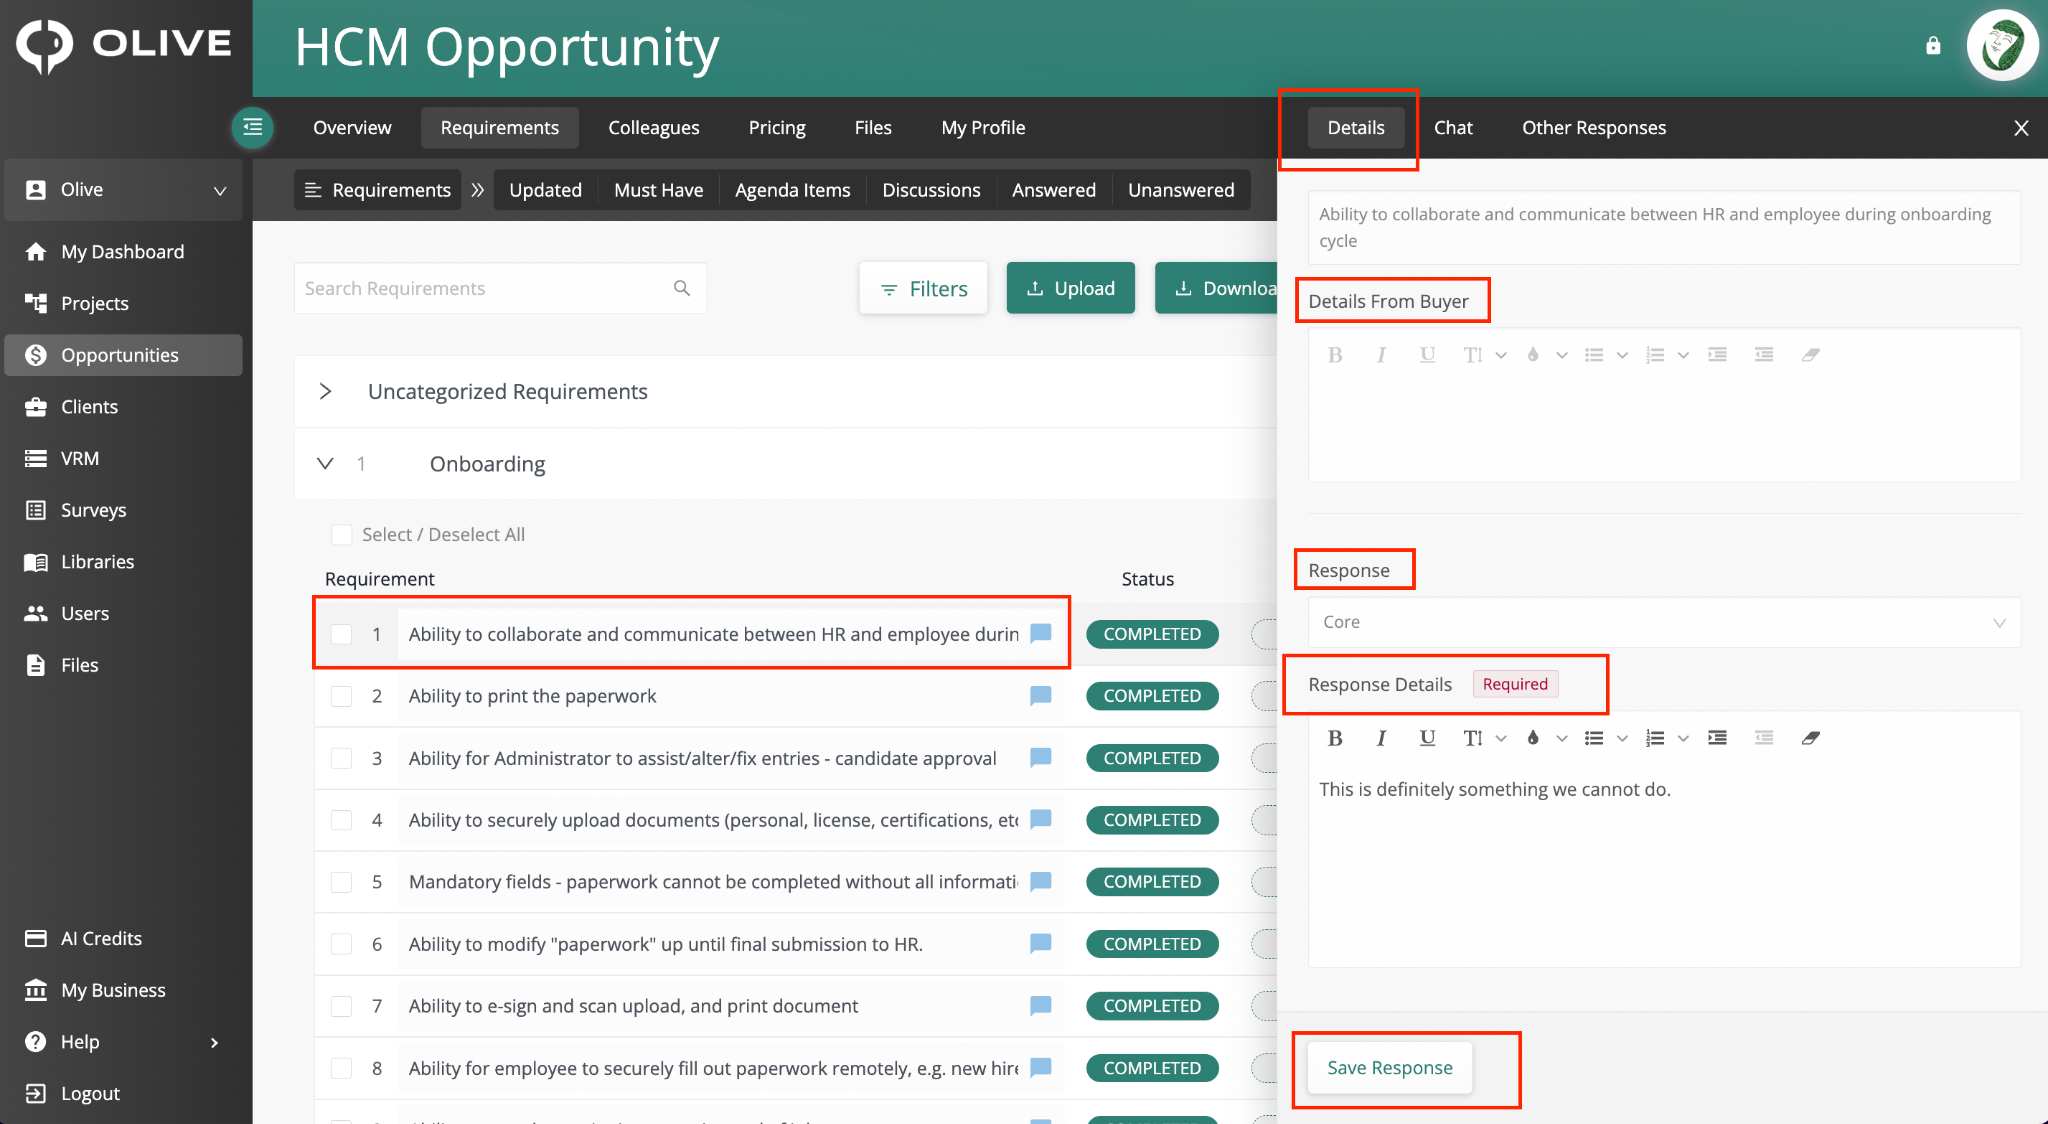
Figure 7: Entering your response in the Response Details field and saving with Save Response
|
💡 Tip: Be specific in your Response Details — the client reads these alongside your drop-down answer. A well-written explanation is especially important for requirements where you answer "Partial" or "No", as it helps the client understand your position. |
Q8: How do I respond to a message or question the client has left on a specific requirement?
A:
- Click Details on the requirement row to open the requirement panel
- Click the Chat sub-tab at the top of the panel
- Read the client's message, then type your reply and send it
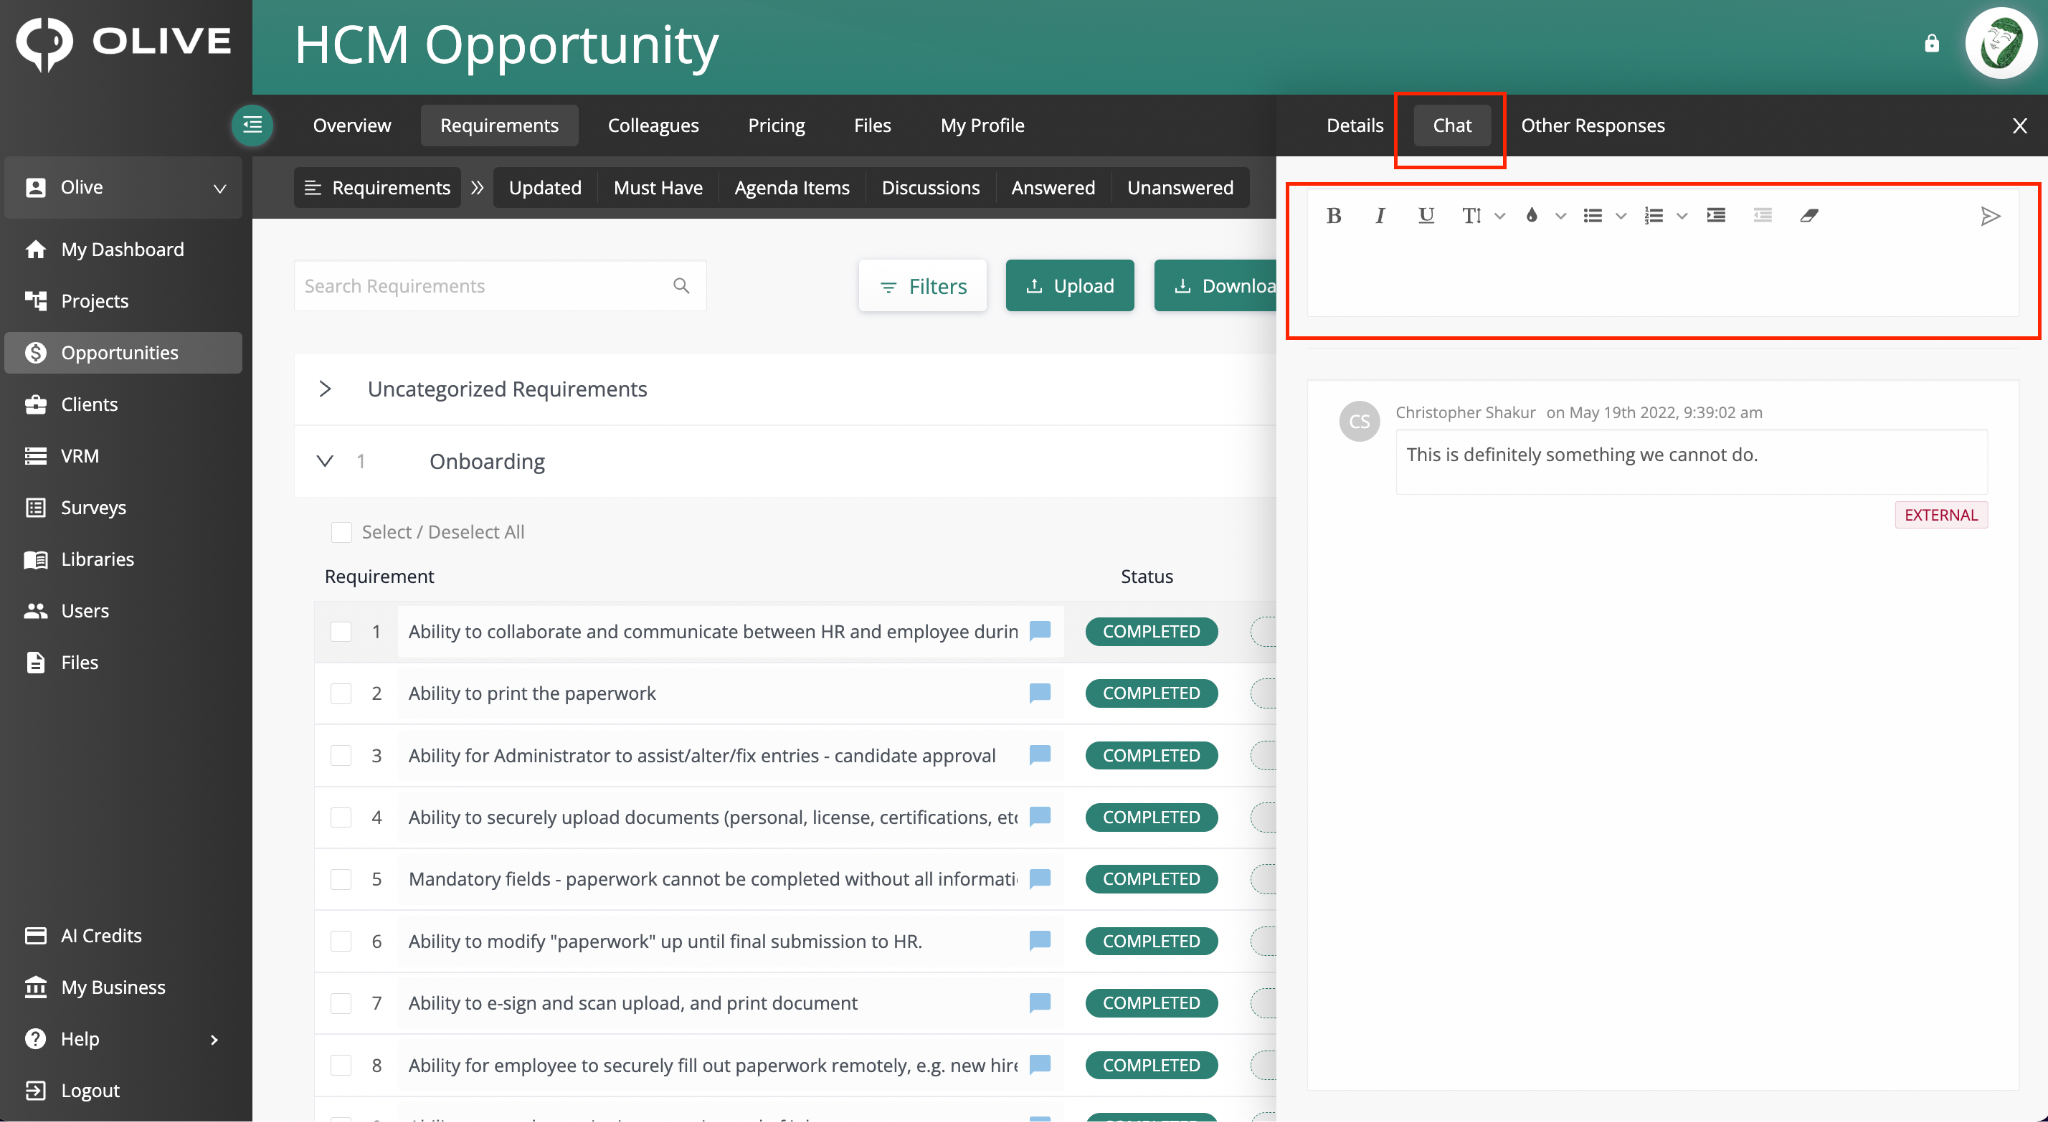
Figure 8: The Chat sub-tab within the requirement panel — for direct communication with the client about a specific requirement
|
💡 Tip: Check the Chat sub-tab on your requirements regularly. The client may ask follow-up questions or request clarifications on specific responses, and responding promptly reflects positively on your organisation. |
Q9: How do I tell which requirements the client considers most important?
A:
Each requirement row displays a star rating assigned by the client to indicate priority. A common scale is:
- 3 stars = Must-have
- 2 stars = Should-have
- 1 star = Nice-to-have
Use these ratings to focus your time — address the highest-starred requirements first and make sure those responses are particularly thorough.
Q10: How do I track which requirements I have already answered?
A:
Each requirement row shows a status indicator. Requirements you have not yet responded to show a status of ToDo. Once you save a response, the status changes to Complete. You can also apply the Answered or Unanswered filters at the top of the Requirements tab to see exactly where you stand.
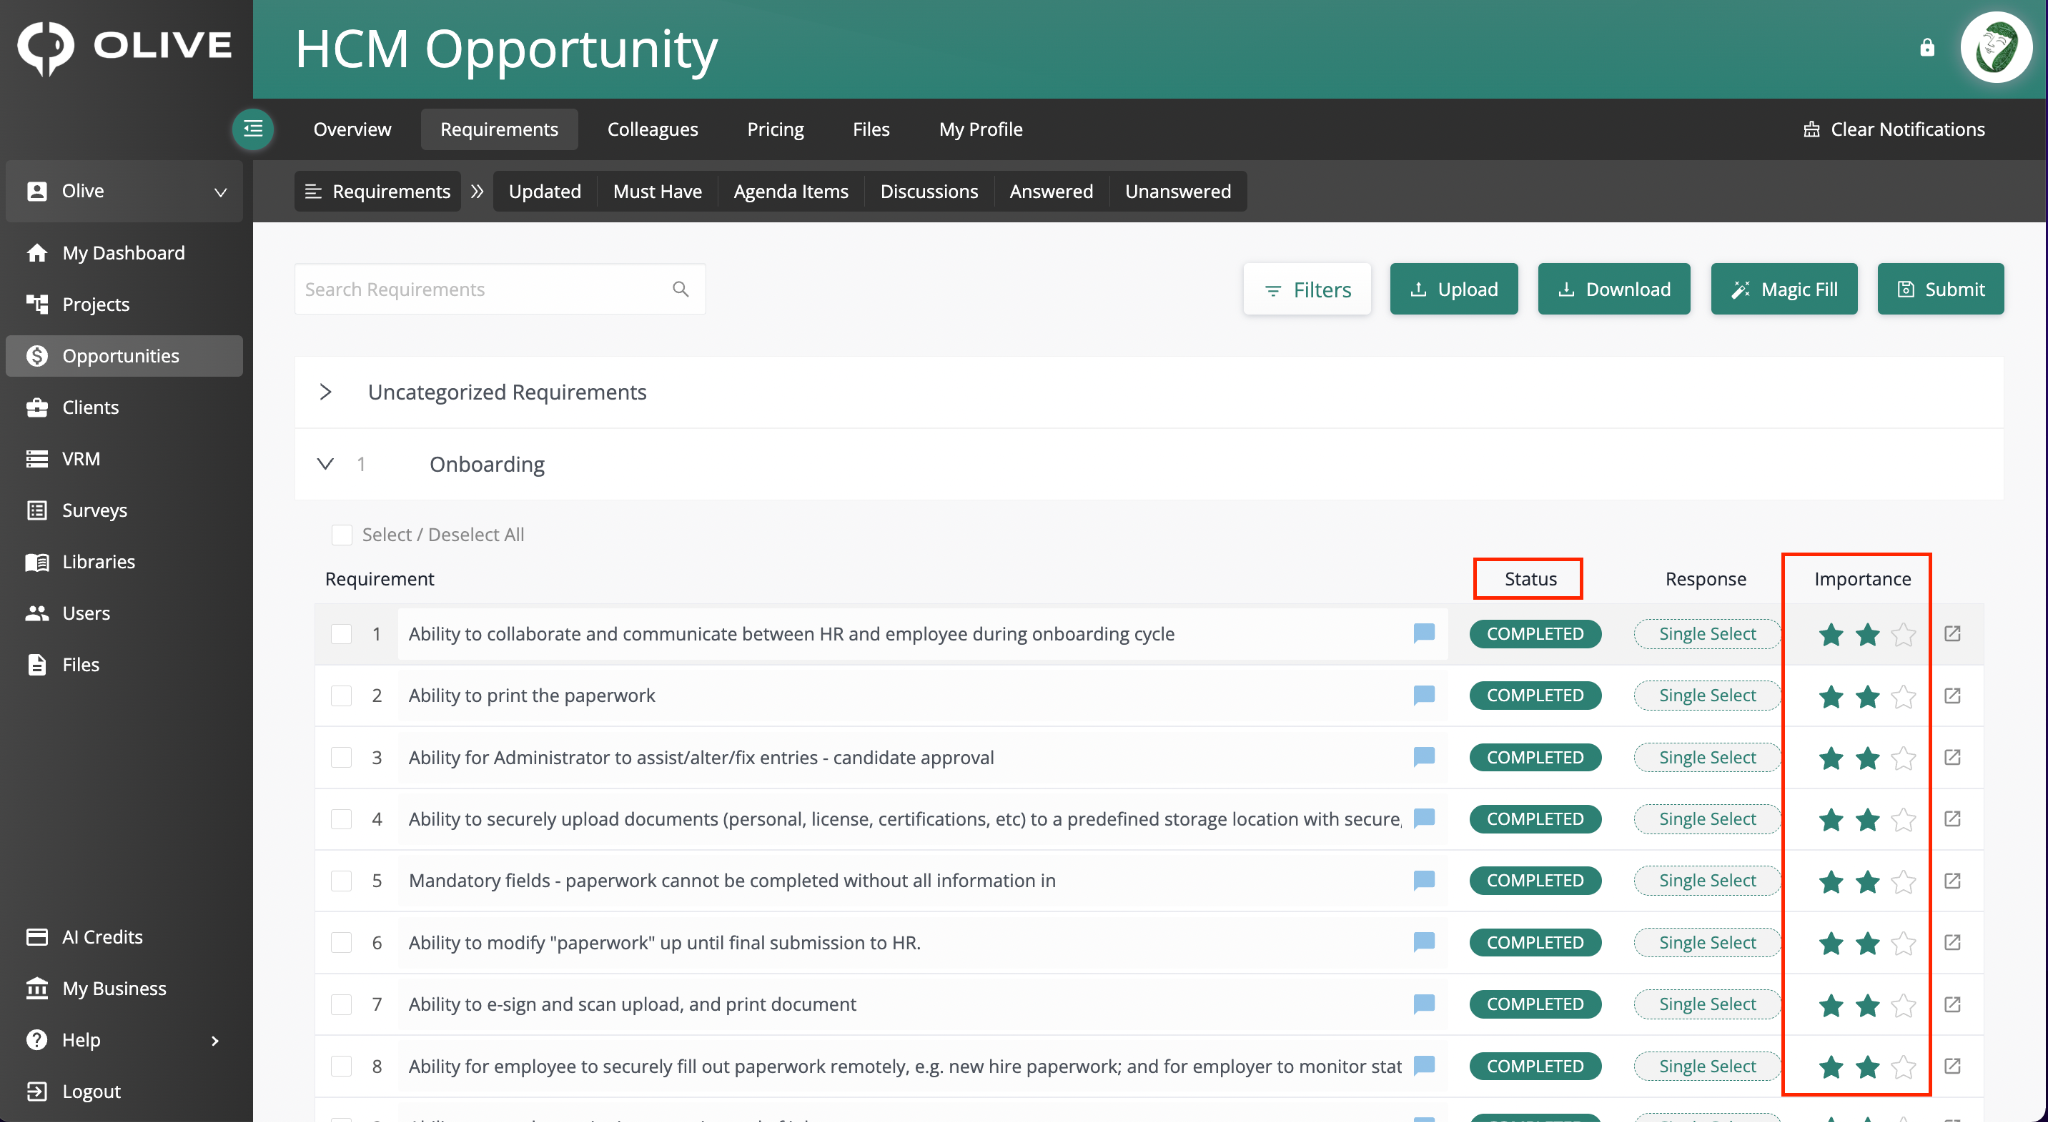
Figure 9: Status (ToDo / Complete) and star-based priority ratings on requirement rows
Q11: How do I filter requirements to focus on a specific group?
A:
Click the filter options at the top of the Requirements tab to narrow the list:
|
Filter |
Shows |
|
Updated |
Requirements the client has recently added or changed |
|
Must Have |
Requirements flagged as mandatory by the client |
|
Agenda Items |
Requirements the client has flagged for demo coverage — useful for planning your demo |
|
Discussions |
Requirements that have messages in the Chat sub-tab |
|
Answered |
Requirements you have already responded to |
|
Unanswered |
Requirements you still need to address |
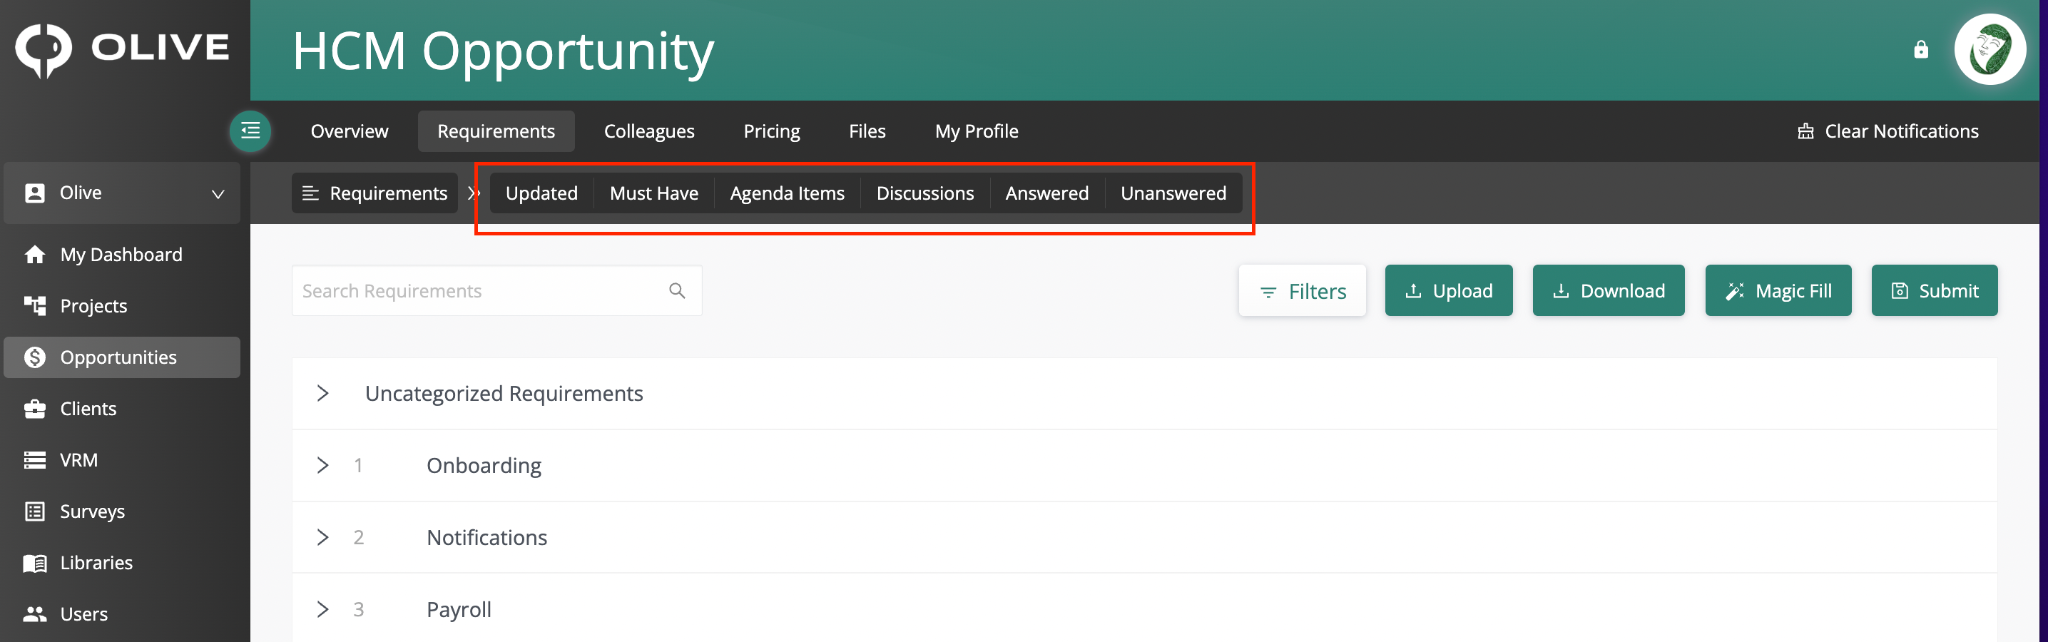
Figure 10: The filter options on the Requirements tab — use these to focus on specific subsets of requirements
|
💡 Tip: Use the Unanswered filter just before you submit as a final completeness check. It will surface any requirements you may have overlooked so you can address them before the deadline. |
Q12: How do I respond to requirements offline and upload my answers in bulk?
A:
- Click the Download button on the Requirements tab to export requirements as a spreadsheet. A Response column is included for your answers.
- Open the spreadsheet, complete the Response column for each requirement, and save the file
- Return to the Requirements tab and click Upload
- Select your completed spreadsheet — all responses will be imported at once
|
📌 Note: Do not change the column structure or sheet layout of the exported file before uploading. Alterations to the format can cause the upload to fail or responses to import incorrectly. |
Q13: How do I use AI to generate draft responses for all requirements at once?
A:
- Click the Magic Fill button on the Requirements tab
- Olive's AI will research publicly available information about your company and solution, and populate responses where information is found
- Requirements where no matching information is found will be left blank — your credits are reimbursed for those
- Review every generated response carefully, edit as needed, and then submit
|
⚠️ Important: Magic Fill generates draft responses only — nothing is submitted automatically. Always review and refine every generated response before submitting, as the AI draws on public data and may not accurately reflect your specific capabilities or differentiators. |
Q14: How do I submit my requirement responses to the client?
A:
- Apply the Unanswered filter to confirm there are no outstanding requirements
- Click the Submit button on the Requirements tab
- Confirm the submission when prompted
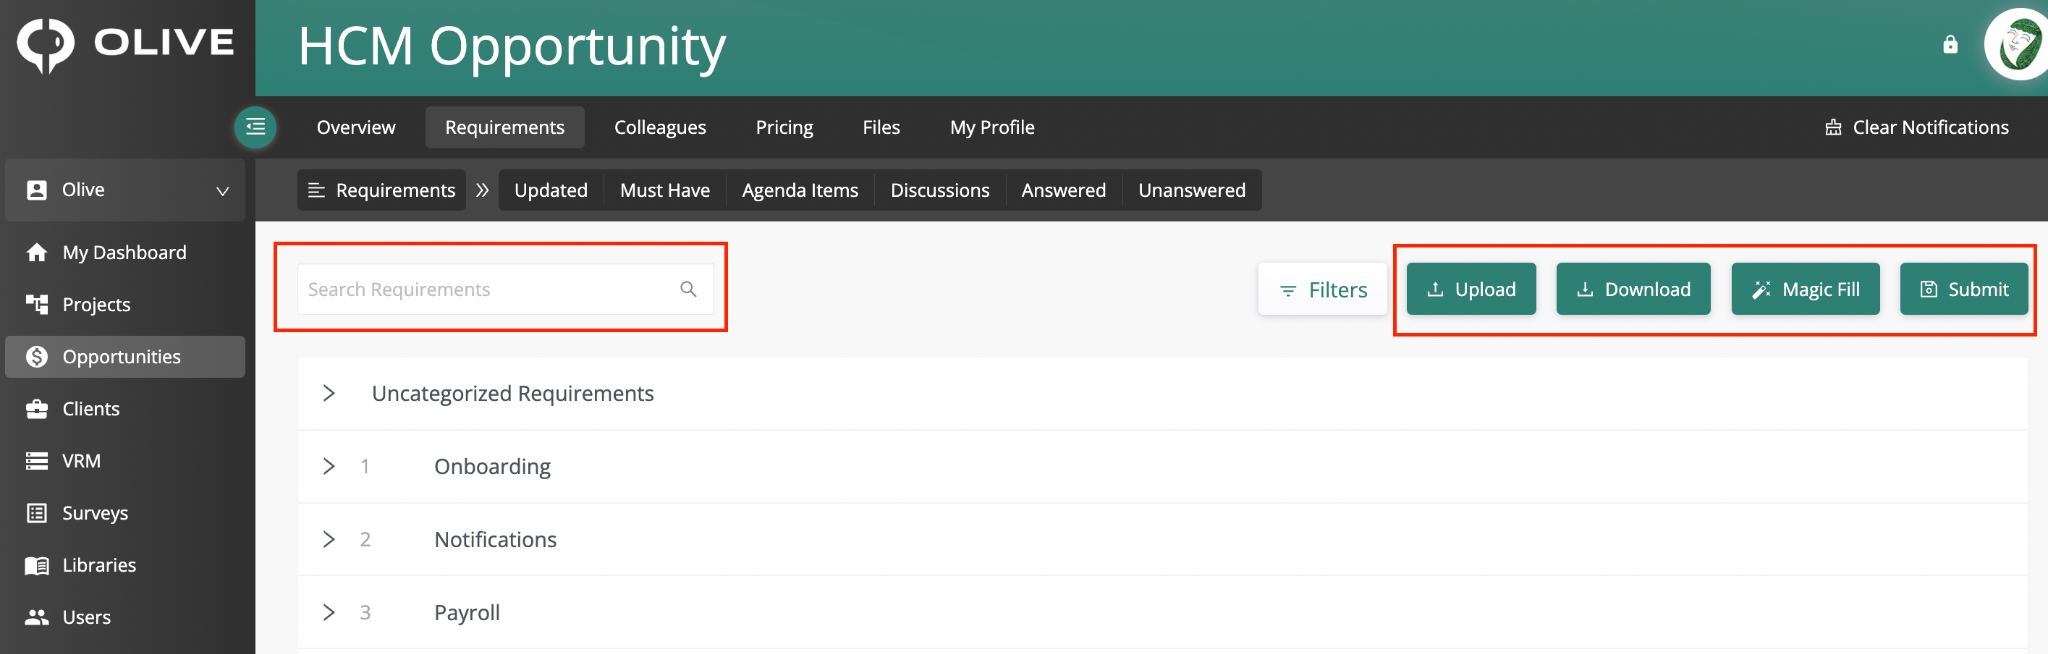
Figure 11: The Submit button on the Requirements tab — click once all responses are finalised
|
⚠️ Important: Submitting your requirement responses does not also submit your pricing — these are two separate actions. Make sure you complete both before the client's deadline. |
Working with Colleagues
Q15: How do I invite a colleague to help me respond to an Opportunity?
A:
- Click the Colleagues tab in the top navigation
- Click '+ Add Colleague'
- Enter your colleague's email address
- Click 'Add', then click 'Send Invitations'
|
💡 Tip: Invite colleagues early so they have time to set up their Olive account and review the Opportunity before the deadline. Splitting the requirements by section or area of expertise can make your response process significantly faster. |
Q16: How do I remove a colleague who no longer needs access to the Opportunity?
A:
- Click the Colleagues tab
- Find their card and click the three-dot menu (⋯) on it
- Click Remove
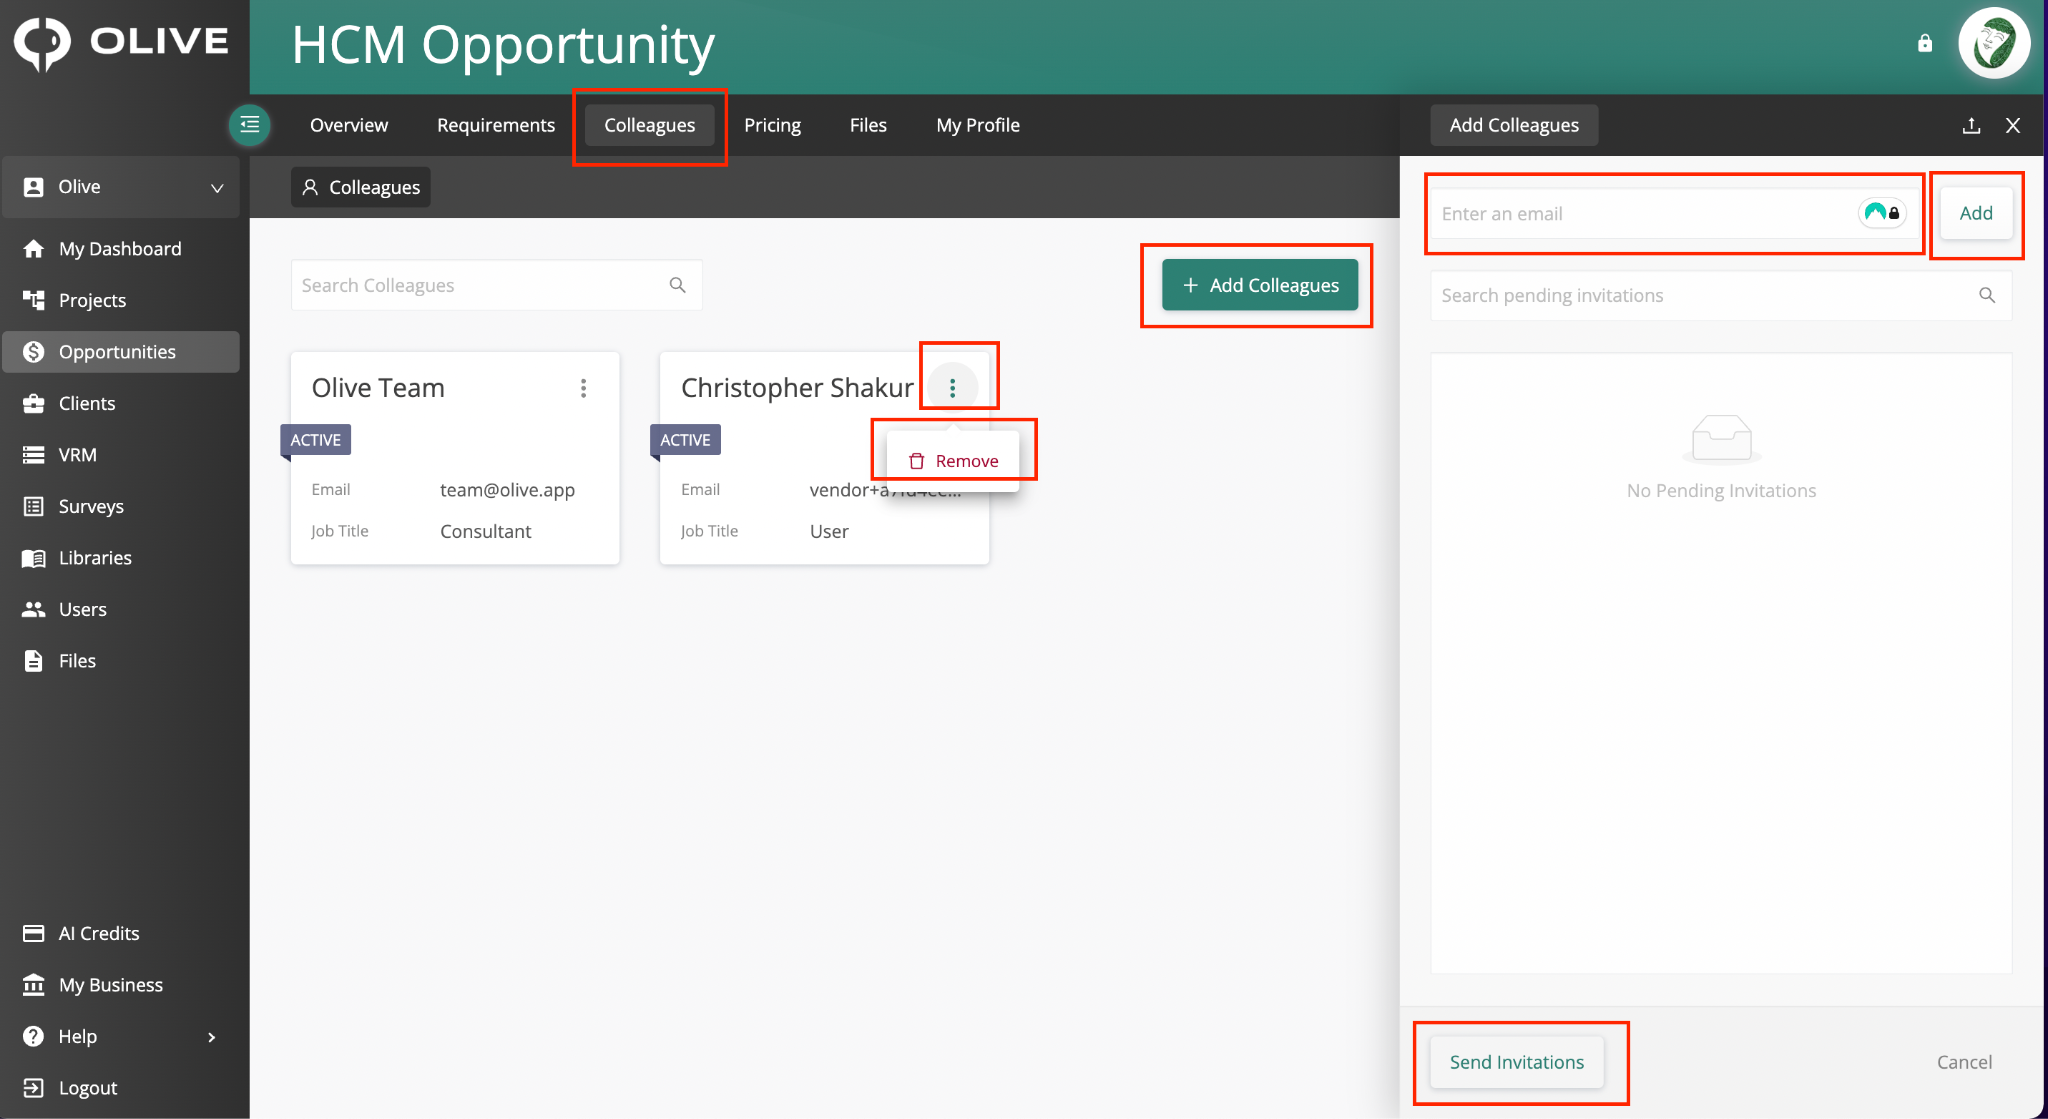
Figure 12: The Colleagues tab — invite teammates with +Add Colleague and remove them via the three-dot menu
Submitting Your Pricing
Q17: How do I enter my licence pricing?
A:
- Click the Pricing tab in the top navigation, then select Summary
- Scroll to the License Details section
- Select your licence type: Subscription, Perpetual, or Other
- Complete the relevant fields — such as License Fees and Maintenance & Support
- Use the frequency drop-down to specify whether charges are One-Time, per a number of Years, or Yearly
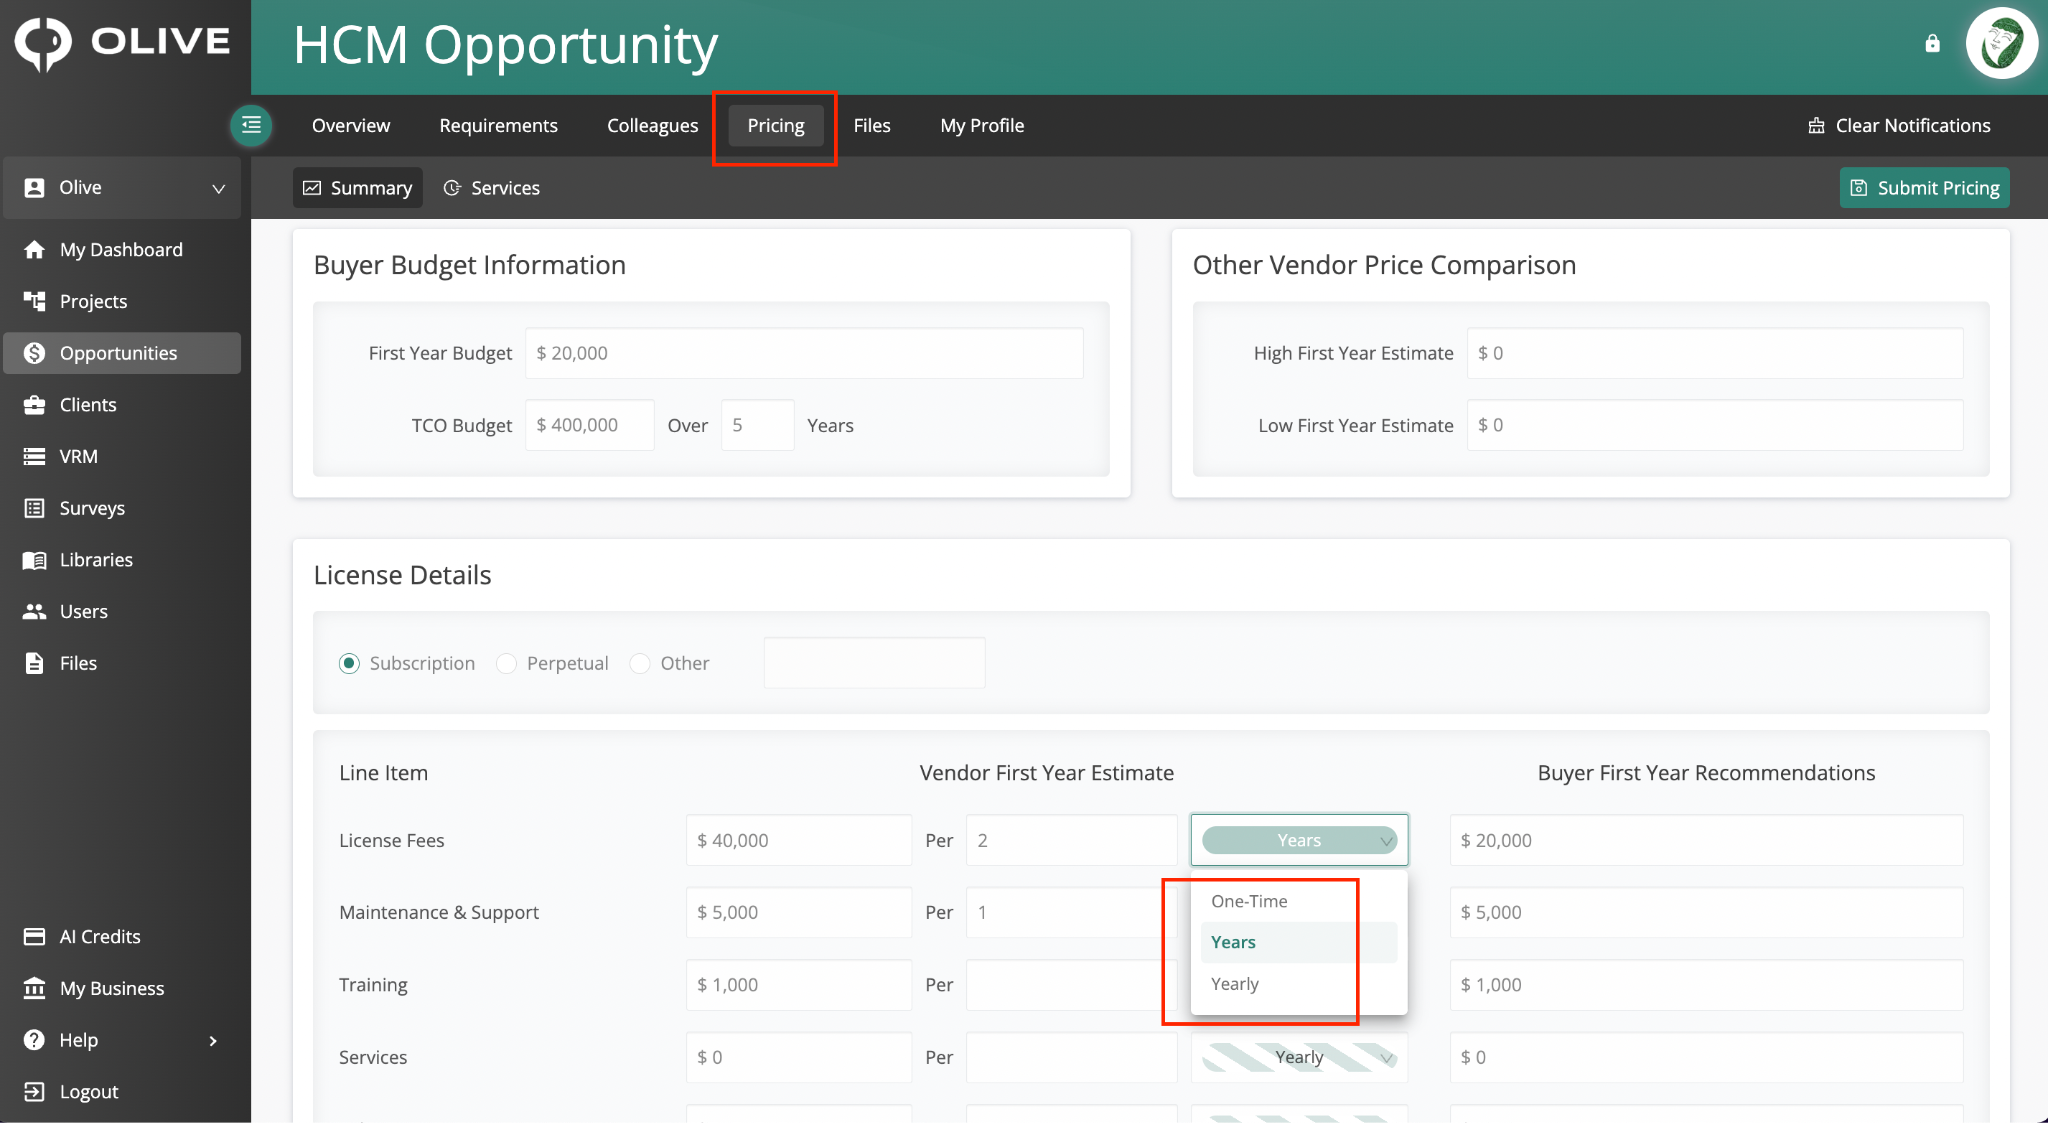
Figure 13: The Pricing Summary sub-tab — complete licence details, add pricing notes, and review any client budget information
|
💡 Tip: Use the Pricing Notes from Vendor section to explain any variables or conditions attached to your pricing — for example, pricing that varies by number of users, contract length, or deployment model. This helps the client make a fair and accurate comparison. |
Q18: How do I add notes or context for the client alongside my pricing?
A:
In the Pricing Summary sub-tab, find the Pricing Notes from Vendor section and enter your notes there. This field is specifically for context, assumptions, or explanations you want the client to read alongside your pricing figures.
Q19: How do I enter pricing for implementation or professional services?
A:
- Click the Pricing tab, then select the Services sub-tab
- To add a time-based entry, click + in the Services Time section and fill in Role Type, Role Description, Role Count, Rate, and Time Frame
- To add a materials entry, click + in the Services Material section and fill in Material Type, Material Description, and Estimated cost
- Add any relevant notes and save each entry
All services entries are totalled automatically and displayed in the Summary sub-tab under License Details.
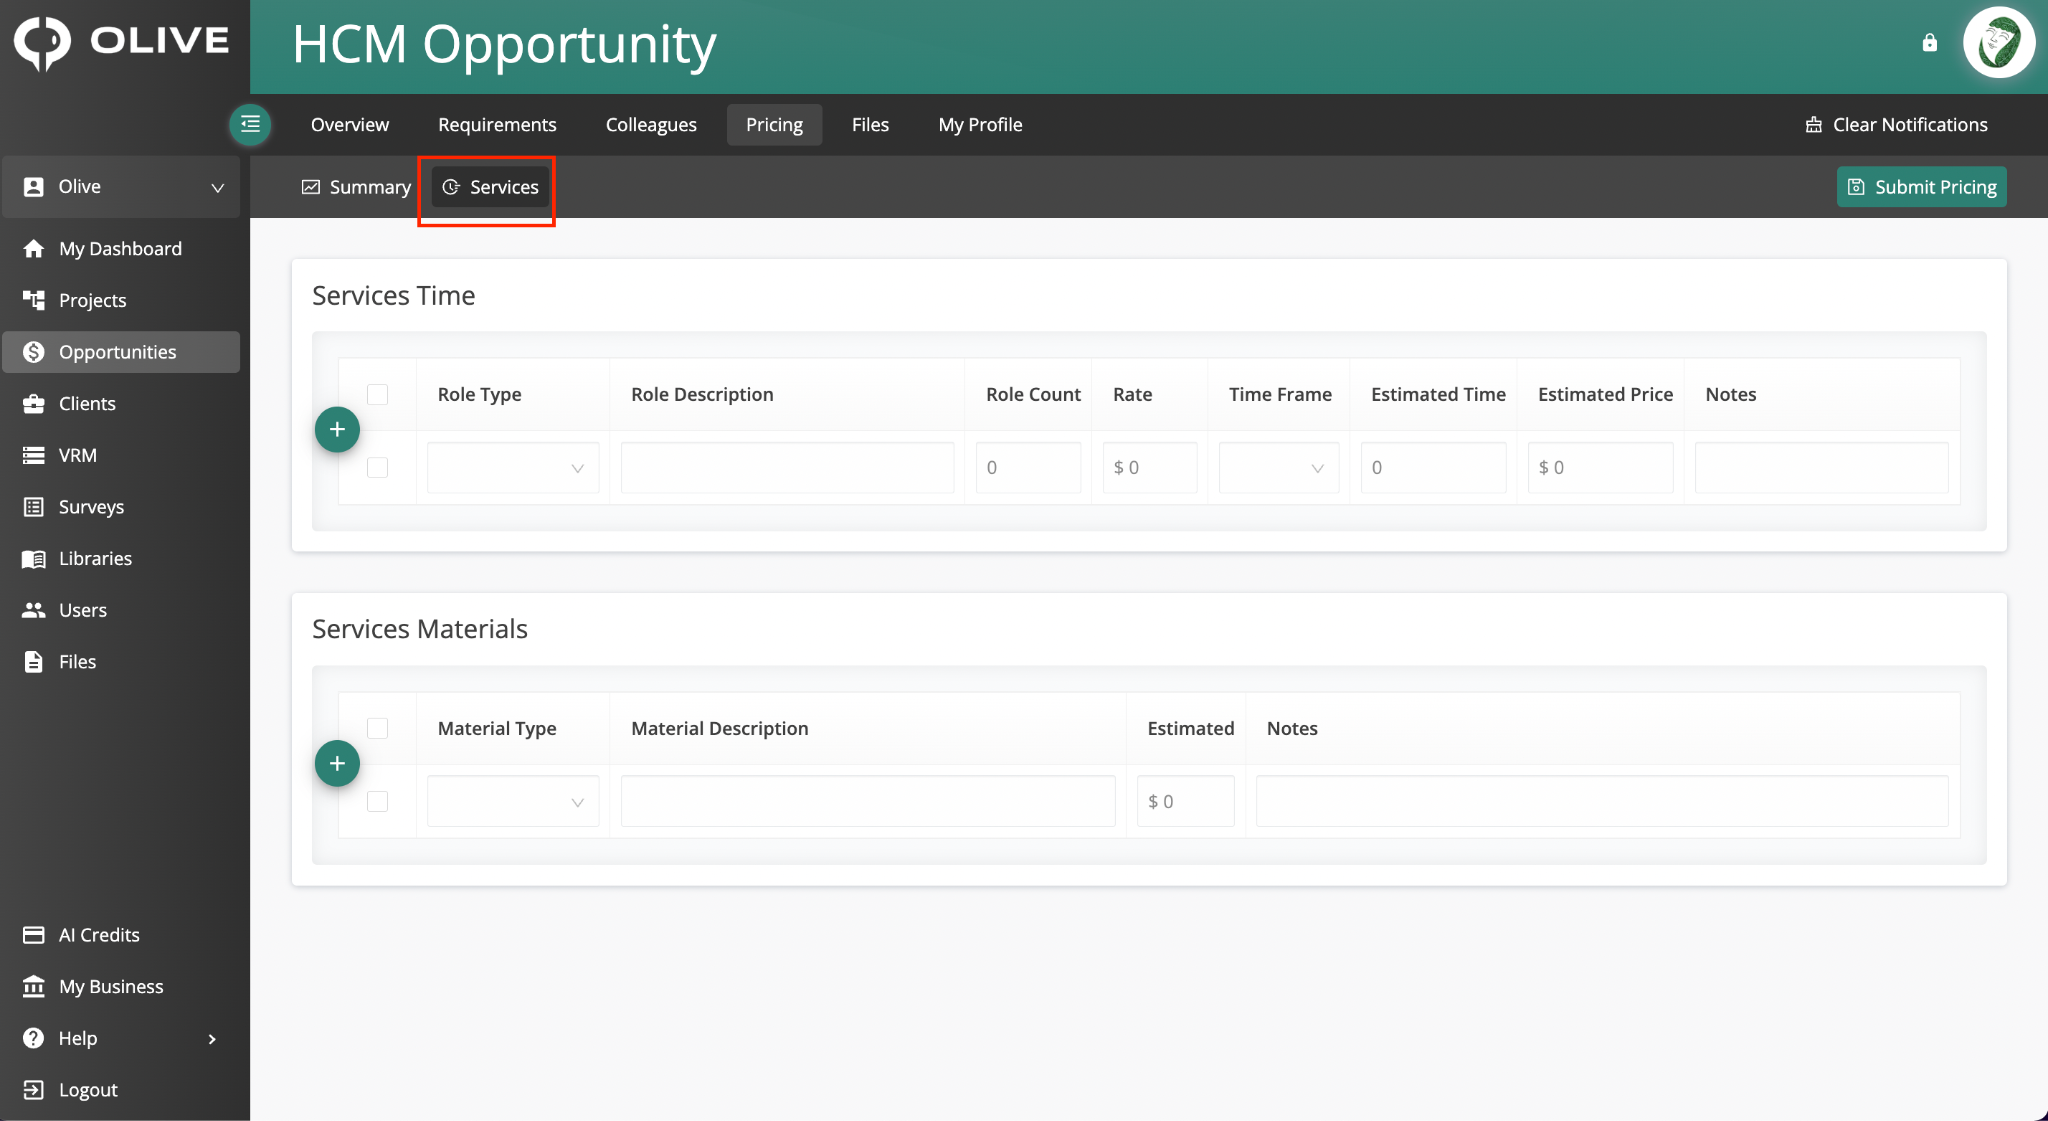
Figure 14: The Pricing Services sub-tab — add Services Time and Services Material entries
Q20: How do I submit my pricing to the client?
A:
- Navigate to the Pricing tab and select the Summary sub-tab
- Review all pricing fields to confirm they are complete and correct
- Click Submit Pricing
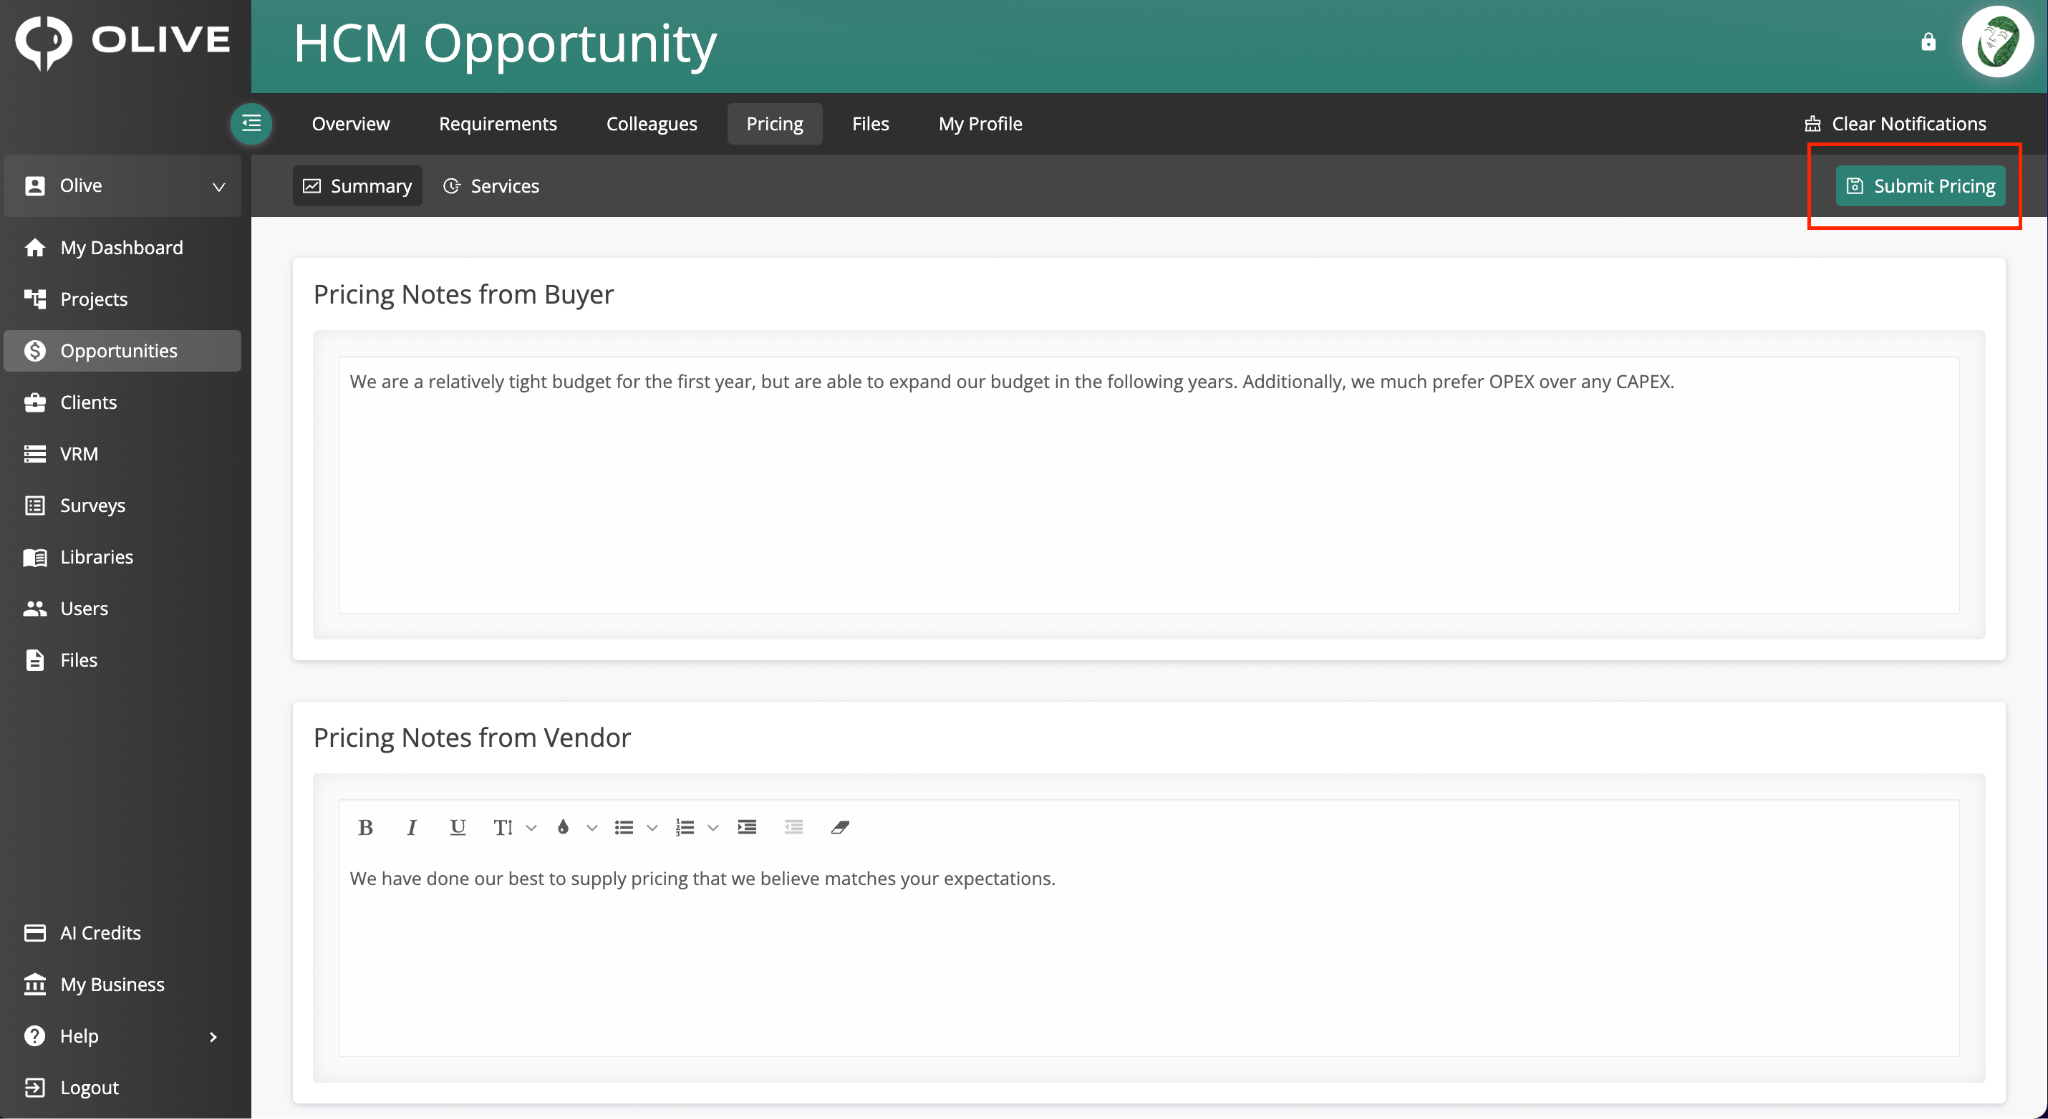
Figure 15: The Submit Pricing button on the Pricing Summary sub-tab
|
⚠️ Important: Submitting your pricing is separate from submitting your requirement responses. Both must be completed before the client's deadline — do not assume submitting one covers the other. |
Working with Files
The Files tab has three sub-tabs. Use the table below to find the right one for your task:
|
Sub-tab |
Use it when… |
|
Generated Files |
You want to download a system-generated export once its status shows Complete |
|
Files for Buyer |
You want to upload a supporting document for the client to access — such as a datasheet, certification, or case study |
|
Files from Buyer |
You want to download documents the client has shared with all vendors — such as specifications or reference materials |
Q21: How do I download a system-generated file?
A:
- Click the Files tab in the top navigation, then select Generated Files
- When a file's status shows Complete, click the Download icon in its row
- The file saves to your browser's default download location
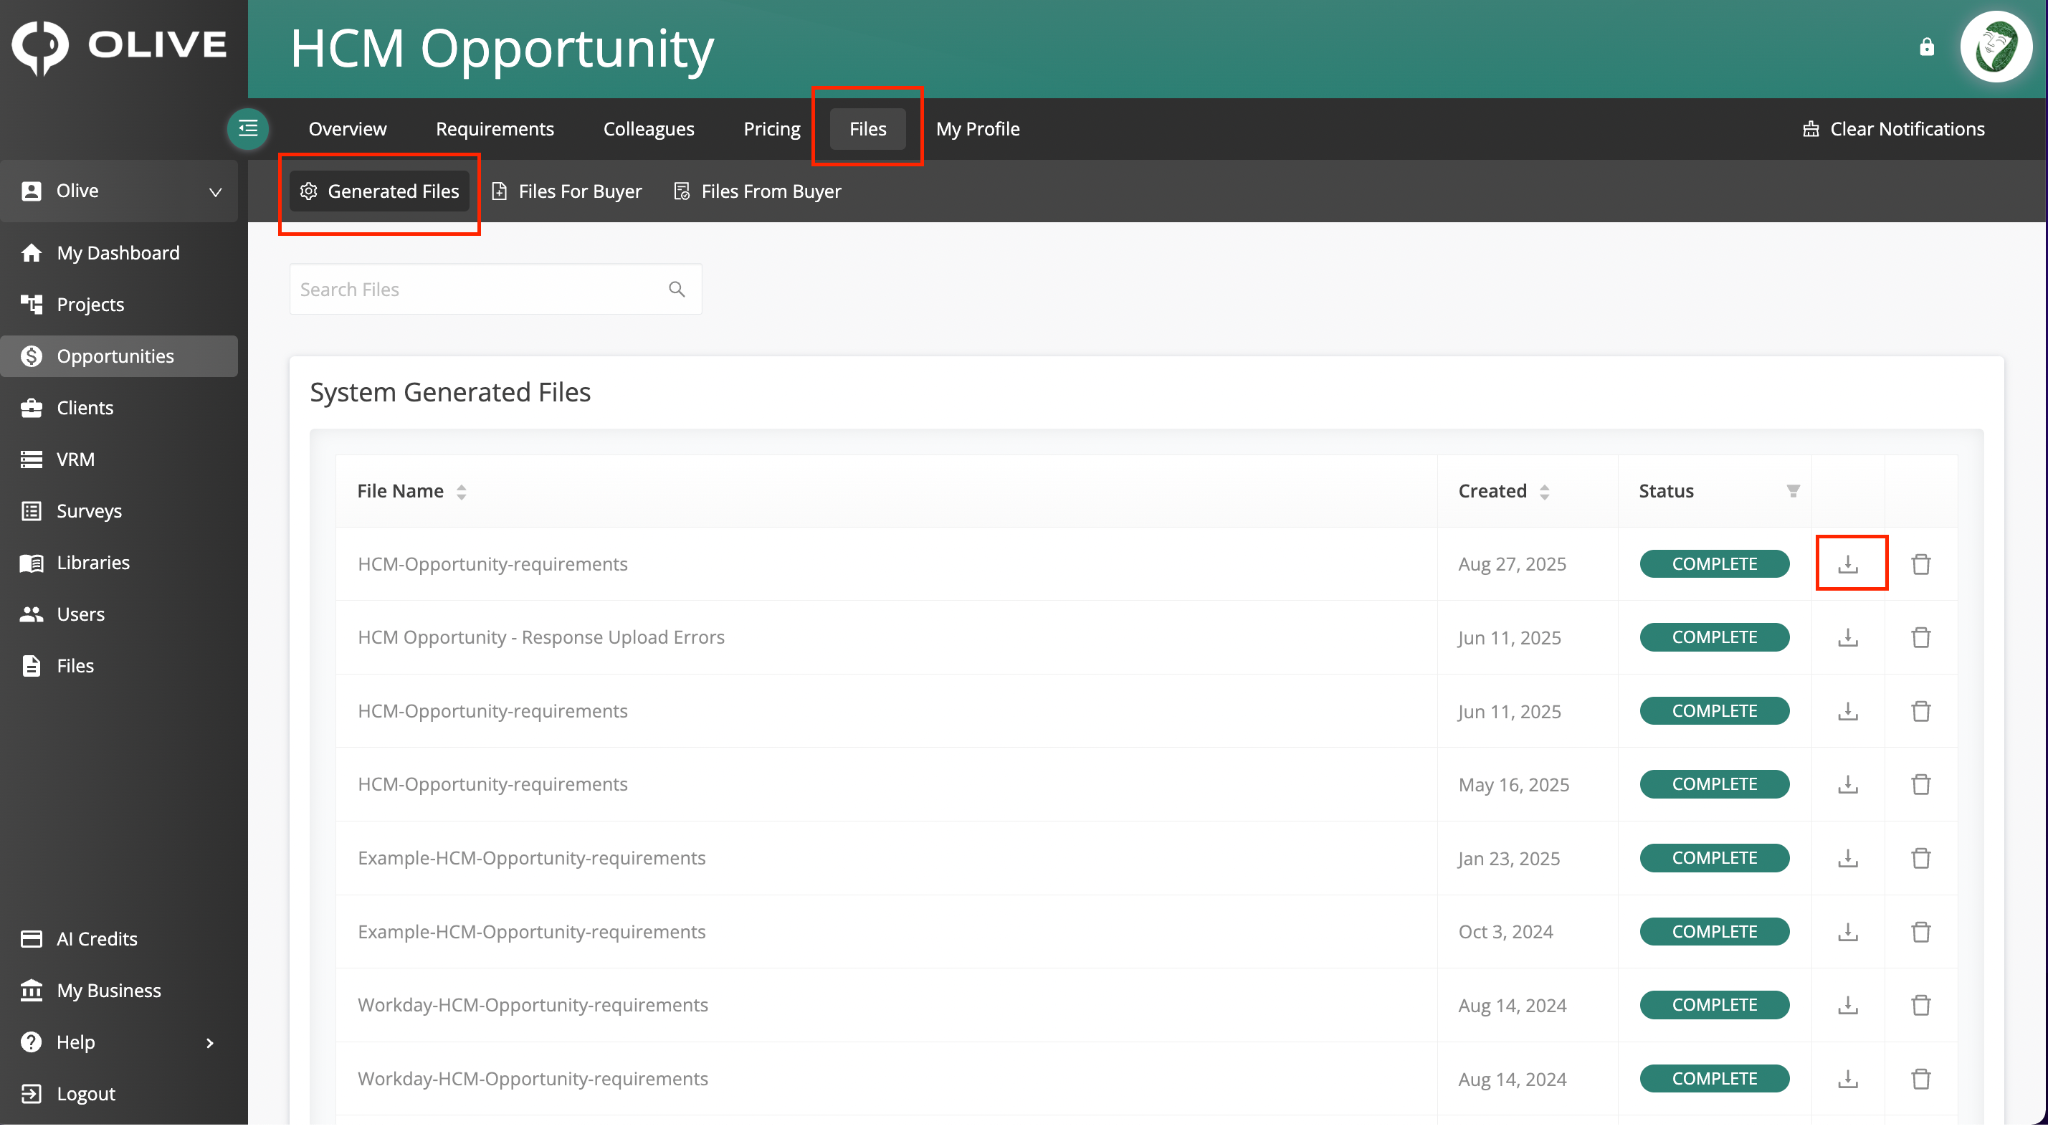
Figure 16: The Generated Files sub-tab — download system-generated files once their status shows Complete
Q22: How do I upload a supporting document for the client to see?
A:
- Click the Files tab, then select Files for Buyer
- Click '+ Add Files'
- Select your file(s) and confirm the upload — the file is immediately accessible to the client
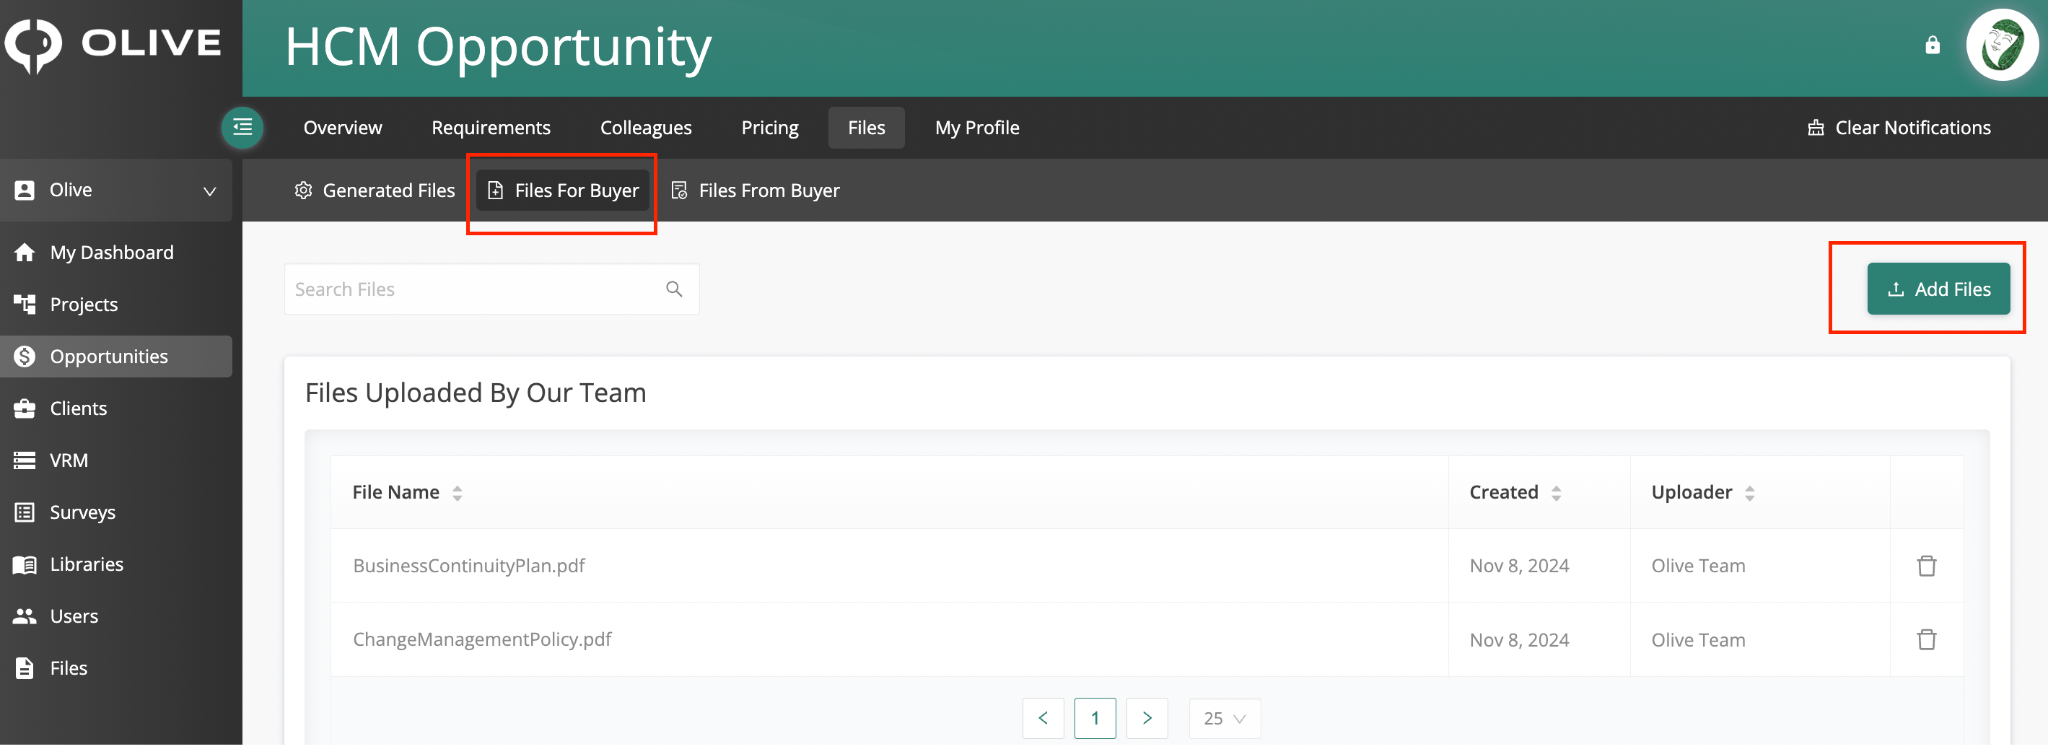
Figure 17: The Files for Buyer sub-tab — upload supporting documents for the client using +Add Files
|
💡 Tip: Use this sub-tab to share materials that strengthen your response — such as product datasheets, security certifications, or case studies. Use descriptive file names so the client can identify each document at a glance. |
Q23: How do I access documents the client has shared with me?
A:
- Click the Files tab in the top navigation, then select Files from Buyer
- Browse the table and click the Download icon next to any file you want to save
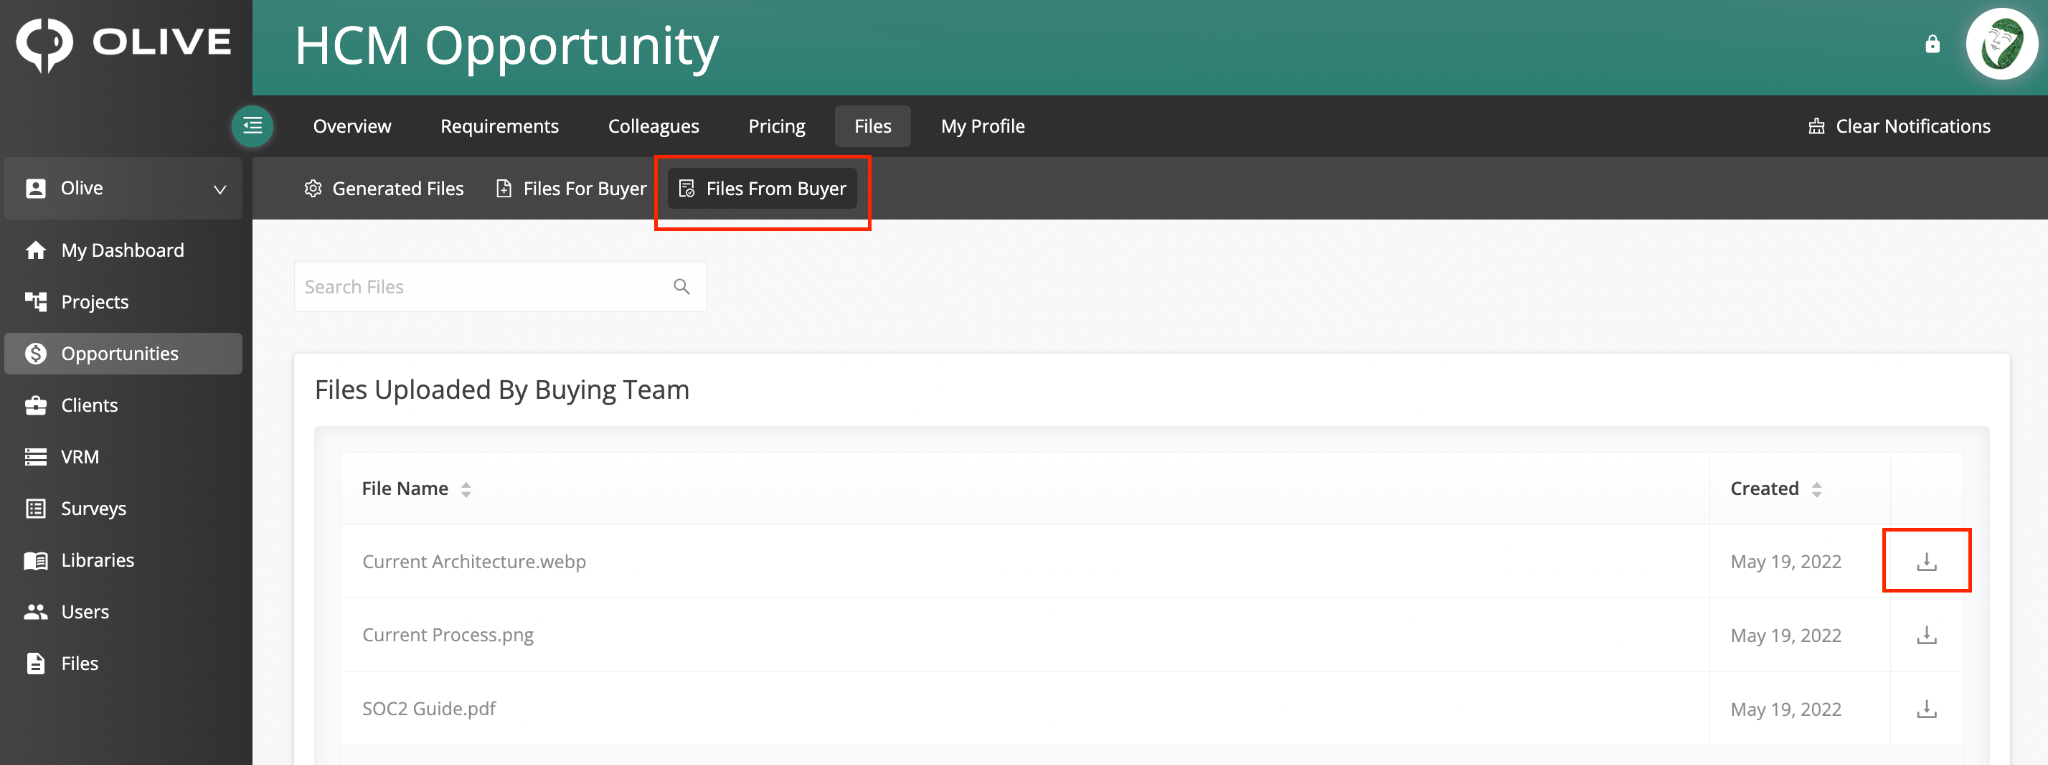
Figure 18: The Files from Buyer sub-tab — view and download documents shared by the client
|
💡 Tip: Check the Files from Buyer sub-tab early and revisit it periodically throughout the response period. Clients sometimes upload updated specifications or clarifications during the response window that are important to read before finalising your answers. |
Completing Your Profile
Q24: How do I fill in my company and solution information for the client?
A:
- Click the My Profile tab in the top navigation
- Fill in the fields the client has configured — these typically cover company background, solution details, and relevant credentials
- Save your entries when complete
The fields available vary between Opportunities depending on what the client has requested.
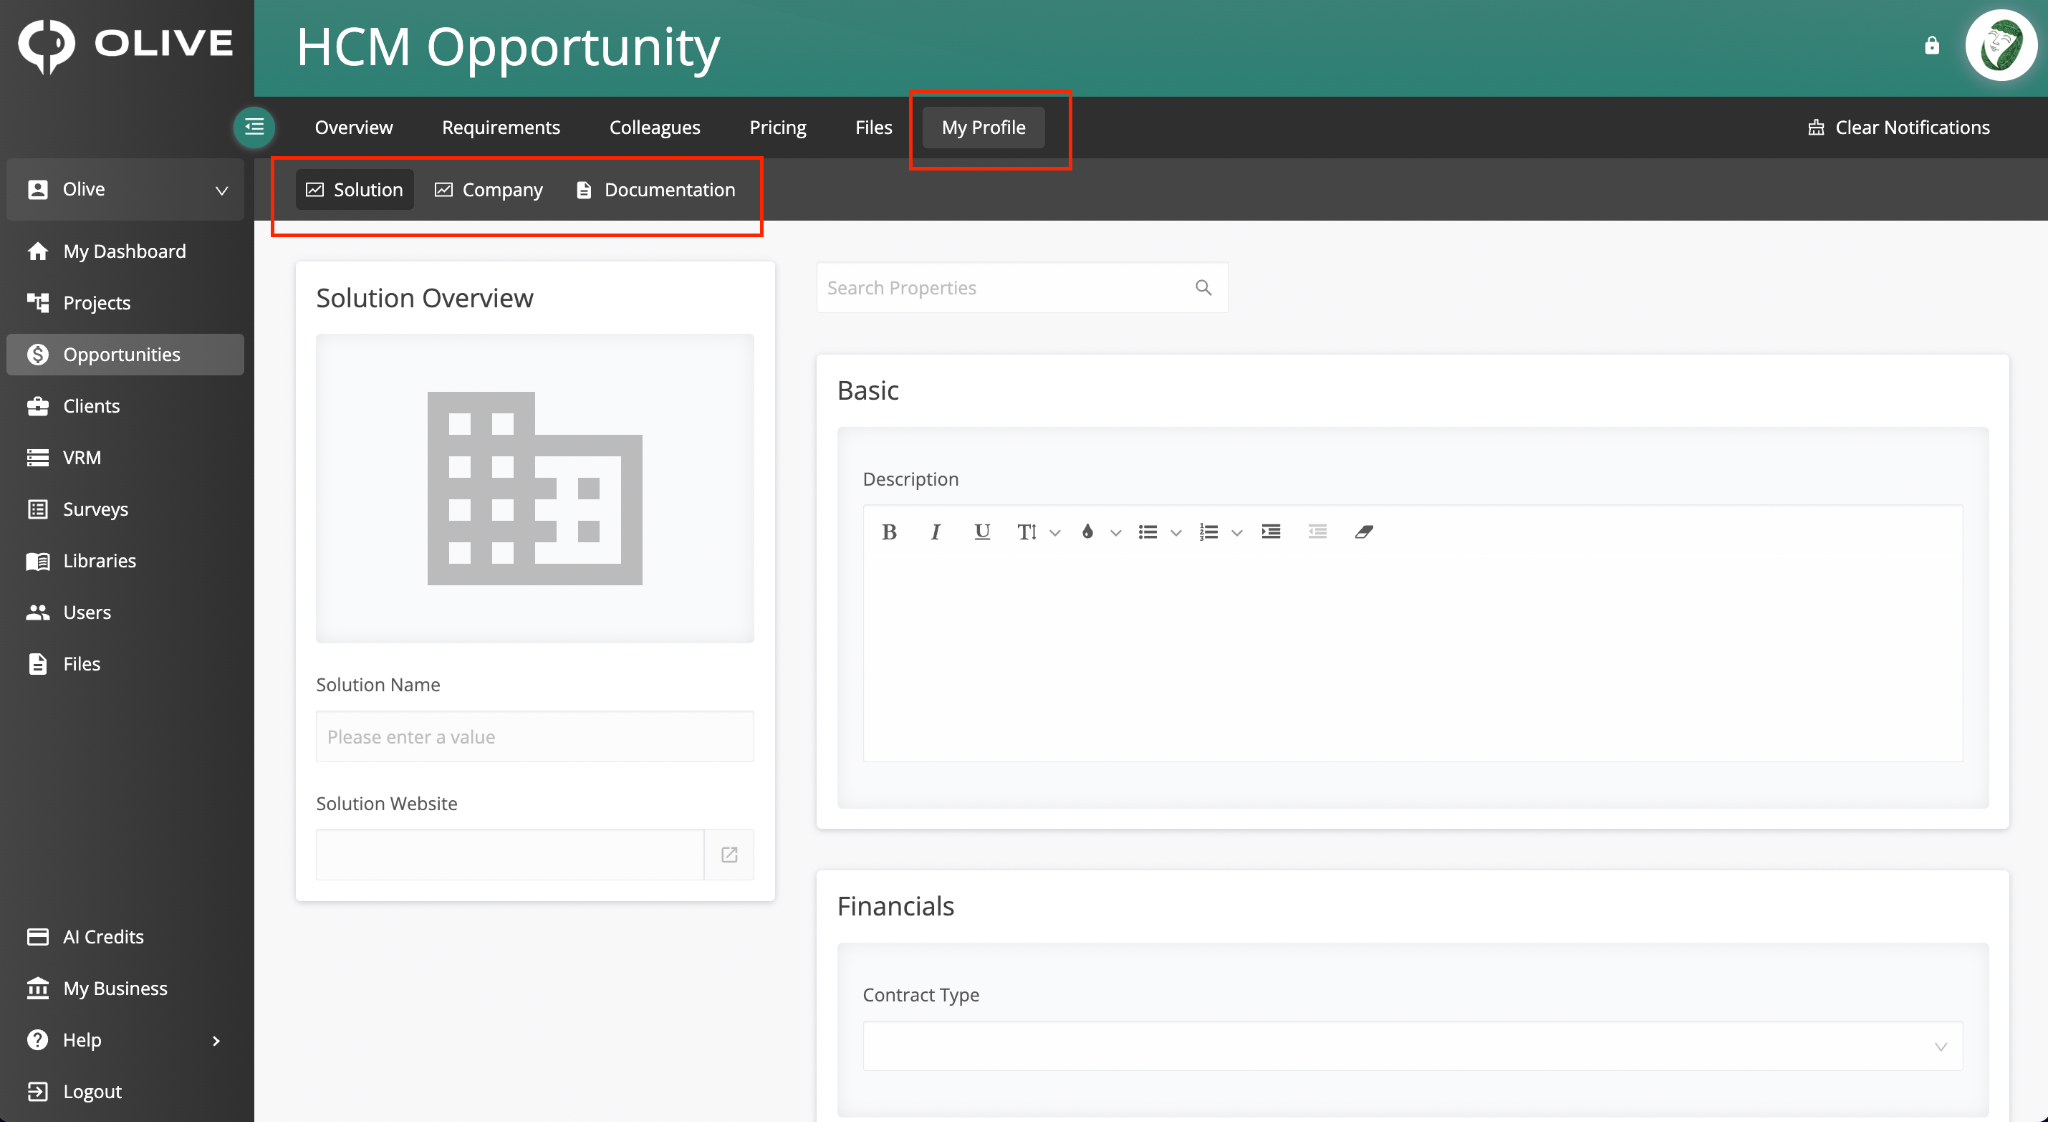
Figure 19: The My Profile tab — complete your company and solution information as requested by the client
|
💡 Tip: Complete every field in My Profile as thoroughly as possible. Clients use this information to evaluate your organisation alongside your requirement responses and pricing — a detailed, well-written profile can positively influence their decision. |
Before You Submit: Final Checklist
Use this checklist before you click Submit on your requirement responses or pricing:
- Apply the Unanswered filter on the Requirements tab — address any outstanding requirements before submitting
- Check the Chat sub-tab on requirements — respond to any client follow-up questions
- Review all pricing fields in the Pricing Summary sub-tab — confirm figures are complete and correct
- Upload any supporting documents to Files for Buyer
- Complete your My Profile fields thoroughly
- Submit both separately — requirement responses via the Submit button on the Requirements tab, and pricing via Submit Pricing on the Pricing Summary sub-tab
|
⚠️ Important: Requirements and pricing must both be submitted separately before the client's deadline. Submitting one does not submit the other. |
Still have questions? Contact your Olive project administrator or reach out to Olive support for assistance.