This guide answers common questions about the Administration tab in Olive. The Administration tab is where you configure how vendor scores are calculated, set up your evaluation criteria, and monitor background processes running in your project.
General
Q1: How do I get to the Administration area in my project?
A:
Open your project in Olive, then click Administration in the top navigation bar. You will see two sub-tabs beneath the main navigation:
- Weighting — configure scoring, star ratings, and section/department weights
- Jobs — monitor the status of background processes such as exports
Q2: How do I know which Administration section to use?
A:
- Use Weighting when you need to configure how vendor scores and match percentages are calculated — including your scoring scale, star ratings, and how sections and departments are weighted.
- Use Jobs when you want to check the progress of a background process, such as an export or scoring update.
Scoring and Rating Setup
Q3: How do I set the maximum score I can give a vendor for a response?
A:
The Scoring Scale sets the upper limit for scores you assign to vendor responses. To configure it:
- Click Administration in the top navigation, then select Weighting
- Find the Scoring Scale field
- Enter the maximum value you want to score out of — for example, 5 or 10
- Click Save to apply your changes
Once set, all vendor responses will be scored on a scale from 0 up to the value you entered.
|
💡 Tip: Choose a scale that gives evaluators enough room to differentiate. A 1–5 scale suits straightforward projects; a 1–10 scale works better when you need to make fine distinctions between vendors. |
Q4: How do I set up star ratings to show how important each requirement is?
A:
Star ratings let your team indicate the relative importance of each requirement. To configure them:
- Click Administration in the top navigation, then select Weighting
- Find the Stars field
- Enter the maximum number of stars — for example, 3
- Click Save to apply your changes
Each star level represents a tier of importance. For example, with a 3-star scale:
- 1 star = nice to have
- 2 stars = should have
- 3 stars = must have
You define what the levels mean for your team.
|
💡 Tip: Agree on what each star level means with your team before building requirements, and document it somewhere evaluators can reference. Consistent star usage keeps your scoring results meaningful. |
Section and Department Weighting
Q5: How do I control how much each section of my RFP counts towards a vendor's overall score?
A:
Section Weighting lets you assign more influence to the areas of your RFP that matter most. To configure it:
- Click Administration in the top navigation, then select Weighting
- Scroll to the Section Weighting area — you will see a list of requirement sections in your project
- Enter a weight value for each section
- Click Save to apply your changes
Sections with a higher weight have more influence on a vendor's overall score. Assign higher weights to the sections most critical to your project decision.
|
💡 Tip: Think of weights as relative priorities rather than percentages that must add up to 100. If Security is twice as important as Reporting for your project, give it twice the weight. |
Q6: How do I control how much each department's evaluation counts towards a vendor's overall score?
A:
Department Weighting lets you give more influence to the departments whose evaluation matters most. To configure it:
- Click Administration in the top navigation, then select Weighting
- Scroll to the Department Weighting area — you will see a list of departments involved in the evaluation
- Enter a weight value for each department
- Click Save to apply your changes
Departments with a higher weight carry more influence over the final vendor score. This is useful when certain departments — such as IT or Legal — are the primary decision-makers for your project.
Q7: How do I make sure all my weighting settings have been saved correctly?
A:
After entering your weights, click Save on the Weighting sub-tab. To confirm your changes were saved:
- Navigate away from the Administration tab
- Return to Administration > Weighting
- Check that your values are still displayed as you entered them
If any values appear to have reset, re-enter them and save again.
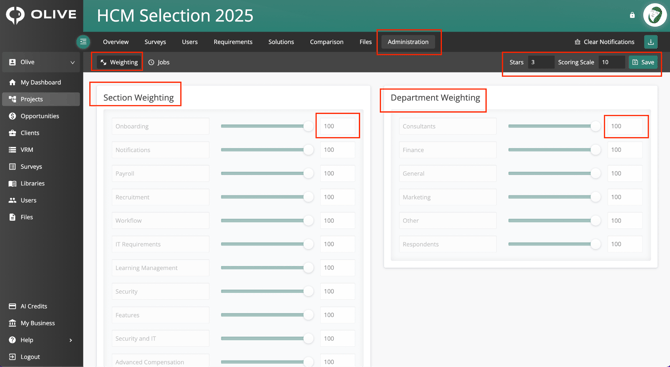
Figure 1: The Weighting sub-tab — configure Scoring Scale, Stars, Section Weighting, and Department Weighting
Background Jobs
Q8: How do I check whether an export or process I triggered has finished?
A:
Background jobs are tasks Olive runs automatically — such as generating an export file or recalculating scores. To check the status of a job:
- Click Administration in the top navigation, then select Jobs
- Find your job in the table and check the Status column
- If the status is Running or Pending, wait a moment and refresh the page to see if it has updated
Once a job shows Complete, any associated output — such as a generated file — will be ready for you to access. Status options are:
- Running — the job is currently in progress
- Pending — the job is queued and will start shortly
- Complete — the job has finished successfully
- Failed — the job encountered an error (see below)
|
💡 Tip: If you've just triggered an export and can't find it in the Jobs list, wait a few seconds and refresh the page — it may take a moment to appear. |
Q9: How do I filter the jobs list to find the ones I care about?
A:
- Click Administration in the top navigation, then select Jobs
- Click the filter icon next to the Status column header
- Select one or more statuses — Running, Complete, Failed, and/or Pending
The table will update to show only jobs matching your selected filters.
Q10: How do I find out why a job failed and get it fixed?
A:
If a job shows a Failed status, note the job name and any details visible in the table, then contact your Olive administrator.
|
⚠️ Important: Do not re-trigger the process until the issue has been investigated. Repeated failed jobs can indicate a configuration or data problem that needs to be resolved first. |
|
📌 Note: A failed job does not always mean something went wrong with your project data — it may be a temporary platform issue. Your Olive administrator can advise on whether it is safe to retry. |
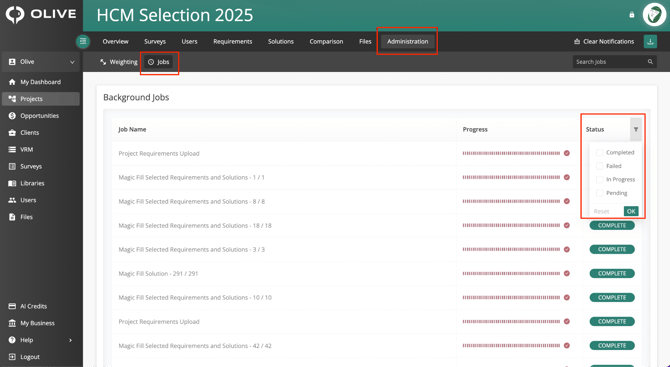
Figure 2: The Jobs sub-tab — monitor background job statuses and use the Status filter to narrow the list
What's Next?
Once your Administration settings are configured, you're ready to start evaluating vendors. Here's the recommended order:
- Set your Scoring Scale and Stars before evaluators start scoring responses
- Configure Section and Department Weighting to reflect your project's priorities
- Share what each star level means with your team so everyone evaluates consistently
- Use the Jobs tab to confirm any exports or background processes have completed successfully
Still have questions? Contact your Olive project administrator or reach out to Olive support for assistance.